NETGEAR troubleshoot routerlogin.net
How do I troubleshoot routerlogin.net and routerlogin.com access errors?
There are many reasons why you may not be able to access the NETGEAR router login (admin settings) page. The most common reasons are browser cache and IP address issues.
Note: If you are having issues with router setup or your wireless router network see the following links instead:
- Wireless Networking Setup And Issues
- Wireless router self-help
- How to Troubleshoot your NETGEAR Wireless Router Network
Use the following steps to gain access to your router admin page
- First ensure you are using the proper web address, user name, and password.
- Web address: www.routerlogin.net or www.routerlogin.com
- User Name: admin
- Password: password
- For more information, see How do I log in to my NETGEAR home router?.
- Note: If you previously changed the admin password for your router, the default password (password) will no longer work.
- If you receive an error when attempting to access routerlogin.com or routerlogin.net web address, try clearing your internet browser cache using the following links:
- Google Chrome
- Internet Explorer
- Mozilla Firefox
- Apple Safari
- Note: Using a different browser may also resolve your access error. If you normally use Google Chrome, try accessing the router login pages from Internet Explorer, Mozilla Firefox, or Apple Safari.
- Another solution is to use your router IP address (http://192.168.1.1 or http://192.168.0.1) to login instead of using the routerlogin.com or routerlogin.net addresses.
- Note: If the 192.168.1.1 or 192.168.0.1 IP addresses do not work, see How to Find Your Router’s IP Address on Any Computer, Smartphone, or Tablet or Finding your IP address without using the command prompt.
- If you are still unable to reach the router login page, try accessing it using different methods, such as a wired Ethernet connection (direct wired connections to the router provide better results), different wireless connections (2.4GHz network vs 5GHz network), or attempt access with a different device (phone, tablet, laptop, desktop, etc.).
- Note: Ensure you are using your NETGEAR router internet connection in order to access the NETGEAR router login page. A wired connection is the best way to ensure you are accessing the router.
- If you are connected to multiple networks at the same time, such as wired and wireless, VPN, or a corporate connection, the router login page may not work.
- Disconnect from all internet and VPN connections and only connect to your NETGEAR router.
- Temporarily disable pop-up blockers, firewalls, and ad-blocking software to see if any of these are causing access issues to the router login user name and password pop-up.
- Power cycle your router, modem, and connected devices (including desktops, laptops, phones, tablets, etc.)
- Leave the power off on your NETGEAR router and cable modem for at least 10 seconds before rebooting the network.
- For more information, see How do I power cycle my home network?.
- If none of the above steps resolve your router login access problem, perform a factory reset of the router.
- For more information, see How do I perform a factory reset on my NETGEAR router?
- Note: After you perform a factory reset, any personalized router settings and configurations previously modified from the default are lost; including user name, password, network name (SSID), and security settings.
- After factory resetting your router, login into your router using the information in step 1.
- Once you are logged in, click ADVANCED
- Under Router Information, ensure your router IP Address is 192.168.1.1 or 192.168.0.1.
- To prevent further login issues, ensure your firmware is up to date.
- Click ADVANCED > Router Update > Check.
If new firmware is found, click Yes to update the firmware.
How do I perform a factory reset on my NETGEAR router?
A factory reset deletes all personalized settings including your user name, password, WiFi network name (SSID), and security settings. A factory reset is necessary when you cannot recover your password.
If you enabled the password recovery feature, see How do I recover my NETGEAR admin password using the password recovery feature?
The following instructions do not apply to DGN2000 or DG834Gv5 routers. For more information, see How do I perform a factory reset on my DGN2000 or DG834gv5 router?
To perform a factory reset
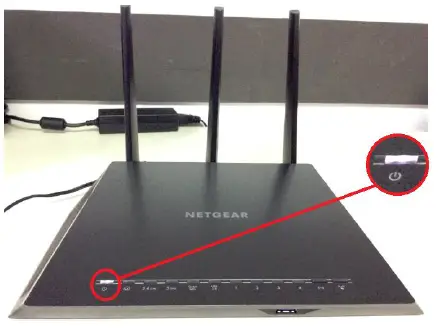
- Verify that your router’s Power light is on.
- On the back of your router, locate the Restore Factory Settings or Reset button.
- Use a paper clip or similar object to press and hold the Restore Factory Settings or Reset button for seven seconds.
- Release the Restore Factory Settings or Reset button. Your router resets.
When you log in to your router again, use the default login credentials
- User Name: admin
- Password: password
How do I power cycle my home network?
If you have connection issues with your NETGEAR device(s), performing a complete power cycle of your entire network can help resolve these issues. To power cycle your home network, you need to turn OFF all your networking devices and then turn them back ON. Power cycling your home network may help resolve the following issues:
- You cannot get Internet access on any device.
- You are unable to go online.
- An Internet connection cannot be established on your router/gateway.
- Your router’s Internet LED light is amber.
Note: You must follow a sequence to turn all your networking devices OFF and ON to ensure they are properly reset. Follow the instructions below depending on the setup of your home network.
To power cycle your home network:
Scenario 1: You are using a standalone Cable/DSL modem with a router.
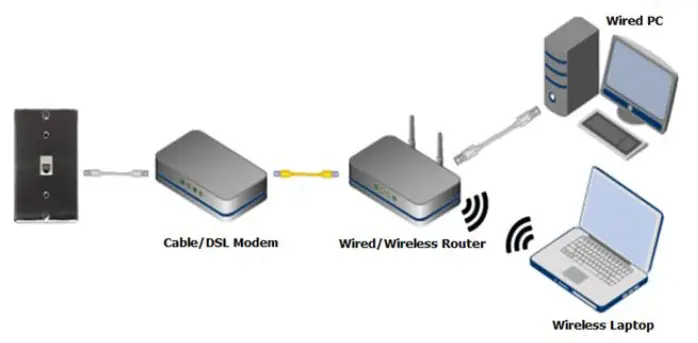
- Turn off or shut down all your networking devices (Cable/DSL modem, Wired/Wireless router, and Wired & Wireless devices).
- Note: Some modems are equipped with a backup battery. If your modem has one, please remove the backup battery to completely turn off your modem. For common cable modems equipped with backup batteries, please see Performing a full reset of cable modem with battery backup
- Turn on the Cable/DSL modem first and let it boot up. This will take a couple of minutes while the modem is syncing with your ISP to establish a connection. In most cases all the LED lights will remain stable, however, always refer to the user manual of the modem to verify the status of the LED lights.
- Once the Cable/DSL modem completes the connection to your ISP, turn on the Wired/Wireless router. The router will now establish a connection with the Cable/DSL modem. This process will take a few minute as well. In most cases, the Internet LED light on the router will turn solid green, however, please refer to the user manual of the router to verify the status of the LED lights.
- Turn ON your wired & wireless devices.
Scenario 2: You are using only a DSL/Cable gateway (modem router).

- Turn off or shut down all your networking devices (DSL/Cable Gateway, and Wired &Wireless devices).
- Turn on the DSL/Cable gateway first and let it boot up. This might take a couple of minutes while the DSL/Cable gateway is syncing with your ISP to establish a connection. In most cases, all the LED lights will remain stable, however, always refer to the user manual of the DSL/Cable gateway to verify the status of the LED lights.
- Once the DSL/Cable gateway completes the connection to your ISP, turn on the wired & wireless devices.
How to resolve flashing DSL or no light on DSL LED
This article will guide you on how to resolve flashing DSL or no light on DSL LED issue. It will also assist resolving the “No DSL Cable is plugged into the Router ADSL Port” error message during initial genie setup. Internet Service Provider (ISP) issues or home wiring issues can cause faulty DSL connection. You can find out whether you have an issue with your wiring by viewing the lights on the DSL modem.
To resolve flashing DSL or no light on DSL LED issue
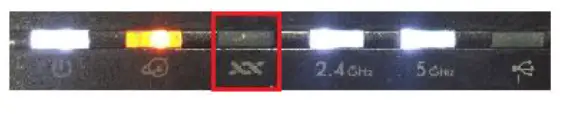
DSL LED will flash when the DSL modem/Gateway is trying to establish connection with your DSL service. It should flash for about 30 seconds for your DSL modem to connect and display a solid light. If the DSL LED continues to flash, try the following:
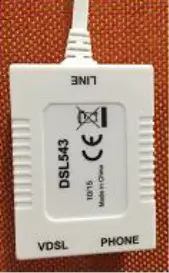
- Make sure all devices are plugged into the phone line using DSL filter, including fax machines, satellite receivers, and alarm systems. These filters prevent interference with your DSL signal.
- If you have PHLO+ or line share ADSL, Verify that there is a clean dial tone on the phone line that is plugged into your DSL modem. You will need a regular analog telephone to do this test.
- The phone cable coming from your DSL modem should plug directly into the wall outlet. Try bypassing any splitters or other devices as they can sometimes cause interference with your DSL signal. We suggest you remove and re-plug the phone cable into the DSL modem and the wall jack to ensure the cable is plugged in securely. The cable should ‘click ‘when it is pushed into place.
- Try moving the DSL modem along with its power supply and phone cable to a different telephone wall jack. There may be internal wiring issues causing problems with a specific wall jack or group of wall jacks at your location.
- Assuming you are using line-sharing DSL (meaning that your phone and DSL share a line) turn off the DSL modem and listen for audible noise on the line. If you hear snaps or static when making a phone call, it is likely that the phone company will need to repair your wiring before DSL will work reliably.
- As a final test, running your DSL modem directly into the “MPOE” (usually a grey telephone box on the outside of your home where the wires attach from the telephone pole) eliminates the possibility of inside wiring issues.
In cases above-mentioned troubleshooting does not resolve your issue. Please contact your ISP/Phone service provider to have them perform a phone line test.
WAN or LAN port not working
Performing these simple troubleshooting steps (performing a loopback test) will help you determine if the LAN or Internet (WAN) port of your router is still working.
Symptoms
- WAN (Internet) or LAN port not working
- WAN (Internet) or LAN LED is not lit
- Cannot get IP address when connected to any LAN port of the router
- Router not getting an Internet IP Address
To troubleshoot your WAN or LAN port
- Plug in the power adapter of your router to the power outlet.
- Turn on the router and wait for the power LED to become solid green or white. (Note that the LED lights may be different depending on your router. Please refer to the user manual for more information).
- Take one Ethernet cable, and connect one end to any of the router’s LAN port, and the other end to the router’s WAN port.
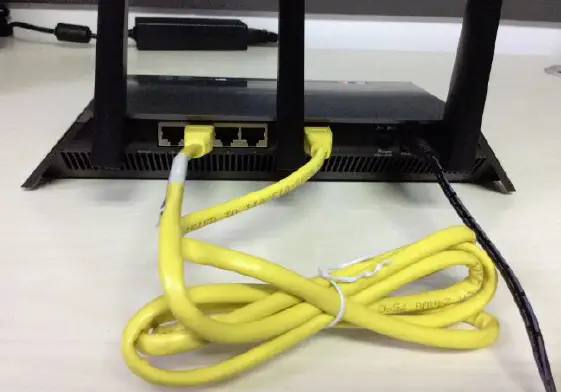
- Check the LEDs. The LAN LED and WAN LED should both be lit. In this example, LAN 3 LED and WAN LED are both lit.

Note: Perform the same steps to check the remaining LAN ports.
My router keeps rebooting itself, what can I do?
To troubleshoot a router that keeps rebooting:
- Upgrade your router’s firmware.
- Try using a different power outlet.
- Use an uninterrupted power supply (UPS) to protect your router from power outages.
- Make sure that you’re using the power adapter that came in the box with your router.
Reset your router to factory default settings.


