1. Introduction and Overview
This manual provides detailed instructions for the installation, setup, and operation of your Veise VE017G-H Wi-Fi Smart Fingerprint Front Door Lock Set. This advanced lock offers multiple access methods and smart home integration for enhanced security and convenience.
Key Features:
- Smart Wi-Fi Control: Remote lock/unlock, password management, real-time notifications, activity logs via the KK Home App.
- 8-in-1 Keyless Entry: Access via Fingerprint, App, Password, Cards, Backup Key, User Authorization, Code Sharing, and Voice.
- Voice Control: Compatible with Amazon Alexa & Google Home for hands-free operation.
- Enhanced Security: ANSI Grade 3 and BHMA tested, IP55 weatherproof, built-in alarm, emergency power port, AES 128-bit encryption.
- Modern Design: Matte Black finish with a retro handle set.
- Easy Installation: Designed for DIY installation with a screwdriver.
2. What's Included
The Veise VE017G-H package includes the following components:
- Fingerprint Smart Lock with 2 Handles (Exterior & Interior assembly)
- Veise G1 Gateway
- 2 Keys
- 2 IC Cards
- Screws
- Latch
- Strike
- Mounting Plate
- Installation & User Manual

3. Installation Guide
3.1 Pre-Installation Checks
Before beginning installation, verify your door's compatibility and dimensions:
- Door Thickness: 1-3/8" to 2" (35 to 50mm).
- Hole Diameter: 1-1/2" or 2-1/8" (38mm or 54mm).
- Backset: 2-3/8" or 2-3/4" (60mm or 70mm).
- Minimum Distance between holes: 5" (127mm).
- Hole Spacing for Handle: 7-8/8" to 8-7/8" (200 to 225mm).
- Bore Diameter for Handle: 3/8" (10mm).
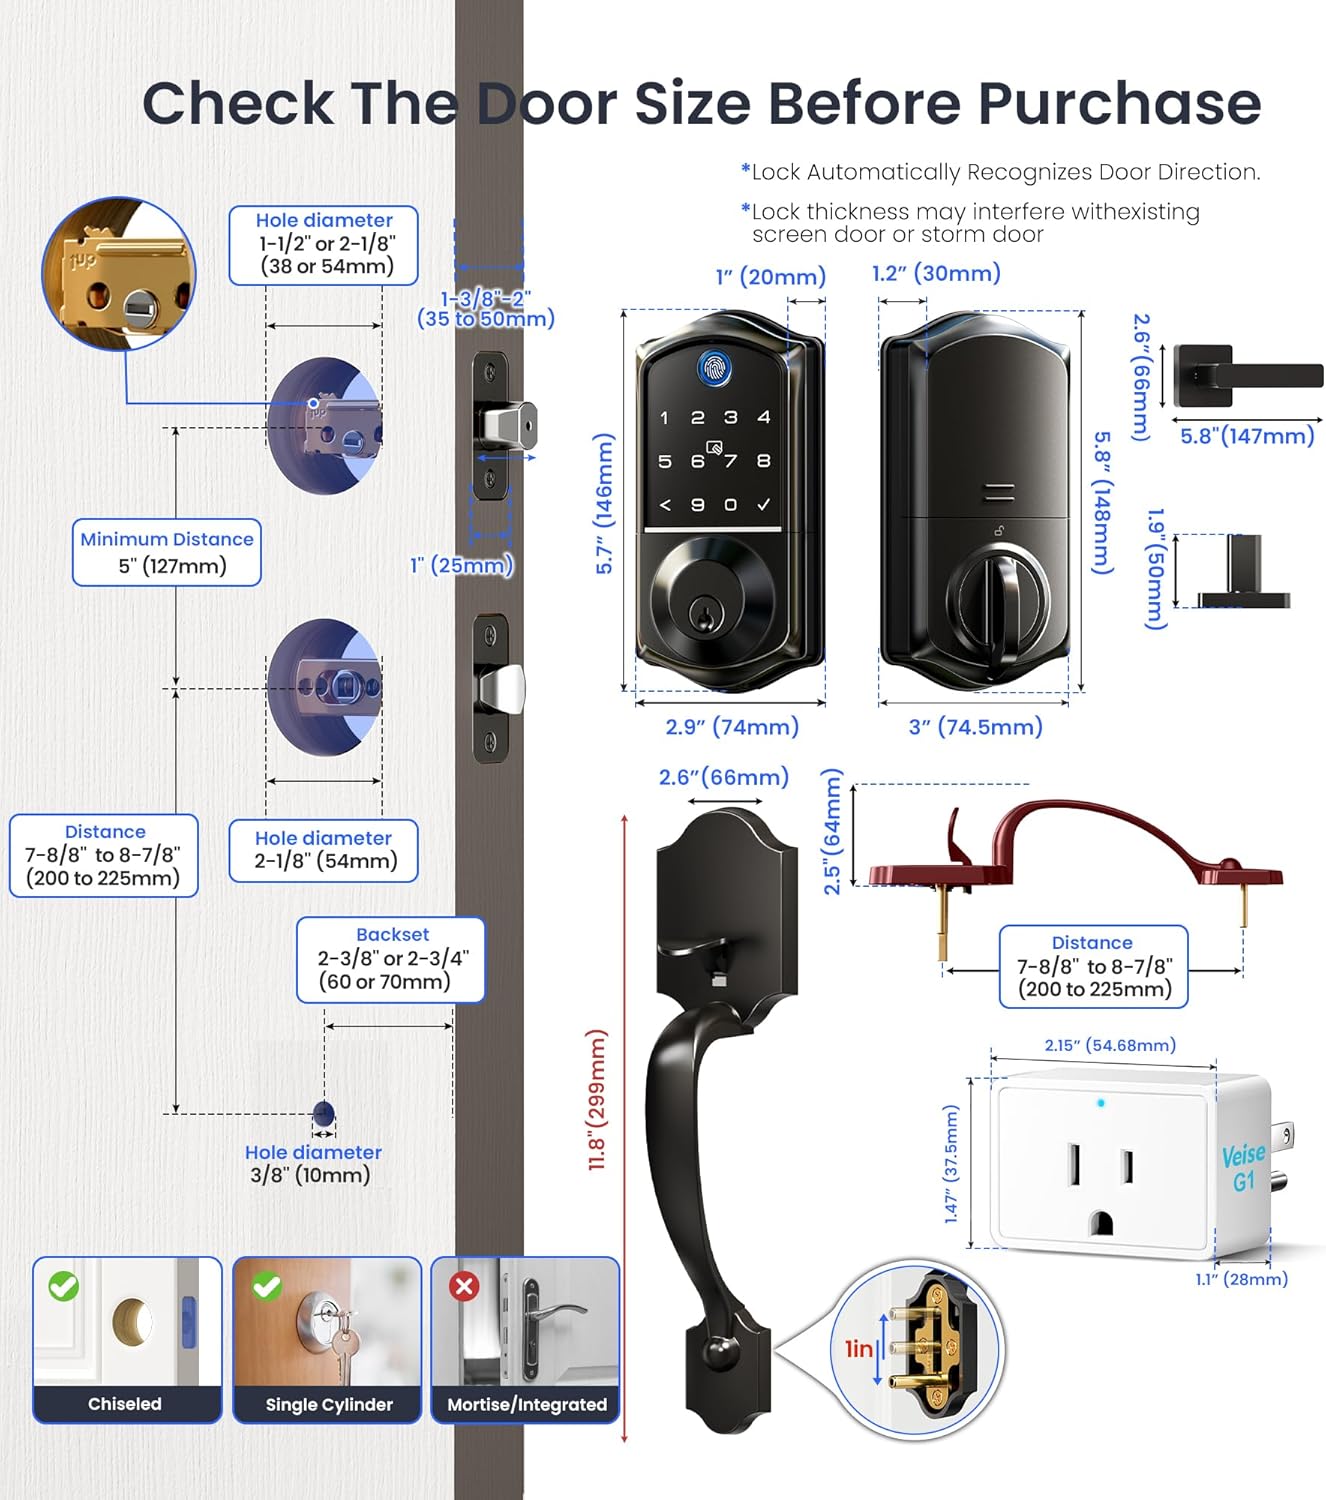
Ensure your door is chiseled for the latch and strike plates. This lock is designed for single cylinder deadbolts and is not compatible with mortise/integrated locks.

3.2 Step-by-Step Installation
It is strongly recommended to keep the door open or ajar during installation. Do not close the door before inserting the batteries. Do not insert the batteries until the lock is fully installed.
Video 1: Detailed guide on how to install the smart lock and handle sets.
- Install the Latch and Strike:
- Adjust the latch backset (60mm or 70mm) if necessary.
- Ensure the beveled edge of the latch bolt faces the direction the door swings shut.
- Secure the latch with screws.
- Install the strike plate on the door frame.
- Install Exterior Assembly:
- Route the cable below the latch.
- Insert the torque blade through the slot in the latch, ensuring it's horizontal.
- Align the exterior assembly with the door holes and secure it.
- Install Interior Assembly:
- Disassemble the battery cover.
- Insert the cable connector into the socket, pushing firmly until seated.
- Align the torque blade with the knob hole.
- Attach the interior assembly to the mounting plate and tighten the 3 screws.
- Insert 4 AA alkaline batteries (do not mix old and new batteries or different brands).
- Attach the battery cover.
- Install Handle Set:
- Ensure the handle set is compatible with your door's 3-hole spacing (7-8/8" to 8-7/8").
- Install the exterior handle, ensuring the handle button is not pressed during installation.
- Install the interior handle.
- Do not exert excessive force on the handle or hang objects on it.
4. App Setup & Connectivity
4.1 KK Home App Setup
The KK Home App allows full control and management of your smart lock.
Video 2: Instructions on how to pair the lock to the KKHome App and G1 Gateway.
- Download and Register: Download the KK Home App from your app store. Register and log in to your account.
- Enable Permissions: Turn on Bluetooth for iOS. For Android, turn on Location and Bluetooth, and grant location permission to the app. Keep your phone and lock within 2 meters during pairing.
- Add Device: Click "Add device" in the app. Scan the QR code or manually enter the ESN located on the back of the interior assembly. Follow in-app instructions to complete pairing.
- Change Master Code: After successful connection, tap on "Settings" then "Master code" to set a new 4-10 digit master PIN code.
4.2 G1 Gateway Pairing
The G1 Gateway enables Wi-Fi connectivity for your lock.
- Power On: Plug in the G1 Gateway. Keep it within 15 meters (49ft) of your home router.
- Scan QR Code: Open the KK Home App and scan the QR code on the G1 Gateway.
- Reset Gateway: Find the RES button on the device, press and hold it for 5 seconds until the indicator starts to slowly flash.
- Wi-Fi Connection: Set up Wi-Fi connection. The gateway only works with 2.4G Wi-Fi networks. Click "next" to complete.
- Add Smart Lock: Add the smart lock in the App. Ensure the G1 gateway has been added successfully first. Keep the G1 gateway within 10 meters of the door lock.
4.3 Voice Control Integration
Integrate your smart lock with Amazon Alexa or Google Home for convenient voice commands.
Video 3: Guide on how to connect your Veise smart lock to Alexa.
After successfully connecting your G1 gateway and smart lock to the KK Home App, follow the in-app instructions to link your KK Home account with Alexa or Google Assistant. You can then use voice commands like "Alexa, unlock the front door" or "Alexa, lock the front door."
5. Operating Instructions
5.1 Multiple Access Methods
Your Veise smart lock offers various ways to unlock and lock your door:
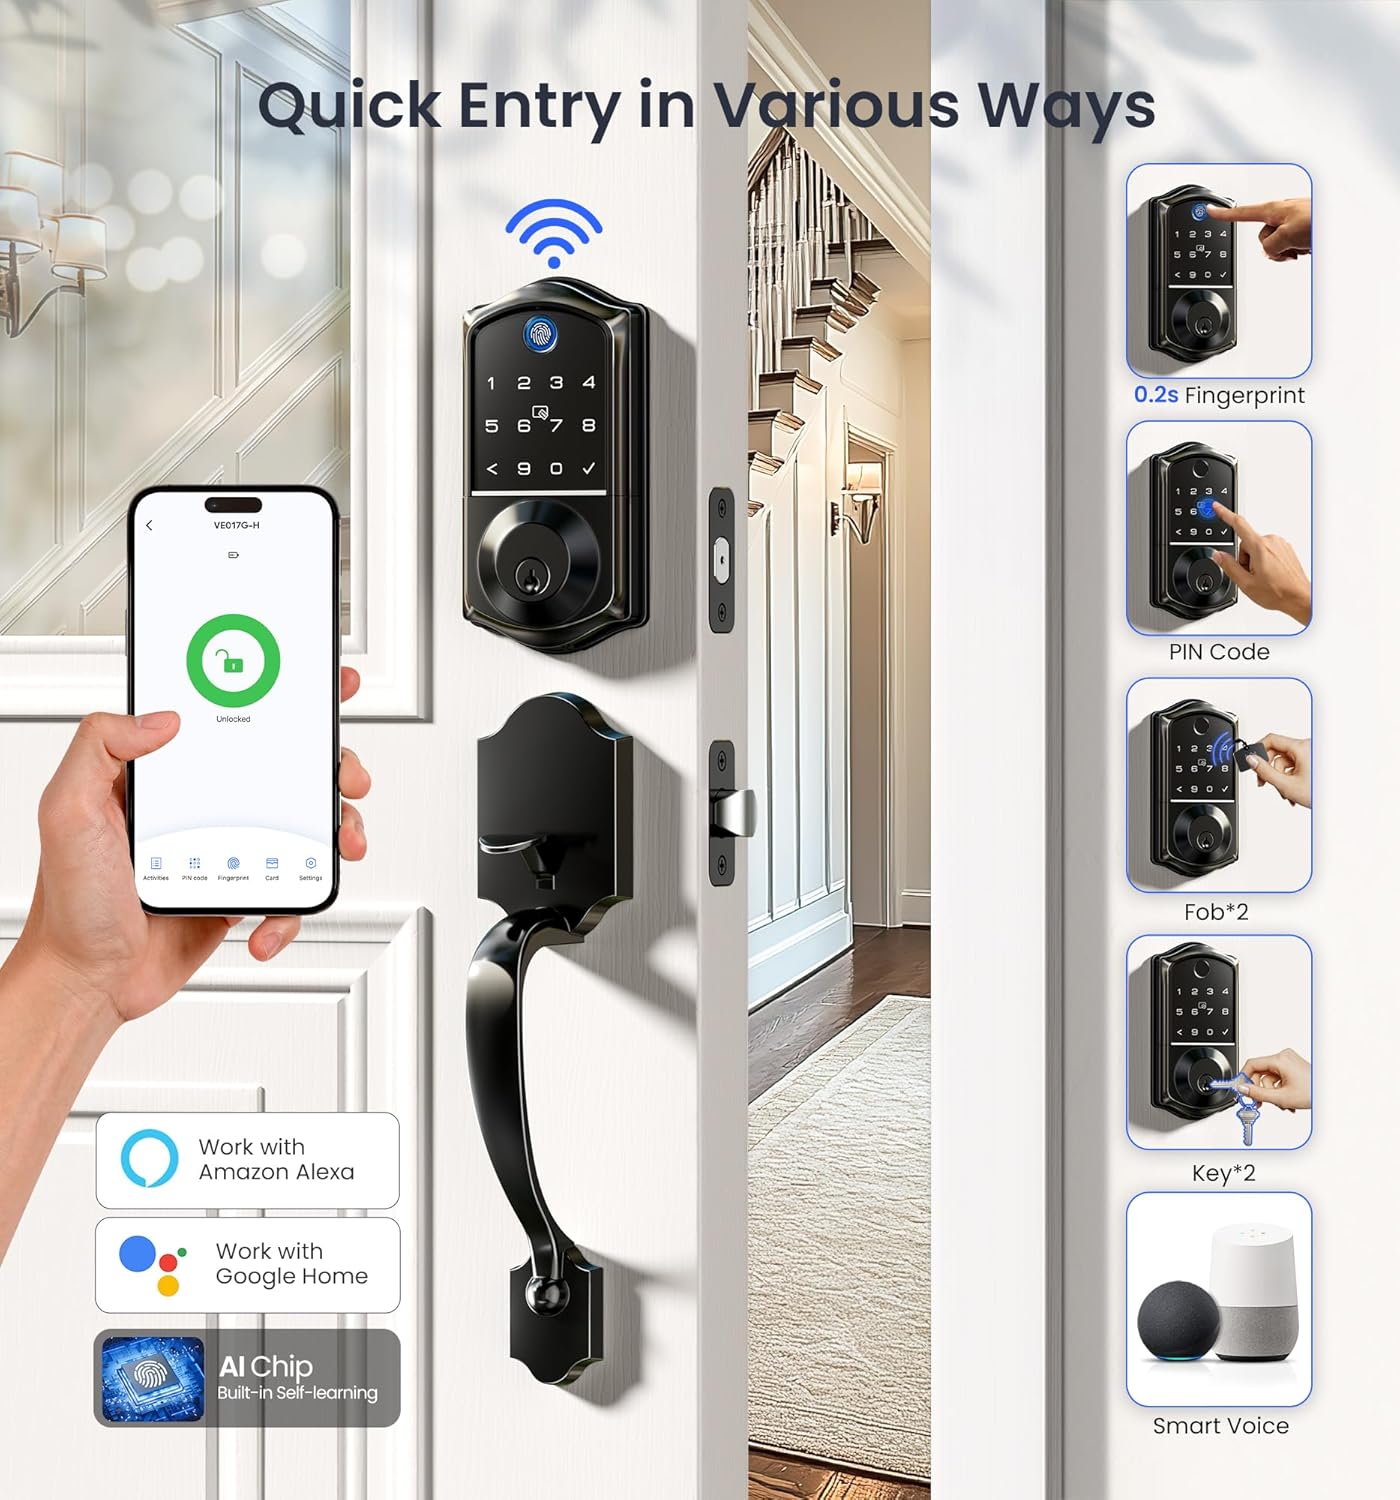
- Fingerprint: Fast 0.2-second recognition.
- PIN Code: Use the backlit keypad to enter your personalized code.
- Fob/IC Card: Tap the provided IC cards for quick entry.
- Backup Key: Traditional key access is always available.
- KK Home App: Remote lock/unlock from anywhere.
- Voice Control: Use Alexa or Google Home commands.
5.2 Auto-Lock Function
The auto-lock feature automatically locks your door after a set period, providing peace of mind.

5.3 Remote Management
Manage your lock's access and monitor activity remotely through the KK Home App.

- Generate Passwords: Create permanent, one-time, duration, or recurring codes for various users.
- Manage Users: Add or remove users and assign specific access permissions.
- Real-time Notifications: Receive instant alerts on your phone when the door is locked or unlocked.
- Activity Logs: View a detailed history of all lock and unlock events.

5.4 Security Features
The lock incorporates several features to enhance security:
- Anti-Peeping Passcode: Enter random digits before or after your actual PIN to prevent others from guessing your code.
- Lockout Alarm: The lock will trigger an alarm and temporarily disable access after multiple incorrect entry attempts.
- IP55 Weatherproof: Designed to withstand various weather conditions.


5.5 Special Modes
- Away Mode: Activates an alarm if the lock is unlocked mechanically or by thumb turn.
- Silent Mode: Disables sound prompts for quiet operation.
- Backlit Keypad: Keypad illuminates for easy visibility in low light conditions.


6. Maintenance
6.1 Battery Replacement
The lock requires 4 AA alkaline batteries. Replace batteries when the low battery alarm is triggered.

6.2 Emergency Power
In case of complete battery depletion, an emergency Type-C port is available for temporary power to unlock the door.
7. Troubleshooting
If you encounter issues with your Veise smart lock, refer to the following common problems and solutions:
Video 4: Troubleshooting guide for the VE017G-H smart lock.
| Problem | Solution |
|---|---|
| The latch bolt keeps going in and out. | Disassemble and reinstall the lock by following the installation tips:
|
| Can only be unlocked with a key; password, fingerprint, and mobile app unlocking are unavailable. | Press and hold the reset button with the reset tool for 5 seconds. The lock will resume normal operation after resetting. |
| Keeps showing stuck. Key/password/fingerprint/KK Home App can't be unlocked and locked. | Route the cable below the Latch and insert the Torque Blade horizontally into the Latch slot, ensuring both the blade and slot are level. |
| Connection failed during pairing or lock not found. | Perform a resetting on the lock. Test if the default master code (12345678) works to unlock. Make sure Bluetooth is turned on in your phone's settings and the lock is supplied with power. |
| Master PIN Code cannot be changed. | Refer to the Quick Start Guide to reset the lock and reprogram all PIN Codes. |
| Forgot Master PIN Code. | Perform a factory reset to clear all PIN Codes. Once reset, all PIN Codes will be deleted and the Master PIN Code will be reset to the default (12345678). |
| Auto Lock is not working. | If the light continues to flash red and the voice announces "Low battery", replace the batteries with four new AA alkaline batteries. See Quick Setup to activate the auto-lock feature. |
| Fingerprint can't unlock. | Clean the fingerprint sensor and try again. |
| Lock setup failed. | Make sure the lock is installed correctly. Insert fresh batteries and make sure the cable is properly connected, not pinched. After installation, reset the lock to the factory default settings. |
| Keypad not responding. | Make sure batteries are inserted correctly. If the battery indicator flashes continuously, the batteries are low. Replace them with four new AA alkaline batteries. Make sure that the cable is properly connected and has not been damaged during installation. |
8. Specifications
| Feature | Detail |
|---|---|
| Brand | Veise |
| Model Name | VE017G-H |
| Lock Type | Biometric, Deadbolt, Keypad |
| Material | Aluminum |
| Color | Matte Black |
| Finish Type | Matte Black |
| Item Dimensions L x W x H | 12.83 x 9.29 x 3.74 inches |
| Item Weight | 5.37 pounds |
| Connectivity Protocol | Bluetooth, 2.4GHz Wi-Fi |
| Controller Type | APP, Amazon Alexa, Google Assistant, Hand Control |
| Batteries Required | 4 AA batteries (not included) |
| Battery Cell Type | Alkaline |
| Special Features | Auto-Lock, Back-Lit Keypad, Fingerprint, One-Touch Lock, Smart Lock with Retro Handle Set, Wi-Fi Remote Control, Remote Lock/Unlock, Remote Access Sharing, Real-time Notifications, Instant Access Log, Monitor Lock Status, Alexa and Google Voice Control, Remotely Generate/Modify/Delete Code, Voice Prompts in 3 Languages, US-Based Customer Support |
9. Warranty and Support
Veise offers comprehensive support for your product:
- Warranty: At least 1-year warranty.
- Online Phone Support: Monday–Friday, 9 AM–5 PM PST.
- Email Assistance: 24/7 email support.
If you have any questions or require assistance, please contact us first!
- Toll-Free: +1 (855) 400-3853 (USA)
- E-Mail: support@iveise.com


