1. Product Overview
This Naifay Android Car Stereo (Model C) is designed to upgrade the in-car entertainment and navigation system for specific Toyota Tundra and Sequoia models equipped with the original JBL sound system. It features a 10.1-inch touch screen, Android 11 operating system, 4-core processor, 2GB RAM, and 32GB ROM, offering a range of functionalities including wireless Carplay, Android Auto, MirrorLink, GPS navigation, Bluetooth, FM radio, and support for AHD backup cameras and steering wheel controls.

Image 1.1: Comparison of the dashboard before and after installing the Naifay Android Car Stereo. Note the integrated JBL system indicator.
2. Compatibility and Model Selection
This specific unit, Model C, is exclusively designed for Toyota Tundra (2007-2013) and Toyota Sequoia (2008-2018) vehicles that are equipped with the original JBL sound system. It is crucial to verify your vehicle's audio system before installation to ensure proper functionality and compatibility.
- Model A: For vehicles without a large screen and without the original JBL system.
- Model B: For vehicles with a large screen but without the original JBL system.
- Model C: For vehicles equipped with the original JBL sound system.
If your vehicle does not have the JBL system, please refer to Model A or B as appropriate. Using the incorrect model may result in wiring harness incompatibility or audio system malfunctions.

Image 2.1: Visual guide for selecting the correct Naifay car stereo model based on vehicle's original audio system (JBL or non-JBL) and screen configuration. Model C is specifically for JBL versions.
3. Installation Guide
3.1. Pre-Installation Checklist
- Ensure the vehicle's ignition is off and the battery is disconnected.
- Confirm all necessary cables and accessories are present as per the packing list.
- Verify the correct model (Model C) is selected for your JBL-equipped vehicle.
3.2. Removing the Original Head Unit
- Carefully remove the trim panels surrounding the original car stereo using appropriate prying tools to avoid damage.
- Unscrew the mounting bolts or clips securing the original head unit.
- Gently pull out the original head unit and disconnect all wiring harnesses and antenna cables from its rear.
3.3. Wiring Connections
The Naifay Android Car Stereo comes with a plug-and-play wiring harness designed for your vehicle. Connect the provided harness to the vehicle's existing wiring and then to the new head unit. Ensure all connections are secure.
- Power Cable: Connect the main power harness.
- Steering Wheel Control (SWC) Wires: Connect the two Key/SWC wires for analog steering wheel control functionality.
- GPS Antenna: Mount the GPS antenna in a location with a clear view of the sky (e.g., dashboard, under the windshield).
- WiFi/Bluetooth Antenna: Connect the dedicated antenna for optimal wireless performance.
- USB Cables: Route the USB extension cables to a convenient location (e.g., glove box, center console).
- Rear View Input: Connect the backup camera input cable if installing a rear view camera.
- RCA Cables: Connect any additional audio/video input/output cables as needed (e.g., subwoofer, external amplifier).

Image 3.1: Radio Wiring Harness Diagram illustrating the connections for various inputs and outputs on the rear of the head unit.
3.4. Installing the New Head Unit
- Carefully slide the new Naifay head unit into the dashboard opening.
- Secure it with the original mounting bolts or clips.
- Reattach the trim panels, ensuring they snap securely into place.
- Reconnect the vehicle battery.
- Turn on the ignition and test the unit's functionality.
Note: If the provided harness does not fit your car, contact Naifay customer support for assistance instead of returning the unit.
4. Operating Instructions
4.1. Wireless Carplay & Android Auto
This unit supports both wireless and wired Apple Carplay and Android Auto. To connect:
- Wireless Connection: Enable Bluetooth on your smartphone and pair it with the car stereo. Follow the on-screen prompts to initiate Carplay or Android Auto.
- Wired Connection: Connect your smartphone to one of the USB ports using a high-quality USB cable. The system should automatically detect and launch Carplay or Android Auto.
Once connected, you can access navigation, music, calls, and messages directly from the car stereo's screen.

Image 4.1: Display of Wireless Carplay, Android Auto, and MirrorLink functionalities, showing phone integration and app access.
4.2. GPS Navigation & WiFi Connection
The unit comes with a built-in offline map of North America. For online navigation and app downloads, connect to WiFi:
- Go to Settings > Network & Internet > Wi-Fi.
- Select your desired Wi-Fi network and enter the password if required.
- Once connected, you can use online navigation apps (e.g., Google Maps, Waze) and download other applications from the Application Store.

Image 4.2: GPS Navigation interface showing a route, and the WiFi connection screen with various app icons.
4.3. Bluetooth & FM Radio
- Bluetooth: Enable Bluetooth on your phone and the car stereo. Search for available devices on your phone and select the car stereo to pair. This allows for hands-free calling and wireless audio streaming. An external microphone jack is provided for improved call quality.
- FM Radio: Access the FM Radio application. You can manually search for stations or use the automatic search function to find and save preset stations.
4.4. Rear View Camera & Steering Wheel Control (SWC)
- Rear View Camera: When the vehicle is shifted into reverse, the display will automatically switch to the backup camera feed, providing a wide-angle view to assist with parking and maneuvering.
- Steering Wheel Control: The unit supports the original car's steering wheel controls. After installation, you may need to configure the buttons in the system settings (Settings > SWC) to match your vehicle's controls for functions like volume, track change, and call management.
4.5. Split Screen Function
The split-screen feature allows you to run two applications simultaneously on the 10.1-inch display. For example, you can have navigation running on one side and music playback on the other. To activate, long-press the recent apps button or drag an app to one side of the screen, then select another app for the other side.

Image 4.3: Example of the split-screen function, displaying two applications concurrently.
5. Specifications
| Feature | Specification |
|---|---|
| Operating System | Android 11 |
| Processor | 4-Core |
| RAM | 2GB |
| ROM (Internal Storage) | 32GB |
| Screen Size | 10.1 Inches |
| Display Type | 2.5D IPS Touch Screen |
| Resolution | 1280*720P (HD) |
| Connectivity | Wireless, Bluetooth, USB, WiFi |
| Bluetooth Version | 5.0 (for hands-free calling, music streaming) |
| GPS | Built-in module, supports online/offline maps (North America offline map included) |
| Radio | FM Radio with preset stations |
| Backup Camera Support | AHD (170-degree ultra-wide angle, waterproof) |
| Steering Wheel Control | Supports original car SWC (analog) |
| Product Dimensions | 11.02 x 1.57 x 6.81 inches |
| Item Weight | 3.3 pounds |
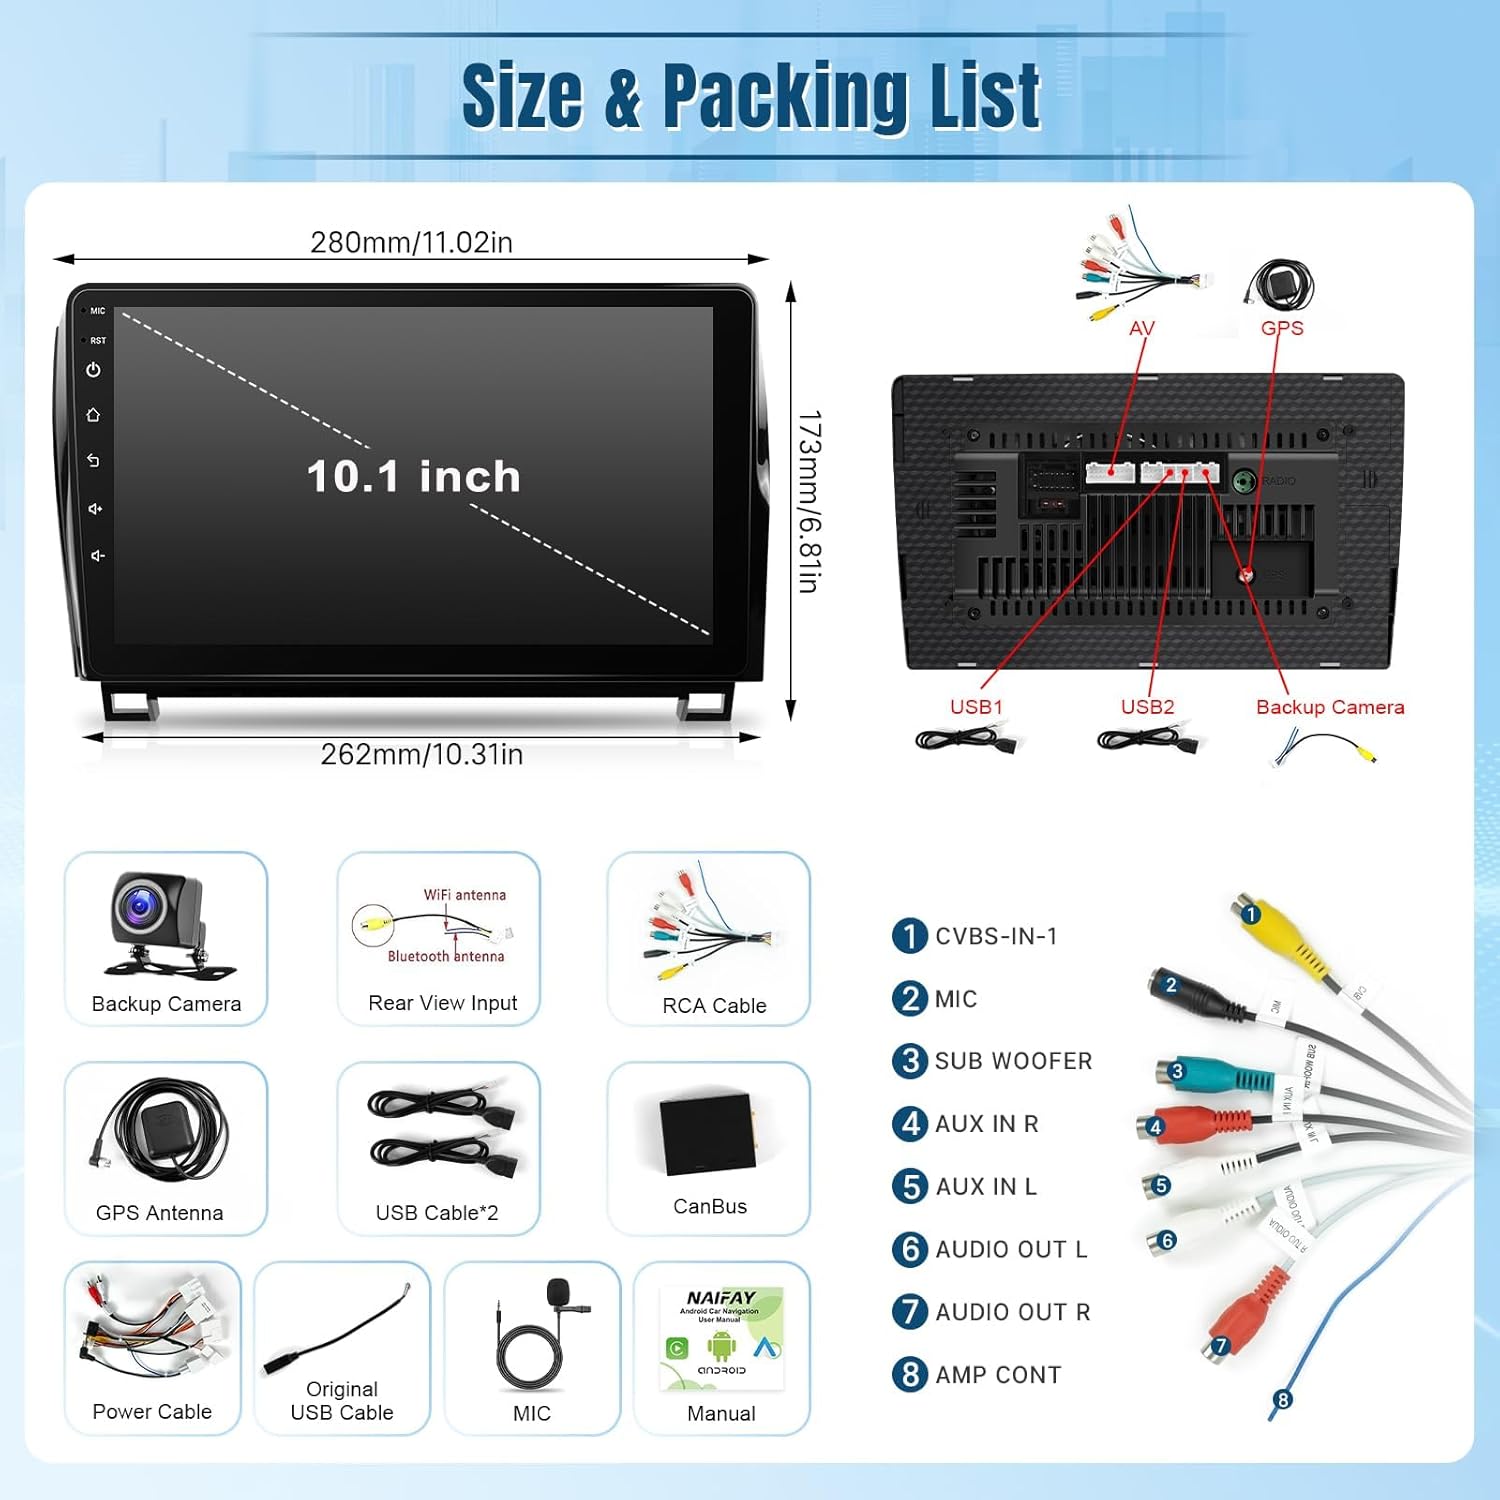
Image 5.1: Physical dimensions of the head unit and a comprehensive list of items included in the package.
6. Maintenance
- Screen Cleaning: Use a soft, lint-free cloth slightly dampened with water or a screen cleaner specifically designed for electronic displays. Avoid harsh chemicals or abrasive materials.
- Software Updates: Periodically check for system software updates via the unit's settings menu when connected to Wi-Fi. Keeping the software updated ensures optimal performance and access to new features.
- General Care: Avoid exposing the unit to extreme temperatures, direct sunlight for prolonged periods, or excessive moisture. Ensure proper ventilation around the unit.
7. Troubleshooting
| Problem | Possible Cause / Solution |
|---|---|
| Unit does not power on. | Check power cable connections. Ensure vehicle battery is connected and charged. Check vehicle's fuse box for blown fuses related to the stereo. |
| No sound or distorted sound. | Verify all speaker wire connections. Ensure the volume is not muted or set too low. Check audio settings (EQ, balance, fader). For JBL systems, ensure Model C is correctly installed and all JBL-specific wiring is connected. |
| Carplay/Android Auto not connecting. | Ensure Bluetooth is enabled on both devices and paired. For wired connection, try a different USB cable or USB port. Restart both the phone and the car stereo. Check phone settings for Carplay/Android Auto permissions. |
| GPS signal weak or inaccurate. | Ensure the GPS antenna is mounted in a location with a clear view of the sky, away from obstructions. Check antenna connection. Update map data if necessary. |
| Backup camera not displaying. | Check the camera's power and video signal connections. Ensure the reverse trigger wire is correctly connected to the vehicle's reverse light circuit. Verify camera settings in the unit's menu. |
| Steering Wheel Controls not working. | Ensure the SWC wires are correctly connected. Access the SWC learning function in the unit's settings and program the buttons according to the instructions. |
| Microphone quality is poor. | Ensure the external microphone is properly connected and positioned. Check microphone settings in the unit. Avoid placing the microphone near air vents or noisy areas. |
8. Warranty and Support
Naifay provides a 12-month replacement warranty for this product, available within 12 months of purchase. Additionally, lifetime after-sales consultation and technical support are offered.
For any technical assistance, troubleshooting, or warranty claims, please contact Naifay customer service. You can typically find contact information by navigating to the seller's page on the platform where you purchased the product and looking for a "Contact Seller" or "Ask a question" option.

Image 8.1: Guide on how to contact Naifay support through the seller's page for assistance.


