
1. Introduction
This manual provides detailed instructions for the installation, operation, and maintenance of your DieseRC AC 230V 220V Wireless Remote Control Light Switch. This 1-channel 433Mhz RF relay receiver, paired with two key fob transmitters, allows for convenient remote control of lighting or other connected appliances. It is designed for stable and reliable performance with a high reception sensitivity and a strong radio frequency signal capable of passing through walls, floors, and doors, offering a control range of up to 50 meters in open areas.
The product is suitable for various applications including homes, farms, factories, offices, laboratories, and supermarkets, enabling remote operation of devices such as lamps, ventilation systems, and DIY wireless sockets.
2. Safety Information
- Electrical Safety: Always disconnect power before installation or maintenance to prevent electric shock. Installation should be performed by a qualified electrician or in accordance with local electrical codes.
- Voltage Compatibility: Ensure the input voltage (AC 90V-250V) matches your electrical system.
- Load Capacity: Do not exceed the maximum load capacity of 1500W or 10A to prevent damage to the device and potential hazards.
- Environmental Conditions: Do not expose the receiver to moisture, extreme temperatures, or corrosive environments. The receiver is not waterproof unless explicitly stated for a specific model.
- Children and Pets: Keep the device and remote controls out of reach of children and pets.
3. Product Components
The package includes:
- 1 x DieseRC RF Relay Receiver (Model 2201O)
- 2 x Key Fob Transmitters (with 27A 12V battery included)
- Wiring connectors (if applicable)

4. Specifications
| Manufacturer | DieseRC |
| Model Reference | 2201O |
| Product Dimensions (L x W x H) | 6.5 x 3.6 x 2.3 cm |
| Weight | 132 grams |
| Operating Voltage | AC 90V-250V |
| Max Current | 10A |
| Max Wattage | 1500 Watts |
| RF Frequency | 433Mhz |
| Control Channels | 1 Channel |
| Remote Control Range | Up to 50 meters (open area) |
| Remote Control Battery | 1 x 27A 12V Alkaline (included) |
| Certifications | CE |
| Operating Mode | Manual (Momentary, Toggle, Latched) |
| Contact Type | Normally Open |
| Terminal Type | Screw |

5. Installation
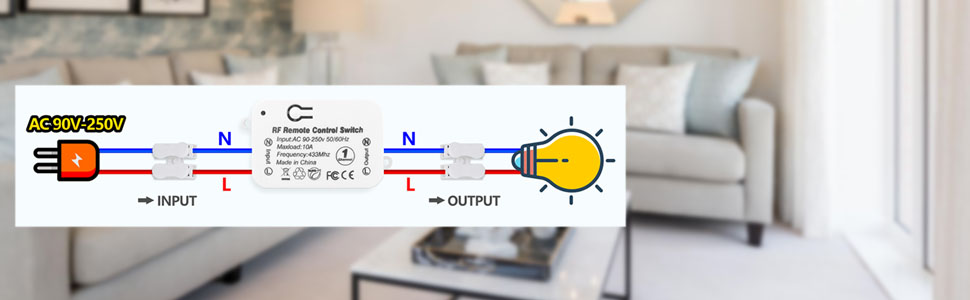
The receiver is designed for easy installation between the power source and the appliance. No complex wiring is required. The compact size (65x36x23 mm) allows for discreet placement.
- Disconnect Power: Before starting, ensure the main power supply to the circuit is turned off at the breaker.
- Identify Wires: Locate the live (L) and neutral (N) wires from your power source and to your appliance (e.g., light fixture).
- Connect Input: Connect the live (L) and neutral (N) wires from the power source to the corresponding 'Input' terminals on the receiver.
- Connect Output: Connect the live (L) and neutral (N) wires leading to your appliance to the corresponding 'Output' terminals on the receiver.
- Secure Connections: Ensure all wire connections are secure using the provided screw terminals or push-in connectors.
- Mount Receiver: Place the receiver in a safe, enclosed location, such as a junction box, to protect it from environmental factors.
- Restore Power: Once all connections are secure and the receiver is safely housed, restore power to the circuit.
6. Operating Modes
The receiver supports three operating modes: Momentary, Toggle, and Latched. The product is pre-configured in Latched mode. You can change the mode by programming the remote control as described in the next section.
6.1. Momentary Mode
In Momentary mode, the output is active only while the remote button is pressed. Releasing the button turns the output off.
6.2. Toggle Mode
In Toggle mode, pressing the remote button once turns the output on. Pressing the same button again turns the output off.
6.3. Latched Mode
In Latched mode, one button (e.g., 'A') turns the output on, and another button (e.g., 'B') turns the output off. This mode requires two distinct buttons for ON/OFF control.

7. Programming Remote Control (Pairing)
The receiver can store approximately 20 transmitters. Follow these steps to program your remote control to the desired operating mode.
7.1. Clear Existing Codes (Optional but Recommended)
To clear all stored remote control codes from the receiver, press the learning button on the receiver 8 times. The indicator light will flash to confirm that all codes have been cleared.
7.2. Program Momentary Mode
- Press the learning button on the receiver 4 times. The indicator light will flash.
- Press button 'A' on your remote control.
- Wait approximately 3 seconds. The indicator light on the receiver will flash, confirming successful pairing in Momentary mode.
7.3. Program Toggle Mode
- Press the learning button on the receiver 2 times. The indicator light will flash.
- Press button 'B' on your remote control.
- Wait approximately 3 seconds. The indicator light on the receiver will flash, confirming successful pairing in Toggle mode.
7.4. Program Latched Mode
- Press the learning button on the receiver 3 times. The indicator light will flash.
- Press button 'A' on your remote control (for ON).
- Press button 'B' on your remote control (for OFF).
- Wait approximately 3 seconds. The indicator light on the receiver will flash, confirming successful pairing in Latched mode.
7.5. Set Default State (On/Off)
To set the default state of the relay (ON or OFF) when power is restored:
- Press the learning button on the receiver 7 times. The indicator light will flash.
- The receiver will now toggle between the default ON and OFF states. The indicator light will confirm the selected default state.


8. Maintenance
8.1. Remote Control Battery Replacement
The remote control uses a 27A 12V battery. If the remote's indicator light does not illuminate or its range decreases significantly, the battery may need replacement. To replace the battery:
- Carefully open the remote control casing.
- Remove the old 27A 12V battery.
- Insert a new 27A 12V battery, ensuring correct polarity.
- Close the remote control casing securely.
8.2. Cleaning
Wipe the receiver and remote control with a dry, soft cloth. Do not use liquid cleaners or solvents.
9. Troubleshooting
- Device not responding to remote:
- Check if the receiver is properly powered (indicator light on receiver should be active).
- Ensure the remote control battery is not depleted.
- Verify that the remote control is paired with the receiver in the desired operating mode. If unsure, clear all codes and re-program.
- Check for obstructions or excessive distance between the remote and receiver.
- Device turns on/off unexpectedly:
- This could be due to interference. Try clearing all codes and re-pairing the remote.
- Ensure no other 433Mhz devices are operating nearby on the same frequency.
- Indicator light on receiver does not turn on:
- Check the power supply to the receiver. Ensure wiring connections are secure.
- Verify the circuit breaker is not tripped.


