1. Introduction
This manual provides comprehensive instructions for the installation, operation, and maintenance of your hornbill A5-SBFT-H Smart Front Door Lock. This keyless entry system offers multiple unlocking methods including fingerprint, passcode, app control, and traditional mechanical keys, enhancing security and convenience for your home or apartment.

Image: The hornbill A5-SBFT-H Smart Lock with its digital keypad and fingerprint sensor, alongside a smartphone displaying the lock's control application.
2. Product Overview and Components
The hornbill A5-SBFT-H Smart Lock system includes the following main components:
- Front Lock Assembly: Exterior unit with keypad, fingerprint sensor, and keyhole.
- Back Lock Assembly: Interior unit with battery compartment and thumb turn.
- Mounting Hardware: Screws, bolts, and other necessary parts for installation.
- Mechanical Keys: For emergency manual unlocking.
- User Manual: This document.

Image: An illustration showing the various components of the hornbill smart lock, including the exterior keypad, interior unit, deadbolt, and mechanical keys.
3. Installation Guide
The hornbill A5-SBFT-H Smart Lock is designed for easy installation, typically requiring only a screwdriver. No drilling is necessary for standard door preparations.
3.1 Pre-Installation Checklist
- Ensure your door thickness is between 1.49 inches and 1.88 inches.
- Verify that your door has a standard deadbolt preparation.
- Confirm the lock is compatible with both left and right-handed doors. The direction can be set in the app after installation.
- Gather necessary tools: Phillips head screwdriver.

Image: A diagram illustrating the required door thickness and backset dimensions for proper installation of the smart lock.
3.2 Step-by-Step Installation
- Prepare the Door: Remove any existing deadbolt hardware from your door.
- Install the Deadbolt: Insert the new deadbolt into the door edge. Ensure the latch bolt is facing the correct direction for your door swing.
- Install Exterior Assembly: Place the exterior keypad assembly onto the door, aligning the spindle through the deadbolt mechanism.
- Install Interior Assembly: Attach the interior assembly, ensuring the cable from the exterior unit is connected to the interior unit. Secure with screws.
- Insert Batteries: Open the battery cover on the interior unit and insert 4 AA batteries (not included).
- Test Operation: Manually test the deadbolt with a mechanical key to ensure smooth operation.
- App Configuration: Download the companion app and follow the on-screen instructions to pair your lock and set the door direction (left or right-handed).
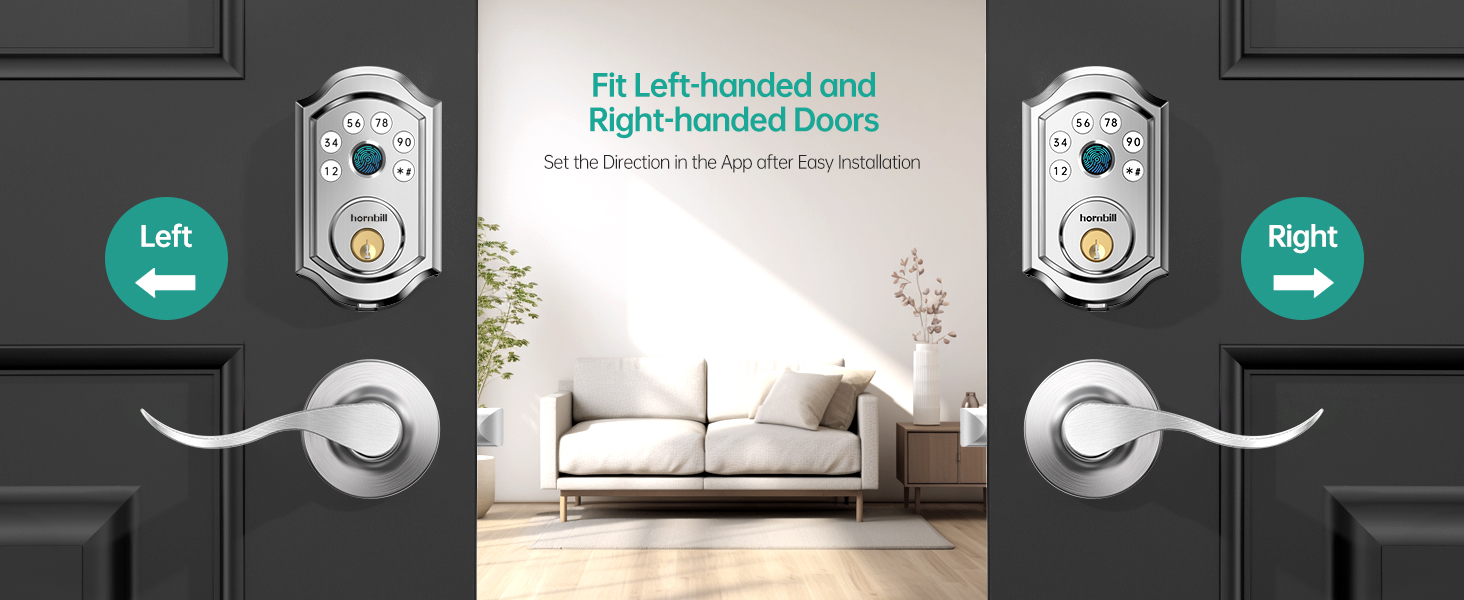
Image: A visual guide demonstrating the compatibility and configuration for both left-handed and right-handed door installations.
4. Operating Instructions
Your hornbill Smart Lock offers multiple convenient ways to lock and unlock your door.
4.1 Unlocking Methods
- Fingerprint Unlocking:
Place your registered fingerprint on the sensor. The lock will unlock within 1 second after identification. The lock features encryption and anti-hacker fingerprint reader chips for security.

Image: A hand placing a finger on the lock's biometric sensor, illustrating the quick 0.1s identification and 0.3s unlocking process.
- Passcode Unlocking:
Enter your registered passcode on the keypad. The lock supports up to 100 passcodes. If an incorrect password or fingerprint is entered more than 5 times, the lock will be temporarily disabled for 5 minutes.
- Anti-Peeping Passcode:
To prevent others from guessing your code, you can enter random digits before and after your actual passcode. For example, if your code is 369668, you can enter ****369668****. The lock will still recognize the correct sequence.

Image: A visual explanation of the anti-peeping passcode feature, showing how random digits can be added before and after the actual code for enhanced security.
- App Control (Bluetooth/Wi-Fi):
Use the dedicated mobile application to unlock your door via Bluetooth when nearby, or remotely via Wi-Fi if a Tuya Gateway (ASIN: B0CQ4MK442, sold separately) is connected. The app allows for lock/unlock, user management, eKey sharing, and tracking operation records.

Image: A smartphone screen showing the "Smart Life App Control" interface, with options for lock/unlock, user management, and activity logs.
- Mechanical Key:
In case of battery depletion or electronic malfunction, the lock can always be opened using the provided mechanical keys.
4.2 Locking Methods
- Auto Lock:
The deadbolt will automatically lock after a set period (5-1800 seconds) once the door is closed. This feature ensures your door is always secured.
- One-Touch Locking:
Hold the '#' button on the keypad for 2 seconds to manually lock the door from the outside. This can also be done through the mobile app.

Image: A person demonstrating the one-touch locking feature by pressing the '#' button on the keypad, alongside an illustration of the auto-lock timer setting.
- Double Locking:
From the inside, press and hold the double lock button for 5 seconds to activate. In this mode, only the mechanical key, admin code, or app can unlock the door from the outside, providing an extra layer of security.

Image: A child pressing the double lock button on the interior unit of the smart lock, indicating activation of the double locking mode.
4.3 Smart Features
- Smart User Management:
Authorize and manage family members, guests, or employees through the app. You can assign unique fingerprints and passcodes, or allow them to use the app for access. This includes setting temporary codes with specific validity periods.

Image: An illustration demonstrating how to add users as family members, highlighting keyless entry, 100 passcodes, free app control, and user authorization.
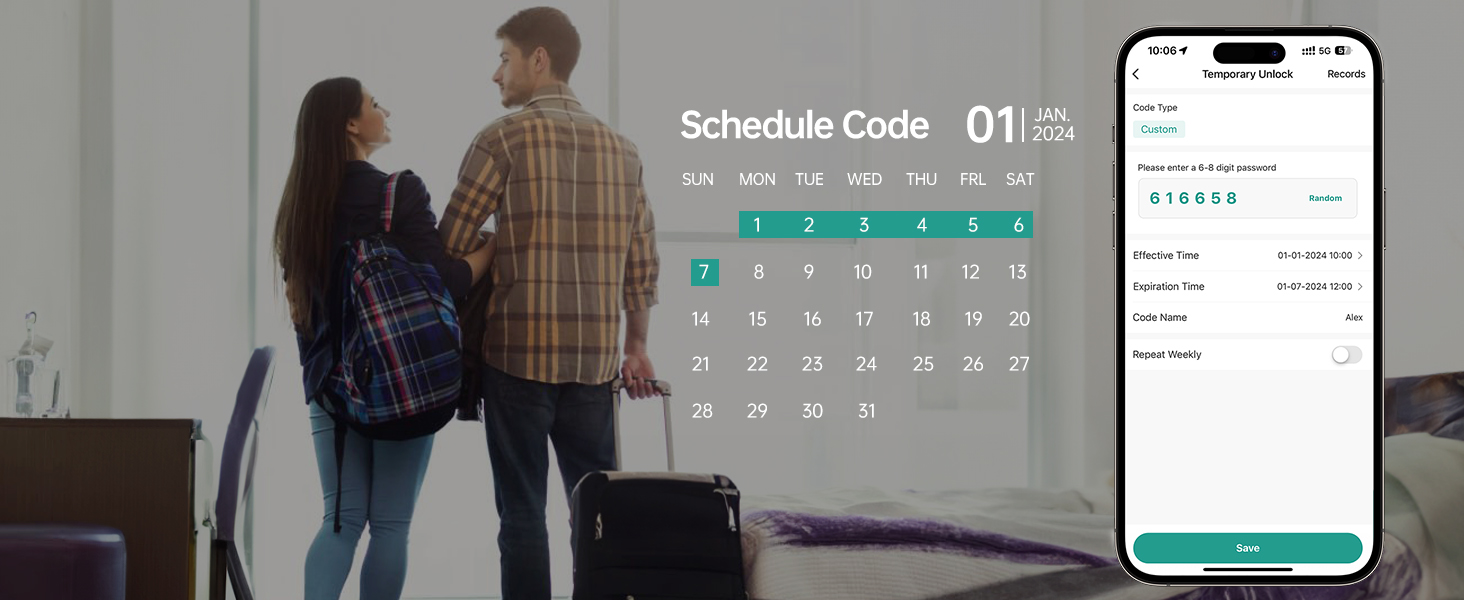
Image: The mobile app interface for creating and managing scheduled access codes, showing options for effective time, expiration time, and repeat weekly settings.
- Voice Control (Alexa/Google Assistant):
Integrate your smart lock with Amazon Alexa or Google Assistant for voice-activated locking and unlocking. This feature requires a Tuya Gateway (sold separately) to enable Wi-Fi connectivity.

Image: A family interacting with an Amazon Alexa device to control the smart lock, demonstrating voice command functionality.
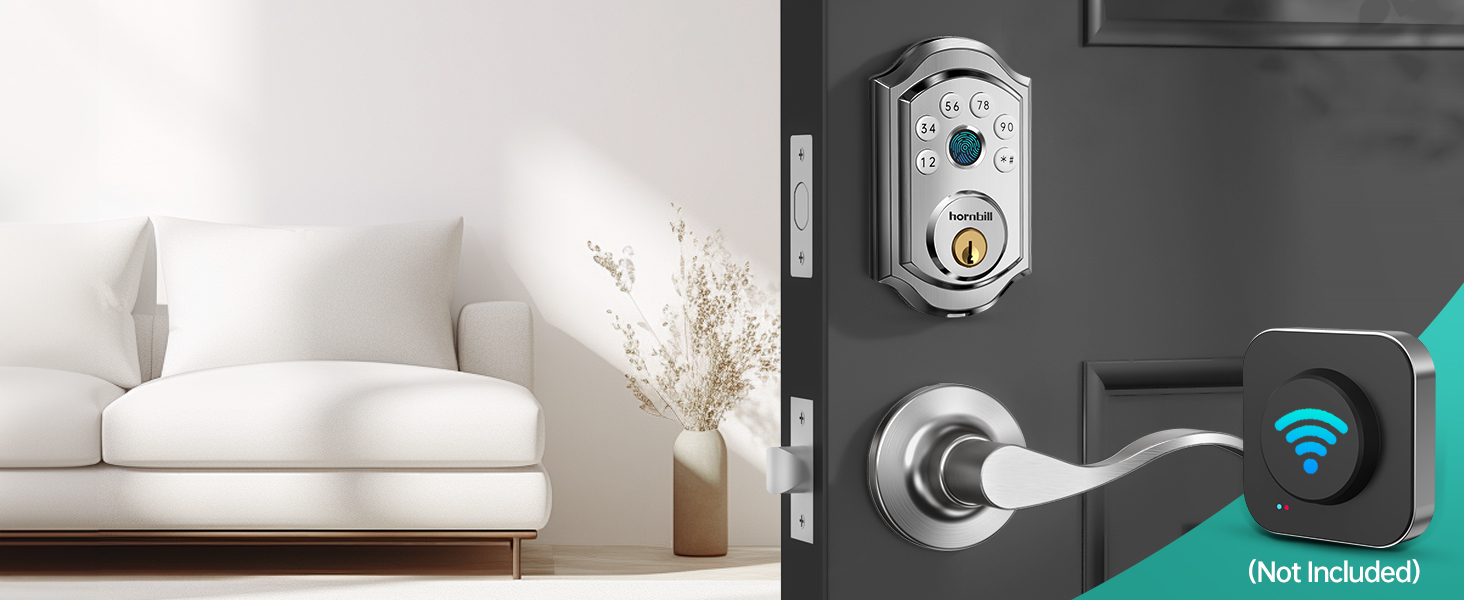
Image: The smart lock installed on a door, with a separate Wi-Fi gateway device shown, indicating its necessity for remote and voice control features.
- Real-time Records:
View a history of all lock and unlock events, including who accessed the door and when, directly from the mobile app.

Image: A smartphone on a desk displaying notifications of recent lock activity, such as "Unlock with Code" and "Local manual lock."
5. Maintenance
- Battery Replacement: The lock will provide a low battery alarm. Replace all four AA batteries promptly to ensure continuous operation. Do not mix old and new batteries.
- Cleaning: Wipe the lock's exterior with a soft, dry cloth. Avoid abrasive cleaners or solvents that could damage the finish or electronic components.
- Environmental Conditions: The lock is made of durable aluminum alloy and is designed for harsh environments, with a temperature range of -13°F to 158°F and IP63 water resistance. However, prolonged exposure to extreme conditions should be minimized.
- Firmware Updates: Regularly check the mobile application for available firmware updates to ensure optimal performance and security.
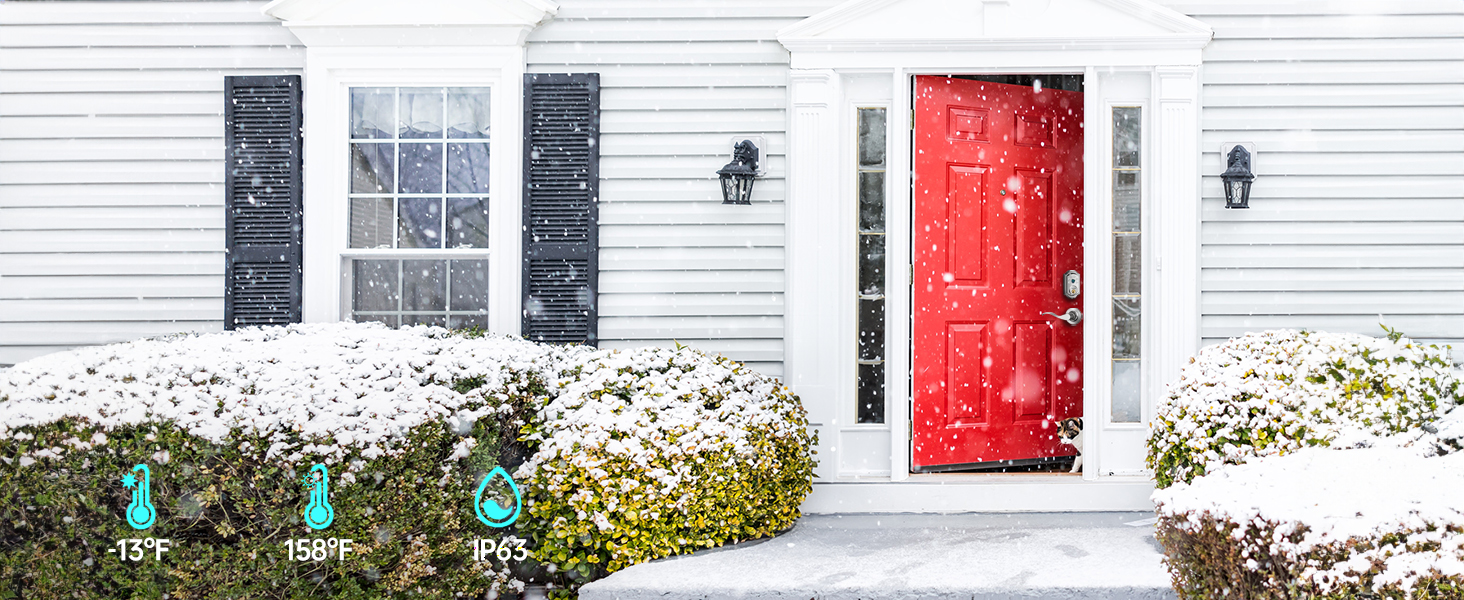
Image: The smart lock installed on a front door during winter, illustrating its durability and resistance to various weather conditions (temperatures from -13°F to 158°F and IP63 rating).
6. Troubleshooting
| Problem | Possible Cause | Solution |
|---|---|---|
| Lock does not respond to fingerprint/passcode. | Low batteries, incorrect entry, or lock is in a temporary lockout state. | Replace batteries. Ensure correct fingerprint/passcode. Wait 5 minutes if locked out due to multiple incorrect attempts. |
| App cannot connect to the lock. | Bluetooth is off, lock is out of range, or Tuya Gateway is not connected/configured. | Ensure Bluetooth is enabled on your phone and you are within range. Verify Tuya Gateway connection and configuration for remote access. Metal doors can affect signal transmission. |
| Auto-lock feature not working. | Auto-lock setting is disabled or timer is set too long. | Check auto-lock settings in the mobile app and adjust the timer as needed. |
| Keypad buttons are unresponsive or difficult to press. | Possible manufacturing defect or environmental factor. | Ensure buttons are pressed firmly. If issue persists, contact customer support. |
| Voice control (Alexa/Google) not working. | Tuya Gateway not connected, incorrect voice command, or integration issue. | Verify Tuya Gateway is properly set up and connected to your Wi-Fi network. Ensure correct voice commands are used. Check app for integration status. |
7. Specifications
| Feature | Detail |
|---|---|
| Brand | hornbill |
| Model Name | A5 Smart Lock |
| Part Number | A5-SBFT-H |
| Lock Type | Biometric, Deadbolt, Keypad |
| Material | Aluminum |
| Color | Silver |
| Product Dimensions (L x W x H) | 2.45 x 0.8 x 3.9 inches |
| Item Weight | 1.76 pounds |
| Door Thickness Compatibility | 1.49 inches to 1.88 inches |
| Special Features | Anti-Peeping Password, Auto-Lock, Fingerprint, One-Touch Lock, Passcode Unlock |
| Connectivity Protocol | Bluetooth (Wi-Fi with Tuya Gateway) |
| Controller Type | Amazon Alexa, Android, Google Assistant, Hand Control, iOS |
| Power Source | Batteries (4x AA, not included) |
| Included Components | Front Lock, Back Lock, User Manual, Keys, Accessories |
8. Warranty and Support
hornbill provides the following support for your A5-SBFT-H Smart Lock:
- Warranty: 18 months warranty from the date of purchase.
- Returns/Exchanges: 30 days free return and exchange service.
- Technical Support: Lifetime technical support is available.
- Parts Replacement: If any parts are damaged during or after the warranty period, replacements will be provided.
For assistance, please refer to the contact information provided with your product packaging or visit the official hornbill support website.


