1. Introduction
This manual provides detailed instructions for the installation, operation, and maintenance of your VSYSTO F9 WiFi Motorcycle Dash Camera. Please read this manual thoroughly before using the product to ensure proper function and safety.
2. Product Overview
2.1 Package Contents
The VSYSTO F9 system includes the following components:
- Main Unit with bracket
- 2 Cameras (Front and Rear)
- Tire Pressure Sensors
- GPS Module
- Wired Controller
- Power Cable

Image 2.1: VSYSTO F9 Motorcycle Dash Camera components.

Image 2.2: Detailed view of included accessories.
2.2 Key Features
- Phone Assistant Mode: Pair with your phone and Bluetooth headset for music playback and call management.
- Integrated GPS Tracker: Records driving speed, longitude, latitude, altitude, and atmospheric pressure. View driving tracks via mobile app or computer.
- Tire Pressure Monitoring System (TPMS): Real-time tire pressure and temperature display with alarm function for abnormal readings.
- HD 1080P Recording: Front and rear 150° wide-angle cameras with SONYIMX307 sensor for clear video capture.
- WDR Technology: Wide Dynamic Range for enhanced video clarity in varying light conditions.
- 24-hour Parking Monitoring: Automatic recording upon detecting vibration when the motorcycle is off.
- Auxiliary Display Mode: Access various driving data displays via the remote control.
- Temperature Sensor: Displays ambient temperature.
- Overspeed Alarm: User-definable speed threshold with audible alerts.
- Type-C Interface: For convenient data transfer and connectivity.
- Built-in G-sensor: Automatically locks video files upon impact.
- Loop Recording: Continuously records by overwriting older files when storage is full.
- Custom License Plate Watermark: Option to display your license plate number on recorded video.
3. Setup and Installation
Proper installation is crucial for optimal performance. It is recommended to have this device installed by a qualified technician if you are unfamiliar with motorcycle electrical systems.
3.1 Wiring Connection
The power cable connects to the motorcycle's battery and ACC power source:
- The red wire connects to the positive terminal of the motorcycle battery.
- The black wire connects to the negative terminal of the motorcycle battery.
- The yellow wire connects to the ACC power of the motorcycle (a switched power source that turns on/off with the ignition).

Image 3.1: Power Cable Connection Methods.
3.2 Component Placement
- Main Unit: Mount the main unit securely in a location that allows for clear viewing of the screen and access to the Type-C port, typically on the handlebars or dashboard.
- Cameras: Install the front and rear cameras in positions that provide an unobstructed 150° wide-angle view of the road. Ensure they are securely fastened to minimize vibration.
- Wired Controller: Mount the wired controller on the handlebar for easy access during operation.
- GPS Module: Place the GPS module in a location with a clear view of the sky for optimal signal reception.
- Tire Pressure Sensors: Install the sensors on the tire valves according to the instructions provided with the sensors.
4. Operating Instructions
4.1 Basic Operation
The main unit features a 4-inch screen for display. Control is primarily managed through the wired handlebar remote control.
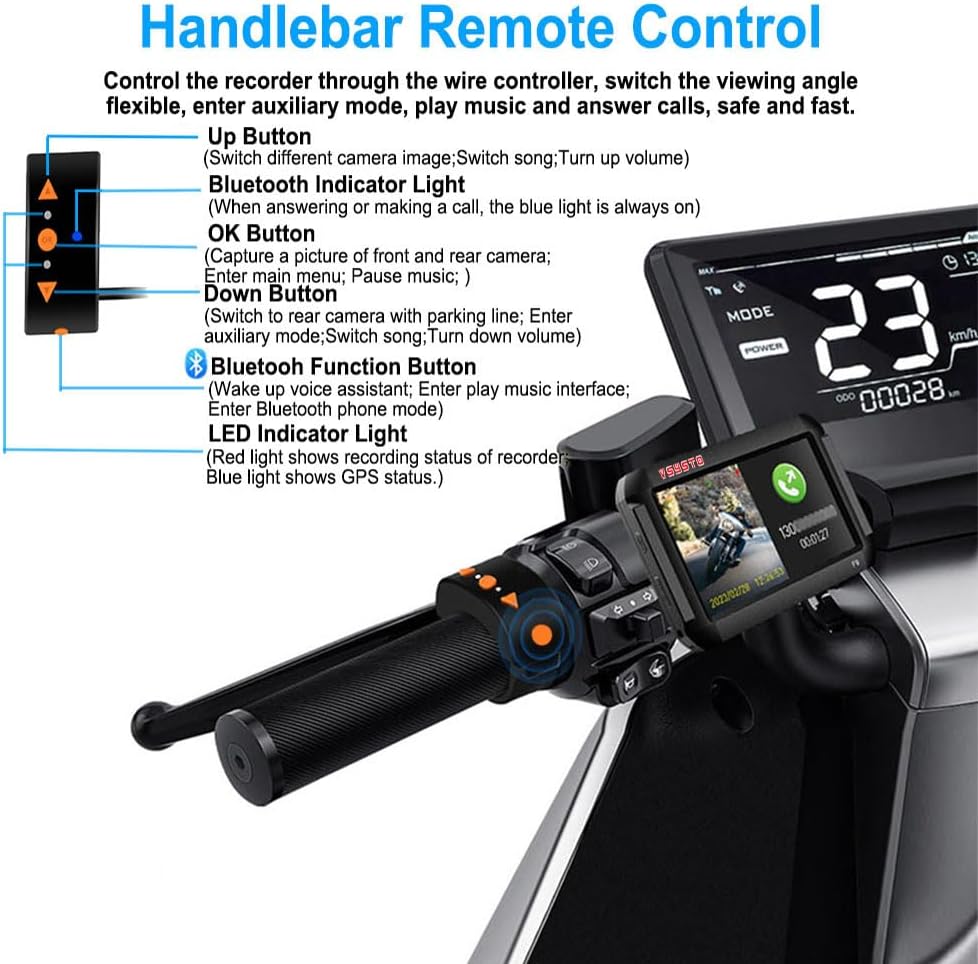
Image 4.1: Handlebar Remote Control Functions.
- Up Button: Switch between different camera images (front/rear), switch songs (in music mode), turn up volume.
- OK Button: Capture a picture of the front and rear cameras, enter the main menu, pause music.
- Down Button: Switch to the rear camera with parking line, enter auxiliary display mode, switch songs (in music mode), turn down volume.
- Bluetooth Function Button: Wake up voice assistant, enter play music interface, enter Bluetooth phone mode.
- LED Indicator Light (Red): Shows recording status.
- LED Indicator Light (Blue): Shows GPS status.
- Bluetooth Indicator Light: Blue light is always on when answering or making a call.
4.2 Phone Assistant Mode
Pair your dash camera with your smartphone and Bluetooth headset to enable communication and entertainment features without removing your hands from the handlebars.
- Making/Answering Calls: When a call is received, the recorder displays the calling number and name (English names only). Use the remote control to answer or decline.
- Music Playback: Play music from your mobile phone through your Bluetooth headphones. The recorder displays the music interface. Use the remote control to play/pause, adjust volume, and switch tracks.

Image 4.2: Phone Assistant Mode in action.
4.3 Parking Monitoring
This feature provides security when your motorcycle is parked. When the motorcycle power is off, the recorder will automatically activate and record for 30 seconds if it detects vibration. It then shuts off automatically. This function can be enabled or disabled as needed.
Note: This feature does not activate with USB power supply or electric vehicle installations. The battery voltage must not be lower than 11.8V for this function to operate.

Image 4.3: Parking Monitoring activation upon vibration.

Image 4.4: Parking Auxiliary Line display.
4.4 GPS Tracker & TPMS
The integrated GPS module provides precise positioning data, including driving speed, longitude, latitude, altitude, and atmospheric pressure. Recorded video tracks can be reviewed on the mobile application or a computer.
The Tire Pressure Monitoring System (TPMS) continuously checks tire pressure and temperature. An alarm will sound if tire pressure exceeds the set minimum or maximum thresholds.

Image 4.5: GPS Tracker functionality with map and data display.

Image 4.6: Tire Pressure Monitoring System (TPMS) display.
4.5 Auxiliary Display Mode
The remote control allows access to various auxiliary display interfaces, providing real-time information:
- Current vehicle speed.
- Tire pressure and temperature.
- Battery power display.
- Altitude, longitude, latitude, and atmospheric pressure.
- Short-term memory driving speed and ODO.
- Time and date.
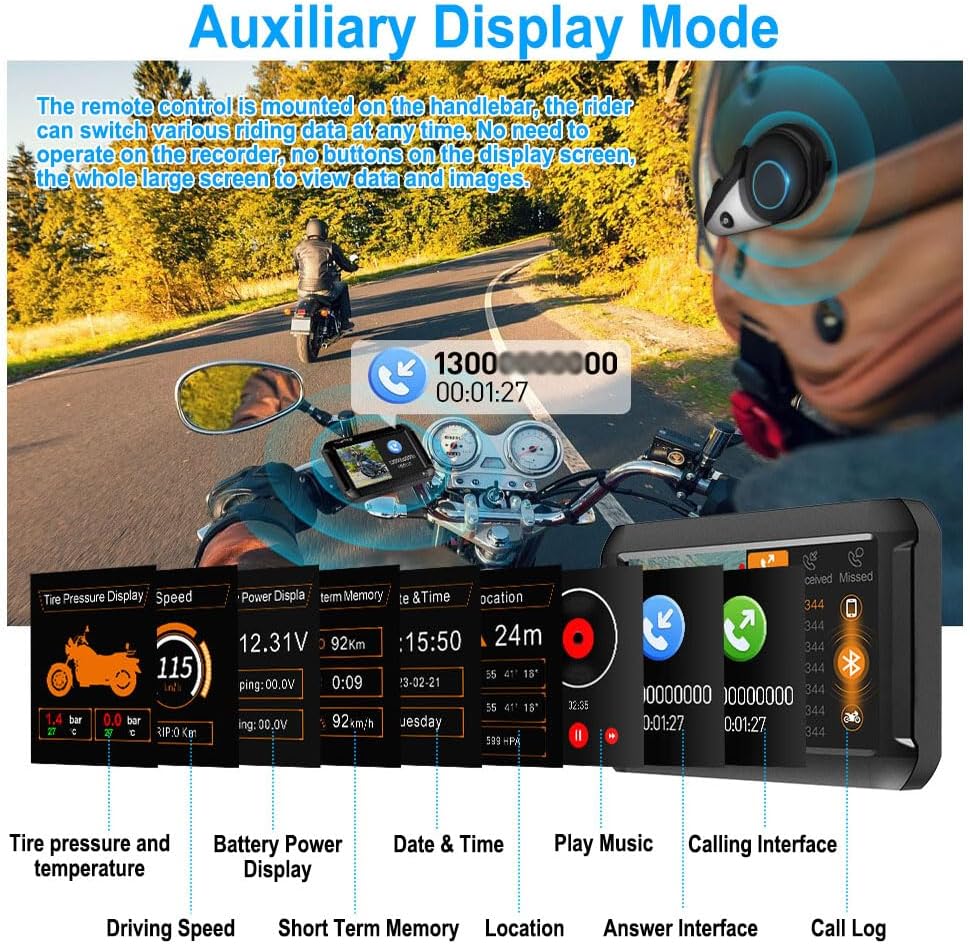
Image 4.7: Auxiliary Display Mode interfaces.

Image 4.8: Full Screen and Split Screen Display options.
4.6 Temperature Sensor and Overspeed Alarm
The built-in temperature sensor displays the surrounding temperature, assisting the rider in making informed decisions about clothing. The overspeed alarm can be configured to alert the rider when a preset speed limit is exceeded.

Image 4.9: Temperature Sensor display.

Image 4.10: Overspeed Alarm notification.
4.7 WiFi Connectivity and App
The built-in WiFi module allows connection to a dedicated mobile application. This enables real-time preview of recordings, downloading, playback, and viewing of driving tracks directly on your smartphone.

Image 4.11: WiFi connectivity and mobile app interface.
5. Maintenance
- Regular Cleaning: Keep camera lenses and the main unit screen clean from dust and debris using a soft, dry cloth. Avoid abrasive materials.
- Firmware Updates: Check the VSYSTO official website or app for any available firmware updates to ensure optimal performance and access to new features.
- SD Card Management: Periodically format the microSD card to maintain recording efficiency and prevent data corruption. Use a high-quality microSD card (up to 256GB recommended).
- Cable Inspection: Regularly inspect all cables for wear, damage, or loose connections.
- Water Resistance: The dash cam is designed with water resistance. However, avoid direct high-pressure water jets on the unit and cameras during cleaning.

Image 5.1: Water resistance feature.
6. Troubleshooting
- Device Not Powering On: Check all power connections (red, black, yellow wires) to ensure they are secure and correctly wired to the battery and ACC power. Verify battery voltage is sufficient.
- No Recording: Ensure a microSD card is inserted and properly formatted. Check if loop recording is enabled.
- Poor Video Quality: Clean camera lenses. Ensure cameras are securely mounted to minimize vibration. Verify WDR technology is active for challenging light conditions.
- GPS Signal Loss: Ensure the GPS module has a clear view of the sky. Avoid mounting it under metal objects.
- TPMS Not Displaying Data: Check if tire pressure sensors are correctly installed and paired. Ensure the main unit is receiving signals.
- WiFi Connection Issues: Restart the dash camera and your smartphone. Ensure you are within range of the dash camera's WiFi signal.
- Remote Control Unresponsive: Check the wired connection of the remote control to the main unit.
7. Specifications
| Feature | Specification |
|---|---|
| Model Name | RM |
| Product Dimensions | 4.4 x 0.7 x 2.95 inches (Main Unit) |
| Item Weight | 3.19 pounds |
| Video Capture Resolution | 1080p (1920x1080 pixels) |
| Field Of View | 150 Degrees (Front and Rear Cameras) |
| Connectivity Technology | Wi-Fi, GPS |
| Display Features | 4-inch Screen, Wireless |
| Special Features | Auxiliary Display Mode, Type-C Interface, G-Sensor, Loop Recording, Built-in WiFi Module, HD 1080P 150° Wide Angle Front and Rear Camera & WDR, Parking Monitoring, Phone Assistant Mode, Tire Pressure Monitoring Sensors, Temperature Sensor, GPS |
| Batteries | 1 Lithium Ion battery required (included) |
| Mounting Type | Dashboard Mount |

Image 7.1: Product Dimensions.

Image 7.2: HD 1080P and WDR Technology.

Image 7.3: 150° Wide Angle Lens and SONYIMX307 Sensor.

Image 7.4: Built-in G-sensor functionality.

Image 7.5: Loop Recording feature.

Image 7.6: Custom License Plate Watermark.

Image 7.7: Type-C Interface for connectivity.
8. Warranty and Support
For warranty information and technical support, please refer to the official VSYSTO website or contact their customer service. A digital version of this user manual is available for download:
Protection plans are available for purchase to extend coverage:
- 2-Year Protection Plan
- 3-Year Protection Plan
- Complete Protect (monthly plan covering eligible past and future purchases)


