1. Safety Information
Read all instructions carefully before beginning installation. If you are unfamiliar with electrical wiring, consult a qualified electrician. This product is ETL Listed, ensuring compliance with safety standards.
- Ensure the power is turned off at the circuit breaker before installation or maintenance.
- All wiring must be in accordance with national and local electrical codes.
- The mounting structure must be capable of supporting the weight of the fan (approximately 7.83 kg).
- Do not operate the fan with damaged blades.
- Avoid placing objects in the path of the fan blades.
2. Package Contents and Components
Verify that all components are present before proceeding with installation.

Figure 2.1: Exploded view showing key components like the fast installation terminal, sloped ceiling mounting bracket, acrylic lampshade, and integrated LED light module.
Typical Components:
- Motor Housing Assembly
- Fan Blades (5 reversible blades)
- Downrod and Canopy
- Mounting Bracket
- Integrated LED Light Kit
- Acrylic Lampshade
- Remote Control and Receiver
- Hardware Pack (screws, washers, wire nuts)
3. Installation and Setup
3.1 Mounting Options
This fan supports both standard downrod mounting and angled (sloped) ceiling mounting up to 15 degrees.
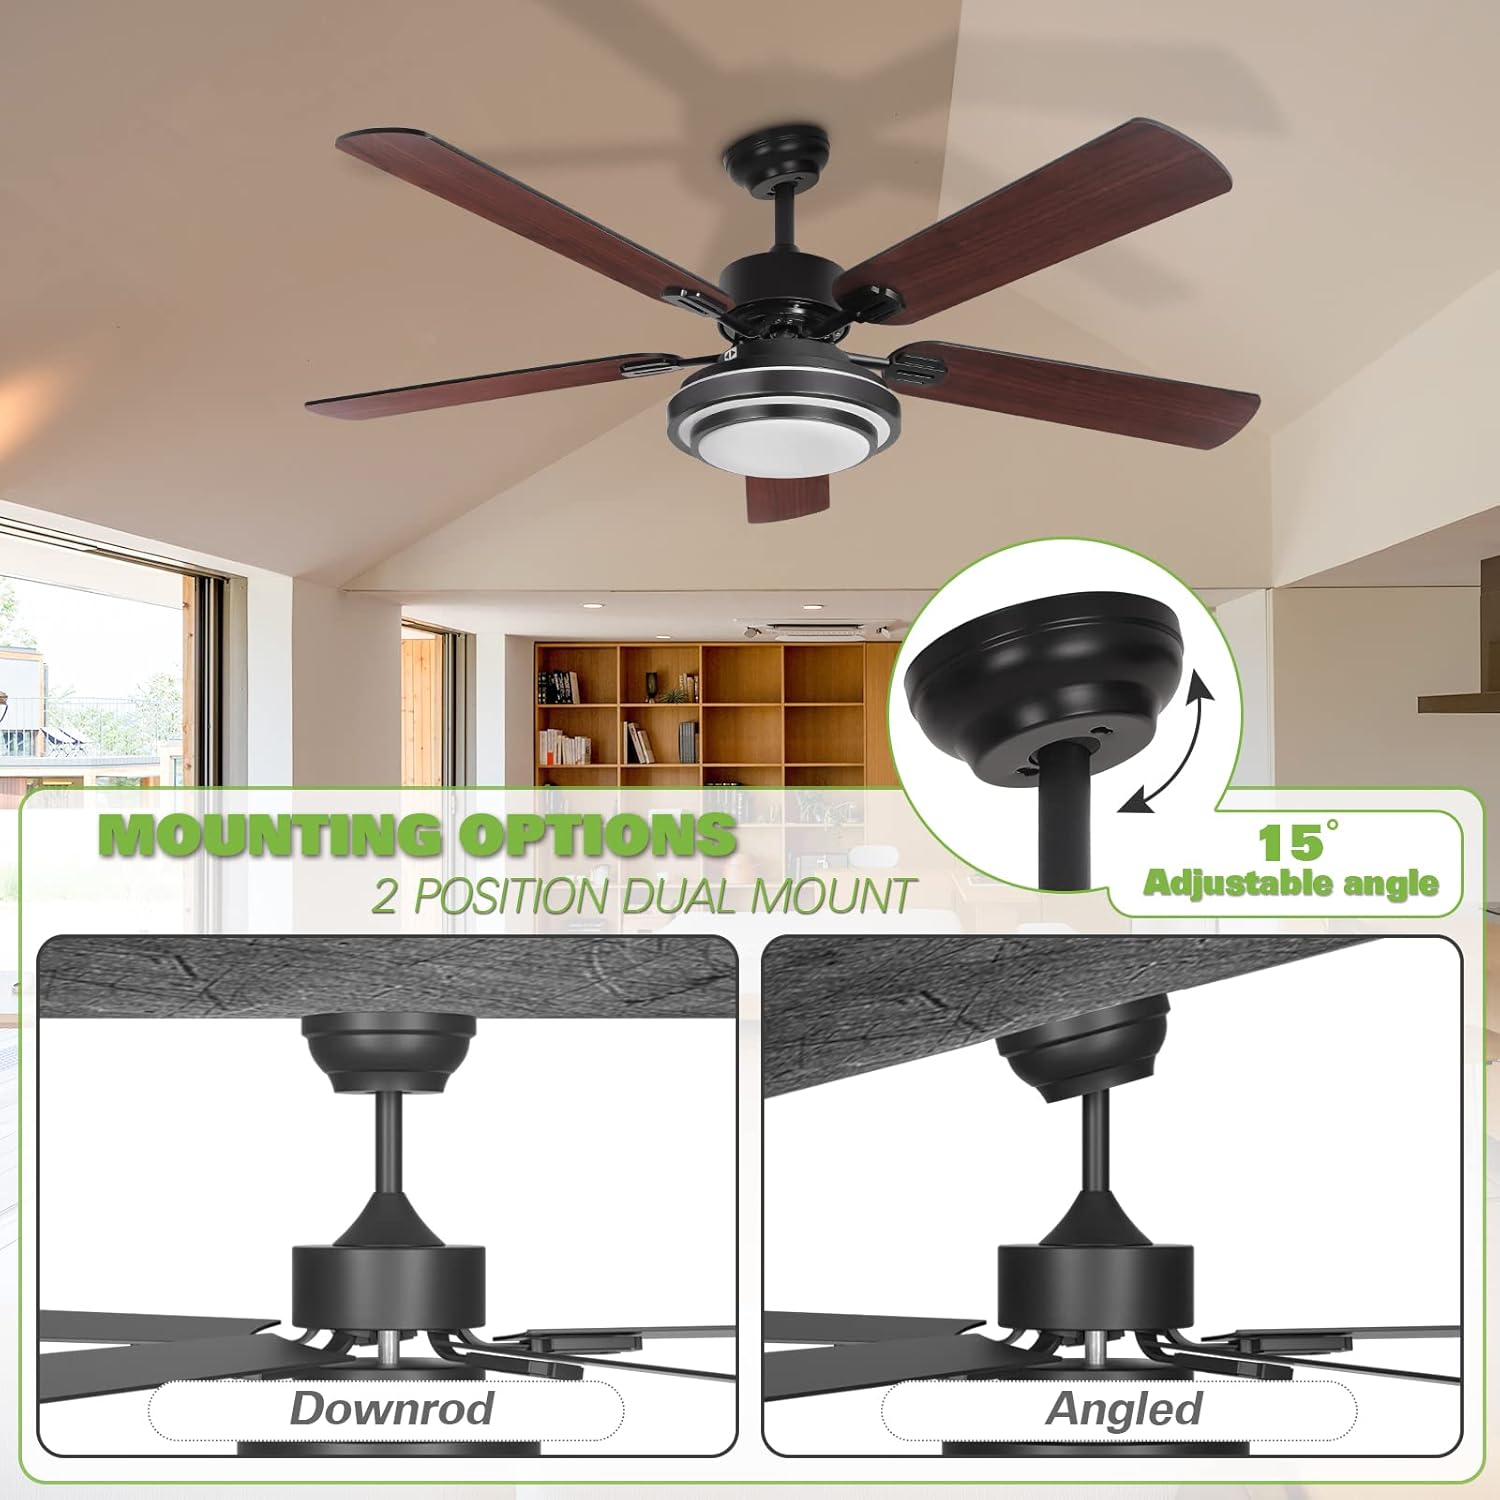
Figure 3.1: Illustration of downrod and angled mounting configurations. The fan can accommodate sloped ceilings up to 15 degrees.
- Secure Mounting Bracket: Attach the mounting bracket to the ceiling junction box. Ensure the bracket is securely fastened and can support the fan's weight.
- Assemble Downrod: Insert the downrod through the canopy and connect it to the motor housing.
- Hang Fan: Carefully lift the fan assembly and hang it from the mounting bracket.
3.2 Electrical Wiring
Connect the fan's electrical wires to the household wiring using the provided fast installation terminals and wire nuts. Ensure all connections are secure.
- Connect the ground wire (green or bare copper) from the fan to the ground wire from the outlet box.
- Connect the neutral wire (white) from the fan to the neutral wire from the outlet box.
- Connect the live wire (black) from the fan to the live wire from the outlet box.
- Install the remote receiver into the canopy.
3.3 Blade Installation
The fan includes 5 reversible blades, with one side in dark wood color and the other in black. Choose your preferred finish before installation.

Figure 3.2: Reversible fan blades, offering a choice between dark wood and black finishes.
- Attach each blade to the blade arm using the provided screws.
- Secure the blade arms to the motor housing.
3.4 Light Kit Assembly
Connect the integrated LED light kit to the fan's wiring and secure the acrylic lampshade.
- Connect the LED light kit wires to the corresponding wires from the fan.
- Mount the LED light kit to the bottom of the fan motor housing.
- Attach the acrylic lampshade by twisting or securing it into place.
4. Operating Instructions
The Hykolity ceiling fan is operated using the included remote control.
4.1 Remote Control Functions

Figure 4.1: Remote control functionality for light dimming and color temperature adjustment (3000K, 4000K, 5000K).
- Fan On/Off: Press the fan button to turn the fan on or off.
- Fan Speed: Use the speed buttons (1, 2, 3) to adjust the fan's rotation speed.
- Light On/Off: Press the light button to turn the integrated LED light on or off.
- Light Dimming: Use the dimming buttons (+/-) to adjust the brightness of the LED light.
- Color Temperature Adjustment: The LED light offers three color temperatures: Warm White (3000K), Natural Light (4000K), and Daylight (5000K). Cycle through these options using the dedicated button on the remote or by quickly toggling the light switch.
4.2 Reversible Motor Function
The fan features a reversible motor for year-round comfort. A slide switch on the fan's motor housing controls the direction of airflow.

Figure 4.2: Reversible motor switch for seasonal airflow adjustment.
- Summer Mode (Left Position): Set the switch to the LEFT position for downward airflow, creating a cooling effect.
- Winter Mode (Right Position): Set the switch to the RIGHT position for upward airflow, circulating warm air trapped near the ceiling.
- Important: Ensure the fan is OFF before changing the direction of the motor. The fan will not operate if the reverse switch is in the middle position.
5. Maintenance
Regular maintenance ensures optimal performance and longevity of your ceiling fan.
- Cleaning: Periodically clean the fan blades and motor housing with a soft, damp cloth. Do not use abrasive cleaners or solvents.
- Blade Balance: If the fan wobbles, check that all blade screws are tight and that the blades are balanced. Balancing kits are available if needed.
- Electrical Connections: Annually inspect all electrical connections for tightness. Ensure power is off at the circuit breaker before inspection.
- Light Kit: The integrated LED light is designed for long life and typically does not require replacement. If issues occur, contact support.
6. Troubleshooting
Refer to the following table for common issues and their solutions.
| Problem | Possible Cause | Solution |
|---|---|---|
| Fan does not start | No power to the fan; Loose wire connections; Remote control battery low; Reverse switch in middle position. | Check circuit breaker; Verify all wire connections are secure; Replace remote battery; Ensure reverse switch is fully engaged left or right. |
| Light does not work | Loose wire connection to light kit; LED driver failure; Remote control battery low. | Check light kit wiring; Contact support for LED driver replacement; Replace remote battery. |
| Fan wobbles | Loose blade screws; Unbalanced blades; Loose mounting bracket. | Tighten all blade screws; Use a blade balancing kit; Ensure mounting bracket is securely fastened. |
| Remote control not working | Battery depleted; Remote not paired with receiver. | Replace battery; Refer to remote pairing instructions (usually involves pressing a button within a few seconds of turning on power). |
| Excessive noise | Loose screws; Motor housing rubbing; Blades hitting an obstruction. | Check and tighten all screws; Ensure no parts are rubbing; Clear any obstructions from blade path. |
7. Specifications
Detailed technical specifications for the Hykolity 52 Inch Ceiling Fan.

Figure 7.1: Key dimensions of the 52-inch ceiling fan.
| Feature | Detail |
|---|---|
| Brand | Hykolity |
| Model | 52 Inch Ceiling Fan |
| Diameter | 52 inches |
| Height (Ceiling to Fan Bottom) | 15.7 inches (optional) |
| Light Source | Integrated 24-watt LED |
| Color Temperature | 3000K (Warm White), 4000K (Natural Light), 5000K (Daylight) |
| Motor Noise Level | Less than 35 dB |
| Number of Blades | 5 (Reversible: Dark Wood / Black) |
| Mounting Type | Dual-Mount (Downrod, Angled up to 15°) |
| Control Type | Remote Control |
| Power/Wattage | 24 watts (for light) |
| Item Weight | 7.83 kg |
| Material | Polycarbonate (blades), Metal (housing) |
| ETL Listed | Yes |
8. Warranty and Support
Hykolity provides the following warranty for this product:
- Motor: Lifetime warranty.
- Light Accessories: 3 years warranty.
For any product problems or warranty claims, please contact the Hykolity after-sales support team. Keep your purchase receipt as proof of purchase.
Contact information is typically provided on the product packaging or official website.


