1. Introduction
This manual provides detailed instructions for the installation, operation, and maintenance of your ieGeek Floodlight Camera, Model ZY-E1. This device combines a high-resolution security camera with powerful floodlights to enhance outdoor surveillance and security around your property.
The ieGeek Floodlight Camera features 2K video resolution, 2600 lumens of illumination, advanced motion detection, a 110dB siren, two-way audio communication, and compatibility with Alexa for integrated smart home security. It is designed for wired installation and is rated IP65 for outdoor use.

Image 1.1: The ieGeek Floodlight Camera ZY-E1, a combination of a security camera and two adjustable floodlights.
2. Product Components
Before installation, please ensure all components are present in the package:
- ieGeek Floodlight Camera Unit
- Mounting Bracket
- Mounting Screws and Wall Anchors
- Wire Nuts
- User Manual (this document)

Image 2.1: Contents of the ieGeek Floodlight Camera package, including the camera unit, mounting hardware, and user manual.
3. Installation and Setup
The ieGeek Floodlight Camera requires a wired installation to an existing junction box. Professional installation is recommended if you are unfamiliar with electrical wiring.
3.1. Pre-installation Checklist
- Ensure power to the installation area is turned OFF at the circuit breaker.
- Verify you have the necessary tools (screwdriver, drill, ladder, wire strippers).
- Confirm your Wi-Fi network is 2.4GHz. The camera does not support 5GHz Wi-Fi.
3.2. Mounting the Camera
- Turn off power at the circuit breaker.
- Remove your existing floodlight or cover plate from the junction box.
- Attach the mounting bracket to the junction box using the provided screws.
- Connect the camera's wires to your home's wiring (Live to Live, Neutral to Neutral, Ground to Ground) using the wire nuts.
- Secure the camera unit to the mounting bracket.
- Adjust the angle of the floodlights and camera as desired. The camera features a 360° rotatable base for flexible positioning.
- Restore power at the circuit breaker.

Image 3.1: The ieGeek Floodlight Camera installed on an exterior wall, illuminating a driveway.
3.3. App Installation and Wi-Fi Connection
- Download the "ieGeek Cam" or "CloudEdge" app from the App Store (iOS) or Google Play Store (Android).
- Create an account or log in.
- Follow the in-app instructions to add your new ieGeek Floodlight Camera. This typically involves scanning a QR code on the camera or packaging.
- Ensure your smartphone is connected to a 2.4GHz Wi-Fi network during the setup process.

Image 3.2: A smartphone screen showing the ieGeek Cam app and options to download from Google Play or the App Store.
4. Operating Instructions
The ieGeek Floodlight Camera offers various features accessible through the mobile application to enhance your home security.
4.1. Live View and Recording
- Open the ieGeek Cam or CloudEdge app to access the live feed from your camera.
- You can manually record video or capture screenshots directly from the live view.
- The camera supports 2K FHD video resolution, providing clear and detailed images.
4.2. Motion Detection and Alerts
The camera features a 150° PIR motion sensor to detect movement. You can customize its behavior via the app:
- Sensitivity Adjustment: Adjust the PIR detection sensitivity (levels 1-10) to minimize false alarms.
- Customizable Detection Zones: Define specific areas within the camera's field of view where motion detection should be active. This helps focus on critical areas and ignore irrelevant movements.
- Instant Notifications: Receive real-time alerts on your smartphone when motion is detected.

Image 4.1: Illustration of the camera's 150-degree PIR motion sensor range and 130-degree viewing angle.
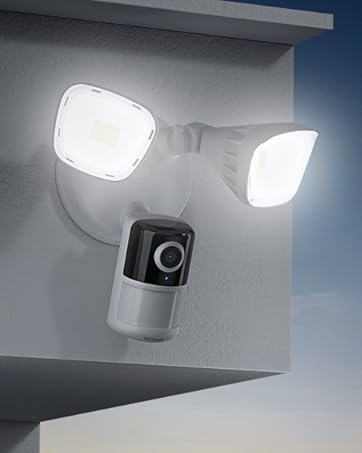
Image 4.2: A smartphone displaying the app interface for setting customized security zones within the camera's view.
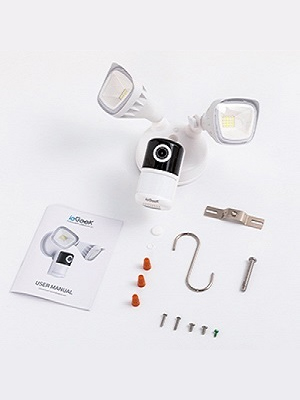
Image 4.3: A smartphone screen showing a slider for adjusting motion detection sensitivity within the app.
4.3. Night Vision
The camera provides clear surveillance even in low-light conditions:
- Color Night Vision: Equipped with 4 IR lights, the camera intelligently switches to color night vision mode, providing full-color images up to 15 meters (49 feet) in the dark.
- Infrared Night Vision: In extremely dark conditions, the camera can utilize infrared for black and white night vision.

Image 4.4: A comparison showing the clarity and detail of color night vision versus traditional infrared night vision in a parking lot scene.
4.4. Floodlight Control
The integrated 2600 lumens floodlights can be controlled and customized:
- Motion-Activated: The lights can be set to turn on automatically when motion is detected.
- Adjustable Brightness: Control the brightness of the floodlights via the app.
- Custom Lighting Plans: Schedule specific times for the lights to activate or remain off.

Image 4.5: A smartphone screen displaying an interface to adjust the brightness level of the floodlight.

Image 4.6: An illustration of the app's interface for setting a custom security lighting plan, including scheduled on/off times.
4.5. Siren Activation
The camera includes a 110dB siren to deter intruders. It can be activated manually through the app when an event is detected.

Image 4.7: A person reacting to the bright floodlight and audible alarm of the security camera.
4.6. Two-Way Audio
Communicate with visitors or deter unwanted guests using the built-in microphone and speaker. This feature allows for real-time conversation through the app.

Image 4.8: A person speaking into their phone, with a speech bubble indicating communication through the camera, demonstrating the two-way audio feature.
5. Video Storage Options
Your ieGeek Floodlight Camera offers flexible video storage solutions:
- Free Cloud Storage: The camera provides a free lifetime cloud storage service for 6-second event recordings with 7 days of loop coverage.
- Micro SD Card Storage: Supports a Micro SD card (up to 128GB) for 24/7 continuous recording or event-triggered recording. The card slot is typically located on the camera unit.

Image 5.1: Visual representation of the available storage options: cloud storage and local Micro SD card storage.
6. Alexa Integration
The ieGeek Floodlight Camera is compatible with Amazon Alexa, allowing for voice control and integration into your smart home ecosystem.
- Voice Commands: Use voice commands to view your camera feed on compatible Alexa-enabled devices (e.g., "Alexa, show me the front door").
- Smart Home Routines: Integrate the camera into Alexa routines for automated actions.

Image 6.1: An Alexa-enabled smart display showing the live feed from the ieGeek Floodlight Camera, demonstrating Alexa compatibility.
7. Maintenance
To ensure optimal performance and longevity of your ieGeek Floodlight Camera, follow these maintenance guidelines:
- Cleaning: Periodically wipe the camera lens and floodlight covers with a soft, damp cloth to remove dust, dirt, or water spots. Avoid abrasive cleaners.
- Weather Resistance: The camera has an IP65 waterproof rating, meaning it is protected against dust and low-pressure water jets. While designed for outdoor use, avoid directing high-pressure water directly at the unit.
- Firmware Updates: Regularly check the app for available firmware updates to ensure your camera has the latest features and security enhancements.

Image 7.1: The ieGeek Floodlight Camera being subjected to water spray, illustrating its IP65 waterproof design.
8. Troubleshooting
If you encounter issues with your ieGeek Floodlight Camera, refer to the following common solutions:
- Camera Offline:
- Check your Wi-Fi connection and ensure it is 2.4GHz.
- Restart your Wi-Fi router.
- Ensure the camera is receiving power.
- Relocate the camera closer to your Wi-Fi router if the signal is weak.
- Motion Detection Not Working:
- Verify motion detection is enabled in the app settings.
- Adjust the detection sensitivity.
- Check the customized detection zones to ensure the area of interest is covered.
- Poor Video Quality:
- Ensure the camera lens is clean.
- Check your internet upload speed.
- Adjust video quality settings in the app if available.
- Siren Not Activating:
- Ensure the siren feature is enabled and manually triggered in the app.
For further assistance, please contact ieGeek customer support.
9. Specifications
| Feature | Detail |
|---|---|
| Model Name | ZY-E1 |
| Video Capture Resolution | 3 MP (2K FHD) |
| Field Of View | 130 Degrees |
| Night Vision Range | 15 Meters (49 feet) |
| Floodlight Brightness | 2600 Lumens |
| Siren Volume | 110dB |
| Connectivity Technology | Wired installation, 2.4Ghz Wi-Fi |
| Controller Type | CloudEdge or ieGeek Cam Phone APP, works with Alexa |
| Storage Options | Free Cloud (6s/7 days loop), Micro SD Card (Max. 128GB) |
| Water Resistance Level | IP65 Waterproof |
| Power Source | Corded Electric (AC 100V~240V) |
| Item Dimensions (L x W x H) | 10.04 x 8.43 x 5.98 inches |
| Item Weight | 2.88 pounds |
| UPC | 734931269914 |
10. Warranty and Support
ieGeek is committed to providing reliable products and excellent customer service.
- Warranty: Your ieGeek Floodlight Camera comes with a 2-year quality guarantee from the date of purchase.
- Returns: A 30-day free returns policy is applicable for eligible purchases.
- Customer Support: For any questions, technical assistance, or warranty claims, please contact our professional after-sales team.
After-Sales Email: service@iegeek.com

Image 10.1: Summary of ieGeek's after-sales support, including 24/7 team, 30-day returns, and 2-year quality guarantee.


