Introduction
This manual provides detailed instructions for the installation, operation, and maintenance of your VIMAR 02971.B Smart Thermostat. Please read this manual thoroughly before using the device to ensure proper function and safety.
Product Overview
The VIMAR 02971.B is a smart thermostat designed for ambient temperature control in both heating and air conditioning systems. It features a rotary wheel for intuitive control, supports 2-pipe and 4-pipe installations, and includes fan-coil control with 3 speeds and proportional settings. This device offers advanced temperature control capabilities and can be integrated into a home automation system.
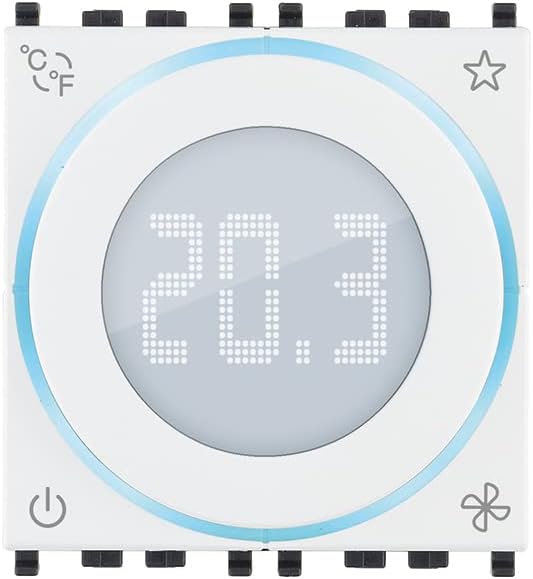
Figure 1: Front view of the VIMAR 02971.B Smart Thermostat. The central display shows the current temperature, and the rotary wheel allows for adjustments. Icons indicate various functions.
Specifications
| Feature | Detail |
|---|---|
| Model Number | 02971.B |
| Brand | VIMAR |
| Color | White |
| Connectivity | Wired |
| Special Features | Advanced Temperature Control |
| Controller Type | Mechanical Knob, Button |
| Specific Uses | Heating, Air Conditioning |
| Temperature Control Type | Manual |
| Power Source | Battery Powered |
| Voltage | 230 Volts |
| Compatibility | Requires Eikon, Arké, Plana plates and dedicated support 16723 for Idea installation. |
| Temperature Control Class (ON/OFF) | Class I (1% contribution) |
| Temperature Control Class (PID) | Class IV (2% contribution) |
| Modulating Thermostat Class | Class V (3% contribution) with analog actuator 01466.1 |
| Sensor Input | 1 input for electronic temperature sensor (20432, 19432, or 14432) or wired temperature sensor (02965.1) |
| Backlighting | White LED |
| Modules | 2 modules |
Setup and Installation
Safety Precautions
- Ensure power is disconnected before beginning any installation or wiring.
- Installation should be performed by a qualified electrician in accordance with local electrical codes.
- Do not expose the device to moisture or extreme temperatures.
Mounting
- The thermostat is designed for installation with dedicated support 16723 (for Idea series) and requires Eikon, Arké, or Plana plates for completion.
- Choose a central location on an interior wall, away from direct sunlight, drafts, and heat sources, to ensure accurate temperature readings.
- Mount the dedicated support (e.g., 16723) securely to the wall.
Wiring
The VIMAR 02971.B is a wired thermostat. Refer to the wiring diagram provided with your HVAC system and the specific instructions for the 02971.B model. Ensure all connections are secure and correctly terminated.
- Connect the power supply (230 Volts).
- Connect to the HVAC system for heating and cooling control.
- If using an external temperature sensor (e.g., 20432, 19432, 14432, or 02965.1), connect it to the designated input.
- For modulating control (Class V), interface with analog actuator 01466.1.
Operation
Powering On/Off
Press the Power icon (bottom-left) to turn the thermostat on or off. The display will illuminate when the device is active.
Figure 2: Location of the Power icon on the thermostat.
Adjusting Temperature
Rotate the central wheel to adjust the desired temperature. The digital display will show the set temperature as you turn the wheel.
Changing Temperature Units (°C/°F)
Press the °C/°F icon (top-left) to toggle between Celsius and Fahrenheit temperature display units.
Figure 3: Location of the °C/°F unit selection icon.
Fan Control
The thermostat supports 3-speed fan-coil control. Press the Fan icon (bottom-right) to cycle through fan speeds or modes (e.g., Auto, Low, Medium, High). Refer to your system's specific configuration for available fan modes.
Figure 4: Location of the Fan control icon.
Favorite/Program Mode
The Star icon (top-right) may be used to access favorite settings or activate a pre-programmed mode. Consult your home automation system's documentation for specific functionality related to this icon.
Figure 5: Location of the Star icon, typically for favorite or program modes.
Maintenance
Cleaning
- Wipe the thermostat's surface with a soft, dry cloth.
- Do not use abrasive cleaners, solvents, or chemical sprays, as these can damage the device.
Battery Replacement
As the device is battery-powered, replace batteries when the low battery indicator appears on the display (if applicable) or when the device ceases to function. Refer to the installation guide for specific battery type and replacement procedure.
Troubleshooting
| Problem | Possible Cause | Solution |
|---|---|---|
| Thermostat display is blank. | No power or dead batteries. | Check power supply (230V). Replace batteries if applicable. Ensure the device is switched on. |
| HVAC system not responding. | Incorrect wiring, system fault, or thermostat not in correct mode. | Verify wiring connections. Check HVAC system for error codes. Ensure thermostat is set to heating or cooling mode and desired temperature is appropriate. |
| Inaccurate temperature reading. | Thermostat location, external sensor issue. | Ensure thermostat is not exposed to direct sunlight, drafts, or heat sources. Check external sensor connection if used. |
| Fan not operating correctly. | Incorrect fan setting or wiring issue. | Cycle through fan modes using the fan icon. Verify fan-coil wiring. |
Warranty and Support
For warranty information and technical support, please refer to the documentation provided with your purchase or visit the official VIMAR website. Keep your proof of purchase for warranty claims.
Spare parts availability information is not available at this time. Software updates are not guaranteed.


