1. Introduction
This manual provides detailed instructions for the installation, operation, and maintenance of your Techage Full HD 1080p PoE CCTV Security Camera System. This system is designed for reliable surveillance with high-definition video capture, suitable for both indoor and outdoor environments.
2. Package Contents
Please verify that all items listed below are included in your package. If any items are missing or damaged, please contact customer support.
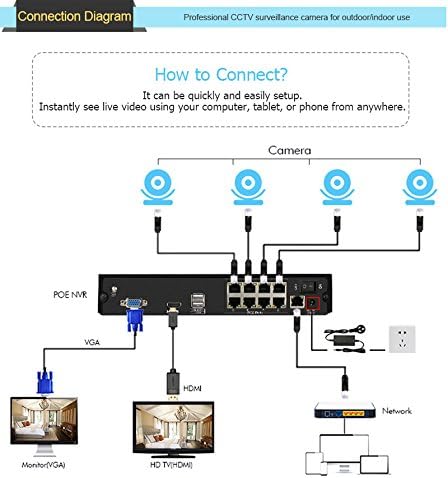
Image: Overview of the package contents, including the NVR, cameras, cables, power adapter, mouse, and user guide.
- 1 x 4-Channel 1080p NVR (Network Video Recorder) with built-in 4 PoE ports
- 4 x 2.0 Megapixel 1080p Bullet IP Cameras (Outdoor/Indoor Waterproof)
- 4 x 20-meter CAT5 Network Cables (Plug and Play for camera video)
- 1 x Power Supply for NVR
- 1 x USB Mouse for NVR operation
- 1 x User Manual
- Note: Hard drive for NVR storage is not included.
3. Product Features
NVR (Network Video Recorder) Features:
- High Resolution: Supports 1080p (1920x1080) video recording.
- PoE (Power over Ethernet): Built-in 4 PoE ports for simplified camera connection and power.
- Multi-channel Recording: Simultaneous real-time recording across multiple channels.
- Recording Modes: Supports manual, alarm, dynamic detection (motion detection), and timed recording.
- Storage: Supports 1 SATA hard drive (up to 6TB per disk, hard drive not included).
- Output: VGA and HDMI full HD output.
- User Interface: True color 16-bit graphical menu interface with mouse operation.
- Network Functions: Cloud technology support, network penetration, alarm information push to mobile devices.
IP Camera Features:

Image: A close-up of a Techage IP camera, highlighting its IP66 waterproof rating and resistance to rain and snow.
- Resolution: 2.0 Megapixel (1080p) with 2400TVL.
- Sensor: 1/6.9 inch F02 CMOS sensor.
- Night Vision: Clear night vision with IR-cut filter for continuous clarity in low light.
- Weatherproof: IP66 rated for outdoor and indoor use, resistant to water and snow.
- ONVIF Support: Compatible with ONVIF standards for integration with third-party NVRs.
- Mobile Surveillance: Supports multiple mobile surveillance platforms (iOS, Android).
4. Setup Guide
4.1 System Connection Diagram
Follow the diagram below to connect your NVR and cameras. The PoE ports simplify wiring by providing both power and video transmission through a single Ethernet cable.

Image: A visual guide showing how to connect the PoE NVR to cameras, a monitor (via VGA or HDMI), and a network router.
- Connect the IP cameras to the PoE ports on the back of the NVR using the provided network cables.
- Connect the NVR to a monitor or TV using either the VGA or HDMI port.
- Connect the NVR to your network router using an Ethernet cable for remote viewing capabilities.
- Connect the power adapter to the NVR and plug it into a power outlet.
- Connect the USB mouse to the NVR's USB port for navigation.
4.2 Camera Installation
The cameras are designed for both indoor and outdoor use. Choose a location that provides optimal viewing angles and is within the range of the provided network cables. Ensure the cameras are securely mounted.
4.3 Mobile Phone Viewing Setup
To view your security feed remotely on your smartphone, follow these steps:
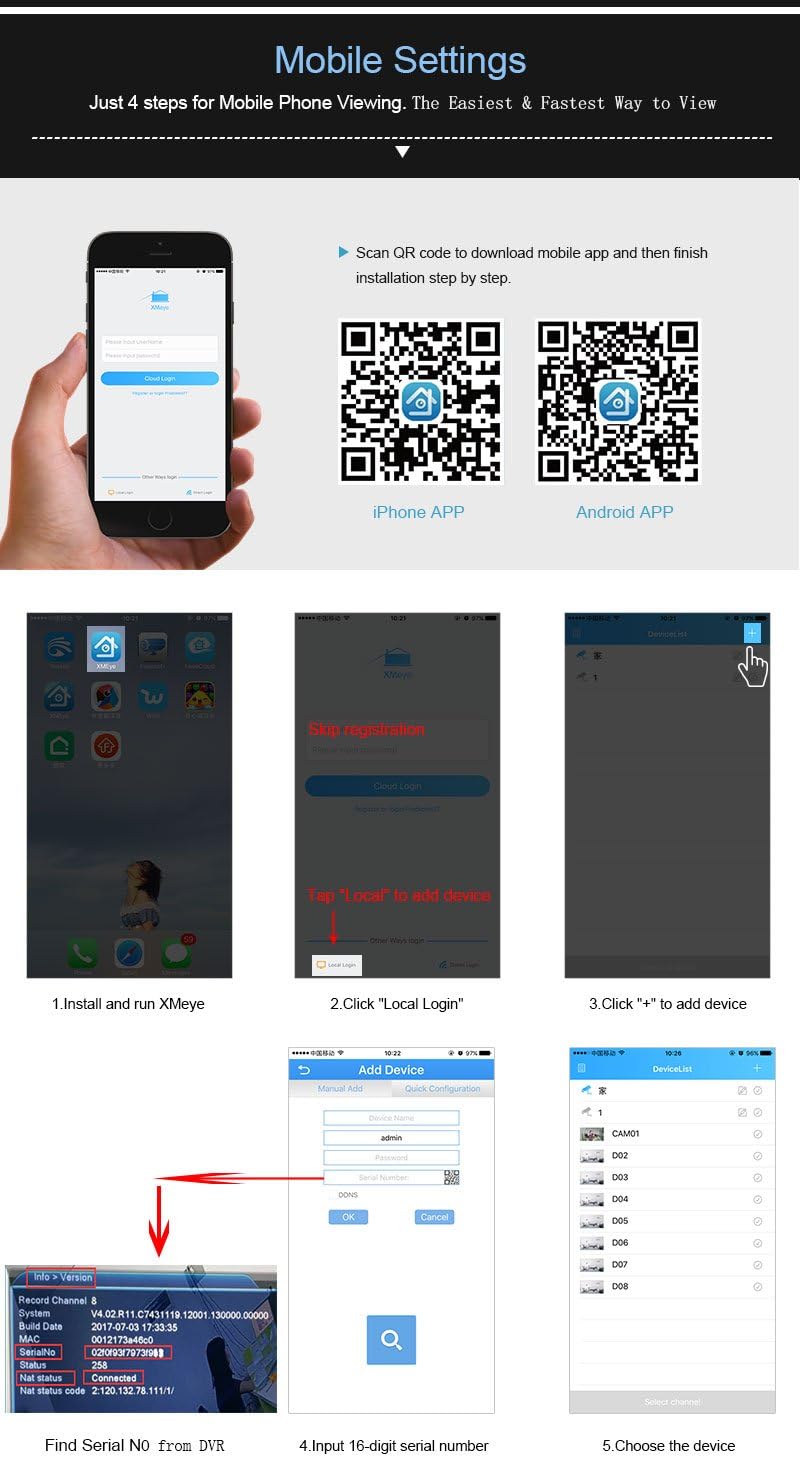
Image: A step-by-step visual guide for setting up the xmeye mobile application, including QR codes for iOS and Android app downloads, and instructions for adding devices.
- Download the App: Scan the QR code below or visit the respective app store to download the xmeye mobile application.
iOS App Store Link
Android APK Download Link - Install and Run: Install the app on your smartphone and launch it.
- Local Login: Tap "Local" to proceed without registration.
- Add Device: Tap the "+" icon to add a new device.
- Find Serial Number: Locate the 16-digit serial number (SN) from your NVR's system information.
- Input SN: Enter the 16-digit serial number into the app.
- Select Device: Choose the device from the list to start viewing.
5. Operating Instructions
5.1 Recording Modes
The NVR supports various recording modes:
- Manual Recording: Start and stop recording manually.
- Alarm Recording: Recording triggered by external alarm inputs (if connected).
- Motion Detection Recording: Recording starts automatically when motion is detected in the camera's view.
- Timed Recording: Schedule specific times for continuous recording.
5.2 Remote Viewing and Notifications
Once the mobile app is set up, you can view live feeds and recorded footage from anywhere with an internet connection. The system also supports push notifications for events like motion detection.
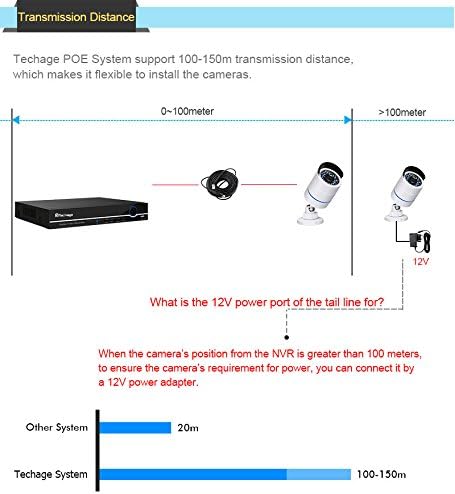
Image: Illustration of the motion detection feature, showing how the system can send email notifications with screenshots to your smartphone when motion is detected.
To enable email notifications for motion detection, navigate to the NVR's menu: Main Menu > Alarm > Motion Detect. Configure the detection area, sensitivity, and enable email alerts with screenshots.
6. Maintenance
Regular maintenance ensures optimal performance and longevity of your security system.
- Camera Lenses: Periodically clean camera lenses with a soft, lint-free cloth to ensure clear image quality. Avoid abrasive cleaners.
- Cable Connections: Check all cable connections (PoE, network, power) regularly to ensure they are secure and free from damage.
- NVR Ventilation: Ensure the NVR is placed in a well-ventilated area to prevent overheating. Keep vents clear of dust and obstructions.
- Software Updates: Check the manufacturer's website periodically for firmware updates for the NVR and cameras to ensure the latest features and security patches.
- Data Backup: Regularly back up important video footage to an external storage device.
7. Troubleshooting
This section addresses common issues you might encounter with your Techage security system.
No Video Display on Monitor:
- Ensure the NVR is powered on and the power adapter is securely connected.
- Check the VGA or HDMI cable connection between the NVR and the monitor/TV.
- Verify the monitor/TV input source is correctly selected (VGA/HDMI).
No Camera Image:
- Check if the camera's network cable is securely connected to the NVR's PoE port.
- Ensure the camera is receiving power (check if IR LEDs illuminate in the dark).
- Verify the camera is enabled in the NVR's channel settings.
- If the camera is more than 100 meters from the NVR, ensure a 12V power adapter is used for the camera's tail line power port.
Remote Viewing Not Working:
- Ensure the NVR is connected to your router via an Ethernet cable and has internet access.
- Verify your smartphone has a stable internet connection.
- Double-check the serial number entered in the mobile app.
- Ensure the xmeye app has necessary network permissions on your phone.
Motion Detection Not Triggering:
- Check the motion detection settings in the NVR menu (sensitivity, detection area).
- Ensure the recording schedule for motion detection is correctly configured.
- Verify that the camera lens is clean and free from obstructions.
8. Specifications
| Feature | Specification |
|---|---|
| Product Model Number | 6708FN-4*BT508-20SC/P |
| NVR Channels | 4 CH |
| NVR Video Output | VGA, HDMI (Full HD) |
| NVR Hard Drive Support | 1 SATA (up to 6TB) |
| Camera Resolution | 2.0 MP (1920x1080p) |
| Camera Sensor | 1/6.9 inch F02 CMOS |
| Camera Minimum Illumination | 0.1Lux @ F1.2 (Color), 0.01Lux @ F1.2 (Black/White) |
| Camera Ingress Protection | IP66 (Waterproof) |
| Camera Power Input | DC12V/2A (via PoE or separate adapter) |
| Camera Main Stream Output | 1920*1080 (15fps), 1280*720 |
| Camera Sub-stream Output | 704*576 |
| System Dimensions | 37.46 x 25.4 x 22.61 cm |
| System Weight | 4.99 kg |
9. Warranty and Support
For warranty information and technical support, please refer to the documentation included with your purchase or visit the official Techage website. Keep your purchase receipt as proof of purchase for warranty claims.


