1. Introduction
Thank you for choosing the TROTEC TTK 30 E Dehumidifier. This manual provides important information regarding the safe operation, setup, maintenance, and troubleshooting of your new appliance. Please read this manual thoroughly before first use and keep it for future reference.
The TTK 30 E is designed to effectively reduce humidity levels in rooms up to 15 m², preventing mold growth, condensation, and unpleasant odors. Its compact design and user-friendly features make it ideal for domestic use.

Figure 1: Front view of the TROTEC TTK 30 E Dehumidifier. The unit is white with a control panel on top and a water tank at the bottom front.
2. Safety Instructions
Always observe the following safety instructions to prevent injury or damage to the appliance:
- Read all instructions before operating the appliance.
- Ensure the power supply matches the voltage specified on the rating label.
- Do not operate the dehumidifier with a damaged cord or plug.
- Keep the appliance away from heat sources, direct sunlight, and flammable materials.
- Do not insert objects into the air inlet or outlet.
- Always unplug the appliance before cleaning or performing maintenance.
- This appliance is for indoor use only.
- Do not use in bathrooms or other excessively humid environments where water may splash.
- Keep out of reach of children and pets.
3. Product Overview
Familiarize yourself with the main components of your TTK 30 E Dehumidifier.
- Control Panel with LED display
- Air Outlet
- Air Inlet with washable filter
- Water Tank
- Continuous Drainage Outlet
- Power Cord
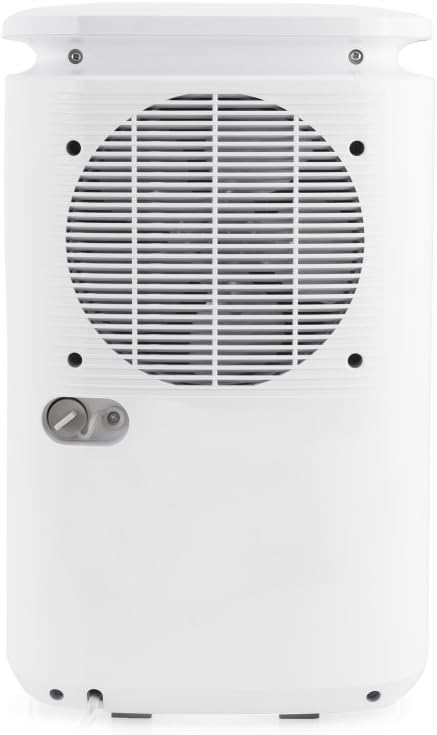
Figure 2: Rear view of the dehumidifier, showing the air inlet grille and the continuous drainage outlet at the bottom left.

Figure 3: Detail showing the power cord neatly stored on top of the unit and a close-up of the continuous drainage connection point.
4. Setup
Follow these steps to set up your dehumidifier for the first time:
- Unpacking: Carefully remove the dehumidifier from its packaging. Retain the packaging for future storage or transport.
- Placement: Place the unit on a firm, level surface. Ensure there is at least 20 cm (8 inches) of clear space around the air inlet and outlet for optimal airflow. Do not block the air vents.
- Power Connection: Plug the power cord into a grounded electrical outlet.
- Water Tank: Ensure the water tank is correctly inserted. The unit will not operate if the tank is full or improperly seated.
- Continuous Drainage (Optional): If you wish to use continuous drainage, connect a suitable hose (not included) to the drainage outlet at the back of the unit. Ensure the hose leads to a drain or larger container and is sloped downwards to allow gravity drainage.
5. Operating Instructions
The TTK 30 E features an intuitive control panel for easy operation.
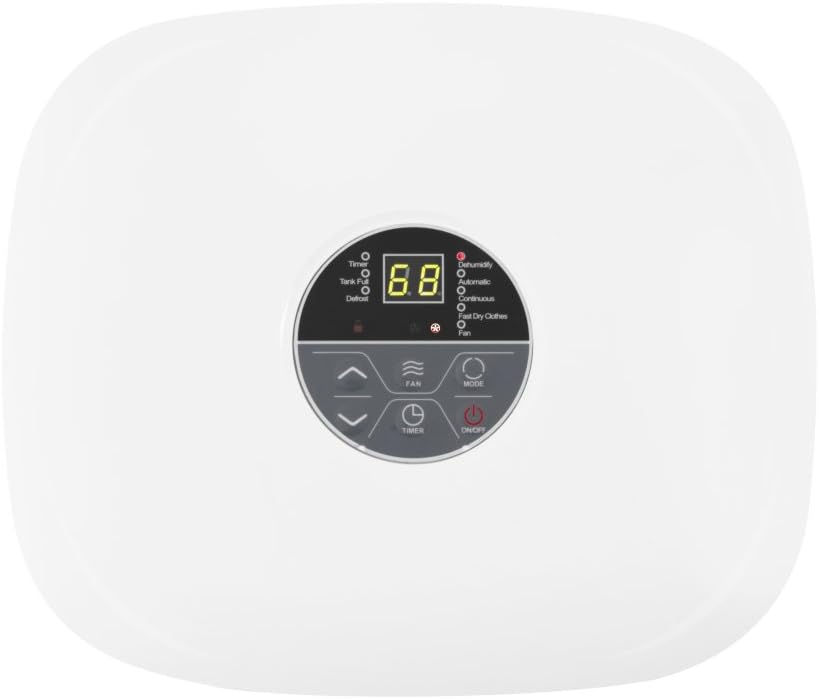
Figure 4: Top-down view of the control panel, showing the digital display, mode buttons, fan speed, timer, and power button.
5.1. Control Panel Functions
- ON/OFF Button (⏻): Press to turn the unit on or off.
- MODE Button: Cycles through operating modes:
- Automatic Mode: The unit automatically adjusts dehumidification based on the set humidity level (30-80% RH).
- Continuous Dehumidification: The unit operates continuously regardless of humidity level until the water tank is full or continuous drainage is used.
- Fast Dry Clothes Mode: Optimized for drying laundry, operating at maximum fan speed and continuous dehumidification.
- FAN Button: Adjusts fan speed (Low/High).
- TIMER Button: Sets the auto-off timer (1-24 hours).
- Humidity Setting Buttons (▲ / ▼): Adjust the desired humidity level in Automatic Mode (5% increments).
- LED Humidity Indicator: Changes color based on current room humidity:
- Blue: Humidity below 50%
- Green: Humidity between 50% and 70%
- Red: Humidity above 70%

Figure 5: The top of the unit showing the LED indicator light changing color to reflect humidity levels (blue, green, red).
5.2. Automatic Operation with Hygrostat
In Automatic Mode, the integrated hygrostat monitors the room's humidity. When the humidity exceeds the set target, the unit will start dehumidifying. Once the target humidity is reached, the compressor will switch off, and the fan will continue to run for a short period before stopping. The unit will restart automatically if humidity rises again.
6. Maintenance
Regular maintenance ensures optimal performance and extends the lifespan of your dehumidifier.
6.1. Emptying the Water Tank
When the water tank is full, the "Tank Full" indicator will illuminate, and the unit will automatically stop operating. Empty the tank as follows:
- Gently pull out the water tank from the front of the unit.
- Carefully pour out the collected water.
- Slide the empty water tank back into its position until it clicks securely. The unit will resume operation.

Figure 6: A user demonstrating the removal of the water collection tank from the front of the dehumidifier.
6.2. Cleaning the Air Filter
The air filter should be cleaned every two weeks or more frequently if the unit is used in a dusty environment. A dirty filter reduces efficiency and can damage the unit.
- Turn off the unit and unplug it from the power outlet.
- Locate the air filter at the back of the unit (behind the air inlet grille).
- Remove the filter.
- Clean the filter using a vacuum cleaner or wash it gently with lukewarm water and mild detergent. Rinse thoroughly.
- Allow the filter to air dry completely before reinserting it. Do not use the unit without a dry filter.
6.3. Cleaning the Unit Exterior
Wipe the exterior of the unit with a soft, damp cloth. Do not use abrasive cleaners or solvents.
7. Troubleshooting
Before contacting customer support, please refer to the following table for common issues and their solutions.
| Problem | Possible Cause | Solution |
|---|---|---|
| Unit does not turn on. | No power supply; Power cord not plugged in; Water tank full or improperly seated. | Check power outlet and plug; Empty and reinsert water tank correctly. |
| Dehumidifier not collecting water. | Room humidity too low; Air filter clogged; Temperature too low (below 5°C); Unit in fan-only mode. | Check room humidity; Clean air filter; Ensure room temperature is adequate; Select appropriate dehumidification mode. |
| Unit is noisy. | Unit not on a level surface; Air filter clogged; Obstruction in fan. | Place on a level surface; Clean air filter; Check for obstructions. |
| "Tank Full" indicator is on, but tank is not full. | Water tank sensor malfunction; Tank improperly seated. | Remove and reinsert tank firmly; If issue persists, contact support. |
8. Specifications
Technical data for the TROTEC TTK 30 E Dehumidifier:
- Model: TTK 30 E
- Dehumidification Capacity (Max.): 12 liters/24 hours
- Air Flow: 120 m³/hour
- Power Consumption (Max.): 0.27 kW
- Recommended Room Size: Up to 15 m²
- Water Tank Volume: 1.2 Liters
- Operating Temperature Range: 5°C - 35°C
- Operating Humidity Range: 30% - 80% RH
- Refrigerant: R290
- Weight: 10.16 kg
- Special Features: Automatic defrost, Automatic humidity control (hygrostat), Continuous drainage option, LED humidity indicator.
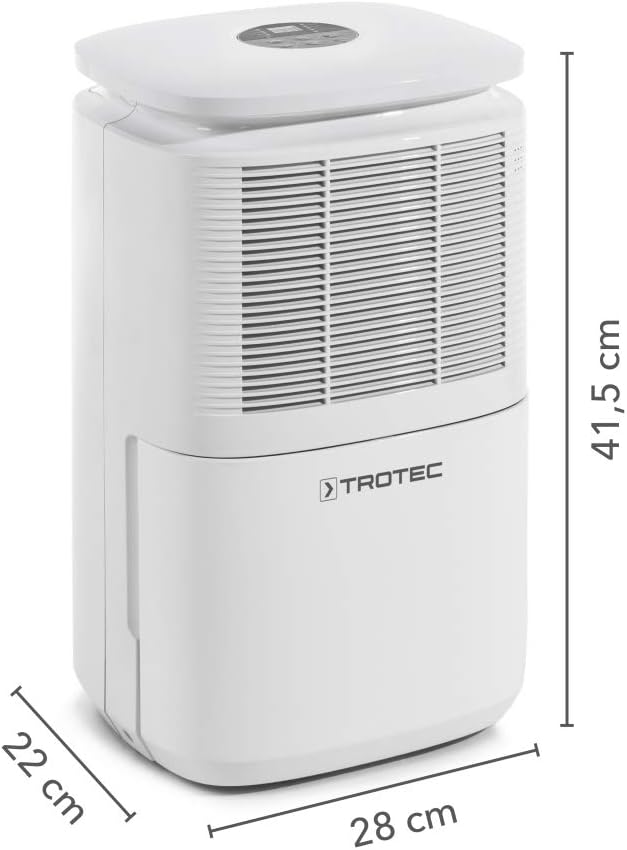
Figure 7: The dehumidifier shown with its approximate dimensions: 41.5 cm height, 28 cm width, and 22 cm depth.
9. Warranty and Support
For warranty information and technical support, please refer to the warranty card included with your purchase or visit the official TROTEC website. Keep your proof of purchase for warranty claims.
Contact Information:
- Website: www.trotec.com
- Customer Service: Refer to your regional TROTEC contact details.


