LowPowerLab ATX-RASPI-R2 Raspberry Pi Power Controller
Thông tin quan trọng
To keep the price down, the Raspberry Pi doesn’t ship with a power button, yet it’s easy to add your own! This guide will show you how to add a power button to your Raspberry Pi that can turn on/off your BATOCERA system.
This document is splitted in two part and with a short introduction of how to setup.
- Công tắc nguồn thương mại
- provide real power cuts
- costs are around 10-25 USD
- usually need some space to build in
- Nút đơn giản hoặc công tắc chốt
- very simple setup
- low cost
- no power cut possible
Tại sao nút nguồn của Raspberry Pi lại quan trọng?
You should never “yank” the power cord out of your Pi as this can lead to severe data corruption (and in some cases, physically damage your SD card). Even if BATOCERA is best prepared against file corruption it is recommended to safely shut down your Pi via BATOCERAs Quit Menu or even better, use a power button or switch.
Note: When we “shut down” the Pi, it will send it into a halt state, which still consumes a very small amount of power. This is similar to how all modern computers work. In this guide walk through the process of adding a power button that will both halt and wake the Pi up from a halted state.
Additionally, after your Pi has shut down, you can safely disconnect the power supply (should you desire) without the worry of data corruption.
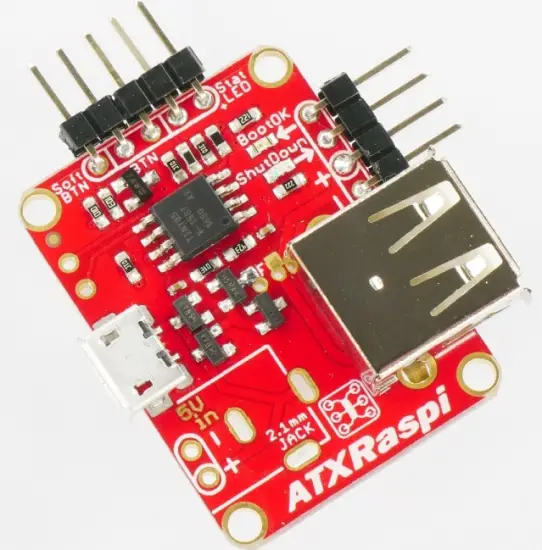
Công tắc nguồn thương mại
Here are some commercial power devices that are currently supported. These offer a real power cut, that means the Raspberry is really switched off. Usually these small power devices are plugged on top of the Raspberry using it’s 40 Pin header. For further install instruction use the links provided.
| Tên thiết bị | system. power. switch | Where to buy and additional help to install | Ghi chú bên lề |
| ATXRaspi | ATX_RASPI_R2_6 | http://lowpowerlab.com/atxraspi/#installation | |
| Mạch Mausberry | MAUSBERRY | http://mausberry-circuits.myshopify.com/pages/setup | |
| Pimorini OnOffShim | ONOFFSHIM | https://shop.pimoroni.com/products/onoff-shim | |
| msldigital PiBoard r2013 | REMOTEPIBOARD_2003 | ttp://www.msldigital.com/pages/support-for-remotepi-board-2013 | |
| msldigital PiBoard r2015 | REMOTEPIBOARD_2005 | http://www.msldigital.com/pages/support-for-remotepi-board-plus-2015 | |
| UUGear Witty Pi | WITTYPI | http://www.msldigital.com/pages/support-for-remotepi-board-plus-2015 | |
| Retroflag Cases | CỜ LẠI | http://www.retroflag.com | enable UART in config.txt for LED laction |
It is possible to add a button to turn on and turn off your BATOCERA console properly! But how?
Which button to use?
You can add a power button to switch on/off BATOCERA. The button can be either a push button (momentary button) or a switch button (latching switch). Note on the push buttons: some GPIO have resistors pull-up built-in (resistors connected to the + 3.3V), so it is preferable to use switches normally open (abbreviated NO) with these pins.
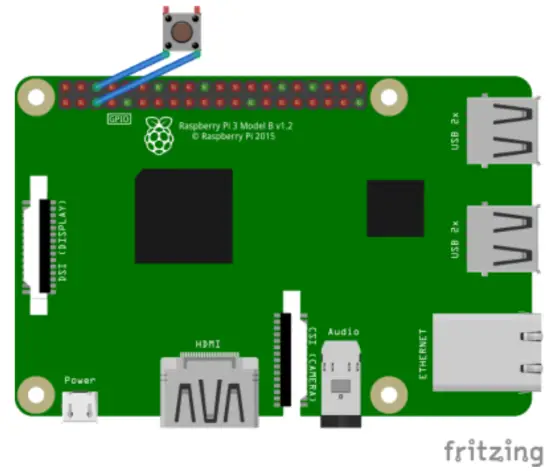
to connect the switch to the Raspberry Pi GPIO, plug a PIN on the GPIO3 (physical PIN 5 above on the left) and another on the mass located just to the right on the right (physical PIN 6):
Kích hoạt công tắc
Thủ công
so your switch is recognized account by BATOCERA, you need to enable this feature in it’s settings.
Therefore edit batocera.config
- Đối với công tắc chốt, hãy chỉnh sửa batocera.conf bằng trình soạn thảo văn bản bạn thích và thêm system.power.switch=PIN56ONOFF
- For a momentary button edit batocera. conf with your preferred OS editor and add system.power.switch=PIN56PUSH
- Khởi động lại hệ thống
- If you are logged in with SSH or you’ve a terminal open then enter
batocera-settings --command set --key system.power.switch --value

PIN56ONOFF

batocera-settings --command set --key system.power.switch --value

PIN56PUSH
your BATOCERA system can now be turned on/off with a button!
Chế độ menu
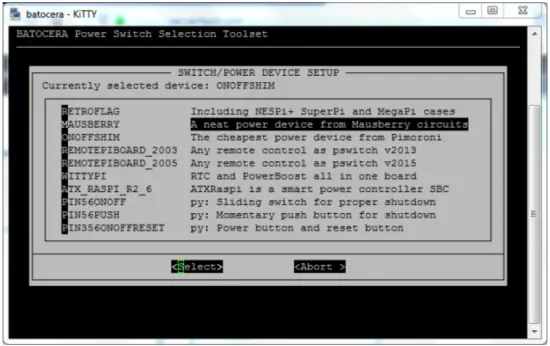
Get a terminal window by quitting Emulation Station with a Keyboard or get a access to terminal by SSH. Now enter rpi_gpioswitch and you will see a terminal windows like in picture down. From there you can select and activate your power or switch device. The script will show you an already activated device (ONOFFSHIM in this case) and will later show you a small message box, if the value setup was successfully setted up. After this reboot the device and everything should work fine.
Hỗ trợ khách hàng
rom:
https://wiki.batocera.org/ – Batocera.linux – Wiki
Liên kết vĩnh viễn:
https://wiki.batocera.org/add_powerdevices_rpi_only?rev=1581110157
Cập nhật lần cuối: 2020/02/07 22:15

https://wiki.batocera.org/
In ngày 2025/06/28 02:48
Tài liệu / Tài nguyên
 |
LowPowerLab ATX-RASPI-R2 Raspberry Pi Power Controller [tập tin pdf] Hướng dẫn ATX_RASPI_R2_6, MAUSBERRY, OnOffShim, ATX-RASPI-R2 Raspberry Pi Power Controller, ATX-RASPI-R2, Raspberry Pi Power Controller, Pi Power Controller, Power Controller |