 PRORUN PMC160S Attachment Capable String Trimmer

Product Information
Specifications
- Model: Cordless String Trimmer
- Battery Type: Lithium-Ion
- Weight: 4.5 lbs
- Cutting Diameter: 12 inches
- Charging Time: 2 hours
Product Usage Instructions
General Machine Safety Warnings
Before using the cordless string trimmer, it is important to understand and adhere to the following safety guidelines:
- Work in a clean and well-lit area to avoid accidents.
- Avoid operating the machine in explosive atmospheres or dusty environments.
- Ensure the machine is properly maintained and operated according to instructions.
Safety Instructions for String Trimmer
When using the string trimmer, follow these safety precautions:
- Wear appropriate clothing and protective gear.
- Avoid contact with moving parts while the trimmer is in operation.
Transporting and Storage
After use, transport and store the string trimmer in a safe and secure location away from children and unauthorized users.
FAQ
- Q: How long does the battery last on a full charge?
A: The battery life of the cordless string trimmer can vary based on usage but typically lasts for up to 45 minutes on a full charge. - Q: Can I use the string trimmer in wet conditions?
A: It is not recommended to use the string trimmer in wet conditions to avoid damage and potential safety hazards.
Operator’s Manual
CORDLESS ATTACHMENT CAPABLE STRING TRIMMER & BRUSHCUTTER
MODEL: PM Cl 608
Before charging, read the instructions.
IMPORTANT – READ CAREFULLY BEFORE USE

IMPORTANT SAFETY INSTRUCTIONS – SAVE THESE INSTRUCTIONS
WARNING: To reduce the risk of injury, the user must read and understand the Operator’s Manual before using this product. Save these instructions for future reference.
Pleaseletusknowwhatyouthink.
I-844-905•0882, info@proruntech.com
Version : A – Issue Date: 2t2U11ft1
To leave a review and see our full line of products, visit:
General machine safety warnings
WARNING Read all safety warnings, instructions, illustrations and specifications provided with this machine. Failure to follow the warnings and instructions may result in electric shock, fire, and/or serious injuries.
Save all warnings and instructions for future reference.
The term “machine” in all of the warnings listed below refers to your battery-operated (cordless) machine.
Work area safety
- Keep work area clean and well lit. Cluttered or dark areas invite accidents.
- Do not operate machines in explosive atmospheres, such as in the presence of flammable liquids, gases or dust. machines create sparks which may ignite the dust or fumes.
- Keep children and bystanders away while operating a machine. Distractions can cause you to lose control.
Electrical safety
- Avoid body contact with earthed or grounded surfaces such as pipes, radiators, ranges and refrigerators. There is an increased risk of electric shock if your body is earthed or grounded.
- Do not expose machines to rain or wet conditions. Water entering a machine will increase the risk of electric shock.
- Do not abuse the cord. Never use the cord for carrying. Keep cord away from heat, oil, sharp edges or moving parts. Damaged or entangled cords increase the risk of electric shock.
Personal safety
- Stay alert, watch what you are doing and use common sense when operating a machine. Do not use a machine while you are tired or under the influence of drugs, alcohol or medication. A moment of inattention while operating machines may result in serious personal injury.
- Use personal protective equipment. Always wear eye protection. Protective equipment such as dust mask, non-skid safety shoes, hard hat, or hearing protection used for appropriate conditions will reduce personal injuries.
- Prevent unintentional starting. Ensure the switch is in the off-position before connecting to power source and/or battery pack, picking up or carrying the machine. Carrying machines with your finger on the switch or energizing machines that have the switch on invites accidents.
- Remove any adjusting key or wrench before turning the machine on. A wrench or a key left attached to a rotating part of machine may result in personal injury.
- Do not overreach. Keep proper footing and balance at all times. This enables better control of the machine in unexpected situations.
- Dress properly. Do not wear loose clothing or jewelry. Keep your hair, clothing, and gloves away from moving parts. Loose clothes, jewelry, or long hair can be caught in moving parts.
- If devices are provided for the connection of dust extraction and collection facilities, ensure these are connected and properly used. Use of these devices can reduce dust-related hazards.
- Do not let familiarity gained from frequent use of tools allow you to become complacent and ignore tool safety principles. A careless action can cause severe injury within a fraction of a second.
Machine use and care
- Do not force the machine. Use the correct machine for your application. The correct machine will do the job better and safer at the rate for which it was designed.
- Do not use the machine if the switch does not turn it on and off. Any machine that cannot be controlled with the switch is dangerous and must be repaired.
- Remove the battery pack from the machine before making any adjustments, changing accessories, or storing machines. Such preventive safety measures reduce the risk of starting the power tool accidentally.
- Store idle machines out of the reach of children and do not allow persons unfamiliar with the machine or these instructions to operate the machine. machines are dangerous in the hands of untrained users.
- Maintain machines and accessories. Check for misalignment or binding of moving parts, breakage of parts and any other condition that may affect the machine’s operation. If damaged, have the machine repaired before use. Many accidents are caused by poorly maintained machines.
- Keep cutting tools sharp and clean. Properly maintained cutting tools with sharp cutting edges are less likely to bind and are easier to control. Use only trimmer line as outlines in this manual.
- Use the machine, accessories and tool bits etc. in accordance with these instructions, taking into account the working conditions and the work to be performed. Use of the machine for operations different from those intended could result in a hazardous situation.
- Keep handles and grasping surfaces dry, clean, and free from oil and grease. Slippery handles and grasping surfaces do not allow for safe handling and control of the tool in unexpected situations.
Battery tool use and care
- Recharge only with the charger specified by the manufacturer. A charger that is suitable for one type of battery pack may create a risk of fire when used with another battery pack.
- Use machines only with specifically designated battery packs. Use of any other battery packs may create a risk of injury and fire.
- When battery pack is not in use, keep it away from other metal objects, like paper clips, coins, keys, nails, screws, or other small metal objects, that can make a connection from one terminal to another. Shorting the battery terminals together may cause burns or a fire.
- Under abusive conditions, liquid may be ejected from the battery; avoid contact. If contact accidentally occurs, flush with water. If liquid contacts eyes, additionally seek medical help. Liquid ejected from the battery may cause irritation or burns.
- Do not use a battery pack or tool that is damaged or modi-fied. Damaged or modified batteries may exhibit unpredictable behavior resulting in fire, explosion, or risk of injury.
- Do not expose a battery pack or tool to fire or excessive temperature. Exposure to fire or temperature above 212°F (100°C) may cause explosion.
- Follow all charging instructions and do not charge the battery pack or tool outside the temperature range specified in the instructions. Charging improperly or at temperatures outside the specified range may damage the battery and increase the risk of fire.
Service
- Contact PRORUN Customer Service with questions or issues with this machine. This will ensure that the safety of the power tool is maintained.
- Never service damaged battery packs. Service of battery packs should only be performed by the manufacturer or authorized
SAFETY INSTRUCTIONS FOR STRING TRIMMER
General string trimmer safety warnings:
- Do not use the machine in bad weather conditions, especially when there is a risk of lightning. This decreases the risk of being struck by lightning.
- Thoroughly inspect the area for wildlife where the machine is to be used. Wildlife may be injured by the machine during operation.
- Thoroughly inspect the area where the machine is to be used and remove all stones, sticks, wires, bones, and other foreign objects. Thrown objects can cause personal injury.
- Before using the machine, always visually inspect to see that the trimmer head (bump head) and cutting guard are not damaged and the trimmer head has trimmer line properly installed. Damaged parts increase the risk of injury.
- Follow instructions for changing accessories. Improperly tightened trimmer head, cutting guard, or front handle securing nuts and bolts may either damage the string trimmer or result in it becoming detached.
- Wear eye, ear, head, and hand protection. Adequate protective equipment will reduce personal injury by flying debris or accidental contact with the cutting line or blade.
- While operating the machine, always wear non-slip and protective footwear. Do not operate the machine when barefoot or wearing open sandals. This reduces the chance of injury to the feet from contact with the moving cutters or lines.
- While operating the machine, always wear long trousers. Exposed skin increases the likelihood of injury from thrown objects.
- Keep bystanders away while operating the machine. Thrown debris can result in serious personal injury.
- Always use two hands when operating the machine. Holding the machine with both hands will avoid loss of control.
- Hold the machine by the insulated gripping surfaces only because the trimming line may contact hidden wiring. Cutting line contacting a “live” wire may make exposed metal parts of the machine “live” and could give the operator an electric shock.
- Always keep proper footing and operate the machine only when standing on the ground. Slippery or unstable surfaces may cause a loss of balance or control of the machine.
- Do not operate the machine on excessively steep slopes. This reduces the risk of loss of control, slipping and falling which may result in personal injury.
- When working on slopes, always be sure of your footing, always work across the face of slopes, never up or down and exercise extreme caution when changing direction. This reduces the risk of loss of control, slipping and falling which may result in personal injury.
- Keep all parts of the body away from the trimmer head and trimmer line while the machine is operating. Before you start the machine, make sure the trimmer head and trimmer line are not contacting anything. A moment of inattention while operating the string trimmer may cause entanglement or personal injury from flying debris.
- Do not operate the machine above waist height. This helps prevent unintended trimmer head and trimmer line contact and enables better control of the machine in unexpected situations.
- When cutting brush or saplings that are under tension, be alert for spring back. When the tension in the wood fibers is released, the brush or sapling may strike the operator and/or throw the machine out of control.
- Use extreme caution when cutting brush and saplings. The slender material may catch the trimmer head and trimmer line and be whipped toward you or pull you off balance.
- Maintain control of the machine and do not touch trimmer head and trimmer line and other hazardous moving parts while they are still in motion. This reduces the risk of injury from moving parts.
- When clearing jammed material or servicing the machine, make sure the switch is off and the battery pack is removed. Unexpected starting of the machine while clearing jammed material or servicing may result in serious personal injury.
- Carry the machine with the machine switched off and away from your body. Proper handling of the machine will reduce the likelihood of accidental contact with a moving trimmer head and trimmer line.
- Only use replacement cutters, lines, cutting heads and blades. Incorrect replacement parts may increase the risk of breakage and injury.
- Inspect machine for damage upon striking a hard object or if there appears to be excessive vibration.
- Keep hands away from any sharp device intended to limit the length of the filament line.
TRANSPORTING AND STORAGE
- Unintentional starting may result in personal injury or property damage. Remove the battery before inspecting the string trimmer or carrying out any cleaning, maintenance, repair work, before storing, and any other time the string trimmer is not in use.
- Improper storage can result in unauthorized use, damage to the machine, battery, and charger or an increased risk of fire, electric shock, and other personal injuries or property damage.
Store the machine, battery, and charger indoors in a dry, secure place out of reach of children and other unauthorized users. - Before storing, always unplug the charger from the wall outlet and remove the battery.
BATTERY AND BATTERY CHARGER
This section describes the battery and battery charger safety for your battery product.
Only use original batteries for products and only charge them in an original battery charger.
Battery charger
The battery chargers are only used for charging of PRORUN® 60V replacement batteries.
- This manual contains important safety and operating instructions for battery charger.
- Before using battery charger, read all instructions and cautionary markings on battery charger, and product using battery.
CAUTION! Charge only Li-ion batteries recommended by the manufacturer.
- Other types of batteries may burst causing personal injury and damage.
- If the shape of the plug does not fit the power outlet, use an attachment plug adapter of the proper configuration for the power outlet.
WARNING! Minimize the risk of electric shock or short circuit as follows:
- Never insert any object into the charger’s cooling slots. Do not try to dismantle the battery charger.
- Never connect the charger terminals to metal objects as this can short circuit the battery charger.
- Use approved and intact wall sockets.
WARNING! This machine produces an electromagnetic field during operation. This field may under some circumstances interfere with active or passive medical implants. To reduce the risk of serious or fatal injury, we recommend persons with medical implants consult their physician and the medical implant manufacturer before operating this machine. Do not use product when a thunderstorm is approaching.
- Unplug the charger from the wall outlet before inspecting or cleaning the charger.
- Regularly check that the battery charger connection wire is intact and that there are no cracks in it. Replace the charger if the power supply cord becomes worn or damaged. The power supply cord cannot be repaired or replaced.
- Never carry the battery charger using the cord and never pull out the plug by pulling the cord.
- Keep all cords and extension cords away from water, oil, and sharp edges. Make sure the cord is not pinched in doors, fences, or the like. Otherwise, it can cause the object to become live.
- Never clean the battery or the battery charger with water,
- Never allow children to use the battery charger.
- When charging, the charger must be placed in a well-ventilated area under a roof to keep dry.
- WARNING! Do not charge non-rechargeable batteries in the battery charger or use them in the machine.
- WARNING! Do not use the battery charger close to corrosive or flammable materials. Do not cover the battery charger. Pull out the plug to the battery charger in the event of smoke or fire.
- Use the battery charger only when the surround temperatures is between 41 °F (5 °C) and 113 °F (45 °C).
- Use the charger in an environment which is well-ventilated, dry, and free from dust.
Do not use:
- A faulty or damaged battery charger.
- The battery in the battery charger outdoors.
Do not charge:
- Or never use faulty, damaged, or deformed battery.
- The battery in the rain or in wet conditions.
- The battery in direct sunlight.
- The battery in the battery charger outdoors.
Battery
- Do not dismantle, open or shred secondary batteries.
- Keep batteries out of the reach of children.
- Do not expose batteries to heat or fire. Avoid storage in direct sunlight.
- Do not short-circuit a battery. Do not store batteries haphazardly in a box or drawer where they may short-circuit each other or be short-circuited by other metal objects.
- Do not remove a battery from its original packaging until required for use.
- Do not subject batteries to mechanical shock.
- In the event of a cell leaking, do not allow the liquid to come in contact with the skin or eyes. If contact has been made, wash the affected area with copious amounts of water and seek medical advice.
- Do not use any charger other than that specifically provided for use with the equipment.
- Do not use any battery which is not designed for use with the equipment.
- Always purchase the battery recommended by the device manufacturer for the equipment.
- Keep batteries clean and dry.
- Wipe the battery terminals with a clean dry cloth if they become dirty.
- Secondary batteries need to be charged before each use. Always use the correct charger and refer to the manufacturer’s instructions or equipment manual for proper charging instructions.
- Do not leave a battery on prolonged charge when not in use.
- After extended periods of storage, it may be necessary to charge and discharge the batteries several times to obtain maximum performance.
- Retain the original product literature for future reference.
- Use the battery only in the application for which it was intended. When possible, remove the battery from the equipment when not in use.
- Dispose of properly.
SYMBOLS
This page depicts and describes safety symbols that may appear on this product. Read, understand, and follow all instructions on the machine before attempting to assemble and operate it.


This below units may be used in mannual:
| V | Volts | Voltage |
| A | Amperes | Current |
| Hz | Hertz | Frequency(cycles per second) |
| W | Watts | Power |
| min | Minutes | Time |
| mm | Millimeter | Length or size |
| in. | Inch | Length or size |
| Kg | Kilogram | Weight |
| Ib | Pound | Weight |
| RPM | Revolutions per minute | Rotational speed |
![]() DANGER! People with electronic devices, such as pacemakers, should consult their physician(s) before using this product. Operation of electrical equipment in close proximity to a heart pacemaker could cause interference or failure of the pacemaker.
DANGER! People with electronic devices, such as pacemakers, should consult their physician(s) before using this product. Operation of electrical equipment in close proximity to a heart pacemaker could cause interference or failure of the pacemaker.
SPECIFICATIONS
| Machine model | PMC160S |
| Voltage | DC 60V |
| Motor type | BLDC |
| Cutting device of Brush cutter & Grass trimmer | |
| Maximum speed of output shaft | 6100 RPM (high), 4600 RPM (low) |
| Cutting width | 17 inches (440 mm) |
| Weight (without battery) | Max. 10.8 lbs (4.9 Kg) |
| Diameter or cutting line | 0.80 in or 0.095 in (2.4 mm or 2.0 mm) |
| Sound pressure level LpA according to IEC 62841-4-4 | 81.9 dB(A) |
| The noise uncertainties values | K = 3.0 dB(A) |
| Sound power level LwA according to IEC 62841-4-4 | 93.3 dB(A) |
| The noise uncertainties values | K = 2.0 dB(A) |
| Vibration according to IEC 62841-4-4* | Front handle: 6.67 m/s2 Rear handle: 2.97 m/s2 |
| The vibration uncertainties value | K=1.5 m/s2 |
| Battery charger | PC16026 |
| Charger Input | AC 100-240 V, 50/60 Hz, 170 W |
| Charger Output | DC 62.4 V, 2.6 A |
| Battery | PB16025 |
| Battery rated parameter | DC 54 V, 2.5Ah |
The declared vibration total value has been measured in accordance with a standard test method and may be used for comparing one tool with another. The declared vibration total value may also be used in a preliminary assessment of exposure. The vibration emission during actual use of the power tool can differ from the declared total value depending on the ways in which the tool is used.
KNOW YOUR MACHINE

- Harness
- Locking nut
- Bottom protecting cap Bottom clamping plate
- Metal blade
- Top clamping plate
- Trimmer head
- Cutting attachment guard
- Lock pin
- Lock knob
- Front handle
- Barrier bar
- Suspension ring
- Speed switch
- Trigger lock-out
- Variable-speed switch trigger
- Rear handle
- Battery
- Battery release button
IMPORTANT! The safe use of this product requires an understanding of the information located on the product and in this operator’s manual, as well as a knowledge of the projects you are attempting. Before use of this product, familiarize yourself with all operating features and safety rules.
BATTERY AND CHARGER OPERATION
This section describes the battery and battery charger safety for your battery product.
Only use PRORUN original batteries for PRORUN products and only charge them in an original battery charger from PRORUN. The batteries are software encrypted. 
- Electric plug
- Battery charger
- Electrical terminal
- Cooling slots
- Charger LED light
- Battery
- Electric charge status button
- 5 LED charge status indicator
NOTE! The specifications of the plugs can be different by country, the picture is only for reference. If the shape of the plug does not fit the power outlet, use an attachment plug adapter of the proper configuration for the power outlet
WARNING! Risk of electric shock and short circuiting. Use approved and intact wall sockets. Make sure that the power cord is not damaged. Replace power cord if it appears to be damaged in any way.
Connect the battery charger
This entire section should match string trimmer manual:
Connect the battery charger (3) to the voltage and frequency specified on the rating plate.
- Put the electric plug (1) in an earthed or grounded socket outlet.
- The charging indication LED (5) will shine green indicating that the charger is working correctly.
- After 5 second, the light will turn off if no battery in the charger.
Connect the battery to the battery charger
The battery must be charged before using it the first time. The battery is only 30% charged when delivered.
NOTE! Monitor the charging process while charging a battery. It is recommended to remove ehe battery from the battery charger when the battery is full charged, or the charger is diaconnected from the power supply.
- Align the raised ribs of the battery pack with the mounting slots in the charger, slide the battery pack down onto the charger and engage ehe battery with the charger’s electrical terminals.
- The charger will communicate with the battery packto evaluate the condition of the battery pack.
- While the battery pack is charging, the charger’s indication LED will shine as follows to indicate the charging process and levels:
 The charging LED light always flashes green when the battery is charging.
 The charging LED light shines consistently green if the battery is fully charged.
 The battery will not be charged if the battery temperature is deviation from normal. In that case the fault LED light flashes red until the battery cool down or heat to normal temperature.
 NOTE: The battery will never be charged if the battery is damaged. In that case, the charger LED light shines consistently RED.
- The five LEDs on the battery pack indicate the current charged power level. Press the battery’s electric energy button to check the power lever of the battery.
- When the battery is full charged, the battery charger will stop charging (switch to stand by).
- It is recommended to remove the battery from the battery charger when the battery is fully charged, or the charger is disconnected from the power supply.
- Pull out the plug. Never use the power supply cable to disconnect the charger from the wall socket.
Maintenance
- Make sure the battery and battery charger are clean and that the terminals on the battery and the battery charger are always clean and dry before the battery is placed in the battery charger.
- Keep the battery guide tracks clean. Clean plastic parts with a clean and dry cloth.
Transport and storage
- Store the equipment in a lockable area so that it is out of reach of children and unauthorized persons.
- Store the battery and the battery charger in a dry, moisture-free and frost-free space.
- Store the battery where the temperature is between 41 °F (5 °C) and 77 °F (25 °C) and never in direct sunlight.
- Store the battery charger only in an enclosed and dry space.
- Be sure to store the battery separate from the battery charger.
Fault codes
Troubleshooting the battery and the battery charger during charging.
| LED display | Possible faults | Possible action |
| Charger LED flashing red. | The battery is ok, but may be experiencing temperature deviation. | Charge the battery in surroundings where temperatures are between 41 °F (5 °C) and 113 °F (45 °C). Wait the battery cool down. |
| Charger LED
always light red. |
Battery is damaged.
Charger is damaged. |
Contact PRORUN Customer Service. |
ASSEMBLY INSTRUCTIONS
Unpacking
This product requires assembly of the adjustable front-assist handle and cutting guard.
- Carefully remove the product and any accessories from the box. Make sure that all items listed in the packing list are included.
- Inspect the product carefully to make sure that no breakage or damage occurred during shipping.
- Do not discard the packing material until you have carefully inspected and satisfactorily operated the product
Package contents:
- 60V Attachment capable powerhead
- String trimmer attachment assembly
- Trimmer guard & extender
- Trimmer bump head
- Brushcutter blade
- Battery
- Battery Charger
- Multi-tool scrench
- Hex key
- Front handle & barrier bar
- Harness
- Operator’s manual
Install the front handle
- Align the protruding boss of the barrier bar with the slotted hole on the rear tube.
- Clip the front handle into the rear tube and slide it to the barrier bar.
- Insert the bolt through the front handle and barrier bar as illustrated.
- Secure the front handle and barrier bar by threading the locking knob onto the bolt and tightening.

Connecting the string trimmer
Align the hole (A1) on the front tube (A) and the loc 3k pin (B). Inserting the front tube (A) into the connector (D) until the lock pin (B) clicks and returns to its original position. Turn the lock knob (C) clockwise to tighten the front tube securely. Turn the lock knob (C) counterclockwise and press the lock pin (B) to pull out the tube to remove.

Fitting the guard extension
WARNING: The guard extension shall always be fitted when using the trimmer head and combination guard. The guard extension shall always be removed when using the grass blade and combination guard.
- Hook the blade guard/combination guard onto the fitting on the shaft and secure with the bolts.
- Enter the guard extension guide in the slot of the combination guard. Then click the guard extension into position on the guard with some claws.

- The guard extension is removed easily using a screwdriver.

Fitting the trimmer guard and trimmer head 
- Fit the correct trimmer guard for use with the trimmer head.
CAUTION! Ensure that the guard extension is fitted. - Hook the trimmer guard/combination guard onto the fitting on the shaft and secure with the bolt.
- Fit the top clamping plate (B) on the output shaft.
- Turn the blade shaft until one of the holes in the top clamping plate aligns with the corresponding hole in the top protecting cap (C).
- Insert a locking pin or screwdriver, (A, not included) in the hole to lock the shaft from rotating.
- Secure the trimmer head (D) by rotating in the opposite direction to the direction of rotation.
NOTE: Nut is a left-hand thread. Turn the nut counterclockwise to tighten. The nut should be tightened to a torque of 35-50 Nm (3.5 – 5 kpm). To dismantle, follow the instructions in the reverse order.

Brush Cutter Blade Assembly
Fit the top clamping plate (B) on the output shaft.
- Turn the blade shaft until one of the holes in the top clamping plate aligns with the corresponding hole in the top protecting cap.
- Insert a locking pin or screwdriver, (A, not included) in the hole to lock the shaft from rotating.
- Place the metal blade (C), bottom clamping plate (D) and bottom protecting cap (E) on the threaded output shaft.
- Secure the brush cutter blade with the locking nut (F). Use the multi-tool scrench and tighten the locking nut.
NOTE: Nut is a left-hand thread. Turn the nut counterclockwise to tighten. The nut should be tightened to a torque of 35-50 Nm (3.5 – 5 kpm). 

WARNING! The machine continues to work for some time even after the power switch trigger has been released! Wait until the cutting accessories come to a complete stop before you put the machine down.
Speed switch
The machine has two speed options, high speed (6100 RPM) and low speed (4600 RPM).
- The high speed is used for thick weeds or heavier lawn grass.
- The low speed is used for sparse weeds or similar soft vegetation.
- Slide the speed switch forward towards the front handle to actuate the high speed.
- Slide the speed switch backwards towards the rear handle to actuate the low speed.
Trimmer line feeding
The string trimmer head is equipped with a bumper to feed the trimming line during operation.
- Tap the bump head on a firm ground while the machine is operating, the spool will release fresh trimming line.
- The line-cutting blade installed on the cutting guard will cut the fresh trimming line to the preset length.

Adjusting the harness and brush cutter
WARNING! When using the machine it must always be hooked securely to the harness. Otherwise you will be unable to control the brush cutter safely and this can result in injury to yourself or others. Never use a harness with a defective quick release.
Single shoulder harness
- Put on the harness.
- Hook the machine onto the harness support hook.
- Adjust the length of the harness so that the support hook is roughly level with your hip.
Quick release
There is an easily accessible, quick release fitted near the suspension ring. Use the quick-release buckle to release the machine quickly from the operator in the event of emergency.

OPERATION
Install and remove the battery pack
- Align the raised ribs of the battery pack with the mounting slots in the string trimmer’s battery port.
- Slide the battery pack forward into the string trimmer until you hear the release button make an audible click.
Remove the battery pack
- Depress the release button and pull out the battery simultaneously to release battery pack.

Checking the machine before use
Before starting work please:
- Inspect before every use and after dropping or other impacts to identify significant damage or defects. Do not use the machine if it is damaged or shows wear.
- Double check that accessories and attachments are properly fixed.
- Wear correct personal safety equipment to protect yourself from hidden objects that may be thrown from the cutting trimmer head.
- Check that handgrips and protection devices are clean and dry, correctly mounted, and well fastened to the machine. Always hold the machine by its handles.
- Keep any ventilation openings clear of debris. Clean them with a soft brush if necessary.
- Ensure the area to be worked is clear of stones, sticks, wires, electrical lines, or other objects that could damage the tool.
- Stop the machine immediately if you are interrupted by other people entering the working area while working. Always let the machine come to complete stop before putting it down.
- Do not overwork yourself. Take regular breaks to ensure you can concentrate on the work and have full control over the machine.
- Understand the purpose and use of all safety equipment.
- Cutting guard and front handle adjustments should be made with the motor stopped and the battery removed. Ensure the machine is in the unfolded position and make sure the locking knob is tightened securely.
Switching ON and OFF
To activate the motor, push the trigger lock-out forward with your thumb, depress the variable-speed switch trigger at the same time.
- It will not be necessary to sustain the actuation of the lock-o? device after the variable-speed switch trigger is activated.
- The variable-speed switch trigger and trigger lock-out will return to their original locked state when the variable-speed switch trigger is released.
- To switch on the machine again, push the trigger lock-out forward and depress variable-speed switch.
Correct height
Adjust the shoulder strap so that the cutting attachment is parallel to the ground.
Correct balance
Let the cutting attachment rest lightly on the ground. Adjust the position of the suspension ring to balance the string trimmer or brushcutter correctly.
Grass trimming with a trimmer head Trimming
- Hold the trimmer head just above the ground at an angle. It is the end of the cord that does the work. Let the cord work at its own pace. Never press the cord into the area to be cut.
- The cord can easily remove grass and weeds up against walls, fences, trees and borders, however it can also damage sensitive bark on trees and bushes, and damage fence posts.
- Reduce the risk of damaging plants by shortening the cord to 3.9 – 4.7in (10-12 cm) and reducing the motor speed.

Clearing
- The clearing technique removes all unwanted vegetation. Keep the trimmer head just above the ground and tilt it. Let the end of the cord strike the ground around trees, posts, statues and the like. CAUTION! This technique increases the wear on the cord.
- The cord wears quicker and must be fed forward more often when working against stones, brick, concrete, metal fences, etc., than when coming into contact with trees and wooden fences.
- When trimming and clearing you should use less than full throttle so that the cord lasts longer and to reduce the wear on the trimmer head.

Cutting
- The trimmer is ideal for cutting grass that is difficult to reach using a normal lawn mower. Keep the cord parallel to the ground when cutting. Avoid pressing the trimmer head against the ground as this can ruin the lawn and damage the tool.
- Do not allow the trimmer head to constantly come into contact with the ground during normal cutting. Constant contact of this type can cause damage and wear to the trimmer head.

Sweeping
- The fan effect of the rotating cord can be used for quick and easy clearing up. Hold the cord parallel to and above the area to be swept and move the tool to and fro.
- When cutting and sweeping you should use full throttle to obtain the best results.

MAINTENANCE AND REPAIR
- Correct maintenance is essential to maintain the original efficiency and safety of the machine over time.
- Keep all nuts, bolts, and screws tight to be sure that the machine is in safe working condition.
- Never use the machine with worn or damaged parts. Damaged parts must be replaced and never repaired.
- Only use original spare parts. Parts that are not of the same quality can seriously damage the equipment and compromise safety.
- If your machine has a malfunction, is damaged, or requires servicing: Contact dealer for Service.
Replacing trimming line
The machine’s trimmer head uses an outstanding and innovative trimming line loading system. When the flexible trimming line is used up, it is easy to refill.
Load a new flexible cutting line:
- Stop the machine. Remove the battery pack and remove the trimmer head
- Press the two spool tabs on the spool cover with two figers, and separate the buckle cover frome the trimmer head with the other hand.

- Take off the spool. Remove any remaining line.
- Clean dirt and debris from all parts. Replace spool if it is worn or damaged.

- Fold the new cutting line in half so that both sides of the rope are the same length.
- Clip the double point of the line into the spool and clockwise around the spool.

NOTE:Do not put more than 16 feet of cutting line in at a time. - Put the spool of the line back into the spool cover. Put the line into the groove.
- Align the spool tabs with the tab openings in the base of the spool. Push the spool cover until it clicks into position.

- Align the spool tabs with the tab openings in the base of the spool. Push the spool cover until it clicks into position.
WARNING! Never use steel threads or cutting lines!
Angle gear
The bevel gear, transmission and gear box is filled with the right quantity of grease at the factory. However, before using the machine you should check that the aforesaid components are filled half full with grease.
The grease in the bevel gear does not normally need to be changed except if repairs are carried out.

Servicing and Repairing the Battery.
The battery requires no servicing and cannot be repaired.
- If the battery has a malfunction or is damaged: Replace the battery.
Servicing and Repairing the Charger
The charger requires no servicing and cannot be repaired.
- If the charger has a malfunction or is damaged: Replace the charger.
- If the connecting cable has a malfunction or is damaged: Do NOT use the charger and contact PRORUN Customer Service.
WARNING! If the battery pack cracks or breaks, with or without leaks, do not recharge it and do not use. Dispose of it and replace with a new battery pack.
Inspections of the machine, battery, and charger
To reduce the risk of personal injury from unintended activation, remove the battery before conducting an inspection, or performing any maintenance on string trimmer
- Maintain and replace trimming line per instructions in this user’s manual.
- Contact TOPSUN Customer Service with questions or issues with this machine.
DO NOT ATTEMPT TO REPAIR THE BATTERY!
To avoid injury and risk of fire, explosion, or electric shock, and to avoid damage to the environment
- Cover the battery’s terminals with heavy-duty adhesive tape.
- DO NOT attempt to remove or destroy any of the battery pack components.
- DO NOT attempt to open the battery pack.
- If a leak develops, the released electrolytes are corrosive and toxic. DO NOT get the solution in the eyes or on skin, and do not swallow it.
- DO NOT place these batteries in your regular household trash.
- DO NOT incinerate.
- DO NOT place them where they will become part of any waste landfill or municipal solid waste stream. Take them to a certified recycling or disposal center.
WARNING! If the battery pack cracks or breaks, with or without leaks, do not recharge it and do not use. Dispose of it and replace with a new battery pack.
Limitations
The manufacturer disclaims any responsibility if the device has not been used for its intended purpose or if the user has not followed the safety instructions for use.
- Read the instructions carefully before each use of the string trimmer.
- Keep your receipt, this is necessary for a guarantee.
TRANSPORTING, CLEANING, AND STORING
Transporting the machine
When transporting the machine:
- Switch off the machine and remove the battery pack.
- When transporting the machine by hand, hold it by the front handle with the bump head pointing backwards, opposite the direction in witch you are walking.
- When transporting the machine in a vehicle, secure and position the machine to prevent turnover, impact, and damage.
Transporting the battery
Switch off the machine and remove the battery.
- Make sure the battery is in a safe condition. Observe the following points when packing the battery:
- The packaging must be non-conductive.
- Make sure the battery cannot shift inside the packaging.
- Secure the packaging so that it cannot move.
Cleaning the machine
To reduce the risk of personal injury from unintended activation, remove the battery before cleaning the machine:
- Clean the machine’s cutting accessories with a slightly dampened cloth. Do not use detergents or solvents.
- Keep the machine’s charger housing and electrical contacts free from foreign matter.
- Do not use a pressure washer to clean the housing and cutting blades or spray them with water or other liquids.
- Keep the battery housing and guides free from foreign matter and clean as necessary with a soft brush or soft, dry cloth. Keep the machine’s charger housing and electrical contacts free from foreign matter.
Cleaning the battery
- Clean the battery housing with a damp cloth.
- Clean the batteries electrical contacts with a soft brush.
Cleaning the charger
- Disconnect the plug from the wall outlet.
- Clean the charger with a damp cloth.
- Clean the charger’s electrical contacts with a soft brush.
Storing the machine
- When storing the machine:
- Switch off the machine and remove the battery pack.
- Clean and maintenance the machine.
- Store the machine indoors in a dry and secure location, out of the reach of children.
- Protect the machine against dampness and corrosive agents such as garden chemicals and de-icing salts.
- Keep the machine clean and dry.
Storing the battery
We recommend that you store the battery with a charge between 40% and 60%. Observe the following points when storing the battery:
- Battery is out of the reach of children.
- Battery is clean and dry.
- Battery is in an enclosed space.
- Battery is stored separately, away from the string trimmer and charger.
- Battery is in non-conductive packaging.
- Battery is in a temperature range between 40°F (5°C) and 115°F (+46°C).
Storing the charger
- Disconnect the charger from the wall outlet. Remove the battery from the charger.
Store the charger indoors in a dry and secure location. - Keep it out of the reach of children.
TROUBLESHOOTING
| Problem | Possible cause | Solution |
| Motor fails to start when power switch are depressed. | Battery is not secure. Battery is not charged. Faulty with the machine. | To secure the battery pack, make sure the latches on the top of the battery pack snap into place. Charge the battery pack according to the instructions included with your model. Contact PRORUN Customer Service. |
| Motor runs, but trimmer head do not move. | Debris or other may be jamming the trimmer head. | Remove battery, clear debris blockage from trimmer head. |
| Machine stop unintentionally during operation. | Battery pack too hot. Electrical malfunction. |
Allow the battery to cool down gradually at ambient temperatures. Contact PRORUN Customer Service. |
| Machine runtime is too short. | Battery not fully charged. Useful life of battery has been reached or exceeded. | Fully charge the battery. Contact PRORUN Customer Service for replacement. |
DISPOSAL
![]() All toxic materials must be disposed of in a specified manner to prevent contamination of the environment. Before disposing of damaged or worn out Lithium-Ion battery packs, contact your local waste disposal agency, or the local Environmental Protection Agency for information and specific instructions. Take the batteries to a local recycling and/or disposal center, certified for lithium-ion disposal.
All toxic materials must be disposed of in a specified manner to prevent contamination of the environment. Before disposing of damaged or worn out Lithium-Ion battery packs, contact your local waste disposal agency, or the local Environmental Protection Agency for information and specific instructions. Take the batteries to a local recycling and/or disposal center, certified for lithium-ion disposal.
EXPLODED VIEW


| NO. | DESCRIPTION | QTY. | NO. | DESCRIPTION | QTY. |
| 1 | Upper cover decoration | 1 | 31 | Square neck bolt | 1 |
| 2 | Motor | 1 | 32 | Front handle | 1 |
| 3 | Screw ST4*16 | 17 | 33 | Barrier bar | 1 |
| 4 | Big gear wheel | 1 | 34 | Locking knob | 1 |
| 5 | Small gear wheel | 1 | 35 | Driver shaft | 1 |
| 6 | Driver shaft | 1 | 36 | Circlip | 1 |
| 7 | external circlips | 1 | 37 | Connecting shaft | 1 |
| 8 | Ball bearing | 1 | 38 | screw M4*10 | 1 |
| 9 | Bearing sleeve | 1 | 39 | Clamping cap | 1 |
| 10 | Bearing | 1 | 40 | Clamping button | 1 |
| 11 | Dental box cover | 1 | 41 | releasing spring | 1 |
| 12 | Release button | 1 | 42 | Aluminum clamp pipe | 1 |
| 13 | Buckle | 1 | 43 | Bolt M6*50 | 1 |
| 14 | Buckle spring | 2 | 44 | Locking knob | 1 |
| 15 | Insert seat | 1 | 45 | hex nut M6 | 1 |
| 16 | Screw M5x10 | 4 | 46 | hex nut M6 | 1 |
| 17 | Eject button | 4 | 47 | Anti-spinning plate | 1 |
| 18 | Spring | 2 | 48 | screw M 5*25 | 1 |
| 19 | Limit plate | 1 | 49 | Front aluminum tube | 1 |
| 20 | Controller | 1 | 50 | Lifing sleeve | 1 |
| 21 | Self locking button | 1 | 51 | Lifing ring conbination | 1 |
| 22 | Self locking torsion spring | 1 | 52 | Dead ring | 1 |
| 23 | Cylindrical pin | 1 | 53 | screw M5 *22 | 1 |
| 24 | Trigger | 1 | 54 | Nut M5 | 1 |
| 25 | Pull rope spring | 1 | 55 | Screw ST2.9×9.5 | 2 |
| 26 | Main switch | 1 | 56 | Right handle | 1 |
| 27 | Left handle | 1 | 57 | Bearing | 4 |
| 28 | Speed button | 1 | 58 | Bearing rubber sleeve | 1 |
| 29 | Speed switch | 1 | 59 | hoop | 1 |
| 30 | Left rear housing | 1 | 60 | Right rear housing | 1 |
EXPLODED VIEW
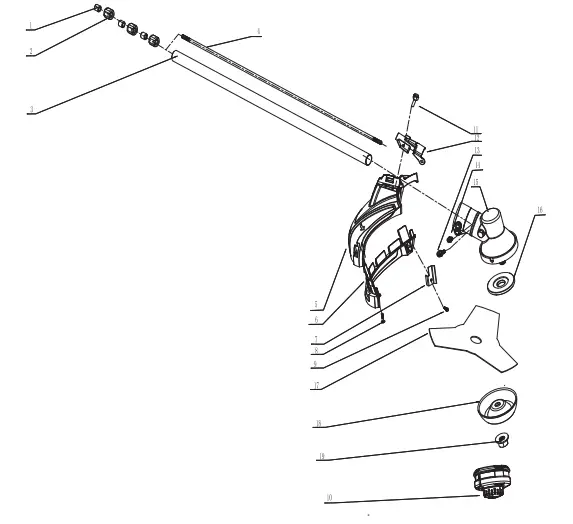
| NO. | DESCRIPTION | QTY. | NO. | DESCRIPTION | QTY. |
| 1 | Bearing | 3 | |||
| 2 | Rubber sleeve | 3 | |||
| 3 | Aluminum tube | 1 | |||
| 4 | Driver shaft | 1 | |||
| 5 | guard | 1 | |||
| 6 | Protective cover edge strip | 1 | |||
| 7 | cutting blade | 1 | |||
| 8 | ST screw 4.8×19 | 1 | |||
| 9 | ST screw | 1 | |||
| 10 | String head assembly | 1 | |||
| 11 | Locking bolt | 1 | |||
| 12 | clamp \ guard | 1 | |||
| 13 | screw M6x25 | 1 | |||
| 14 | screw M6x12 | 1 | |||
| 15 | Gear box | 1 | |||
| 16 | cap washer | 1 | |||
| 17 | blade | 1 | |||
| 18 | blade retainer | 1 | |||
| 19 | Nut M10 | 1 | |||
| 20 | |||||
| 21 | |||||
| 22 | |||||
| 23 | |||||
| 24 | |||||
| 25 | |||||
| 26 | |||||
| 27 | |||||
| 28 |
PRORUN regularly improves our products, and you may find slight differences between your machine and the descriptions contained within this operator’s manual. Modifications can be made to the machine without notice and without the obligation to update the manual, providing that the essential safety and functional characteristics remain unaltered. Contact PRORUN Customer Service with any questions and for current specifications.
- PRORUN / TOPSUN USA
- 200 Overhill Drive, Suite A
- Mooresville, NC 28117
- www.proruntech.com
- Zhejiang Zhongjian Technology Co., Ltd
- Web: www.topsunpower.cc
- E-mail: sales@topsunpower.cc
- ADD: No.155 Mingyuan North AVE, Economic Development Zone,
- Yongkang, Zhejiang, 321300, P.R. CHINA
- Made in China

Documents / Resources
 |
PRORUN PMC160S Attachment Capable String Trimmer [pdf] Instruction Manual PMC160S Attachment Capable String Trimmer, PMC160S, Attachment Capable String Trimmer, Capable String Trimmer, String Trimmer, Trimmer |


