សៀវភៅណែនាំអ្នកប្រើប្រាស់
![]()
VLVWIP2000-ENC
VLVWIP2000-ធ្នូ
JPEG2000 AVoIP អ៊ិនកូដ និងឌិកូដ

រក្សាសិទ្ធិគ្រប់យ៉ាង
កំណែ៖ VLVWIP2000-ENC_2025V1.0
កំណែ៖ VLVWIP2000-DEC_2025V1.0
![]()
JPEG2000 AVoIP អ៊ិនកូដ និងឌិកូដ
បុព្វបទ
សូមអានសៀវភៅណែនាំអ្នកប្រើប្រាស់នេះដោយប្រុងប្រយ័ត្នមុនពេលប្រើផលិតផល។ រូបភាពដែលបង្ហាញក្នុងសៀវភៅណែនាំនេះគឺសម្រាប់ជាឯកសារយោងតែប៉ុណ្ណោះ។ ម៉ូដែល និងលក្ខណៈពិសេសខុសៗគ្នាគឺអាស្រ័យលើផលិតផលពិត។
សៀវភៅណែនាំនេះគឺសម្រាប់តែការណែនាំអំពីប្រតិបត្តិការប៉ុណ្ណោះ សូមទាក់ទងអ្នកចែកចាយក្នុងស្រុកសម្រាប់ជំនួយថែទាំ។ នៅក្នុងការខិតខំប្រឹងប្រែងឥតឈប់ឈរដើម្បីកែលម្អផលិតផល យើងរក្សាសិទ្ធិក្នុងការផ្លាស់ប្តូរមុខងារ ឬប៉ារ៉ាម៉ែត្រដោយមិនចាំបាច់ជូនដំណឹង ឬកាតព្វកិច្ច។ សូមយោងទៅកាន់អ្នកចែកបៀសម្រាប់ព័ត៌មានលម្អិតចុងក្រោយបំផុត។
សេចក្តីថ្លែងការណ៍របស់ FCC
ឧបករណ៍នេះបង្កើត ប្រើប្រាស់ និងអាចបញ្ចេញថាមពលប្រេកង់វិទ្យុ ហើយប្រសិនបើមិនបានដំឡើង និងប្រើប្រាស់ដោយអនុលោមតាមការណែនាំ អាចបណ្តាលឱ្យមានការរំខានដល់ការទំនាក់ទំនងវិទ្យុ។ វាត្រូវបានសាកល្បង និងរកឃើញថាអនុលោមតាមដែនកំណត់សម្រាប់ឧបករណ៍ឌីជីថលថ្នាក់ B ដោយអនុលោមតាមផ្នែកទី 15 នៃច្បាប់ FCC ។ ដែនកំណត់ទាំងនេះត្រូវបានរចនាឡើងដើម្បីផ្តល់នូវការការពារសមហេតុផលប្រឆាំងនឹងការជ្រៀតជ្រែកដែលបង្កគ្រោះថ្នាក់នៅក្នុងការដំឡើងពាណិជ្ជកម្ម។
ប្រតិបត្តិការនៃឧបករណ៍នេះនៅក្នុងតំបន់លំនៅដ្ឋានទំនងជាបង្កឱ្យមានការជ្រៀតជ្រែក ក្នុងករណីនេះ អ្នកប្រើប្រាស់ដោយចំណាយផ្ទាល់ខ្លួនរបស់ពួកគេនឹងត្រូវតម្រូវឱ្យចាត់វិធានការណាក៏ដោយដែលចាំបាច់ដើម្បីកែតម្រូវការជ្រៀតជ្រែកនេះ។
ការផ្លាស់ប្តូរ ឬការកែប្រែណាមួយដែលមិនត្រូវបានអនុម័តដោយក្រុមហ៊ុនផលិតនឹងចាត់ទុកជាមោឃៈនូវសិទ្ធិអំណាចរបស់អ្នកប្រើប្រាស់ក្នុងប្រតិបត្តិការឧបករណ៍។
![]()

![]()
![]()
ការប្រុងប្រយ័ត្នសុវត្ថិភាព
ដើម្បីធានាបាននូវដំណើរការល្អបំផុតពីផលិតផល សូមអានការណែនាំទាំងអស់ដោយប្រុងប្រយ័ត្នមុនពេលប្រើឧបករណ៍។ រក្សាទុកសៀវភៅណែនាំនេះសម្រាប់ជាឯកសារយោងបន្ថែម។
- ខ្ចប់ឧបករណ៍ដោយប្រុងប្រយ័ត្ន ហើយរក្សាទុកប្រអប់ដើម និងសម្ភារៈវេចខ្ចប់សម្រាប់ការដឹកជញ្ជូននាពេលអនាគត។
- អនុវត្តតាមការប្រុងប្រយ័ត្នសុវត្ថិភាពជាមូលដ្ឋាន ដើម្បីកាត់បន្ថយហានិភ័យនៃអគ្គីភ័យ ការឆក់អគ្គិសនី និងរបួសដល់មនុស្ស។
- កុំរុះរើលំនៅដ្ឋាន ឬកែប្រែម៉ូឌុល។ វាអាចបណ្តាលឱ្យមានការឆក់ ឬឆេះ។
- ការប្រើប្រាស់គ្រឿងផ្គត់ផ្គង់ ឬផ្នែកដែលមិនបំពេញតាមលក្ខណៈបច្ចេកទេសរបស់ផលិតផលអាចបណ្តាលឱ្យខូចខាត ការខ្សោះជីវជាតិ ឬដំណើរការខុសប្រក្រតី។
- បញ្ជូនសេវាកម្មទាំងអស់ទៅកាន់បុគ្គលិកសេវាកម្មដែលមានសមត្ថភាព។
- ដើម្បីបងា្ករគ្រោះថ្នាក់អគ្គីភ័យ ឬឆក់ កុំដាក់អង្គធាតុឱ្យត្រូវទឹកភ្លៀង សំណើម ឬដំឡើងផលិតផលនេះនៅជិតទឹក។
- កុំដាក់វត្ថុធ្ងន់ណាមួយនៅលើខ្សែបន្ថែមក្នុងករណីមានការហៀរចេញ។
- កុំដកលំនៅដ្ឋានរបស់ឧបករណ៍ចេញ ព្រោះថាការបើក ឬដោះលំនៅដ្ឋានអាចនាំឱ្យអ្នកជួបគ្រោះថ្នាក់tage ឬគ្រោះថ្នាក់ផ្សេងទៀត។
- ដំឡើងឧបករណ៍នៅកន្លែងដែលមានខ្យល់ចេញចូលល្អ ដើម្បីជៀសវាងការខូចខាតដែលបណ្តាលមកពីការឡើងកំដៅខ្លាំង។
- ទុកម៉ូឌុលឱ្យឆ្ងាយពីវត្ថុរាវ។
- ការលេចធ្លាយចូលទៅក្នុងលំនៅដ្ឋានអាចបណ្តាលឱ្យមានអគ្គីភ័យ ការឆក់អគ្គិសនី ឬការខូចខាតឧបករណ៍។ ប្រសិនបើវត្ថុ ឬវត្ថុរាវធ្លាក់ ឬកំពប់ទៅលើលំនៅដ្ឋាន សូមដោះដោតម៉ូឌុលភ្លាមៗ។
- កុំបង្វិល ឬទាញដោយកម្លាំងចុងនៃខ្សែអុបទិក។ វាអាចបណ្តាលឱ្យដំណើរការខុសប្រក្រតី។
- កុំប្រើឧបករណ៍សម្អាតរាវ ឬអេរ៉ូសូលដើម្បីសម្អាតគ្រឿងនេះ។ តែងតែដកថាមពលទៅឧបករណ៍មុនពេលសម្អាត។
- ដកខ្សែភ្លើងចេញពេលទុកចោលមិនបានប្រើក្នុងរយៈពេលយូរ។
- ព័ត៌មានស្តីពីការចោលឧបករណ៍សំណល់អេតចាយ៖ មិនត្រូវដុត ឬលាយឡំជាមួយកាកសំណល់ក្នុងផ្ទះទូទៅទេ សូមចាត់ទុកវាជាសំណល់អគ្គិសនីធម្មតា។
អរគុណសម្រាប់ការទិញasing ផលិតផលនេះ។
សម្រាប់ដំណើរការល្អបំផុត និងសុវត្ថិភាព សូមអានការណែនាំទាំងនេះដោយប្រុងប្រយ័ត្នមុនពេលភ្ជាប់ ប្រតិបត្តិការ ឬកែតម្រូវផលិតផលនេះ។ សូមរក្សាសៀវភៅណែនាំនេះទុកជាឯកសារយោងនាពេលអនាគត។
ឧបករណ៍ការពាររលកត្រូវបានណែនាំ
ផលិតផលនេះមានសមាសធាតុអគ្គិសនីរសើប ដែលអាចត្រូវបានខូចខាតដោយការកើនឡើងនៃចរន្តអគ្គិសនី ការកើនឡើង ការឆក់អគ្គិសនី ការឆក់ភ្លើង។
1. សេចក្តីផ្តើម
ផលិតផលនេះគឺផ្អែកលើបច្ចេកវិទ្យា JPEG2000 ។ វារួមបញ្ចូលច្រក Copper និង Fiber port នៅក្នុងប្រអប់តែមួយ។ ការបញ្ចូលកម្មវិធីបំប្លែងកូដគាំទ្ររហូតដល់ 4K60 4:4:4 ការបង្កប់ ឬស្រង់សំឡេង។ លទ្ធផលឌិកូដគាំទ្រដល់កម្រិត 4K60 4:4:4 ការស្រង់សំឡេង។ ផលិតផលនេះគាំទ្រមុខងារត្រឡប់អូឌីយ៉ូ ARC/eARC/S/PDIF/Analog ក៏គាំទ្រ USB2.0/KVM/Camera, 1G Ethernet, bidirectional RS-232, two-way IR and POE function។ ការគ្រប់គ្រងរបៀបភ្ញៀវនៃ RS-232, IR, CEC ត្រូវបានគាំទ្រ។ ច្រក RELAY ឆានែលពីរដែលភ្ជាប់មកជាមួយនិងច្រក I / O ឆានែលពីរសម្រាប់ការគ្រប់គ្រងទំនាក់ទំនង។ របៀប Dante AV-A ត្រូវបានគាំទ្រ ប្រសិនបើផលិតផលត្រូវបានបើកដំណើរការអាជ្ញាប័ណ្ណ។
ភ្ជាប់មកជាមួយ MJPEG Substream ដែលគាំទ្រការបញ្ជា API ជាច្រើនដើម្បីសម្រេចបាននូវការកំណត់រចនាសម្ព័ន្ធដែលអាចបត់បែនបានគឺមានប្រយោជន៍សម្រាប់កម្មវិធីគ្រប់គ្រងភាគីទី 3 ជាមុន។view មាតិកាវីដេអូ។
ប្រព័ន្ធនេះគឺផ្អែកលើលីនុចសម្រាប់ការអភិវឌ្ឍន៍កម្មវិធី ផ្តល់នូវវិធីសាស្ត្រត្រួតពិនិត្យដែលអាចបត់បែនបាន ដែលផ្អែកលើបណ្តាញឆ្លាតវៃនៃ 1G Ethernet Switch ។
2. លក្ខណៈពិសេស
☆ អនុលោមតាម HDCP 2.2
☆ គាំទ្រកម្រិតបញ្ជូនវីដេអូ 18Gbps
☆ គុណភាពបង្ហាញវីដេអូបញ្ចូល និងលទ្ធផលគឺរហូតដល់ 4K60 4:4:4 ដូចដែលបានបញ្ជាក់នៅក្នុង HDMI 2.0b
☆ ចម្ងាយបញ្ជូនសញ្ញាអាចពង្រីករហូតដល់ 328ft/100m តាមរយៈខ្សែ CAT5E/6/6A/7
☆ បញ្ជូនវីដេអូ អូឌីយ៉ូអាណាឡូក/ឌីជីថល IR RS-232 CEC និង USB តាមអ៊ីសឺរណិត
☆ បញ្ចូលច្រកស្ពាន់ និងច្រក Fiber នៅក្នុងប្រអប់តែមួយ
☆ ARC/eARC/S/PDIF/មុខងារត្រឡប់អូឌីយ៉ូអាណាឡូក
☆ របៀប Dante AV-A ត្រូវបានគាំទ្រប្រសិនបើអាជ្ញាប័ណ្ណត្រូវបានធ្វើឱ្យសកម្ម
☆ ការកំណត់រចនាសម្ព័ន្ធឆានែលតាមរយៈប៊ូតុងបន្ទះខាងមុខ និងអេក្រង់ LED
☆ ច្រក RELAY ពីរដែលភ្ជាប់មកជាមួយនិងច្រក I/O ឆានែលពីរសម្រាប់ការគ្រប់គ្រងទំនាក់ទំនង
☆ គាំទ្រមុខងារ unicast និង multicast
☆ គាំទ្រចំណុចមួយទៅចំណុច ម៉ាទ្រីសវីដេអូ និងមុខងារជញ្ជាំងវីដេអូ (ជញ្ជាំងវីដេអូគាំទ្ររហូតដល់ 9 × 9)
☆ការគ្រប់គ្រងថ្នាក់ជញ្ជាំងវីដេអូឆ្លាតវៃ
☆ គាំទ្រ MJPEG Substream ពេលវេលាពិតមុនview
☆ 1G Ethernet Switch
☆គាំទ្រមុខងារ POE
☆ ភ្ជាប់មកជាមួយ web ការកំណត់រចនាសម្ព័ន្ធ និងការគ្រប់គ្រងទំព័រ Telnet និង SSH ផងដែរ។
☆ ទម្រង់អូឌីយ៉ូ HDMI៖ LPCM 2.0/5.1/7.1CH, Dolby Digital/Plus/EX, Dolby True HD, DTS, DTS-96/24, DTS-EX DSD, DTS High Res, DTS-HD Master
☆ ការរចនាបណ្តាញឆ្លាតវៃសម្រាប់ការដំឡើងងាយស្រួល និងអាចបត់បែនបាន។
3. មាតិកាកញ្ចប់
| ចំនួន | ធាតុ |
| 1 | អ៊ិនកូដ 4K60 លើ IP 1GbE |
| 1 | ខ្សែទទួល IR (1.5 ម៉ែត្រ) |
| 1 | ខ្សែ IR Blaster (១,៥ ម៉ែត្រ) |
| 3 | ឧបករណ៍ភ្ជាប់ Phoenix 3-pin 3.81mm |
| 2 | ឧបករណ៍ភ្ជាប់ Phoenix 4-pin 3.81mm |
| 1 | អាដាប់ទ័រចាក់សោថាមពល 12V / 2.5A |
| 2 | ការដំឡើងត្រចៀក |
| 4 | វីសម៉ាស៊ីន (KM3*4) |
| 1 | សៀវភៅណែនាំអ្នកប្រើប្រាស់ |
or
| ចំនួន | ធាតុ |
| 1 | ឧបករណ៍ឌិកូដ 4K60 លើ IP 1GbE |
| 1 | ខ្សែទទួល IR (1.5 ម៉ែត្រ) |
| 1 | ខ្សែ IR Blaster (១,៥ ម៉ែត្រ) |
| 3 | ឧបករណ៍ភ្ជាប់ Phoenix 3-pin 3.81mm |
| 2 | ឧបករណ៍ភ្ជាប់ Phoenix 4-pin 3.81mm |
| 1 | អាដាប់ទ័រចាក់សោថាមពល 12V / 2.5A |
| 2 | ការដំឡើងត្រចៀក |
| 4 | វីសម៉ាស៊ីន (KM3*4) |
| 1 | សៀវភៅណែនាំអ្នកប្រើប្រាស់ |
4. លក្ខណៈបច្ចេកទេស
បច្ចេកទេស
| អនុលោមតាម HDMI | HDMI 2.0b |
| អនុលោមតាម HDCP | HDCP 2.2 |
| កម្រិតបញ្ជូនវីដេអូ | 18Gbps |
| ស្តង់ដារបង្ហាប់វីដេអូ | JPEG2000 |
| កម្រិតបញ្ជូនបណ្តាញវីដេអូ | 1G |
| ដំណោះស្រាយវីដេអូ | រហូតដល់ 4K@60Hz 4:4:4 |
| ជម្រៅពណ៌ | បញ្ចូល៖ ៨/១០/១២ ប៊ីត លទ្ធផល៖ ៨ ប៊ីត |
| ចន្លោះពណ៌ | RGB 4:4:4, YCbCr 4:4:4 / 4:2:2 / 4:2:0 |
| ទ្រង់ទ្រាយអូឌីយ៉ូ HDMI | LPCM 2.0/5.1/7.1CH, Dolby Digital/Plus/EX, Dolby True HD, DTS, DTS-96/24, DTS-EX DSD, DTS High Res, DTS-HD Master |
| ចម្ងាយបញ្ជូន | 100M CAT5E/6/6A/7 |
| កម្រិត IR | លំនាំដើម 12V ស្រេចចិត្ត 5V |
| ប្រេកង់ IR | រលកពន្លឺ 20K - 60KHz |
| ការការពារ ESD | IEC 61000-4-2: ± 8kV (ការបញ្ចេញគម្លាតខ្យល់) & ± 4kV (ទំនាក់ទំនងផ្តាច់ចរន្ត) |
ការតភ្ជាប់
| ឧបករណ៍បំលែងកូដ | ធាតុបញ្ចូល៖ 1 x HDMI IN [ប្រភេទ A, 19-pin ស្រី] 1 x L/R AUDIO IN [3-pin 3.81mm Phoenix connector] លទ្ធផល: 1 x HDMI OUT [ប្រភេទ A, 19-pin female] 1 x L/R AUDIO OUT [3-pin 3.81mm xOUD Connector] Phoenix អូឌីយ៉ូ: 1 x OPD RS-232 [3-pin 3.81mm Phoenix connector] 1 x LAN (POE) [RJ45 jack] 1 x FIBER [Optical fiber slot] 1 x USB 2.0 HOST [Type B, 4-pin female] 2 x USB 2.0 DEVICE [Type-A, x 4pin female] 2 [Type-A, x 4pin female] 2. DIGITAL IO [ឧបករណ៍ភ្ជាប់ Phoenix 3.81mm] 1 x IR IN [3.5mm Audio Jack] 1 x IR OUT [3.5mm Audio Jack] |
| ឌិកូដ | ធាតុបញ្ចូល៖ 1 x SPDIF IN [ឧបករណ៍ភ្ជាប់អូឌីយ៉ូអុបទិក] 1 x L/R AUDIO IN [ឧបករណ៍ភ្ជាប់ Phoenix 3-pin 3.81mm] លទ្ធផល៖ 1 x HDMI OUT [ប្រភេទ A, 19-pin ស្រី] 1 x L/R AUDIO OUT [3-pin 3.81mm Phoenix connector] RS-212 mm x ការគ្រប់គ្រង៖ 1 x LAN (POE) [RJ45 jack] 1 x FIBER [រន្ធដោតខ្សែអុបទិក] 2 x USB 1.1 DEVICE [Type-A, 4-pin female] 2 x USB 2.0 DEVICE [Type-A, 4-pin female] 2 x RELAYS [3.81mm Phoenix DIGIT connector] 2.3 mm. x IR IN [3.5mm Audio Jack] 1 x IR OUT [3.5mm Audio Jack] |
មេកានិច
| លំនៅដ្ឋាន | ឯករភជប់ដែក |
| ពណ៌ | ខ្មៅ |
| វិមាត្រ | អ៊ិនកូដ/ឌិកូដ៖ 204mm [W] x 136mm [D] x 25.5mm [H] |
| ទម្ងន់ | ឧបករណ៍បំលែងកូដ៖ ១៥៨ ក្រាម ឧបករណ៍ឌិកូដ៖ ១៥៥ ក្រាម។ |
| ការផ្គត់ផ្គង់ថាមពល | បញ្ចូល: AC100 - 240V 50/60Hz, ទិន្នផល: DC 12V / 2.5A (ស្តង់ដារសហរដ្ឋអាមេរិក / EU, CE / FCC / UL បានបញ្ជាក់) |
| ការប្រើប្រាស់ថាមពល | ឧបករណ៍បំលែងកូដ៖ 8.52W ឧបករណ៍ឌិកូដ៖ 7.08W (អតិបរមា) |
| សីតុណ្ហភាពប្រតិបត្តិការ | ៣២ - ១០៤ អង្សាសេ / ០ - ៤០ អង្សាសេ |
| សីតុណ្ហភាពផ្ទុក | -4 -140 ° F / -20 -60 ° C |
| សំណើមដែលទាក់ទង | 20 - 90% RH (គ្មាន condensing) |
| ដំណោះស្រាយ / ប្រវែងខ្សែ | 4K60 - ហ្វីត / ម៉ែត្រ | 4K30 - ហ្វីត / ម៉ែត្រ | 1080P60 - ហ្វីត / ម៉ែត្រ |
| រន្ធ HDMI IN / OUT | ១៦៤ ហ្វីត / ៥០ ម | ១៦៤ ហ្វីត / ៥០ ម | ១៦៤ ហ្វីត / ៥០ ម |
| ការប្រើប្រាស់ខ្សែ "Premium High Speed HDMI" ត្រូវបានណែនាំយ៉ាងខ្លាំង។ | |||
ការត្រួតពិនិត្យប្រតិបត្តិការនិងមុខងារ
5.1 បន្ទះបំលែងកូដ


| ទេ | ឈ្មោះ | ការពិពណ៌នាមុខងារ |
| 1 | កំណត់ឡើងវិញ | បន្ទាប់ពីបើកថាមពលនៅលើឧបករណ៍ហើយ សូមចុចប៊ូតុង RESET ឱ្យជាប់រហូតទាល់តែ POWER LED និង LINK LED flash ក្នុងពេលតែមួយ លែងប៊ូតុងដើម្បីកំណត់ឧបករណ៍ឡើងវិញទៅការកំណត់របស់រោងចក្រ។ |
| 2 | អំពូល LED (ក្រហម) |
|
| 3 | តំណភ្ជាប់ LED (បៃតង) | ស្ថានភាពការតភ្ជាប់ LED ។
|
| 4 | អេក្រង់ LED | បង្ហាញលេខសម្គាល់កម្មវិធីអ៊ិនកូដជាលំនាំដើម។ បង្ហាញជម្រើសដែលត្រូវគ្នានៃមុខងារកំណត់រចនាសម្ព័ន្ធកំឡុងពេលកំណត់ការកំណត់រចនាសម្ព័ន្ធអ៊ិនកូដឌ័រ។ |
| 5 | CH SELECT | ប្រើដើម្បីកំណត់លេខសម្គាល់អ៊ិនកូដឌ័រ និងការកំណត់ផ្សេងទៀត។ |
| 6 | ឧបករណ៍ USB 2.0 | ភ្ជាប់ទៅឧបករណ៍ USB 2.0 ។ |
| 7 | USB HOST | ឧបករណ៍ភ្ជាប់ USB-B សម្រាប់ភ្ជាប់កុំព្យូទ័រ។ |
| 8 | IR ចេញ | ច្រកចេញសញ្ញា IR ។ កម្រិត IR អាចត្រូវបានកំណត់ទៅ 5V ឬ 12V (លំនាំដើម) តាមរយៈប៊ូតុងបន្ទះ។ |
| 9 | IR IN | ច្រកបញ្ចូលសញ្ញា IR ។ កម្រិត IR អាចត្រូវបានកំណត់ទៅ 5V ឬ 12V (លំនាំដើម) តាមរយៈប៊ូតុងបន្ទះ។ |
| 10 | បញ្ជូនបន្ត IO ឌីជីថល | VCC: ទិន្នផលថាមពល (12V ឬ 5V អាចកំណត់រចនាសម្ព័ន្ធបាន) អតិបរមាដល់ 12V @50mA, 5V@ 100mA ផ្ទុក។ ទិន្នផលលំនាំដើមគឺ 12V ។ ការបញ្ជូនបន្ត៖ ឆានែល 2 វ៉ុលទាបtage relay ports ក្រុមនីមួយៗគឺឯករាជ្យ និងដាច់ឆ្ងាយ ផ្ទុកអតិបរមាដល់ 1A 30VDC ។ ទំនាក់ទំនងត្រូវបានផ្តាច់តាមលំនាំដើម។ DIGITAL IO: ច្រក GPIO ចំនួន 2 សម្រាប់ការគ្រប់គ្រងកម្រិតសញ្ញាឌីជីថល ឬការរកឃើញការបញ្ចូល (ការរកឃើញកម្រិត 12V)។ របៀបត្រួតពិនិត្យលទ្ធផល (របៀបលំនាំដើម កម្រិតទាបជាលទ្ធផលលំនាំដើម) ឬរបៀបរកឃើញការបញ្ចូលគឺអាចកំណត់រចនាសម្ព័ន្ធបាន។ លេខទាញឡើងខាងក្នុងឌីជីថល IOtage ធ្វើតាម VCC ។ របៀបត្រួតពិនិត្យលទ្ធផល៖ ក. អតិបរមាទប់ទល់នឹងចរន្តលិចគឺ 50mA នៅពេលបញ្ចេញកម្រិតទាប។ ខ. នៅពេលដែល VCC គឺ 5V ហើយកម្រិតខ្ពស់គឺជាទិន្នផល សមត្ថភាពបើកបរបច្ចុប្បន្នអតិបរមាគឺ 2mA ។ គ. នៅពេលដែល VCC គឺ 12V ហើយកម្រិតខ្ពស់គឺជាទិន្នផល សមត្ថភាពបើកបរបច្ចុប្បន្នអតិបរមាគឺ 5mA ។ របៀបរកឃើញការបញ្ចូល៖ ក. នៅពេលដែល VCC គឺ 5V ឌីជីថល IO ត្រូវបានទាញរហូតដល់ 5V នៅខាងក្នុងតាមរយៈរេស៊ីស្តង់ 2.2K ohm ។ ខ. នៅពេលដែល VCC គឺ 12V ឌីជីថល IO ត្រូវបានទាញរហូតដល់ 12V នៅខាងក្នុងតាមរយៈរេស៊ីស្តង់ 2.2K ohm ។ |
| 11 | RS-232 | ច្រកសៀរៀល RS-232 គាំទ្រ RS-232 ពាក្យបញ្ជាឆ្លងកាត់ និងការគ្រប់គ្រងច្រកសៀរៀលក្នុងស្រុក។ |
| 12 | អូឌីយ៉ូចូល / ចេញ | AUDIO IN៖ ច្រកបញ្ចូលអូឌីយ៉ូអាណាឡូក អូឌីយ៉ូអាចត្រូវបានបង្កប់ទៅក្នុងសញ្ញា HDMI សម្រាប់បញ្ជូនបន្តទៅទិន្នផល HDMI និងអូឌីយ៉ូចេញនៅលើឧបករណ៍ឌិកូដ ឬត្រូវបានបិទដោយច្រក AUDIO OUT នៅលើអ៊ិនកូដឌ័រ។ |
| អូឌីយ៉ូចេញ៖ ច្រកលទ្ធផលអូឌីយ៉ូអាណាឡូក។ វាអាចបញ្ចេញអូឌីយ៉ូដែលស្រង់ចេញពីរន្ធ HDMI IN (ក្នុងករណី LPCM) ។ វាក៏អាចបញ្ចេញអូឌីយ៉ូដែលបានបញ្ជូនពីច្រក AUDIO IN របស់ឌិកូដក្នុងរបៀប unicast (ការតភ្ជាប់ដោយផ្ទាល់ពីចំណុចមួយទៅចំណុច)។ | ||
| 13 | SPDIF ចេញ | ច្រកចេញសញ្ញា S/PDIF ។ វាអាចបញ្ចេញសំឡេង ARC ឬ S/PDIF ដែលបានត្រឡប់ពីឧបករណ៍ឌិកូដ នៅពេលដែលទាំងឧបករណ៍បំប្លែង និងឌិកូដត្រូវបានកំណត់ដែលត្រូវគ្នាទៅនឹងរបៀបត្រឡប់អូឌីយ៉ូ ARC ឬ S/PDIF (កំណត់តាមរយៈប្រអប់ឧបករណ៍បញ្ជា ឬពាក្យបញ្ជា API នៅក្នុងរបៀបពហុខាស កំណត់តាមរយៈប៊ូតុងបន្ទះខាងមុខក្នុងរបៀប unicast)។ |
| 14 | រន្ធ HDMI ចេញ | ច្រកចេញរន្ធ HDMI ក្នុងស្រុក ភ្ជាប់ទៅឧបករណ៍បង្ហាញ HDMI ដូចជាទូរទស្សន៍ ឬម៉ូនីទ័រ។ |
| 15 | រន្ធ HDMI ចូល | ច្រកបញ្ចូលសញ្ញា HDMI ដែលភ្ជាប់ទៅឧបករណ៍ប្រភព HDMI ដូចជា Blu-ray Player ឬប្រអប់ Set-top ដែលមានខ្សែ HDMI។ |
| 16 | ជាតិសរសៃ | ភ្ជាប់ជាមួយម៉ូឌុលអុបទិក ហើយបញ្ជូនសញ្ញាទៅឧបករណ៍ឌិកូដដោយប្រើខ្សែអុបទិកដោយផ្ទាល់ ឬតាមរយៈកុងតាក់។ |
| 17 | LAN (POE) | 1G LAN port, connect network Switch ដើម្បីបង្កើតប្រព័ន្ធចែកចាយ។ ចំណាំ៖ នៅពេលដែលកុងតាក់បណ្តាញផ្តល់ការផ្គត់ផ្គង់ថាមពល POE អាដាប់ទ័រ DC 12V មិនចាំបាច់អនុវត្តលើឧបករណ៍នោះទេ។ |
| 18 | សូចនាករសញ្ញាទិន្នន័យ lamp (លឿង) | ពន្លឺភ្លឹបភ្លែតៗ៖ មានការបញ្ជូនទិន្នន័យ។ ▪ បិទភ្លើង៖ មិនមានការបញ្ជូនទិន្នន័យទេ។ |
| 19 | តំណភ្ជាប់សញ្ញាសញ្ញា lamp (បៃតង) | បើកភ្លើង៖ ខ្សែបណ្តាញត្រូវបានភ្ជាប់ជាធម្មតា។ ▪ បិទភ្លើង៖ ខ្សែបណ្តាញមិនបានភ្ជាប់បានល្អទេ។ |
| 20 | DC 12V | ឧបករណ៍នេះអាចដំណើរការបានតាមពីរវិធី៖
នៅពេលដែល Switch គាំទ្រមុខងារ POE ការផ្គត់ផ្គង់ថាមពល DC មិនចាំបាច់ទេ។ |
ការពិពណ៌នាអំពីប្រតិបត្តិការនៃអេក្រង់ LED និងប៊ូតុង CH SELECT (សម្រាប់អ៊ិនកូដឌ័រ)។
1, លេខសម្គាល់ ENC៖ បន្ទាប់ពីប្រព័ន្ធត្រូវបានបើក អេក្រង់ LED របស់កម្មវិធីអ៊ិនកូដនឹងបង្ហាញលេខសម្គាល់ ENC (000 តាមលំនាំដើម ប្រសិនបើមិនកំណត់)។
2, អាសយដ្ឋាន IP៖ ចុចប៊ូតុង UP ឱ្យជាប់រយៈពេល 5 វិនាទី អេក្រង់ LED របស់កម្មវិធីបំប្លែងកូដនឹងបង្ហាញជាលំដាប់ “IPx”, “xxx”, “xxx”, “xxx”, “xxx” ដែលជារបៀប IP និងអាសយដ្ឋាន IP របស់កម្មវិធីអ៊ិនកូដ។
3, របៀបកំណត់រចនាសម្ព័ន្ធ៖ ចុចឱ្យជាប់ប៊ូតុង UP+DOWN ក្នុងពេលដំណាលគ្នារយៈពេល 5 វិនាទី បន្ទាប់មកលែងចេញដើម្បីចូលទៅក្នុងរបៀបកំណត់រចនាសម្ព័ន្ធជាមួយ "CFN" ដែលបង្ហាញនៅលើអេក្រង់ LED ។
4, ការកំណត់លេខសម្គាល់ឧបករណ៍៖ បន្ទាប់ពីចូលទៅក្នុងរបៀបកំណត់រចនាសម្ព័ន្ធ សូមចុចប៊ូតុង UP/DOWN ដើម្បីចូលទំព័រដំបូងដែលមានលេខសម្គាល់បច្ចុប្បន្ន (ឧទាហរណ៍ 001) ដែលបង្ហាញនៅលើអេក្រង់ LED (000 តាមលំនាំដើម)។ ចុចប៊ូតុង UP+DOWN ឱ្យជាប់រយៈពេល 5 វិនាទី បន្ទាប់មកលែងចេញ ដើម្បីចូលទៅក្នុងរបៀបកំណត់លេខសម្គាល់ ដែលលេខសម្គាល់ (ឧ. 001) នៅលើអេក្រង់ LED នឹងបញ្ចេញពន្លឺនៅកម្រិត 1Hz បន្ទាប់មកចុចប៊ូតុង UP/DOWN ដើម្បីជ្រើសរើសលេខសម្គាល់ឧបករណ៍ដែលអ្នកចង់បាន (ID range: 000~762) បន្ទាប់មកចុចប៊ូតុង UP+DOWN ឱ្យជាប់រយៈពេល 5 វិនាទី ដើម្បីបញ្ជាក់ការកំណត់ ហើយបញ្ឈប់ការបើកពន្លឺ។ បន្ទាប់ពីការកំណត់ ឯកតានឹងចាប់ផ្ដើមឡើងវិញដោយស្វ័យប្រវត្តិ។
ចំណាំ៖ លេខសម្គាល់ឧបករណ៍មិនអាចកែប្រែនៅក្នុងរបៀបប្រអប់ឧបករណ៍បញ្ជាបានទេ។
5, ការកំណត់ EDID៖ បន្ទាប់ពីចូលទៅក្នុងរបៀបកំណត់រចនាសម្ព័ន្ធ សូមចុចប៊ូតុង UP/DOWN ដើម្បីចូលទៅកាន់ទំព័រទីពីរដោយ “E00” (ដែល “E” សំដៅលើ EDID, “00” ទៅ EDID ID) ឬ “COP” (ដែលបង្ហាញពីការចម្លង EDID) ដែលបង្ហាញនៅលើអេក្រង់ LED (E15 តាមលំនាំដើម)។
ចុចប៊ូតុង UP+DOWN ឱ្យជាប់រយៈពេល 5 វិនាទី បន្ទាប់មកលែងចេញ ដើម្បីចូលទៅក្នុងរបៀបកំណត់ EDID ដែលលេខសម្គាល់ EDID (ឧ. E01) នៅលើអេក្រង់ LED នឹងបញ្ចេញពន្លឺនៅកម្រិត 1Hz បន្ទាប់មកចុចប៊ូតុង UP/DOWN ដើម្បីជ្រើសរើស EDID ID ដែលអ្នកចង់បាន បន្ទាប់មកចុចប៊ូតុង UP+DOWN ឱ្យជាប់រយៈពេល 5 វិនាទី ដើម្បីបញ្ជាក់ការកំណត់ និងបញ្ឈប់ការបញ្ចេញពន្លឺ។
លេខសម្គាល់ EDID ដែលត្រូវគ្នាមានដូចខាងក្រោម៖
| លេខសម្គាល់ EDID | ការពិពណ៌នា EDID |
| អ៊ី២៦ | 1080P_Stereo_Audio_2.0_SDR |
| អ៊ី២៦ | 1080P_DolbyDTS_5.1_SDR |
| អ៊ី២៦ | 1080P_HD_Audio_7.1_SDR |
| អ៊ី២៦ | 1080I_Stereo_Audio_2.0_SDR |
| អ៊ី២៦ | 1080I_DolbyDTS_5.1_SDR |
| អ៊ី២៦ | 1080I_HD_Audio_7.1_SDR |
| អ៊ី២៦ | 3D_Stereo_Audio_2.0_SDR |
| អ៊ី២៦ | 3D_DolbyDTS_5.1_SDR |
| អ៊ី២៦ | 3D_HD_Audio_7.1_SDR |
| អ៊ី២៦ | 4K2K30_444_Stereo_Audio_2.0_SDR |
| អ៊ី២៦ | 4K2K30_444_DolbyDTS_5.1_SDR |
| អ៊ី២៦ | 4K2K30_444_HD_Audio_7.1_SDR |
| អ៊ី២៦ | 4K2K60_420_Stereo_Audio_2.0_SDR |
| អ៊ី២៦ | 4K2K60_420_DolbyDTS_5.1_SDR |
| អ៊ី២៦ | 4K2K60_420_HD_Audio_7.1_SDR |
| អ៊ី២៦ | 4K2K60_444_Stereo_Audio_2.0_SDR |
| អ៊ី២៦ | 4K2K60_444_DolbyDTS_5.1_SDR |
| អ៊ី២៦ | 4K2K60_444_HD_Audio_7.1_SDR |
| អ៊ី២៦ | 4K2K60_444_Stereo_Audio_2.0_HDR_10-bit |
| អ៊ី២៦ | 4K2K60_444_DolbyDTS_5.1_HDR_10-bit |
| អ៊ី២៦ | 4K2K60_444_HD_Audio_7.1_HDR_10-bit |
| អ៊ី២៦ | DVI_1280x1024 |
| អ៊ី២៦ | DVI_1920x1080 |
| អ៊ី២៦ | DVI_1920x1200 |
ចំណាំ៖ នៅក្នុងរបៀបភ្ជាប់ចំណុចទៅចំណុច មុនពេលប្រើមុខងារចម្លង EDID កូឌិកទាំងអស់ត្រូវកំណត់ទៅជារបៀប CA1 unicast ហើយបន្ទាប់ពីការកំណត់ ខ្សែ HDMI របស់ឧបករណ៍ឌិកូដត្រូវដោតម្តងទៀតដើម្បីរាយការណ៍ EDID នៃទូរទស្សន៍ទៅកាន់ឧបករណ៍បំប្លែងកូដ។
6, ការកំណត់របៀប IR៖ បន្ទាប់ពីចូលទៅក្នុងរបៀបកំណត់រចនាសម្ព័ន្ធ សូមចុចប៊ូតុង UP/DOWN ដើម្បីចូលទៅកាន់ទំព័រទីបីដោយ “IR2” (ដែល “IR” សំដៅលើ IR និង “2” ទៅ 12V) ដែលបង្ហាញនៅលើអេក្រង់ LED (IR2 តាមលំនាំដើម)។ ចុចប៊ូតុង UP+DOWN ឱ្យជាប់រយៈពេល 5 វិនាទី បន្ទាប់មកលែងចេញ ដើម្បីចូលទៅក្នុងទម្រង់ការកំណត់ ដែលនៅក្នុងរបៀប IR (IR1 ឬ IR2) នៅលើអេក្រង់ LED នឹងបញ្ចេញពន្លឺនៅកម្រិត 1Hz បន្ទាប់មកចុចប៊ូតុង UP/DOWN ដើម្បីជ្រើសរើសរបៀប IR បន្ទាប់មកចុចប៊ូតុង UP+DOWN ឱ្យជាប់រយៈពេល 5 វិនាទី ដើម្បីបញ្ជាក់ការកំណត់ និងបញ្ឈប់ការបញ្ចេញពន្លឺ។
ជម្រើសរបៀប IR ដែលត្រូវគ្នាមានដូចខាងក្រោម៖
IR1: 5V ខ្សែ IR
IR2: 12V ខ្សែ IR
7, ការកំណត់របៀបបង្កប់សំឡេង៖ បន្ទាប់ពីចូលទៅក្នុងរបៀបកំណត់រចនាសម្ព័ន្ធ សូមចុចប៊ូតុង UP/DOWN ដើម្បីចូលទៅកាន់ទំព័រទីបួនជាមួយនឹង “HDI/ANA” ដែលបង្ហាញនៅលើអេក្រង់ LED (HDI តាមលំនាំដើម)។ ចុចឱ្យជាប់ប៊ូតុង UP + ចុះក្រោមរយៈពេល 5 វិនាទី បន្ទាប់មកលែងចេញ ដើម្បីចូលទៅក្នុងរបៀបកំណត់ ដែលនៅក្នុងរបៀបត្រឡប់សំឡេង (HDI/ANA) នៅលើអេក្រង់ LED នឹងបញ្ចេញពន្លឺនៅកម្រិត 1Hz បន្ទាប់មកចុចប៊ូតុង UP/DOWN ដើម្បីជ្រើសរើសរបៀប បន្ទាប់មកចុចប៊ូតុង UP+DOWN ឱ្យជាប់រយៈពេល 5 វិនាទី ដើម្បីបញ្ជាក់ការកំណត់ ហើយឈប់បញ្ចេញពន្លឺ។
ជម្រើសរបៀបបង្កប់អូឌីយ៉ូដែលត្រូវគ្នាមានដូចខាងក្រោម៖
HDI៖ ការបង្កប់អូឌីយ៉ូ HDMI
ANA៖ ការបង្កប់អូឌីយ៉ូអាណាឡូក
8, ការកំណត់របៀប IP៖ បន្ទាប់ពីចូលទៅក្នុងរបៀបកំណត់រចនាសម្ព័ន្ធ សូមចុចប៊ូតុង UP/DOWN ដើម្បីចូលទៅកាន់ទំព័រទីប្រាំជាមួយនឹង “IP1/IP2/IP3” ដែលបង្ហាញនៅលើអេក្រង់ LED (IP3 តាមលំនាំដើម)។
ចុចប៊ូតុង UP + DOWN ឱ្យជាប់រយៈពេល 5 វិនាទី បន្ទាប់មកលែងចេញ ដើម្បីចូលទៅក្នុងទម្រង់ការកំណត់ ដែលនៅក្នុងរបៀប IP (IP1/IP2/IP3) នៅលើអេក្រង់ LED នឹងបញ្ចេញពន្លឺនៅកម្រិត 1Hz បន្ទាប់មកចុចប៊ូតុង UP/DOWN ដើម្បីជ្រើសរើសមុខងារ បន្ទាប់មកចុចប៊ូតុង UP+DOWN ឱ្យជាប់រយៈពេល 5 វិនាទី ដើម្បីបញ្ជាក់ការកំណត់ ហើយឈប់បញ្ចេញពន្លឺ។ បន្ទាប់ពីការកំណត់ ឯកតានឹងចាប់ផ្ដើមឡើងវិញដោយស្វ័យប្រវត្តិ។
ជម្រើសរបៀប IP ដែលត្រូវគ្នាមានដូចខាងក្រោម៖
IP1៖ របៀប IP ឋិតិវន្ត (អាសយដ្ឋាន IP លំនាំដើម៖ 169.254.100.254)
IP2៖ របៀប IP DHCP
IP3៖ របៀប IP ស្វ័យប្រវត្តិ (ផ្នែកបណ្តាញដែលបានកំណត់លំនាំដើម៖ 169.254.xxx.xxx)
ចំណាំ៖ របៀប IP មិនអាចត្រូវបានកែប្រែក្នុងទម្រង់ Controller Box ទេ។
9, ការកំណត់របៀប Fiber/Copper៖ បន្ទាប់ពីចូលទៅក្នុងរបៀបកំណត់រចនាសម្ព័ន្ធ សូមចុចប៊ូតុង UP/DOWN ដើម្បីចូលទៅកាន់ទំព័រទីប្រាំមួយជាមួយនឹង “CPP/FIB” ដែលបង្ហាញនៅលើអេក្រង់ LED (CPP តាមលំនាំដើម)។ ចុចប៊ូតុង UP + DOWN ឱ្យជាប់រយៈពេល 5 វិនាទី បន្ទាប់មកលែងចេញ ដើម្បីចូលទៅក្នុងរបៀបកំណត់ ដែលនៅក្នុងរបៀប Fiber/Copper (CPP/FIB) នៅលើអេក្រង់ LED នឹងបញ្ចេញពន្លឺនៅកម្រិត 1Hz បន្ទាប់មកចុចប៊ូតុង UP/DOWN ដើម្បីជ្រើសរើសមុខងារ បន្ទាប់មកចុចប៊ូតុង UP+DOWN ឱ្យជាប់រយៈពេល 5 វិនាទី ដើម្បីបញ្ជាក់ការកំណត់ ហើយបញ្ឈប់ការលោតពន្លឺ។ បន្ទាប់ពីការកំណត់ ឯកតានឹងចាប់ផ្ដើមឡើងវិញដោយស្វ័យប្រវត្តិ។
ជម្រើសរបៀប Fiber/Copper ដែលត្រូវគ្នាមានដូចខាងក្រោម៖
CPP: របៀបស្ពាន់
FIB: របៀបសរសៃ
10, ការកំណត់របៀបពហុខាស៖ បន្ទាប់ពីចូលទៅក្នុងរបៀបកំណត់រចនាសម្ព័ន្ធ សូមចុចប៊ូតុង UP/DOWN ដើម្បីចូលទៅកាន់ទំព័រទីប្រាំពីរជាមួយនឹង “CA1/CA2” ដែលបង្ហាញនៅលើអេក្រង់ LED (CA1 តាមលំនាំដើម)។ ចុចឱ្យជាប់ប៊ូតុង UP + ចុះក្រោមរយៈពេល 5 វិនាទី បន្ទាប់មកលែងចេញដើម្បីចូលទៅក្នុងទម្រង់ការកំណត់ ដែលរបៀបពហុខាស (CA1/CA2) នៅលើអេក្រង់ LED នឹងបញ្ចេញពន្លឺនៅកម្រិត 1Hz បន្ទាប់មកចុចប៊ូតុង UP/DOWN ដើម្បីជ្រើសរើសរបៀប បន្ទាប់មកចុចប៊ូតុង UP+DOWN ឱ្យជាប់រយៈពេល 5 វិនាទី ដើម្បីបញ្ជាក់ការកំណត់ ហើយឈប់បញ្ចេញពន្លឺ។ បន្ទាប់ពីការកំណត់ ឯកតានឹងចាប់ផ្ដើមឡើងវិញដោយស្វ័យប្រវត្តិ។
ជម្រើសរបៀបពហុខាសដែលត្រូវគ្នាមានដូចខាងក្រោម៖
CA1៖ របៀប Unicast
CA2៖ របៀបពហុខាស
11, ការកំណត់របៀបត្រឡប់សំឡេង៖ បន្ទាប់ពីចូលទៅក្នុងរបៀបកំណត់រចនាសម្ព័ន្ធ សូមចុចប៊ូតុង UP/DOWN ដើម្បីចូលទៅកាន់ទំព័រទីប្រាំបីជាមួយនឹង “C2C/A2A” ដែលបង្ហាញនៅលើអេក្រង់ LED (C2C តាមលំនាំដើម)។ ចុចប៊ូតុង UP+DOWN ឱ្យជាប់រយៈពេល 5 វិនាទី បន្ទាប់មកលែងចេញ ដើម្បីចូលទៅក្នុងរបៀបកំណត់ ដែលនៅក្នុងរបៀបត្រឡប់អូឌីយ៉ូ (C2C/A2A) នៅលើអេក្រង់ LED នឹងបញ្ចេញពន្លឺនៅកម្រិត 1Hz បន្ទាប់មកចុចប៊ូតុង UP/DOWN ដើម្បីជ្រើសរើសមុខងារ បន្ទាប់មកចុចប៊ូតុង UP+DOWN ឱ្យជាប់រយៈពេល 5 វិនាទី ដើម្បីបញ្ជាក់ការកំណត់ និងបញ្ឈប់ការបញ្ចេញពន្លឺ។ បន្ទាប់ពីការកំណត់ ឯកតានឹងចាប់ផ្ដើមឡើងវិញដោយស្វ័យប្រវត្តិ។
ជម្រើសរបៀបត្រឡប់អូឌីយ៉ូដែលត្រូវគ្នាមានដូចខាងក្រោម៖
C2C៖ អូឌីយ៉ូ eARC/ARC ឬ S/PDIF ពីឧបករណ៍ឌិកូដត្រូវបានបញ្ជូនត្រឡប់ទៅរន្ធ HDMI IN ឬ SPDIF OUT របស់ឧបករណ៍បំលែងកូដ។
A2A៖ អូឌីយ៉ូអាណាឡូកដែលបានបង្កប់នៅក្នុងឧបករណ៍ឌិកូដត្រូវបានបញ្ជូនត្រឡប់ទៅច្រកអូឌីយ៉ូអាណាឡូក AUDIO OUT របស់ឧបករណ៍បំលែងកូដ។
ចំណាំ៖
(1) របៀបត្រឡប់សំឡេងមិនអាចត្រូវបានកែប្រែតាមរយៈប៊ូតុងបន្ទះខាងមុខក្នុងប្រអប់ Controller ឬ Multicast mode ទេ។
(2) លុះត្រាតែទាំងឧបករណ៍បំប្លែង និងឌិកូដត្រូវបានកំណត់ដែលត្រូវគ្នាទៅនឹងរបៀបត្រឡប់អូឌីយ៉ូ C2C/A2A ក្នុងរបៀប unicast នោះ ការត្រឡប់អូឌីយ៉ូអាចត្រូវបានដឹង។
(3) របៀបត្រឡប់អូឌីយ៉ូ A2A អាចប្រើបានតែក្នុងរបៀប unicast ប៉ុណ្ណោះ។
(4) ពេលណាត្រូវប្រើ ARC, ARC អូឌីយ៉ូ amplifier នៅលើ Encoder HDMI IN port និង ARC TV នៅលើ Decoder HDMI OUT port គួរតែត្រូវបានប្រើ។
ពេលណាត្រូវប្រើ eARC, eARC អូឌីយ៉ូ amplifier នៅលើ Encoder HDMI IN port និង eARC TV នៅលើ Decoder HDMI OUT port គួរតែត្រូវបានប្រើ។
(5) បន្ទាប់ពីបញ្ចូលរបៀបកំណត់ផ្សេងៗ អ្នកអាចសង្កត់ប៊ូតុងចុះក្រោម ដើម្បីចេញពីចំណុចប្រទាក់បច្ចុប្បន្នយ៉ាងឆាប់រហ័ស ឬប្រសិនបើអ្នកមិនធ្វើប្រតិបត្តិការណាមួយក្នុងរយៈពេល 5 វិនាទី វានឹងត្រឡប់ទៅចំណុចប្រទាក់ពីមុនដោយស្វ័យប្រវត្តិ។
5.2 បន្ទះឌិកូដ


| ទេ | ឈ្មោះ | ការពិពណ៌នាមុខងារ |
| 1 | កំណត់ឡើងវិញ | បន្ទាប់ពីបើកថាមពលនៅលើឧបករណ៍ហើយ សូមចុចប៊ូតុង RESET ឱ្យជាប់រហូតទាល់តែ POWER LED និង LINK LED flash ក្នុងពេលតែមួយ លែងប៊ូតុងដើម្បីកំណត់ឧបករណ៍ឡើងវិញទៅការកំណត់របស់រោងចក្រ។ |
| 2 | អំពូល LED (ក្រហម) |
|
| 3 | តំណភ្ជាប់ LED (បៃតង) | ស្ថានភាពការតភ្ជាប់ LED ។
|
| 4 | អេក្រង់ LED | បង្ហាញលេខសម្គាល់អ៊ិនកូដឌ័រដែលបានជ្រើសរើសជាលំនាំដើម។ បង្ហាញជម្រើសដែលត្រូវគ្នានៃមុខងារកំណត់រចនាសម្ព័ន្ធកំឡុងពេលកំណត់ការកំណត់រចនាសម្ព័ន្ធឌិកូដ។ |
| 5 | CH SELECT | ប្រើដើម្បីកំណត់លេខសម្គាល់អ្នកឌិកូដ និងការកំណត់ផ្សេងទៀត។ |
| 6 | ឧបករណ៍ USB 1.1 | ភ្ជាប់ទៅឧបករណ៍ USB 1.1 ដូចជាក្តារចុច ឬកណ្ដុរ។ |
| 7 | ឧបករណ៍ USB 2.0 | ភ្ជាប់ទៅឧបករណ៍ USB 2.0 ដូចជា USB flash disk ឬ USB Camera។ |
| 8 | IR ចេញ | ច្រកចេញសញ្ញា IR ។ កម្រិត IR អាចត្រូវបានកំណត់ទៅ 5V ឬ 12V (លំនាំដើម) តាមរយៈប៊ូតុងបន្ទះ។ |
| 9 | IR IN | ច្រកបញ្ចូលសញ្ញា IR ។ កម្រិត IR អាចត្រូវបានកំណត់ទៅ 5V ឬ 12V (លំនាំដើម) តាមរយៈប៊ូតុងបន្ទះ។ |
| 10 | បញ្ជូនបន្ត IO ឌីជីថល | VCC: ទិន្នផលថាមពល (12V ឬ 5V អាចកំណត់រចនាសម្ព័ន្ធបាន) អតិបរមាដល់ 12V@50mA, 5V@ 100mA ផ្ទុក។ ទិន្នផលលំនាំដើមគឺ 12V ។ ការបញ្ជូនបន្ត៖ ឆានែល 2 វ៉ុលទាបtage relay ports ក្រុមនីមួយៗគឺឯករាជ្យ និងដាច់ឆ្ងាយ ផ្ទុកអតិបរមាដល់ 1A 30VDC ។ ទំនាក់ទំនងត្រូវបានផ្តាច់តាមលំនាំដើម។ DIGITAL IO: ច្រក GPIO ចំនួន 2 សម្រាប់ការគ្រប់គ្រងកម្រិតសញ្ញាឌីជីថល ឬការរកឃើញការបញ្ចូល (ការរកឃើញកម្រិត 12V)។ របៀបត្រួតពិនិត្យលទ្ធផល (របៀបលំនាំដើម កម្រិតទាបជាលទ្ធផលលំនាំដើម) ឬរបៀបរកឃើញការបញ្ចូលគឺអាចកំណត់រចនាសម្ព័ន្ធបាន។ លេខទាញឡើងខាងក្នុងឌីជីថល IOtage ធ្វើតាម VCC ។ របៀបត្រួតពិនិត្យលទ្ធផល៖ ក. អតិបរមាទប់ទល់នឹងចរន្តលិចគឺ 50mA នៅពេលបញ្ចេញកម្រិតទាប។ ខ. នៅពេលដែល VCC គឺ 5V ហើយកម្រិតខ្ពស់គឺជាទិន្នផល សមត្ថភាពបើកបរបច្ចុប្បន្នអតិបរមាគឺ 2mA ។ គ. នៅពេលដែល VCC គឺ 12V ហើយកម្រិតខ្ពស់គឺជាទិន្នផល សមត្ថភាពបើកបរបច្ចុប្បន្នអតិបរមាគឺ 5mA ។ របៀបរកឃើញការបញ្ចូល៖ ក. នៅពេលដែល VCC គឺ 5V ឌីជីថល IO ត្រូវបានទាញរហូតដល់ 5V នៅខាងក្នុងតាមរយៈរេស៊ីស្តង់ 2.2K ohm ។ ខ. នៅពេលដែល VCC គឺ 12V ឌីជីថល IO ត្រូវបានទាញរហូតដល់ 12V នៅខាងក្នុងតាមរយៈរេស៊ីស្តង់ 2.2K ohm ។ |
| 11 | RS-232 | ច្រកសៀរៀល RS-232 គាំទ្រ RS-232 ពាក្យបញ្ជាឆ្លងកាត់ និងការគ្រប់គ្រងច្រកសៀរៀលក្នុងស្រុក។ |
| 12 | អូឌីយ៉ូចូល / ចេញ | អូឌីយ៉ូ IN៖ ច្រកបញ្ចូលអូឌីយ៉ូអាណាឡូក អូឌីយ៉ូអាចត្រូវបានបញ្ជូនទៅអ៊ិនកូដឌ័រអូឌីយ៉ូចេញក្នុងរបៀប unicast (ការតភ្ជាប់ដោយផ្ទាល់ពីចំណុចមួយទៅចំណុច)។ |
| អូឌីយ៉ូចេញ៖ ច្រកលទ្ធផលអូឌីយ៉ូអាណាឡូក។ វាបញ្ចេញអូឌីយ៉ូដូចគ្នានៅលើ HDMI OUT ក្នុងករណីទ្រង់ទ្រាយអូឌីយ៉ូគឺ LPCM ។ | ||
| 13 | SPDIF នៅក្នុង | ច្រកបញ្ចូលសញ្ញា S/PDIF ។ |
| 14 | រន្ធ HDMI ចេញ | ច្រកចេញសញ្ញា HDMI ភ្ជាប់ទៅឧបករណ៍បង្ហាញ HDMI ដូចជាទូរទស្សន៍ ឬម៉ូនីទ័រ។ |
| 15 | ជាតិសរសៃ | ភ្ជាប់ជាមួយម៉ូឌុលអុបទិកអុបទិក និងទទួលសញ្ញាពីឧបករណ៍បំលែងកូដដោយប្រើខ្សែអុបទិកដោយផ្ទាល់ ឬតាមរយៈកុងតាក់។ |
| 16 | LAN (POE) | 1G LAN port, connect network Switch ដើម្បីបង្កើតប្រព័ន្ធចែកចាយ។ ចំណាំ៖ នៅពេលដែលកុងតាក់បណ្តាញផ្តល់ការផ្គត់ផ្គង់ថាមពល POE អាដាប់ទ័រ DC 12V មិនចាំបាច់អនុវត្តលើឧបករណ៍នោះទេ។ |
| 17 | សូចនាករសញ្ញាទិន្នន័យ lamp (លឿង) |
|
| 18 | តំណភ្ជាប់សញ្ញាសញ្ញា lamp (បៃតង) |
|
| 19 | DC 12V | ឧបករណ៍នេះអាចដំណើរការបានតាមពីរវិធី៖
នៅពេលដែល Switch គាំទ្រមុខងារ POE ការផ្គត់ផ្គង់ថាមពល DC មិនចាំបាច់ទេ។ |
ការពិពណ៌នាអំពីប្រតិបត្តិការនៃអេក្រង់ LED និងប៊ូតុង CH SELECT (សម្រាប់ឌិកូដ)។
1, ការតភ្ជាប់ ENC៖ បន្ទាប់ពីប្រព័ន្ធត្រូវបានបើក អេក្រង់ LED របស់ឧបករណ៍ឌិកូដនឹងបង្ហាញ 000 តាមលំនាំដើម ប្រសិនបើមិនបានកំណត់។ ចុចប៊ូតុងឡើងលើ/ចុះក្រោមដោយផ្ទាល់ ដើម្បីជ្រើសរើសលេខសម្គាល់ឆានែលរបស់ឧបករណ៍បំប្លែងដែលបានភ្ជាប់ (ជួរលេខសម្គាល់៖ 000~762) ដើម្បីបញ្ចប់ការតភ្ជាប់។
2, អាសយដ្ឋាន IP៖ ចុចប៊ូតុង UP ឱ្យជាប់រយៈពេល 5 វិនាទី អេក្រង់ LED របស់ឧបករណ៍ឌិកូដនឹងបង្ហាញជាលំដាប់ “IPx”, “xxx”, “xxx”, “xxx”, “xxx” ដែលជារបៀប IP និងអាសយដ្ឋាន IP របស់ឧបករណ៍ឌិកូដ។
3, របៀបកំណត់រចនាសម្ព័ន្ធ៖ ចុចឱ្យជាប់ប៊ូតុង UP+DOWN ក្នុងពេលដំណាលគ្នារយៈពេល 5 វិនាទី បន្ទាប់មកលែងចេញដើម្បីចូលទៅក្នុងរបៀបកំណត់រចនាសម្ព័ន្ធជាមួយ "CFN" ដែលបង្ហាញនៅលើអេក្រង់ LED ។
4, ការកំណត់លេខសម្គាល់ឧបករណ៍៖ បន្ទាប់ពីចូលទៅក្នុងរបៀបកំណត់រចនាសម្ព័ន្ធ សូមចុចប៊ូតុង UP/DOWN ដើម្បីចូលទំព័រដំបូងដែលមានលេខសម្គាល់បច្ចុប្បន្ន (ឧទាហរណ៍ 001) ដែលបង្ហាញនៅលើអេក្រង់ LED (000 តាមលំនាំដើម)។ ចុចប៊ូតុង UP+DOWN ឱ្យជាប់រយៈពេល 5 វិនាទី បន្ទាប់មកលែងចេញ ដើម្បីចូលទៅក្នុងរបៀបកំណត់លេខសម្គាល់ ដែលលេខសម្គាល់ (ឧ. 001) នៅលើអេក្រង់ LED នឹងបញ្ចេញពន្លឺនៅកម្រិត 1Hz បន្ទាប់មកចុចប៊ូតុង UP/DOWN ដើម្បីជ្រើសរើសលេខសម្គាល់ឧបករណ៍ដែលអ្នកចង់បាន (ID range: 000~762) បន្ទាប់មកចុចប៊ូតុង UP+DOWN ឱ្យជាប់រយៈពេល 5 វិនាទី ដើម្បីបញ្ជាក់ការកំណត់ ហើយបញ្ឈប់ការបើកពន្លឺ។ បន្ទាប់ពីការកំណត់ ឯកតានឹងចាប់ផ្ដើមឡើងវិញដោយស្វ័យប្រវត្តិ។
ចំណាំ៖ លេខសម្គាល់ឧបករណ៍មិនអាចកែប្រែនៅក្នុងរបៀបប្រអប់ឧបករណ៍បញ្ជាបានទេ។
5, ការកំណត់មាត្រដ្ឋានលទ្ធផល៖ បន្ទាប់ពីចូលទៅក្នុងរបៀបកំណត់រចនាសម្ព័ន្ធ សូមចុចប៊ូតុង UP/DOWN ដើម្បីចូលទៅកាន់ទំព័រទីពីរជាមួយ “S00” (ដែល “S” សំដៅលើការធ្វើមាត្រដ្ឋាន និង “00” ទៅកាន់លេខសម្គាល់គុណភាពបង្ហាញ) ដែលបង្ហាញនៅលើអេក្រង់ LED (S00 តាមលំនាំដើម)។ ចុចប៊ូតុង UP+DOWN ឱ្យជាប់រយៈពេល 5 វិនាទី បន្ទាប់មកលែងចេញ ដើម្បីចូលទៅក្នុងទម្រង់ការកំណត់ ដែល Sxx នៅលើអេក្រង់ LED នឹងបញ្ចេញពន្លឺនៅកម្រិត 1Hz បន្ទាប់មកចុចប៊ូតុង UP/DOWN ដើម្បីជ្រើសរើស ID ដែលអ្នកចង់បាន បន្ទាប់មកចុចប៊ូតុង UP+DOWN ឱ្យជាប់រយៈពេល 5 វិនាទី ដើម្បីបញ្ជាក់ការកំណត់ និងបញ្ឈប់ពន្លឺ។
ការកំណត់មាត្រដ្ឋានត្រូវបានរាយខាងក្រោម៖
| ការធ្វើមាត្រដ្ឋាន Sxx | ការពិពណ៌នាអំពីដំណោះស្រាយ |
| ស០៤៩២១ | ផ្លូវវាង |
| ស០៤៩២១ | 1080P50 |
| ស០៤៩២១ | 1080P60 |
| ស០៤៩២១ | 720P50 |
| ស០៤៩២១ | 720P60 |
| ស០៤៩២១ | 2160P24 |
| ស០៤៩២១ | 2160P30 |
| ស០៤៩២១ | 2160P50 |
| ស០៤៩២១ | 2160P60 |
| ស០៤៩២១ | ១២៨០ × ១០២៤ |
| ស០៤៩២១ | ១២៨០ × ១០២៤ |
| ស០៤៩២១ | ១២៨០ × ១០២៤ |
| ស០៤៩២១ | ១២៨០ × ១០២៤ |
| ស០៤៩២១ | ១២៨០ × ១០២៤ |
6, ការកំណត់របៀប IR៖ បន្ទាប់ពីចូលទៅក្នុងរបៀបកំណត់រចនាសម្ព័ន្ធ សូមចុចប៊ូតុង UP/DOWN ដើម្បីចូលទៅកាន់ទំព័រទីបីដោយ “IR2” (ដែល “IR” សំដៅលើ IR និង “2” ទៅ 12V) ដែលបង្ហាញនៅលើអេក្រង់ LED (IR2 តាមលំនាំដើម)។ ចុចប៊ូតុង UP+DOWN ឱ្យជាប់រយៈពេល 5 វិនាទី បន្ទាប់មកលែងចេញ ដើម្បីចូលទៅក្នុងទម្រង់ការកំណត់ ដែលនៅក្នុងរបៀប IR (IR1 ឬ IR2) នៅលើអេក្រង់ LED នឹងបញ្ចេញពន្លឺនៅកម្រិត 1Hz បន្ទាប់មកចុចប៊ូតុង UP/DOWN ដើម្បីជ្រើសរើសរបៀប IR បន្ទាប់មកចុចប៊ូតុង UP+DOWN ឱ្យជាប់រយៈពេល 5 វិនាទី ដើម្បីបញ្ជាក់ការកំណត់ និងបញ្ឈប់ការបញ្ចេញពន្លឺ។
ជម្រើសរបៀប IR ដែលត្រូវគ្នាមានដូចខាងក្រោម៖
IR1: 5V ខ្សែ IR
IR2: 12V ខ្សែ IR
7, eARC/ARC ឬ S/PDIF ការកំណត់ត្រឡប់សំឡេង៖ បន្ទាប់ពីចូលទៅក្នុងរបៀបកំណត់រចនាសម្ព័ន្ធ សូមចុចប៊ូតុង UP/DOWN ដើម្បីចូលទៅកាន់ទំព័រទីបួនជាមួយនឹង “ARC/SPD” ដែលបង្ហាញនៅលើអេក្រង់ LED (ARC តាមលំនាំដើម)។ ចុចឱ្យជាប់ប៊ូតុង UP + ចុះក្រោមរយៈពេល 5 វិនាទី បន្ទាប់មកលែងចេញ ដើម្បីចូលទៅក្នុងរបៀបកំណត់សំឡេងត្រឡប់មកវិញ ដែលក្នុងនោះរបៀបត្រឡប់អូឌីយ៉ូ (ARC/SPD) នៅលើអេក្រង់ LED នឹងបញ្ចេញពន្លឺនៅកម្រិត 1Hz បន្ទាប់មកចុចប៊ូតុង UP/DOWN ដើម្បីជ្រើសរើសមុខងារ បន្ទាប់មកចុចប៊ូតុង UP+DOWN ឱ្យជាប់រយៈពេល 5 វិនាទី ដើម្បីបញ្ជាក់ការកំណត់ និងបញ្ឈប់ការបញ្ចេញពន្លឺ។ ជម្រើសរបៀបត្រឡប់អូឌីយ៉ូដែលត្រូវគ្នាមានដូចខាងក្រោម៖
ARC៖ eARC/ARC ត្រឡប់អូឌីយ៉ូ (អូឌីយ៉ូពីរន្ធ HDMI OUT នៃឌិកូដឌឺត្រូវបានបញ្ជូនត្រឡប់ទៅរន្ធ HDMI IN របស់ឧបករណ៍បំលែងកូដ។)
SPD: S/PDIF audio return (អូឌីយ៉ូពី S/PDIF IN port របស់ Decoder ត្រូវបានបញ្ជូនត្រឡប់ទៅច្រក S/PDIF OUT របស់ Encoder។)
ចំណាំ៖
(1) របៀបត្រឡប់សំឡេងមិនអាចត្រូវបានកែប្រែតាមរយៈប៊ូតុងបន្ទះខាងមុខក្នុងប្រអប់ Controller ឬ Multicast mode ទេ។
(2) លុះត្រាតែទាំងឧបករណ៍បំប្លែង និងឌិកូដត្រូវបានកំណត់ទៅជារបៀបត្រឡប់អូឌីយ៉ូ C2C នោះ ការត្រឡប់អូឌីយ៉ូ eARC/ARC ឬ S/PDIF អាចត្រូវបានដឹង។
(3) ពេលណាត្រូវប្រើ ARC, ARC អូឌីយ៉ូ amplifier នៅលើ Encoder HDMI IN port និង ARC TV នៅលើ Decoder HDMI OUT port គួរតែត្រូវបានប្រើ។
ពេលណាត្រូវប្រើ eARC, eARC អូឌីយ៉ូ amplifier នៅលើ Encoder HDMI IN port និង eARC TV នៅលើ Decoder HDMI OUT port គួរតែត្រូវបានប្រើ។
8, ការកំណត់របៀប IP៖ បន្ទាប់ពីចូលទៅក្នុងរបៀបកំណត់រចនាសម្ព័ន្ធ សូមចុចប៊ូតុង UP/DOWN ដើម្បីចូលទៅកាន់ទំព័រទីប្រាំជាមួយនឹង “IP1/IP2/IP3” ដែលបង្ហាញនៅលើអេក្រង់ LED (IP3 តាមលំនាំដើម)។
ចុចប៊ូតុង UP + DOWN ឱ្យជាប់រយៈពេល 5 វិនាទី បន្ទាប់មកលែងចេញ ដើម្បីចូលទៅក្នុងទម្រង់ការកំណត់ ដែលនៅក្នុងរបៀប IP (IP1/IP2/IP3) នៅលើអេក្រង់ LED នឹងបញ្ចេញពន្លឺនៅកម្រិត 1Hz បន្ទាប់មកចុចប៊ូតុង UP/DOWN ដើម្បីជ្រើសរើសមុខងារ បន្ទាប់មកចុចប៊ូតុង UP+DOWN ឱ្យជាប់រយៈពេល 5 វិនាទី ដើម្បីបញ្ជាក់ការកំណត់ ហើយឈប់បញ្ចេញពន្លឺ។ បន្ទាប់ពីការកំណត់ ឯកតានឹងចាប់ផ្ដើមឡើងវិញដោយស្វ័យប្រវត្តិ។
ជម្រើសរបៀប IP ដែលត្រូវគ្នាមានដូចខាងក្រោម៖
IP1៖ របៀប IP ឋិតិវន្ត (អាសយដ្ឋាន IP លំនាំដើម៖ 169.254.100.253)
IP2៖ របៀប IP DHCP
IP3៖ របៀប IP ស្វ័យប្រវត្តិ (ផ្នែកបណ្តាញដែលបានកំណត់លំនាំដើម៖ 169.254.xxx.xxx)
ចំណាំ៖ របៀប IP មិនអាចត្រូវបានកែប្រែក្នុងរបៀប Controller Box។
9, ការកំណត់របៀប Fiber/Copper៖ បន្ទាប់ពីចូលទៅក្នុងរបៀបកំណត់រចនាសម្ព័ន្ធ សូមចុចប៊ូតុង UP/DOWN ដើម្បីចូលទៅកាន់ទំព័រទីប្រាំមួយជាមួយនឹង “CPP/FIB” ដែលបង្ហាញនៅលើអេក្រង់ LED (CPP តាមលំនាំដើម)។ ចុចប៊ូតុង UP + DOWN ឱ្យជាប់រយៈពេល 5 វិនាទី បន្ទាប់មកលែងចេញដើម្បីចូលទៅក្នុងរបៀបកំណត់ ដែលនៅក្នុងរបៀប Copper/Fiber (CPP/FIB) នៅលើអេក្រង់ LED នឹងបញ្ចេញពន្លឺនៅកម្រិត 1Hz បន្ទាប់មកចុចប៊ូតុង UP/DOWN ដើម្បីជ្រើសរើសមុខងារ បន្ទាប់មកចុចប៊ូតុង UP+DOWN ឱ្យជាប់រយៈពេល 5 វិនាទី ដើម្បីបញ្ជាក់ការកំណត់ និងបញ្ឈប់ការបញ្ចេញពន្លឺ។ បន្ទាប់ពីការកំណត់ ឯកតានឹងចាប់ផ្ដើមឡើងវិញដោយស្វ័យប្រវត្តិ។
ជម្រើសរបៀប Fiber/Copper ដែលត្រូវគ្នាមានដូចខាងក្រោម៖
CPP: របៀបស្ពាន់
FIB: របៀបសរសៃ
10, ការកំណត់របៀបពហុខាស៖ បន្ទាប់ពីចូលទៅក្នុងរបៀបកំណត់រចនាសម្ព័ន្ធ សូមចុចប៊ូតុង UP/DOWN ដើម្បីចូលទៅកាន់ទំព័រទីប្រាំពីរជាមួយនឹង “CA1/CA2” ដែលបង្ហាញនៅលើអេក្រង់ LED (CA1 តាមលំនាំដើម)។ ចុចឱ្យជាប់ប៊ូតុង UP+DOWN រយៈពេល 5 វិនាទី បន្ទាប់មកលែងចេញ ដើម្បីចូលទៅក្នុងទម្រង់ការកំណត់ ដែលមុខងារ Multicast (CA1/CA2) នៅលើអេក្រង់ LED នឹងបញ្ចេញពន្លឺនៅកម្រិត 1Hz បន្ទាប់មកចុចប៊ូតុង UP/DOWN ដើម្បីជ្រើសរើសមុខងារ បន្ទាប់មកចុចប៊ូតុង UP+DOWN ឱ្យជាប់រយៈពេល 5 វិនាទី ដើម្បីបញ្ជាក់ការកំណត់ ហើយបញ្ឈប់ការបញ្ចេញពន្លឺ។ បន្ទាប់ពីការកំណត់ ឯកតានឹងចាប់ផ្ដើមឡើងវិញដោយស្វ័យប្រវត្តិ។
ជម្រើសរបៀបពហុខាសដែលត្រូវគ្នាមានដូចខាងក្រោម៖
CA1៖ របៀប Unicast
CA2៖ របៀបពហុខាស
11, ការកំណត់របៀបត្រឡប់សំឡេង៖ បន្ទាប់ពីចូលទៅក្នុងរបៀបកំណត់រចនាសម្ព័ន្ធ សូមចុចប៊ូតុង UP/DOWN ដើម្បីចូលទៅកាន់ទំព័រទីប្រាំបីជាមួយនឹង “C2C/A2A” ដែលបង្ហាញនៅលើអេក្រង់ LED (C2C តាមលំនាំដើម)។ ចុចប៊ូតុង UP+DOWN ឱ្យជាប់រយៈពេល 5 វិនាទី បន្ទាប់មកលែងចេញ ដើម្បីចូលទៅក្នុងរបៀបកំណត់ ដែលនៅក្នុងរបៀបត្រឡប់អូឌីយ៉ូ (C2C/A2A) នៅលើអេក្រង់ LED នឹងបញ្ចេញពន្លឺនៅកម្រិត 1Hz បន្ទាប់មកចុចប៊ូតុង UP/DOWN ដើម្បីជ្រើសរើសមុខងារ បន្ទាប់មកចុចប៊ូតុង UP+DOWN ឱ្យជាប់រយៈពេល 5 វិនាទី ដើម្បីបញ្ជាក់ការកំណត់ និងបញ្ឈប់ការបញ្ចេញពន្លឺ។ បន្ទាប់ពីការកំណត់ ឯកតានឹងចាប់ផ្ដើមឡើងវិញដោយស្វ័យប្រវត្តិ។
ជម្រើសរបៀបត្រឡប់អូឌីយ៉ូដែលត្រូវគ្នាមានដូចខាងក្រោម៖
C2C៖ អូឌីយ៉ូ eARC/ARC ឬ S/PDIF ពីឧបករណ៍ឌិកូដត្រូវបានបញ្ជូនត្រឡប់ទៅរន្ធ HDMI IN ឬ S/PDIF OUT របស់ឧបករណ៍បំលែងកូដ។
A2A៖ អូឌីយ៉ូអាណាឡូកដែលបានបង្កប់នៅក្នុងឧបករណ៍ឌិកូដត្រូវបានបញ្ជូនត្រឡប់ទៅច្រកអូឌីយ៉ូអាណាឡូក AUDIO OUT របស់ឧបករណ៍បំលែងកូដ។
ចំណាំ៖
(1) របៀបត្រឡប់សំឡេងមិនអាចត្រូវបានកែប្រែតាមរយៈប៊ូតុងបន្ទះខាងមុខក្នុងប្រអប់ Controller ឬ Multicast mode ទេ។
(2) លុះត្រាតែទាំងឧបករណ៍បំប្លែង និងឌិកូដត្រូវបានកំណត់ដែលត្រូវគ្នាទៅនឹងរបៀបត្រឡប់អូឌីយ៉ូ C2C/A2A ក្នុងរបៀប unicast នោះ ការត្រឡប់អូឌីយ៉ូអាចត្រូវបានដឹង។
(3) របៀបត្រឡប់អូឌីយ៉ូ A2A អាចប្រើបានតែក្នុងរបៀប unicast ប៉ុណ្ណោះ។
(4) ពេលណាត្រូវប្រើ ARC, ARC អូឌីយ៉ូ amplifier នៅលើ Encoder HDMI IN port និង ARC TV នៅលើ Decoder HDMI OUT port គួរតែត្រូវបានប្រើ។
ពេលណាត្រូវប្រើ eARC, eARC អូឌីយ៉ូ amplifier នៅលើ Encoder HDMI IN port និង eARC TV នៅលើ Decoder HDMI OUT port គួរតែត្រូវបានប្រើ។
(5) បន្ទាប់ពីបញ្ចូលរបៀបកំណត់ផ្សេងៗ អ្នកអាចសង្កត់ប៊ូតុងចុះក្រោម ដើម្បីចេញពីចំណុចប្រទាក់បច្ចុប្បន្នយ៉ាងឆាប់រហ័ស ឬប្រសិនបើអ្នកមិនធ្វើប្រតិបត្តិការណាមួយក្នុងរយៈពេល 5 វិនាទី វានឹងត្រឡប់ទៅចំណុចប្រទាក់ពីមុនដោយស្វ័យប្រវត្តិ។
៥.៣ និយមន័យអាយ។ ភី។ អាយអិល
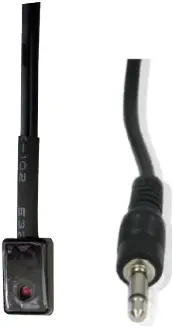
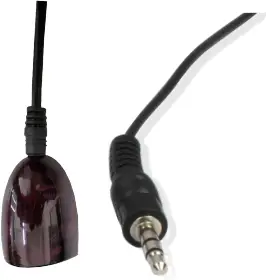
IR BLASTER អ្នកទទួល IR
IR BLASTER
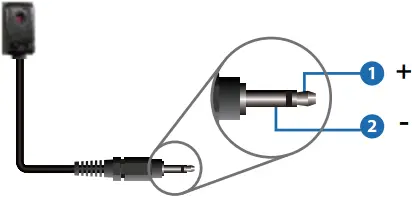
អ្នកទទួល IR
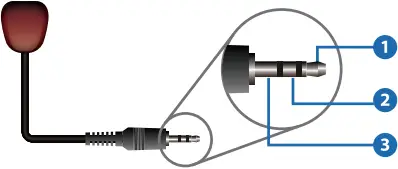
(១៦១៦) សញ្ញា IR
(១៦១៦) ការចុះចត
(១៦១៦) ថាមពល 12V
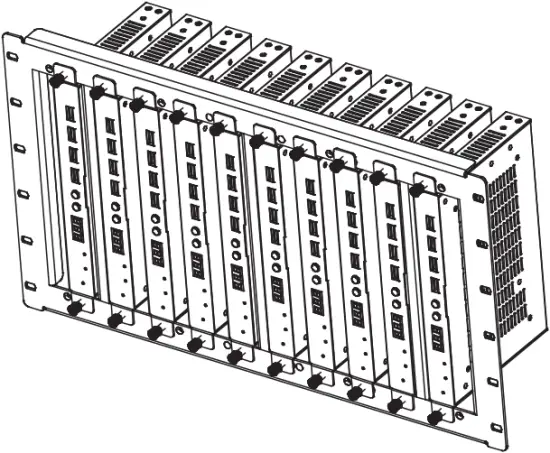
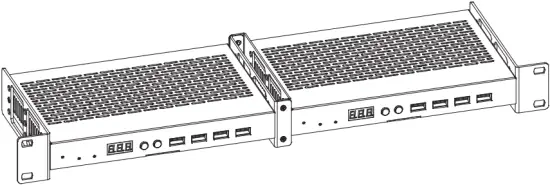
6. ការណែនាំអំពីការដំឡើង Rack
6.1 6U V2 ការដំឡើង Rack
ផលិតផលនេះអាចត្រូវបានម៉ោននៅក្នុង 6U V2 rack ស្តង់ដារ (សូមទាក់ទងអ្នកផ្គត់ផ្គង់របស់អ្នកសម្រាប់ការលក់ 6U V2 rack) ។ ជំហានដំឡើងមានដូចខាងក្រោម៖
ជំហានទី 1៖ ប្រើវីសដែលរួមបញ្ចូលដើម្បីជួសជុលត្រចៀកម៉ោនពីរនៅលើផលិតផល ដូចបង្ហាញក្នុងរូបភាពខាងក្រោម៖
ជំហានទី 2៖ បញ្ចូលផលិតផលដោយភ្ជាប់ត្រចៀកទៅក្នុង 6U V2 rack (6/8/10 អាចត្រូវបានដំឡើងបញ្ឈរ) ដូចបង្ហាញក្នុងរូបភាពខាងក្រោម៖
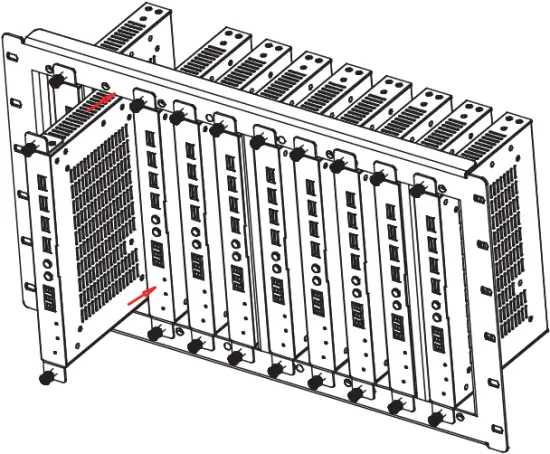
ជំហានទី 3៖ ប្រើវីសដើម្បីជួសជុលត្រចៀកម៉ោននៅលើ rack ដើម្បីបញ្ចប់ការម៉ោនដូចបង្ហាញក្នុងរូបភាពខាងក្រោម:
6.2 1U V2 ការដំឡើង Rack
ផលិតផលនេះក៏អាចត្រូវបានម៉ោននៅក្នុង 1U V2 rack ស្តង់ដារ (2 គ្រឿងអាចត្រូវបានដំឡើងផ្ដេក) ។ ជំហានដំឡើងមានដូចខាងក្រោម៖
ជំហានទី 1៖ ប្រើវីសដែលរួមបញ្ចូលដើម្បីជួសជុលតង្កៀប 1U V2 ពីរនៅលើផលិតផលពីររៀងគ្នា ដូចបង្ហាញក្នុងរូបភាពខាងក្រោម៖
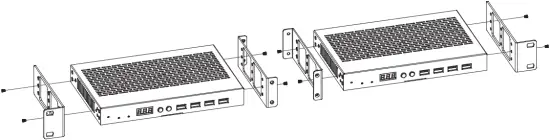
ជំហានទី 2៖ ប្រើវីសដើម្បីជួសជុលតង្កៀប 1U V2 ពីររួមគ្នា ដូចបង្ហាញក្នុងរូបភាពខាងក្រោម៖

ជំហានទី 3៖ ភ្ជាប់វីសរវាងតង្កៀប 1U V2 ពីរ ដូច្នេះផលិតផលពីរត្រូវបានម៉ោននៅក្នុង 1U V2 rack ដូចបង្ហាញក្នុងរូបភាពខាងក្រោម៖
7. ការណែនាំអំពីប្រតិបត្តិការរង MJPEG
7.1 MJPEG Substream Preview/ ការកំណត់រចនាសម្ព័ន្ធតាមរយៈ Web ទំព័រ
ផលិតផលនេះគាំទ្រការលេង MJPEG Substream នៅលើកុំព្យូទ័រតាមរយៈកម្មវិធីដែលត្រូវគ្នាដូចជា កម្មវិធីចាក់មេឌៀ VLCក្នុងពេលដំណាលគ្នាអ្នកអាចចូលប្រើ Web ទំព័រដើម្បីកំណត់រចនាសម្ព័ន្ធ MJPEG Substream ។
អនុវត្តតាមជំហានខាងក្រោមដើម្បីមុន។view និងកំណត់រចនាសម្ព័ន្ធ MJPEG Substream ។
ជំហានទី 1៖ ភ្ជាប់ឧបករណ៍បំប្លែង ឌិកូដ និងកុំព្យូទ័រទៅឧបករណ៍ប្តូរដូចគ្នា បន្ទាប់មកភ្ជាប់ឧបករណ៍ប្រភព HDMI និងការផ្គត់ផ្គង់ថាមពល។ ដ្យាក្រាមតភ្ជាប់ត្រូវបានបង្ហាញដូចខាងក្រោម។
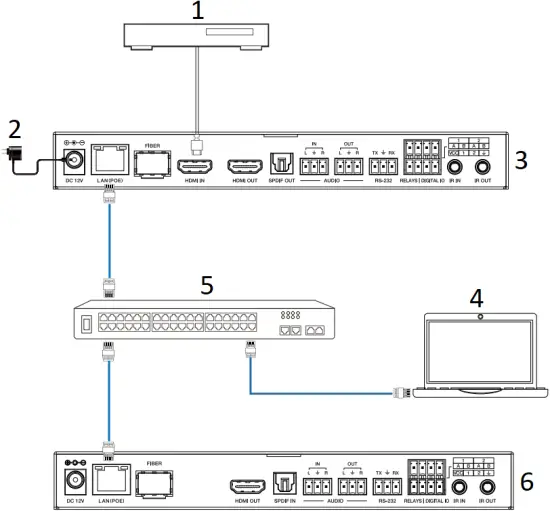
- អ្នកលេង Blu-ray
- អាដាប់ទ័រថាមពល
- ឧបករណ៍បំលែងកូដ
- PC
- កុងតាក់អ៊ីសឺរណិត ១០០ ជី
- ឌិកូដ
ជំហានទី 2៖ ដំឡើងឧបករណ៍ពិនិត្យពិធីការ bonjour (ដូចជា zeroconfService Browser) នៅលើកុំព្យូទ័រ ដើម្បីស្វែងរកអាសយដ្ឋាន IP របស់កម្មវិធីអ៊ិនកូដ/ឌិកូដ។
យក zeroconfServiceBrowser ជាអតីតampលេ បន្ទាប់ពីបើកកម្មវិធី អ្នកអាចជ្រើសរើស "កម្មវិធីគ្រប់គ្រងក្រុម" នៅក្នុងសេវាកម្មនៃកម្មវិធីរុករក ជ្រើសរើសឈ្មោះម៉ាស៊ីននៅក្នុង Service-Instances និងស្វែងរកអាសយដ្ឋាន IP នៅក្នុងធាតុអាសយដ្ឋាននៅក្នុង Instance-Info ។
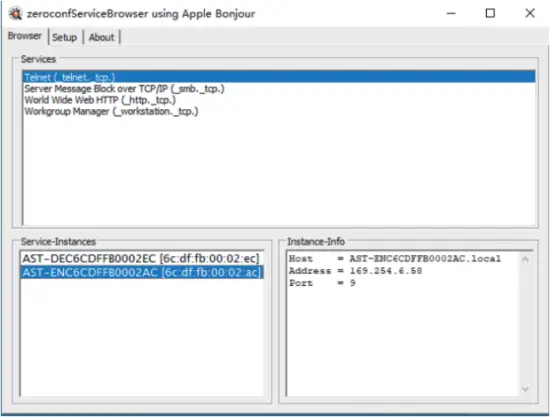
ចំណាំ៖
(1) បង្អួចនៅជ្រុងខាងឆ្វេងខាងក្រោមបង្ហាញឈ្មោះម៉ាស៊ីននៃឧបករណ៍ទាំងអស់នៅក្នុងបណ្តាញបច្ចុប្បន្ន។
(2) បង្អួចនៅជ្រុងខាងស្តាំខាងក្រោមបង្ហាញឈ្មោះម៉ាស៊ីន អាសយដ្ឋាន IP និងលេខច្រករបស់ឧបករណ៍។
(3) ឈ្មោះម៉ាស៊ីនរបស់ Encoder ចាប់ផ្តើមដោយ AST-ENC; ឈ្មោះម៉ាស៊ីនរបស់ Decoder ចាប់ផ្តើមដោយ AST-DEC ។
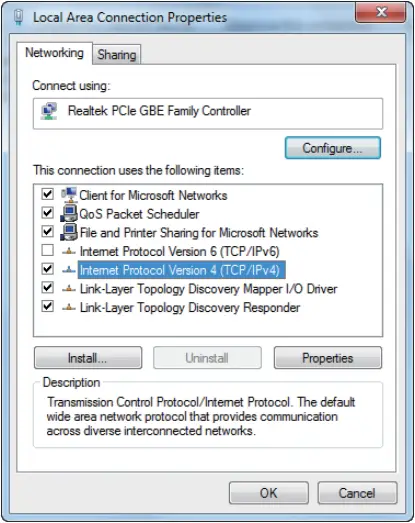
ជំហានទី 3៖ កំណត់អាសយដ្ឋាន IP របស់កុំព្យូទ័រទៅផ្នែកបណ្តាញដូចគ្នាជាមួយអាសយដ្ឋាន IP របស់ឧបករណ៍បំលែងកូដ/ឌិកូដដែលរកឃើញក្នុងជំហានទី 2 ។

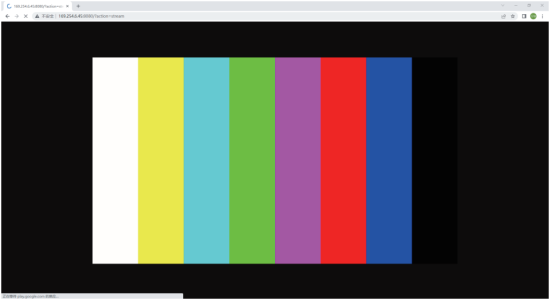
ជំហានទី 4៖ យោងតាមអាសយដ្ឋាន IP របស់កម្មវិធីអ៊ិនកូដ/ឌិកូដដែលរកឃើញតាមរយៈឧបករណ៍ពិនិត្យពិធីការ bonjour សូមបញ្ចូល “http://IP:PORT/?action=stream” ទៅក្នុង web កម្មវិធីរុករកនៅលើកុំព្យូទ័រ។ MJPEG Substream នឹងត្រូវបានបង្ហាញជាមួយនឹងគុណភាពបង្ហាញលំនាំដើម ដូចបានបង្ហាញក្នុងរូបភាពខាងក្រោម។
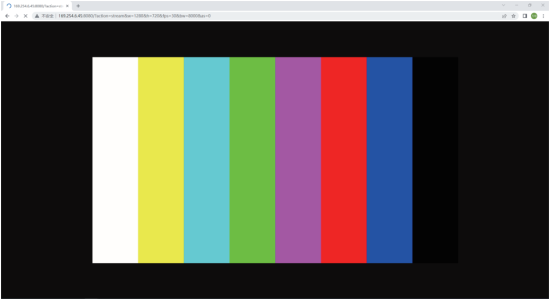
ជំហានទី 5៖ ផ្លាស់ប្តូរគុណភាពបង្ហាញនៃអាសយដ្ឋាន IP អ៊ិនកូដ/ឌិកូដដែលទទួលបានក្នុងទម្រង់ខាងក្រោម។
http://IP:PORT/?action=stream&w=x&h=x&fps=x&bw=x&as=x&mq=x
- WIDTH៖ [ស្រេចចិត្ត] ទទឹងរូបភាព។ ជាភីកសែល។ 'x' មានន័យថាគ្មានការផ្លាស់ប្តូរ។
លំនាំដើមគឺ ៤ ។ - HEIGHT៖ [ស្រេចចិត្ត] កម្ពស់រូបភាព។ ជាភីកសែល។ 'x' មានន័យថាគ្មានការផ្លាស់ប្តូរ។
លំនាំដើមគឺ ៤ ។ - FRAMERATE៖ [ស្រេចចិត្ត] អត្រាស៊ុមនៃស្ទ្រីមរង។
ឯកតា៖ fps (ស៊ុមក្នុងមួយវិនាទី) ។ 'x' មានន័យថាគ្មានការផ្លាស់ប្តូរ។ លំនាំដើមគឺ 30 ។ - BW៖ [ស្រេចចិត្ត] កម្រិតបញ្ជូនអតិបរមានៃចរាចរណ៍រងស្ទ្រីម។
ឯកតា៖ Kbps (Kbits ក្នុងមួយវិនាទី)។ 'x' មានន័យថាគ្មានការផ្លាស់ប្តូរ។ លំនាំដើមគឺ 8000 (8Mbps) ។ - AS៖ [ស្រេចចិត្ត] ការកំណត់រចនាសម្ព័ន្ធសមាមាត្រ។ 'x' មានន័យថាគ្មានការផ្លាស់ប្តូរ។ លំនាំដើមគឺ 0 ។
- 0: ពង្រីកទៅអ្វីដែល "WIDTH" និង "HEIGHT" ដែលបានកំណត់រចនាសម្ព័ន្ធ
- 1: [A1 only] រក្សាសមាមាត្រដើម និងដាក់នៅចំកណ្តាលទិន្នផល (ប្រអប់អក្សរ ឬប្រអប់សសរ)
- MINQ៖ [ស្រេចចិត្ត] លេខគុណភាពរូបភាពអប្បបរមា។ ជួរ៖ 10, 20, …, 90, 100, ការកំណត់ខ្ពស់មានន័យថាគុណភាពរូបភាពកាន់តែប្រសើរ។ 'x' មានន័យថាគ្មានការផ្លាស់ប្តូរ។ តម្លៃលំនាំដើមគឺ 10. កំណត់លេខគុណភាពអប្បបរមានៃការគ្រប់គ្រងកម្រិតបញ្ជូនដោយស្វ័យប្រវត្តិរបស់អ្នកបើកបរ។ ប្រសិនបើគុណភាពទាបជាងតម្លៃ MINQ នោះអ្នកបើកបរនឹងទម្លាក់ស៊ុមដោយត្រឡប់ទំហំ 0 file.
បន្ទាប់ពីផ្លាស់ប្តូរ សូមបញ្ចូលអាសយដ្ឋាន IP អ៊ិនកូដ/ឌិកូដថ្មីទៅក្នុងប្រអប់ web កម្មវិធីរុករកតាមអ៊ីនធឺណិត MJPEG Substream នឹងត្រូវបានបង្ហាញជាមួយនឹងគុណភាពបង្ហាញដែលចង់បានដូចបង្ហាញក្នុងរូបភាពខាងក្រោម។
7.2 ការណែនាំកម្មវិធីចាក់មេឌៀ VLC
ជាដំបូង សូមអនុវត្តជំហាន 1~3 ដូចដែលបានពិពណ៌នានៅក្នុងជំពូក 7.1 បន្ទាប់មកបើកកម្មវិធីចាក់មេឌៀ VLC នៅលើកុំព្យូទ័រ។ សូមមើលរូបតំណាងខាងក្រោម។

ចុច "ប្រព័ន្ធផ្សព្វផ្សាយ> បើកបណ្តាញស្ទ្រីម"
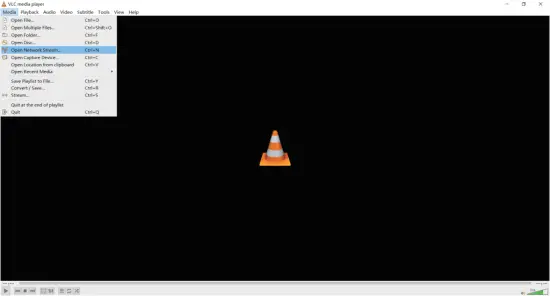
បន្ទាប់ពីចុចលើជម្រើស "បើកបណ្តាញស្ទ្រីម" ទំព័រខាងក្រោមនឹងលេចឡើង។
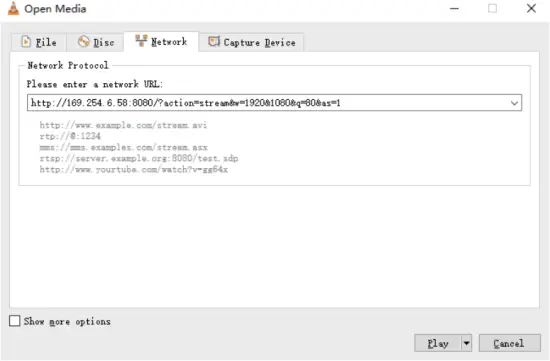
បញ្ចូលបណ្តាញស្ទ្រីមរង MJPEG URLបន្ទាប់មកចុច “លេង"ប៊ូតុង។
ជ្រើសរើស “ឧបករណ៍> ព័ត៌មានកូឌិក“ បង្អួចដែលលេចឡើងនឹងបង្ហាញ និងបង្ហាញអ្នកនូវព័ត៌មានស្ទ្រីម ដូចដែលបានបង្ហាញក្នុងរូបភាពខាងក្រោម។

ជ្រើសរើស “ឧបករណ៍>ព័ត៌មានកូឌិក> ស្ថិតិ” ដើម្បីពិនិត្យមើលអត្រាប៊ីតបច្ចុប្បន្ន។ សូមមើលរូបភាពខាងក្រោម។

ចំណាំ៖ អត្រាប៊ីតអណ្តែតឡើងលើចុះក្រោម នៅពេលអ្នកពិនិត្យវា។ នេះគឺជាបាតុភូតធម្មតា។
8. ប្តូរម៉ូដែល
កុងតាក់បណ្តាញដែលប្រើដើម្បីដំឡើងប្រព័ន្ធគួរតែគាំទ្រលក្ខណៈពិសេសខាងក្រោម៖
- ប្រភេទនៃស្រទាប់ទី 3/គ្រប់គ្រងបណ្តាញប្តូរ។
- កម្រិតបញ្ជូន Gigabit ។
- សមត្ថភាពស៊ុម jumbo 8KB ។
- IGMP snooping ។
ម៉ូដែល Switch ខាងក្រោមត្រូវបានណែនាំយ៉ាងខ្លាំង។
| ក្រុមហ៊ុនផលិត | លេខម៉ូដែល |
| ស៊ីស្កូ | CISCO SG500 |
| ស៊ីស្កូ | ស៊េរី CATALYST |
| HUAWEI | S5720S-28X-PWR-LI-AC |
| ZyXEL | GS2210 |
| លុច្ស | AMS-4424P |
9. 4K លើការគ្រប់គ្រងប្រព័ន្ធ IP
ផលិតផលនេះអាចត្រូវបានគ្រប់គ្រងដោយ Controller Box ឬឧបករណ៍បញ្ជាភាគីទីបី។ សម្រាប់ព័ត៌មានលម្អិតអំពីការគ្រប់គ្រងប្រព័ន្ធ 4K លើ IP សូមមើលសៀវភៅណែនាំអ្នកប្រើប្រាស់នៃ "Video over IP Controller"។
10. ពាក្យសុំឧample
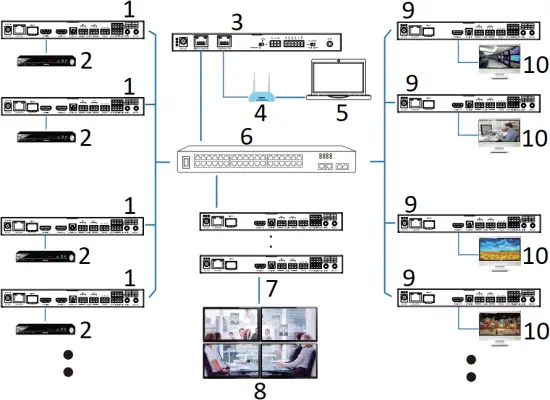
- អេន។ ស៊ី។ ស៊ី
- ឌីវីឌី
- ប្រអប់ឧបករណ៍បញ្ជា
- រ៉ោតទ័រ (ជាជម្រើស)
- PC
- កុងតាក់អ៊ីសឺរណិត ១០០ ជី
- ៤ × ធ្នូ
- ជញ្ជាំងវីដេអូ
- ធ្នូ
- TV
ចំណាំ៖
(1) សម្រាប់របៀប IP លំនាំដើមនៃច្រក Control LAN នៃប្រអប់ Controller គឺ DHCP កុំព្យូទ័រក៏ត្រូវកំណត់ទៅជារបៀប "ទទួលបានអាសយដ្ឋាន IP ដោយស្វ័យប្រវត្តិ" ហើយម៉ាស៊ីនមេ DHCP (ឧទាហរណ៍ រ៉ោតទ័របណ្តាញ) ត្រូវបានទាមទារនៅក្នុងប្រព័ន្ធ។
(2) ប្រសិនបើមិនមានម៉ាស៊ីនមេ DHCP នៅក្នុងប្រព័ន្ធទេ 192.168.0.225 នឹងត្រូវបានប្រើជាអាសយដ្ឋាន IP នៃច្រក LAN គ្រប់គ្រង។ អ្នកត្រូវកំណត់អាសយដ្ឋាន IP របស់កុំព្យូទ័រឱ្យស្ថិតនៅក្នុងផ្នែកបណ្តាញតែមួយ។ សម្រាប់អតីតampដូច្នេះកំណត់អាសយដ្ឋាន IP របស់កុំព្យូទ័រជា 192.168.0.88 ។
(3) អ្នកអាចចូលទៅកាន់ Web GUI ដោយបញ្ចូលអាសយដ្ឋាន IP ច្រក Control LAN (192.168.0.225) ឬ URL “http://controller.local” នៅលើកម្មវិធីរុករកតាមអ៊ីនធឺណិតកុំព្យូទ័ររបស់អ្នក។
(4) មិនចាំបាច់ខ្វល់ពីការកំណត់នៃច្រកវីដេអូ LAN នៃប្រអប់ឧបករណ៍បញ្ជាទេ ពួកគេត្រូវបានគ្រប់គ្រងដោយឧបករណ៍បញ្ជាដោយស្វ័យប្រវត្តិ (លំនាំដើម)។
(5) នៅពេលដែល Network Switch មិនគាំទ្រ PoE នោះ Encoder, Decoder និង Controller Box គួរតែត្រូវបានបំពាក់ដោយអាដាប់ទ័រថាមពល DC ។
![]()
ពាក្យថា HDMI និង HDMI High-Definition Multimedia interface និង HDMI Logo គឺជាពាណិជ្ជសញ្ញា ឬពាណិជ្ជសញ្ញាដែលបានចុះបញ្ជីរបស់ HDMI Licensing LLC នៅក្នុងសហរដ្ឋអាមេរិក និងប្រទេសដទៃទៀត។
សេវាអតិថិជន
ការត្រលប់មកវិញនូវផលិតផលមួយទៅកាន់សេវាបម្រើអតិថិជនរបស់យើង បង្កប់ន័យការព្រមព្រៀងពេញលេញនៃលក្ខខណ្ឌនានានៅពេលក្រោយ។ លក្ខខណ្ឌ និងលក្ខខណ្ឌអាចនឹងត្រូវបានផ្លាស់ប្តូរដោយគ្មានការជូនដំណឹងជាមុន។
1) ការធានា
រយៈពេលធានាមានកំណត់នៃផលិតផលត្រូវបានជួសជុលបីឆ្នាំ។
2) វិសាលភាព
ល័ក្ខខ័ណ្ឌនៃសេវាកម្មអតិថិជនទាំងនេះអនុវត្តចំពោះសេវាកម្មអតិថិជនដែលបានផ្តល់ជូនសម្រាប់ផលិតផល ឬរបស់ផ្សេងទៀតដែលលក់ដោយអ្នកចែកចាយដែលមានការអនុញ្ញាតតែប៉ុណ្ណោះ។
3) ការមិនរាប់បញ្ចូលការធានា៖
- ការធានាផុតកំណត់។
- លេខសៀរៀលដែលបានអនុវត្តពីរោងចក្រត្រូវបានផ្លាស់ប្តូរ ឬដកចេញពីផលិតផល។
- ការខូចខាត ការខ្សោះជីវជាតិ ឬដំណើរការខុសប្រក្រតី បណ្តាលមកពី៖
wear ស្លៀកធម្មតានិងរហែក។
✓ការប្រើប្រាស់គ្រឿងផ្គត់ផ្គង់រឺគ្រឿងបន្លាស់ដែលមិនបានបំពេញតាមការបញ្ជាក់របស់យើង។
✓មិនមានលិខិតបញ្ជាក់រឺវិក័យប័ត្រដែលជាភស្តុតាងនៃការធានា។
product គំរូផលិតផលដែលបានបង្ហាញនៅលើប័ណ្ណធានាមិនត្រូវគ្នានឹងម៉ូដែលផលិតផលសម្រាប់ជួសជុលឬត្រូវបានផ្លាស់ប្តូរ។
✓ការខូចខាតដែលបណ្តាលមកពីកម្លាំងបង្ខំ។
✓សេវាកម្មមិនត្រូវបានអនុញ្ញាតដោយអ្នកចែកចាយ។
causes មូលហេតុផ្សេងទៀតដែលមិនទាក់ទងនឹងកង្វះផលិតផល។ - ថ្លៃដឹកជញ្ជូនការតំឡើងរឺថ្លៃពលកម្មសំរាប់តំឡើងរឺតំឡើងផលិតផល។
៤) ឯកសារ៖
សេវាកម្មអតិថិជននឹងទទួលយកផលិតផលដែលមានបញ្ហានៅក្នុងវិសាលភាពនៃការធានាក្នុងលក្ខខណ្ឌតែមួយគត់ដែលការបរាជ័យត្រូវបានកំណត់យ៉ាងច្បាស់ ហើយនៅពេលទទួលឯកសារ ឬច្បាប់ចម្លងនៃវិក្កយបត្រ បង្ហាញពីកាលបរិច្ឆេទនៃការទិញ ប្រភេទផលិតផល។ លេខស៊េរី និងឈ្មោះអ្នកចែកចាយ។
កំណត់សម្គាល់៖ សូមទាក់ទងអ្នកចែកចាយក្នុងស្រុករបស់អ្នកសម្រាប់ជំនួយ ឬដំណោះស្រាយបន្ថែម។
ឯកសារ/ធនធាន
 |
VIVO LINK JPEG2000 AVoIP អ៊ិនកូដ និងឌិកូដ [pdf] សៀវភៅណែនាំអ្នកប្រើប្រាស់ VLVWIP2000-ENC, VLVWIP2000-DEC, JPEG2000 AVoIP encoder and decoder, JPEG2000, AVoIP encoder and decoder, encoder and decoder, and decoder |