Bespoke 15 Channel Programming Remote Control
Product Information
Specifications
- Remote Control Compatibility: P2
- Motor Speed Adjustment: Yes
- Remote Control Pairing: Yes
Product Usage Instructions
Adding a Remote Control
- On the current remote control, press one P2 button until motor jogs x1 and beeps x1.
- Repeat the same procedure with the current remote control.
- On the new remote control, press one P2 button until motor jogs x2 and beeps x3.
Programming a New Remote Control
Follow the instructions under the section 1. Pair/Unpair Remote Control.
Adjusting the Motor Speed
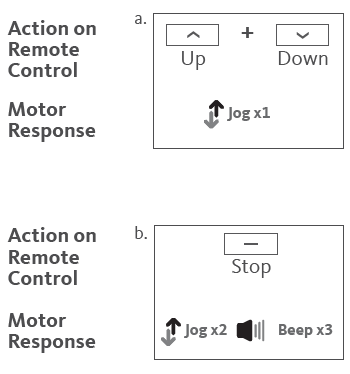
Increase Motor Speed
- Press one P2 button until the motor jogs x1 and beeps x1.
- Press the Up button until the motor jogs x1 and beeps x1.
- Press the Up button once more until the motor jogs x2 and beeps x1.
Decrease Motor Speed
- Press one P2 button until the motor jogs x1 and beeps x1.
- Press the Down button until the motor jogs x1 and beeps x1.
- Press the Down button once more until the motor jogs x2 and beeps x1.
FAQ
Troubleshooting
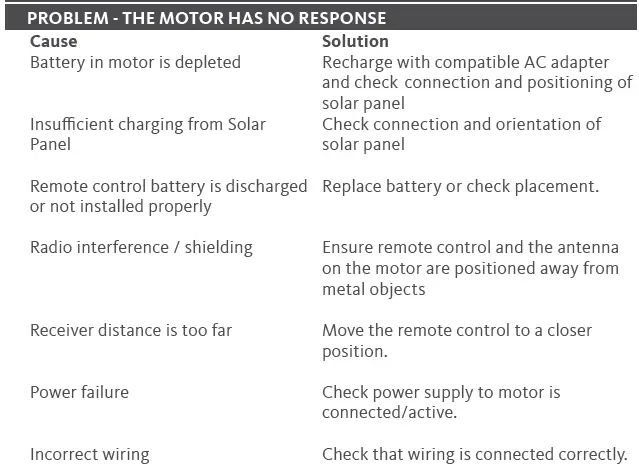
- Problem: The Motor Has No Response
- Cause: Battery in motor is depleted or insufficient charging from Solar Panel.
- Solution: Recharge with compatible AC adapter or check solar panel connection and orientation.
- Cause: Remote control battery is discharged or not installed properly.
- Solution: Replace battery or check placement of the battery.
- Cause: Radio interference, shielding, receiver distance, power failure, or incorrect wiring.
- Solution: Follow appropriate steps according to the cause mentioned.
- Problem: The Motor Beeps 10 Times When in Use
- Cause: Battery voltage is low or Solar Panel Issue.
- Solution: Recharge with AC adapter or check solar panel connection and positioning.
15 CHANNEL REMOTE CONTROL PROGRAMMING AND USERS GUIDE
SAFETY INSTRUCTIONS
- Do not expose motor to humid, damp, or extreme temperature conditions.
- Do not drill into motor.
- Do not cut the antenna. Keep it clear from metal objects.
- Do not allow children to play with this device.
- If the power cable or connector is damaged, do not use
- Ensure the power cable and antenna are clear and protected from moving parts.
- Cable routed through walls should be properly isolated.
- Motor should be mounted in horizontal position only.
- Before installation, remove unnecessary cords and disable equipment not needed for powered operation.
COIN BATTERY WARNING
- Remove and immediately recycle or dispose of used batteries according to local regulations and keep away from children. Do NOT dispose of batteries in household trash or incinerate.
- Even used batteries may cause severe injury or death.
- Call a local poison control center for treatment information.
- CR2450 is the compatible battery type.
- The nominal battery voltage is 3.0V.
- Non-rechargeable batteries are not to be recharged.
- Do not force discharge, recharge, disassemble, heat above 50°C / 122°F or incinerate. Doing so may result in injury due to venting, leakage or explosion resulting in chemical burns.
- Ensure the batteries are installed correctly according to polarity (+ and -). Do not mix old and new batteries, different brands or types of batteries, such as alkaline, carbon-zinc, or rechargeable batteries.
- Remove and immediately recycle or dispose of batteries from equipment not used for an extended period of time according to local regulations.
- Always completely secure the battery compartment. If the battery compartment does not close securely, stop using the product, remove the batteries, and keep them away from children.
WARNING
- INGESTION HAZARD: This product contains a button cell or coin battery.
- DEATH or serious injury can occur if ingested.
- A swallowed button cell or coin cell battery can cause
- Internal Chemical Burns in as little as 2 hours.
- KEEP new and used batteries OUT OF REACH OF CHILDREN.
- Seek immediate medical attention if a battery is suspected to be swallowed or inserted inside any part of the body.
- CR 2450, 3V
GETTING STARTED
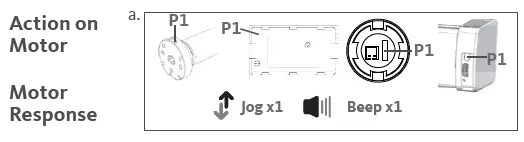
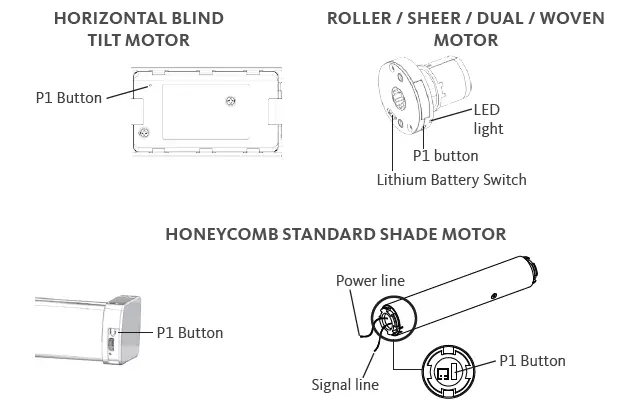
It is important to confirm that the motor is awake and ready to receive programming. To do this, press “P1” button on the motor less than 1 sec, to activate the motor from Sleep Mode.
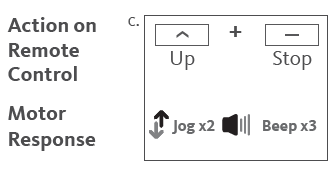
PAIR / UNPAIR REMOTE CONTROL
NOTE: Honeycomb and Horizontal Blind Motors DO NOT BEEP.
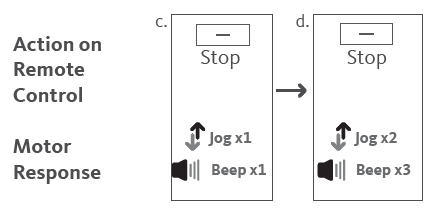
- a Press “P1” button (about 2 sec) on the motor head until motor jogs x1 and beeps x1*.
- b In the next 10 secs, press and hold “Stop” button on the remote control until motor jogs x2 and beeps x3*.

Repeat the same procedure to unpair remote control.
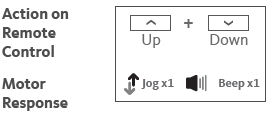
CHANGE MOTOR DIRECTION (IF NECESSARY)
This operation is only valid when no limits have been set. If the motor has the upper and lower limits set, you can only switch direction by pressing “P1” button (about 10 sec) on the motor head until motor jog x3 and beep x3.
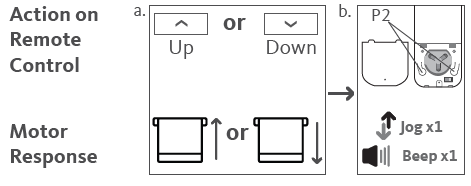
- a Press “Up” or “Down” button to check if the shade moves in the desired direction.
- b If you need to reverse the direction, press and hold (about 2 sec) “Up” and “Down” buttons simultaneously until motor jogs x1 and beeps x1.
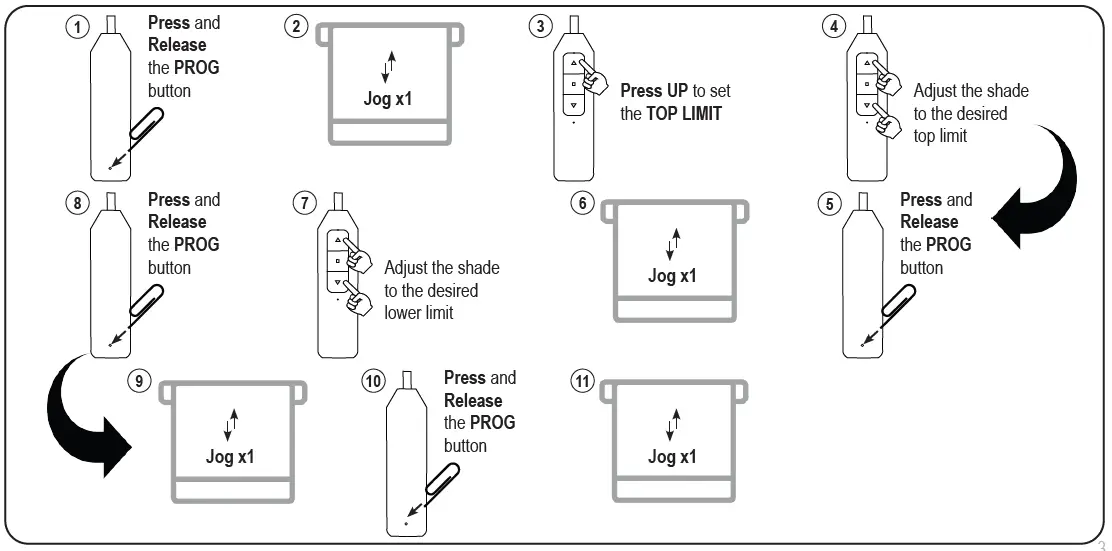
SETTING THE UPPER AND LOWER LIMITS
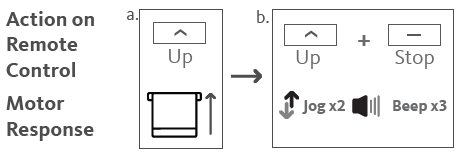
SET UPPER LIMIT
- a Press “Up” button to raise the shade, then press “Stop” button when it is in the desired upper limit.
- b Press and hold (about 5 sec) “Up” and “Stop” buttons simultaneously until motor jogs x2 and beeps x3.
SET LOWER LIMIT
- a Press “Down” button to lower the shade, then press “Stop” button when it is in the desired lower limit.
- b Press and hold (about 5 sec) “Down” and “Stop” buttons simultaneously until motor jogs x2 and beeps x3.
If you exit the limit setting status before you finish the limit settings, the motor will take the previous existing limits.
ADJUST LIMITS
ADJUST THE UPPER LIMIT
- a Press and hold (about 5 sec) “Up” and “Stop” buttons simultaneously until motor jogs x1 and beeps x1.
- b Use “Up” button to raise the shade to the desired highest position, and use “Up” or “Down” button to do the final adjustment if necessary.
- c Press and hold (about 5 sec) “Up” and “Stop” buttons simultaneously until motor jogs x2 and beeps x3.
ADJUST THE LOWER LIMIT
- a Press and hold (about 5 sec) “Down” and “Stop” buttons simultaneously until motor jogs x1 and beeps x1.
- b Use “Down” button to lower the shade to the desired lowest position, and use “Up” or “Down” button to do the final adjustment if necessary.
- c Press and hold (about 5 sec) “Down” and “Stop” buttons simultaneously until motor jogs x2 and beeps x3.
FAVORITE POSITION
SET A FAVORITE POSITION
- a Use “Up” or “Down” button to move the shade to desired Favorite position.
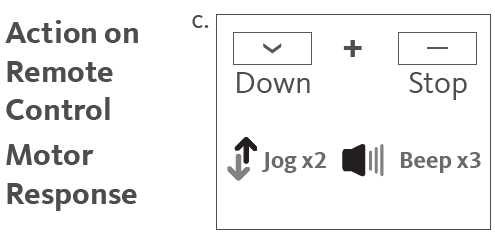
- b Press and hold one “P2”button on the back of remote control until motor jogs x1 and beeps x1.
- c Press and hold “Stop” button until motor jogs x1 and beeps x1.
- d Once more, press “Stop” button until motor jogs x2 and beeps x3.
USING A FAVORITE POSITION
Press and hold (about 2 sec) “Stop” button, motor will move to Favorite position.

REMOVE A FAVORITE POSITION
- a Press one “P2” button until motor jogs and beeps x1.
- b Press (about 2 sec) “Stop” button until motor jogs and beeps x1.
- c Once more, press “Stop” button until motor jogs x1 and long beep x1.
HOW TO TOGGLE FROM ROLLER MODE / SHEER MODE
ROLLER SHADE MODE – Default mode, allows for continuous raising/lowering of shade after a short press
- a Press and hold (about 5 sec) “Up” and “Down” buttons simultaneously until motor jogs x1.
- b Press and hold (about 2 sec) “Stop” button until motor jogs x2 and beeps x3.
For precise control and adjustment, use Sheer Shade Mode.
SHEER SHADE MODE – Allows for slight adjustment after a short press and raising/ lowering of shade after a longer press
- a Press and hold (about 5 sec) “Up” and “Down” buttons simultaneously until motor jog x1.
- b Press and hold (about 2 sec) “Stop” button until motor jog x1 and beep x1.
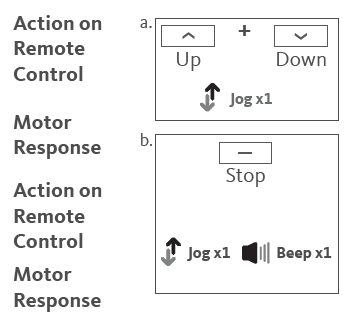
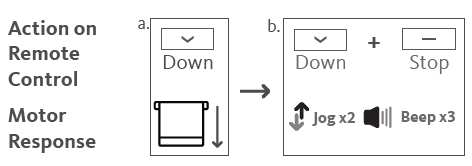
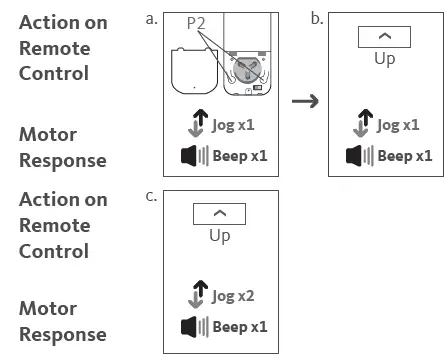
ADDING A REMOTE CONTROL
USING AN EXISTING REMOTE CONTROL
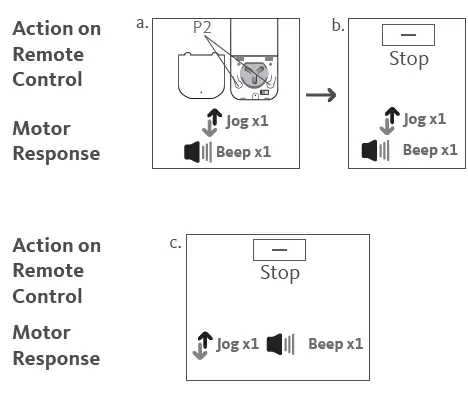
- a On the current remote control, press one “P2” button until motor jogs x1 and beeps x1.
- b Once more, on the current remote control, press one “P2” button until motor jogs x1 and beeps x1.
- c On the New remote control, press one “P2” button until motor jogs x2 and beeps x3.
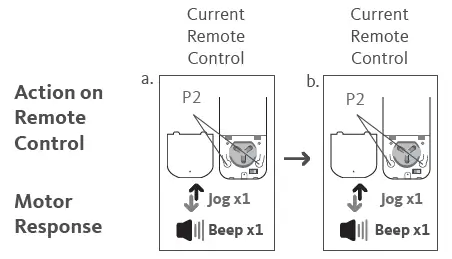
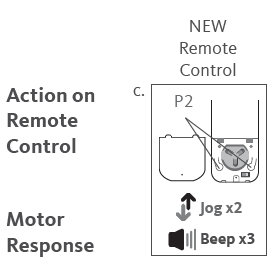
Repeat the same procedure to add/remove additional remote control.
PROGRAMMING A NEW REMOTE CONTROL
Follow instructions under the section 1. Pair / Unpair Remote Control
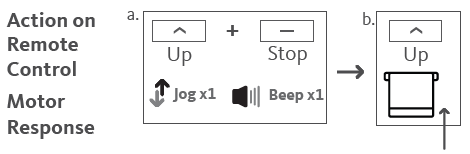
ADJUSTING THE MOTOR SPEED
INCREASE MOTOR SPEED
- a Press one “P2” button until motor jog x1 and beep x1.
- b Press “Up” button until motor jog x1 and beep x1.
- c Once more, press “Up” button until motor jog x2 and beep x1.
If the motor has no response, it already has a Maximum or Minimum speed.
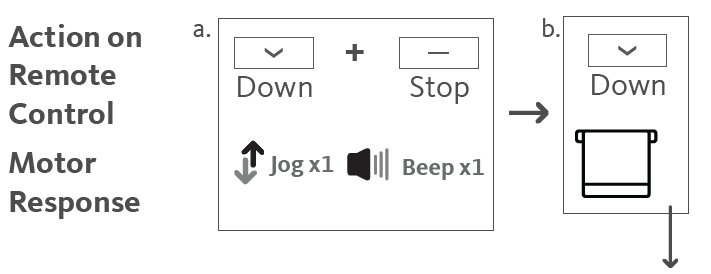
DECREASE MOTOR SPEED
- a Press one “P2” button until motor jogs x1 and beeps x1.
- b Press “Down” button until motor jogs x1 and beeps x1.
- c Once more, press “Down” button until motor jogs x2 and beeps x1.
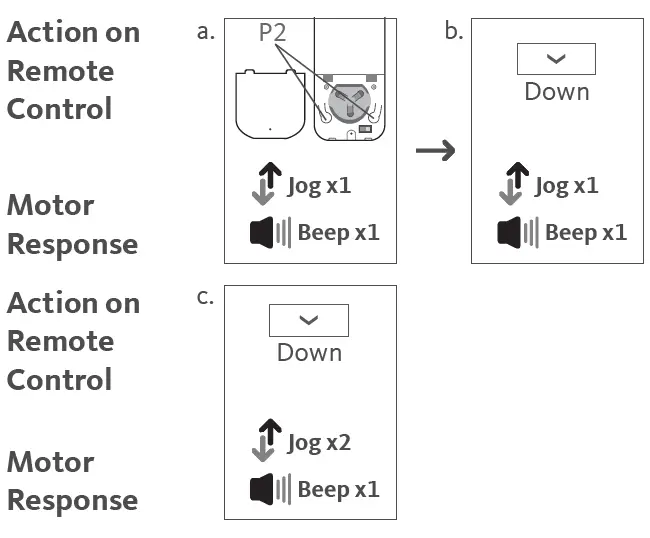
If the motor has no response, it already has a Maximum or Minimum speed.
CHARGING & BATTERY INDICATORS
INTERNAL RECHARGEABLE BATTERY
During operation, if the motor begins to beep, this is an indicator to let users know the motor power is low and needs to be charged. To charge, plug the micro-USB port on the motor into the 5V/2A charger.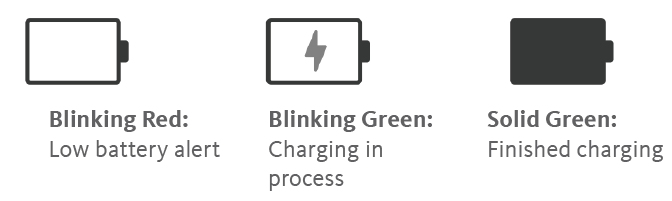
EXTERNAL RECHARGEABLE BATTERY PACK
During operation, if the voltage is detected to be too low, the battery stops running and needs to be recharged. To charge, plug the micro-USB port on the end of the battery pack into the 5V/2A charger
SPECIFICATIONS
| Voltage | 3V (CR2450) |
| Radio Frequency | 433.92 MHz Bi-directional |
| Transmitting Power | 10 milliwatt |
| Operating Temperature | 14°F to 122°F (-10°C to 50°C) |
| RF Modulation | FSK |
| Lock Function | Yes |
| IP Rating | IP20 |
| Transmission Distance | up to 200m (outdoor) |
 Do not dispose of in general waste.
Please recycle batteries and damaged electrical products appropriately.
QUICK INDEX
| SETTINGS | STEPS | |
| 1. | Pairing | P1 (hold for 2s) > Stop (hold for 2s) |
| 2. | Switch Rotating Direction | Up + Down (hold for 2s) |
| 3. | Set Upper/Lower Limits | Upper Limit: Up (hold for 2s) > Up + Stop (hold for 2s)
Lower Limit: Down (hold for 2s) > Down + Stop (hold for 2s) |
| 4. | Add/Remove Favorite Position | P2 > Stop > Stop |
| 5. | Roller/Sheer Mode Switch | Up + Down (hold for 5s) > Stop |
| 6. | Adjusting the Limits | Upper: Up + Stop (hold for 5s) > Up or Dn > Up + Stop (hold for 2s)
Lower: Dn + Stop (hold for 5s) > Up or Dn > Dn + Stop (hold for 2s) |
| 7. | Add/Remove a Remote | P2 (existing) > P2 (existing) > P2 (new) |
| 8. | Speed Regulation | Increase Motor Speed: P2 > Up > Up Decrease Motor Speed: P2 > Down > Down |
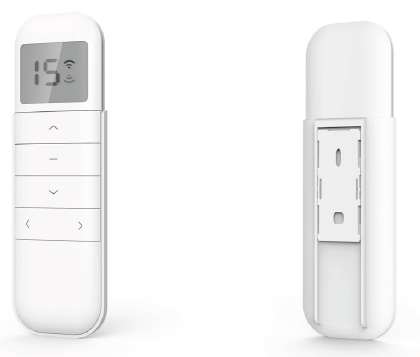
REMOTE CONTROL OVERVIEW
Please read prior to installation and use. Save these instructions for future reference.
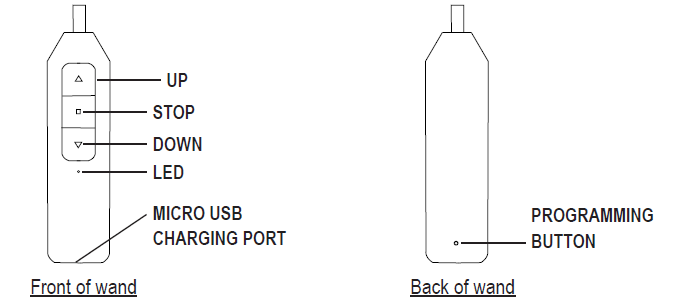
BUTTON INSTRUCTIONS
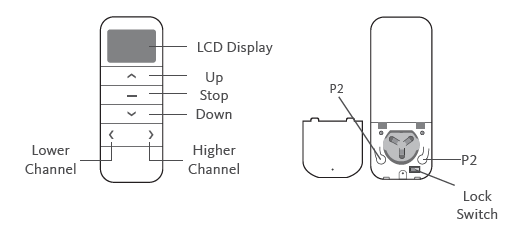
P1 BUTTON LOCATION
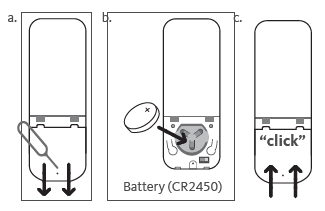
REPLACING THE BATTERY
- a. Gently insert the included ejector tool into the pinhole opening and apply a small amount of pressure to the cover and slide the cover off.
- b. Install battery (CR2450) with positive (+) side facing up.
- c. Gently slide the cover back until a “click” sound is heard.
ADVANCED SETTING – DISABLE LIMIT SETTING
- a. Remove the cover from the backside of remote, the lock switch is in the right corner.
- b. Move the switch to the “Lock” position to disable the following commands, remote will show “L” (lock):
- Change Motor Direction
- Setting the Upper and Lower Limit
- Adjust Limit
- Roller Mode or Sheer Mode
- c. Move the switch to “Unlock” position to assess all remote functions, remote will show “U” (unlock).

*This advanced feature is intended to be used after all shade programming is completed. User Mode will prevent accidental or unintended changing of limits.
CHANNEL OPTIONS
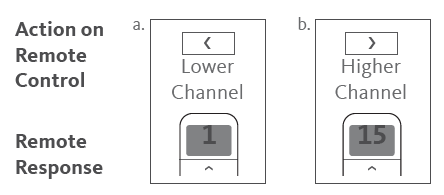
SELECT A CHANNEL
- a. Press “<” button on the remote to select a lower channel.
- b. Press “>” button on the remote to select a higher channel
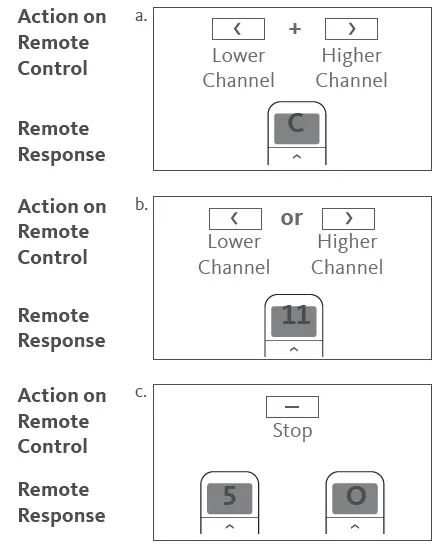
HIDE UNUSED CHANNELS
- a. Press and Hold (about 3 sec) “<” and “>” buttons simultaneously until remote control displays “C” (channel).
- b. Press “<” or “>” button to select required quantity of channel (between 1 to 15).
- c. Press “Stop” button to confirm selection (the example shows a 5-channel selection). The LED will display “O” (OK) once to confirm selection.
TROUBLESHOOTING

QUICK PROGRAMMING GUIDE
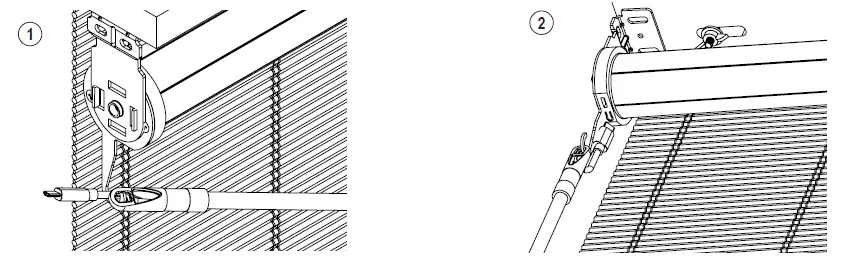
Attach the Wand — Sheer Shadings, Banded & Roller Shades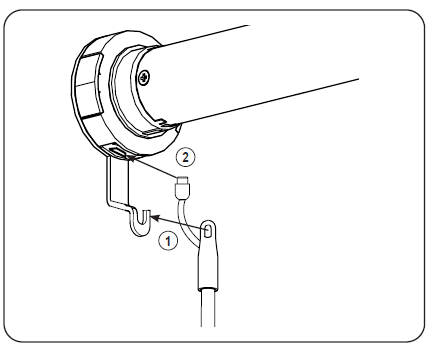
On Banded Shades, Roller Shades and Sheer Shadings, with the wand control buttons facing you, attach the top of the wand on the metal hook support (1) on the motor control side, then connect the cable into the motor head (2).
Note: On Sheer Shadings ordered with Power and on the right side, the cable may be wrapped around the hook. This is normal. You may unwrap, if you desire, as this does not affect functionality. You still need to connect the cable into the motor head.
Attach the Wand — Honeycomb Shades
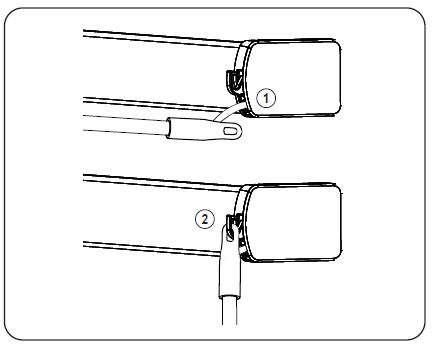
On Honeycomb shades, the wand will be already connected to the shade (1). With the wand control buttons facing you, attach the top of the wand into the plastic hook support on the motor control side (2).
Attach the Wand — Natural Woven Shades
On Natural Woven Shades, with the wand control buttons facing you (1) approach the hook with the wand parallel to the headrail. (2) Gently twist the wand to attach it to the hook. Connect the cable into the motor.
Important: Before starting the programing, install the shade following the installation instructions provided. Honeycomb shades are shipped with the motor in sleep mode to avoid activation during transit.
For Honeycomb Shades, To wake up the motor prior to operating the shade: Press the STOP button 5 times (1) – the first 4 times press quickly and the 5th time PRESS and HOLD the stop button until the motor jog (2).
Operate the Wand
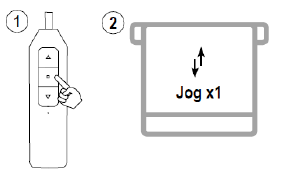
Roller and Honeycomb Mode:
- Press the DOWN or UP button to lower or raise the shade. Press the STOP to stop the shade at the desired position.
Sheer Shadings and Banded Shades Mode: - Tapping the UP or DOWN button for less than 2 seconds will move the shade in short steps.
- Holding the UP or DOWN button down for more than 2 seconds before releasing will operate the shade at the standard speed.
- Press the STOP button to stop the shade at the desired position.
Set a Favorite Position
 IMPORTANT: Once the favorite position is set, the shade will always stop at the designed favorite position when passing by it.
Click 2 x Up or Down button, the shade will go to set Top or Bottom Limit.
Remove a Favorite Position

Advanced Programming
IMPORTANT: Damage to shade may occur when operating the motor prior to setting limits. Attention should be given.
Switch between Roller and Sheer Shadings Mode

Adjust the Top and/or Bottom Limit

Factory Motor Reset

IMPORTANT: All limits will be erased. The motor direction will return to default and may need to be adjusted.
Reverse UP and DOWN Commands (Only if necessary)

Set Upper and Lower Limits ( Only after Factory Motor Reset)
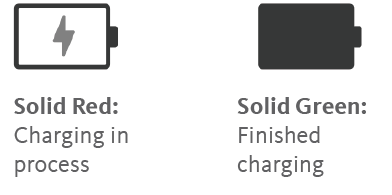
Charge the Battery

When the shade begins to operate slower than normal or only beeps when you attempt to operate, it is time to charge the battery.
To Charge, connect a standard micro USB cable into the bottom of the wand (A) and into USB 5V/2A (max) power supply. A red LED on the wand indicates that the battery is charging. To fully charge the batteries, allow the batteries to charge for at least 1 hour after the LED on the wand turns green.
Note: A typical charge cycle can take between 4-6 hours.
Troubleshooting
| Issues | Possible Causes | Solution |
| The shade is not responding | Built in battery is depleted | Recharge with compatible USB 5V/2A (max) adapter and a micro USB cable. Details under “6. Charge the Battery” |
| Wand is not fully connected to the motor | Check the connection between the wand and the motor | |
| The shade moves the opposite direction on the control buttons | The motor direction is reversed | See details under “Reverse Up and Down Commands” |
| The shade stops by itself before it reaches the top or bottom limit | A favorite position was set | See details under “4. Remove a Favorite Position” |
| The shade only moves in small steps after pressing the button | The shade is operating on Sheer Shadings/ Banded Shades mode | Switch to Roller/Honeycomb mode by following the steps under “Switch between Roller and Sheer Shadings Mode” |
| The shade has no limit set | See details under “Set Upper and Lower Limits” |
Documents / Resources
 |
Bespoke 15 Channel Programming Remote Control [pdf] User Guide 15 Channel Programming Remote Control, Programming Remote Control, Remote Control, Control |


