
hygger HG286
hygger 2-in-1 Submersible Pump 105W Instruction Manual
Model: HG286
1. Introduction
This manual provides detailed instructions for the safe and efficient operation, installation, and maintenance of your hygger 2-in-1 Submersible Pump. Please read this manual thoroughly before use and retain it for future reference.
The hygger 2-in-1 Submersible Pump is designed for various aquatic applications, including aquariums, fish tanks, hydroponic systems, and ponds. It features both side and bottom suction capabilities, allowing for versatile water circulation and efficient water changes.
2. Important Safety Instructions
To reduce the risk of injury, observe the following safety precautions:
- Read all instructions carefully before using the appliance.
- DANGER – To avoid possible electric shock, special care should be taken since water is used in the use of this equipment. For each of the following situations, do not attempt repairs yourself; return the appliance to an authorized service facility for service or discard the appliance.
- If the appliance falls into water, DO NOT reach for it. First, unplug it and then retrieve it. If electrical components get wet, unplug the appliance immediately.
- If the appliance shows any sign of abnormal water leakage, immediately unplug it from the power source.
- Carefully examine the appliance after installation. It should not be plugged in if there is water on parts not intended to be wet.
- Do not operate any appliance if it has a damaged cord or plug, or if it is malfunctioning or has been dropped or damaged in any manner.
- To avoid the possibility of the appliance plug or receptacle getting wet, position the aquarium stand and tank to one side of a wall-mounted receptacle to prevent water from dripping onto the receptacle or plug. A "drip loop" should be arranged by the user for each cord connecting an aquarium appliance to a receptacle. The "drip loop" is the part of the cord below the level of the receptacle, or the connector if an extension cord is used, to prevent water from traveling along the cord and coming into contact with the receptacle. If the plug or receptacle does get wet, DO NOT unplug the cord. Disconnect the fuse or circuit breaker that supplies power to the appliance. Then, unplug and examine for the presence of water in the receptacle.
- Close supervision is necessary when any appliance is used by or near children.
- To avoid injury, do not contact moving parts or hot parts such as heaters, reflector, lamp bulbs, and the like.
- Always unplug an appliance from an outlet when not in use, before putting on or taking off parts, and before cleaning. Never yank cord to pull plug from outlet. Grasp the plug and pull to disconnect.
- Do not use an appliance for other than intended use. The use of attachments not recommended or sold by the appliance manufacturer may cause an unsafe condition.
- Do not install or store the appliance where it will be exposed to the weather or to temperatures below freezing.
- Ensure the appliance is securely installed before operating it.
- Read and observe all important notices on the appliance.
- If an extension cord is necessary, a cord with a proper rating should be used. A cord rated for less amperes or watts than the appliance rating may overheat. Care should be taken to arrange the cord so that it will not be tripped over or pulled.
3. Package Contents
Verify that all components are present and in good condition:
- hygger 2-in-1 Submersible Pump (Model HG286)
- Four suction cups
- Four water nozzles (in 3 sizes)
- Low-level intake attachment
- Side suction inlet attachment

Image: The hygger 2-in-1 Submersible Pump (Model HG286) with its key dimensions (7.68in L x 5.51in W x 3.74in H) and performance specifications (105W, 1585GPH, 15.8ft lift).
4. Setup Instructions
4.1 Attaching Nozzles and Hoses
The pump comes with four nozzles of varying diameters (0.7", 0.87", 0.98", 0.98") to accommodate different hose sizes. Choose the appropriate nozzle for your application.
- Select the desired nozzle.
- Take out the rubber ring from the connector.
- Clamp the rubber ring into the interface gap of the connector.
- Tighten the connector onto the pump's outlet.
- Ensure tightness both inside and outside.
- Connect your hose to the nozzle.
- Loosen the outer protective shell to secure the tube if necessary.
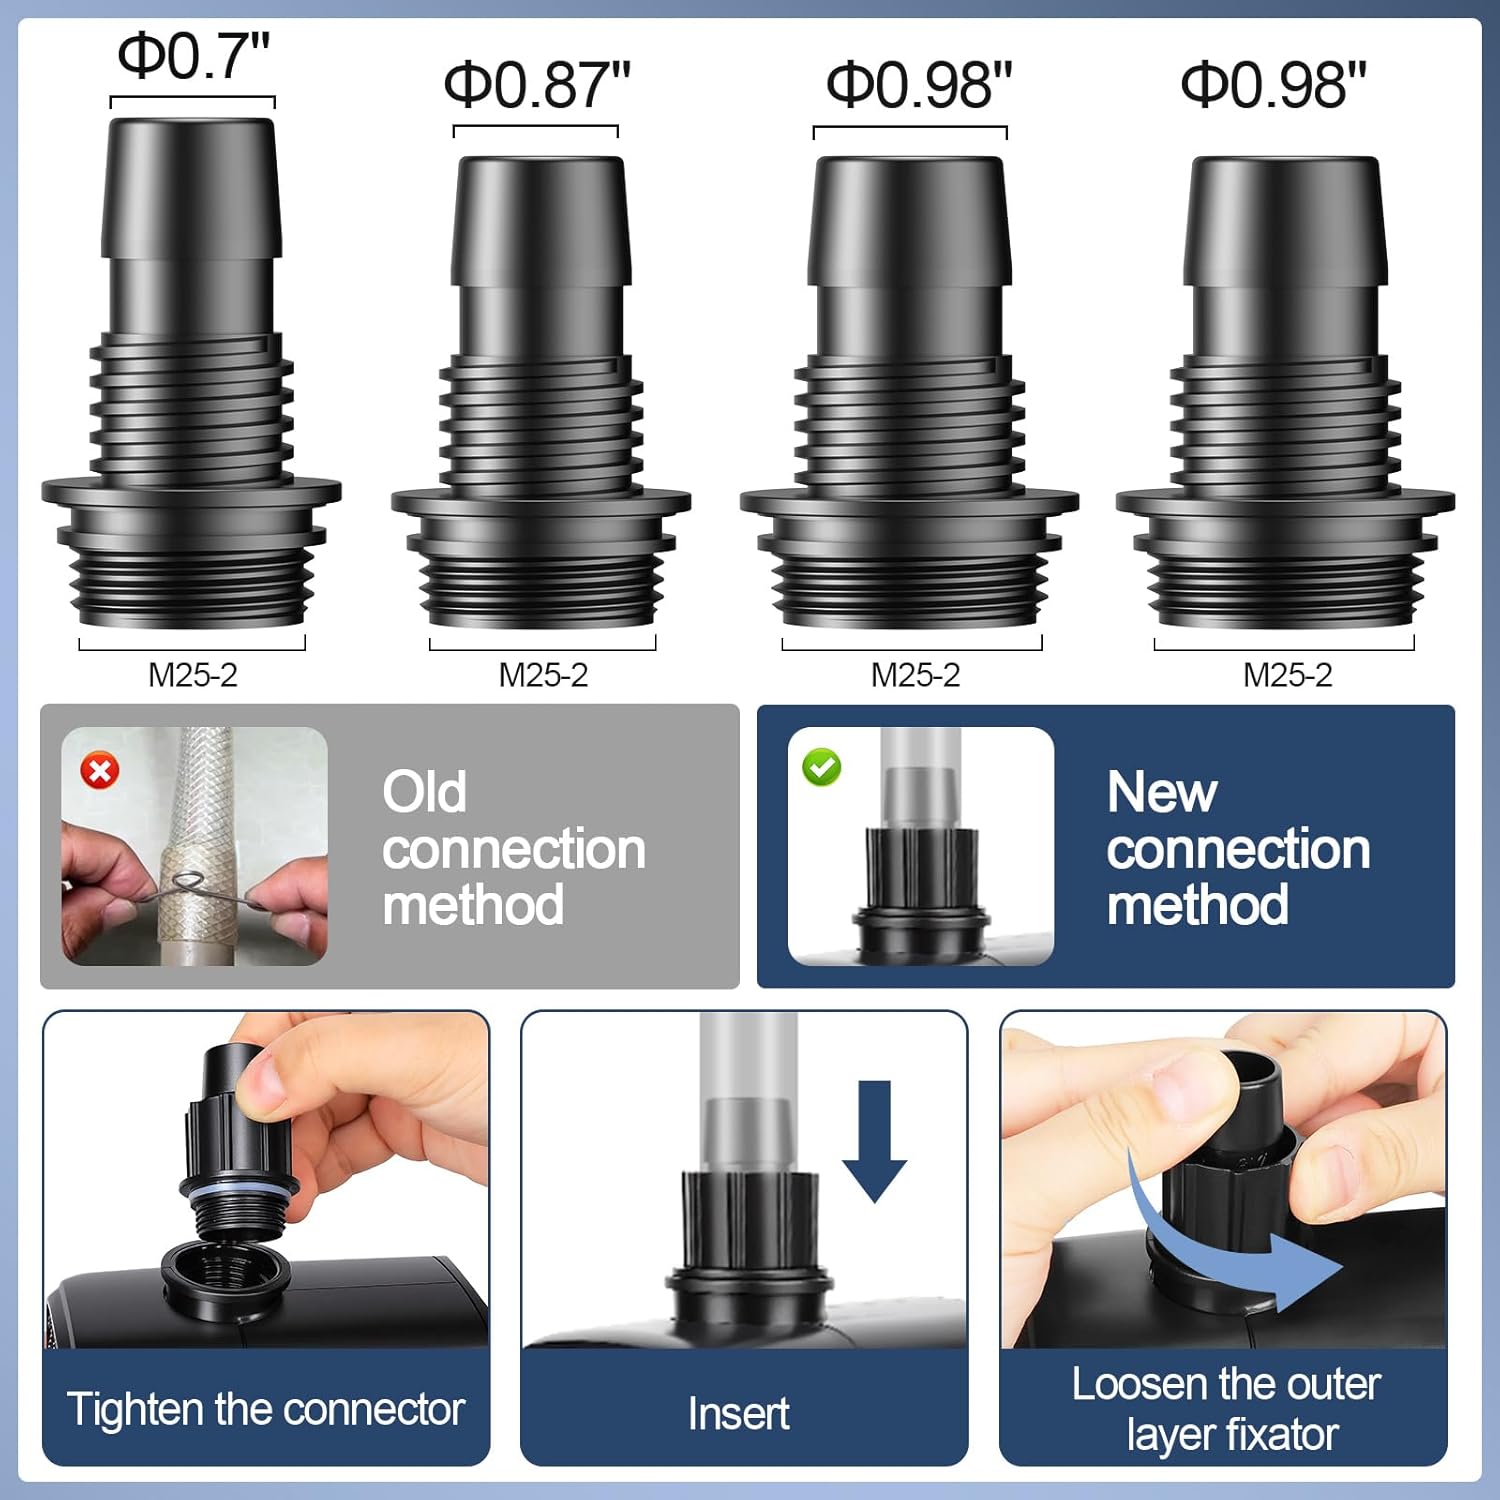
Image: Illustration of the four interchangeable nozzles and the correct method for connecting a hose to the pump, showing how to tighten the connector and insert the tube securely.

Image: A step-by-step guide demonstrating how to properly secure the pipe connection to the pump, including inserting the rubber ring, tightening the connector, and securing the tube.
4.2 Pump Placement and Mode Selection
The pump can be placed vertically or horizontally using its four strong suction cups. It offers two primary modes: side suction and bottom suction.
- Side Suction Mode: For general water circulation and filtration. Attach the side suction inlet.
- Bottom Suction Mode: For fast water changes or cleaning bottom debris. Attach the low-level intake. This mode can drain water down to 0.4 inches (1 cm).

Image: The pump illustrating its replaceable water inlets for side suction (dual-purpose) and bottom suction, which can absorb water down to 1cm. Also shows a "Land Mode" which requires prior water mode activation.
Video: An overview of the hygger 2-in-1 Submersible Pump, demonstrating its features and how to switch between side and bottom suction modes for different applications.
5. Operating Instructions
5.1 Powering On and Flow Adjustment
Once the pump is correctly installed and submerged, plug it into a suitable power outlet. The pump will begin operating.
To adjust the water flow rate, pressure, and lift, rotate the built-in knob on the side suction inlet. This allows for fine-tuning the pump's performance to suit your specific needs.
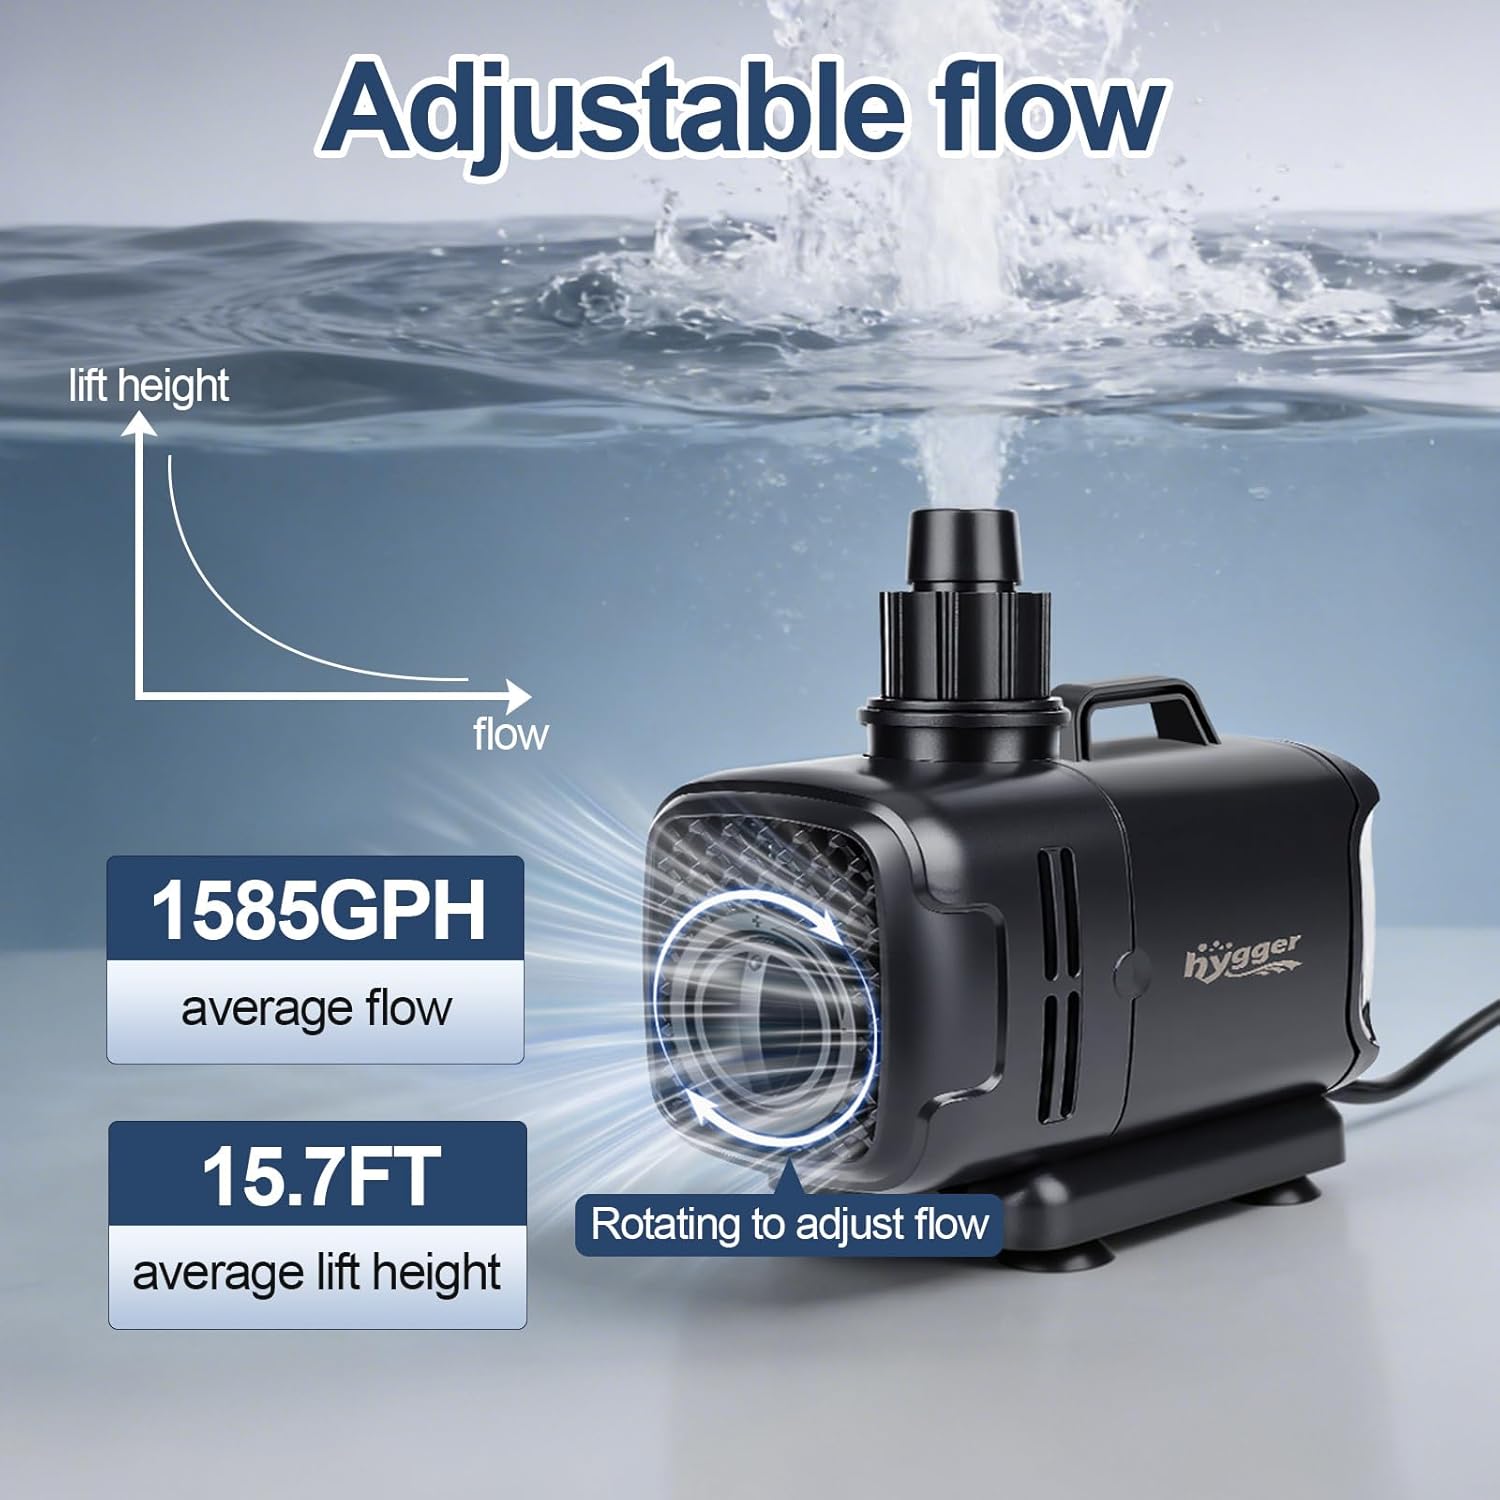
Image: The hygger pump highlighting its adjustable flow feature, showing the knob for rotation to control flow rate, and indicating average flow (1585 GPH) and lift height (15.7 FT).
5.2 Using Low Suction Mode for Water Changes and Cleaning
For efficient water changes or thorough cleaning of bottom debris, utilize the low suction mode. This mode allows the pump to draw water down to a minimum level of 0.4 inches (1 cm), effectively removing fish waste, impurities, and silt from the tank bottom.

Image: The hygger pump in low water absorption mode, showing its ability to reduce water levels to 1 cm and effectively remove fish feces, impurities, and silt from the tank bottom.
6. Maintenance
Regular cleaning of your hygger submersible pump is essential for maintaining its performance and extending its lifespan. The pump features a tool-free design for easy disassembly.
6.1 Cleaning the Pump
- Disconnect Power: Always unplug the pump from the power outlet before performing any maintenance.
- Disassemble: Gently slide the base to unlock and open the pump head to access the impeller and internal components.
- Clean Components: Rinse all parts (impeller, housing, inlets) under clean water. Use a soft brush to remove any accumulated debris, algae, or mineral deposits.
- Inspect: Check the impeller for any damage or wear. Ensure the power cord is free from cuts or abrasions.
- Reassemble: Carefully reassemble the pump, ensuring all parts fit securely. Lock the pump head back into place.

Image: Visual guide demonstrating the easy disassembly process of the hygger pump, including sliding the base, opening the pump head to replace the water inlet, and showing the waterproof lock mechanism.
7. Troubleshooting
If your pump is not operating as expected, refer to the following common issues and solutions:
| Problem | Possible Cause | Solution |
|---|---|---|
| Pump does not start or operate. |
|
|
| Low water flow or weak output. |
|
|
| Excessive noise or vibration. |
|
|
8. Specifications
| Feature | Detail |
|---|---|
| Model Number | HG286 |
| Power | 105W |
| Max Flow Rate | 1585 GPH (6000 L/H) |
| Max Lift Height | 15.7 FT (4.8 m) |
| Product Dimensions (L x W x H) | 7.68" x 5.51" x 3.74" |
| Weight | 5.22 Pounds |
| Material | Plastic |
| Special Feature | 2-in-1 (Side & Bottom Suction) |
| Included Components | Pump, 4 Suction Cups, 4 Water Nozzles, Low-level Intake, Side Suction Inlet |
| Suitable for | Freshwater & Saltwater Aquariums, Fish Tanks, Hydroponics, Ponds, Fountains |
9. Warranty and Support
For warranty information or technical support, please refer to the product packaging or contact hygger customer service directly. Keep your purchase receipt as proof of purchase.
Manufacturer: hygger
Related documentsHG286


Ask a question about this manual
Ask about setup, troubleshooting, compatibility, parts, safety, or missing instructions. Manuals+ will review the question and use this page’s manual context to help answer it.