1. Introduction
The RAINPOINT ITP153 Automatic Indoor Plant Watering System is designed to provide efficient and consistent watering for your potted plants. This system is ideal for indoor use, balconies, offices, patios, greenhouses, and plant stands, ensuring your plants remain hydrated even when you are away. It features a large display for easy programming and includes an exclusive Cycle & Soak mode for optimized water absorption and plant health.

Image: The RAINPOINT ITP153 Automatic Indoor Plant Watering System in operation, connected to a water reservoir and distributing water to several potted plants.
2. What's in the Box
Verify that all components are present in your package:
- 1 x Auto Watering Pump
- 1 x 1/6" Main Line Tubing (4mm)
- 1 x 1/8" Branch Line Tubing (3mm)
- 10 x T Barb Fitting
- 10 x Drip Emitter
- 1 x T Cross Barb Fitting
- 1 x Anti-Siphon Valve
- 1 x Filter
- 3 x Tubing End Plug
- 1 x USB Cable
- 1 x Detachable Mounting Hook
- Zip Ties

Image: All included components of the RAINPOINT ITP153 kit, including the pump, tubing, emitters, fittings, and accessories.
3. Tubing Setup
The system utilizes 4mm main line tubing and 3mm branch line tubing to ensure even water distribution and minimize pressure loss.
- Prepare Tubing: Plan your drip watering layout. Cut the 4mm main line tubing to the desired lengths for connecting plants. For easier installation, soak the cut tubing ends in boiling water for 10 seconds to soften them.
- Connect Filter: Insert the filter into one end of the 4mm main line tubing. Place the filter end into your water container.
- Connect to Pump: Connect the 4mm main line tubing (with filter) to the 'IN' port of the auto watering pump.
- Install Anti-Siphon Valve: Connect the anti-siphon valve to the 'OUT' port of the pump. Ensure the valve is installed correctly according to the water flow direction (indicated by arrows on the valve). This prevents backflow and siphoning.
- Branching Tubing: Use T-barb fittings to split the 4mm main line tubing into 3mm branch lines for individual plants. For splitting into more than two directions, use the cross barb fitting.
- Install Drip Emitters: Attach the 3mm micro drip emitters to the end of each branch line. Insert the emitters at least 3 inches deep into the soil at the base of each plant to ensure water reaches the roots effectively.
- Secure Tubing: Use zip ties or the detachable mounting hook to secure the tubing and pump as needed.
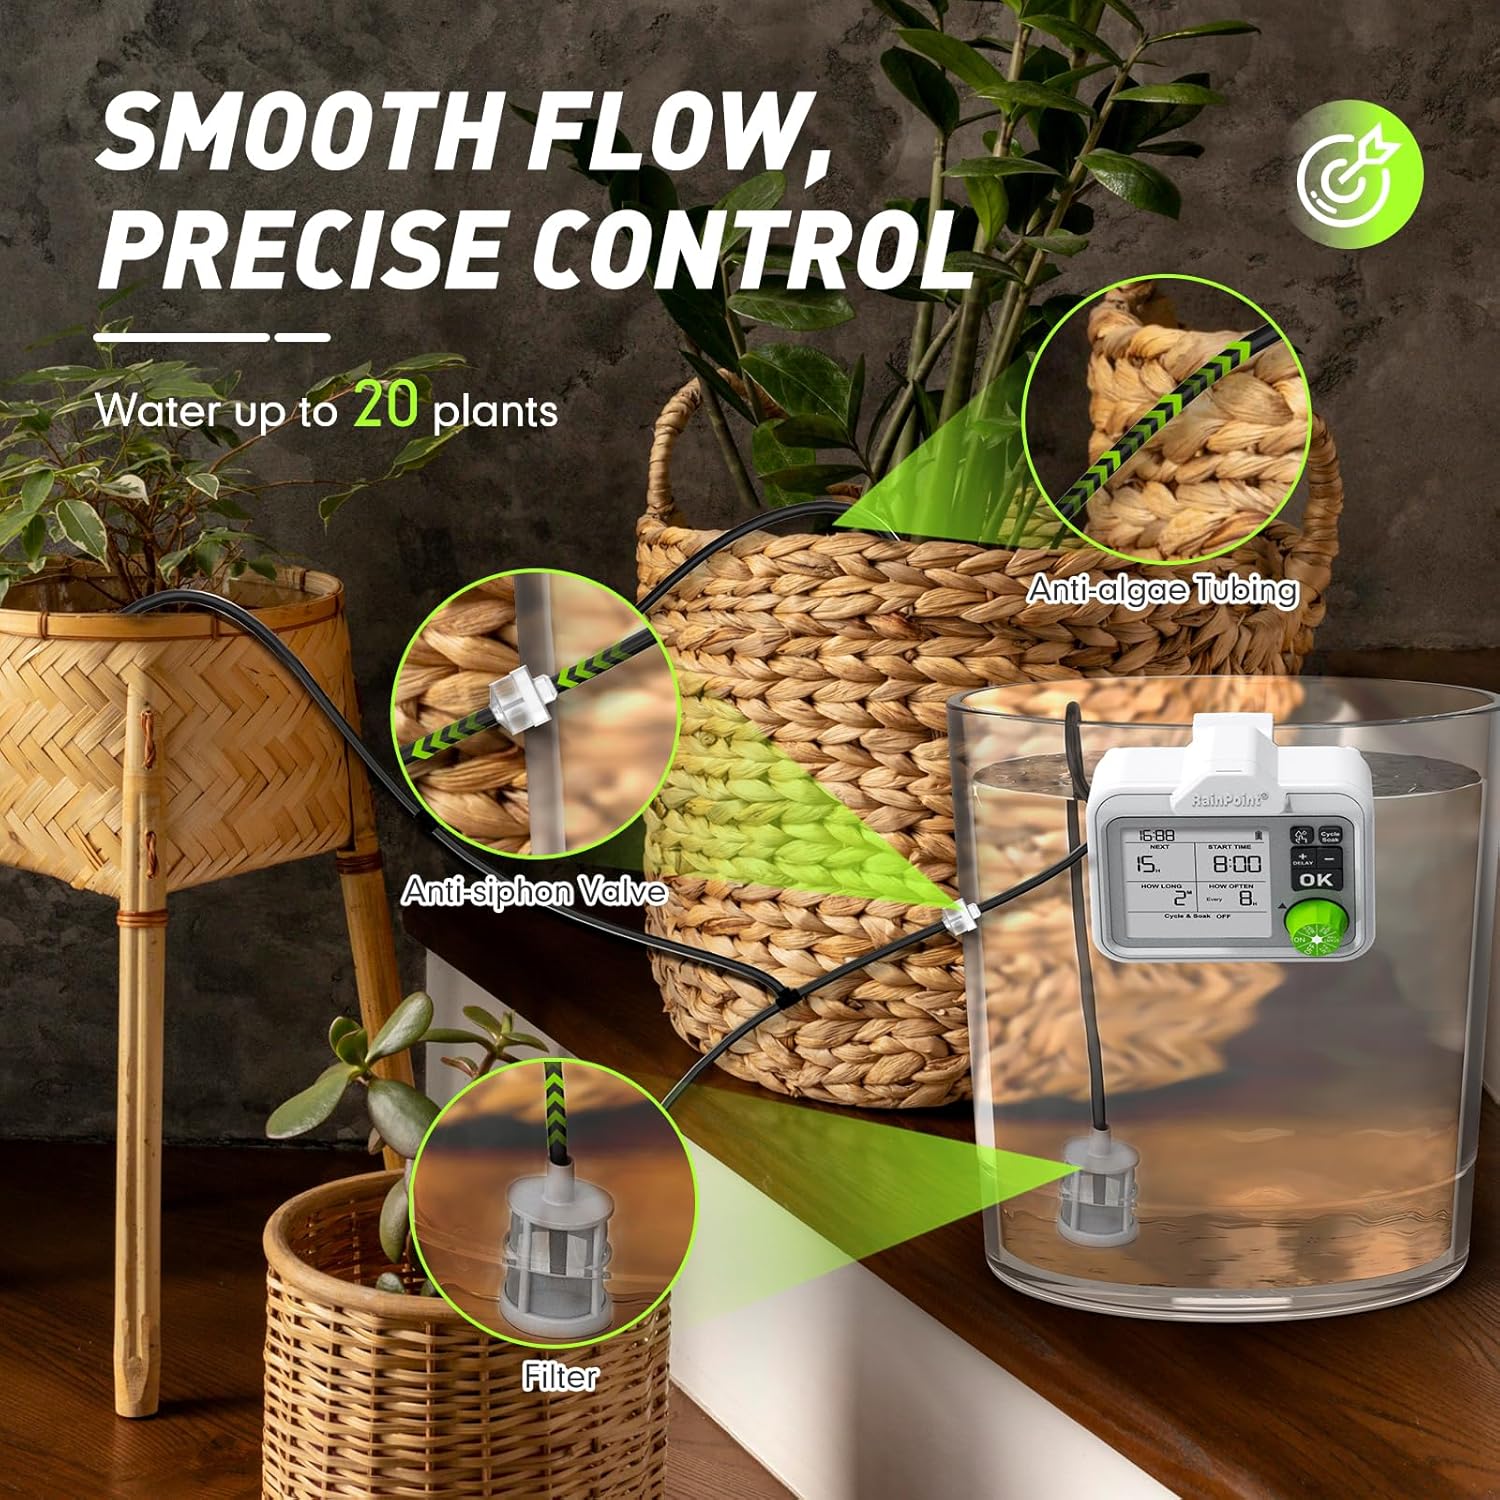
Image: Close-up of the tubing setup, showing the anti-siphon valve, filter in a water reservoir, and drip emitters in potted plants.
Video: Tubing Setup Guide
Video Description: A step-by-step tutorial demonstrating how to connect the tubing, fittings, and emitters for the RAINPOINT ITP153 system.
4. Operating Instructions
4.1 Display Overview
The large LCD display provides all necessary information at a glance, including current time, next watering countdown, start time, watering duration, and frequency settings. A battery level indicator and water shortage indicator are also present.
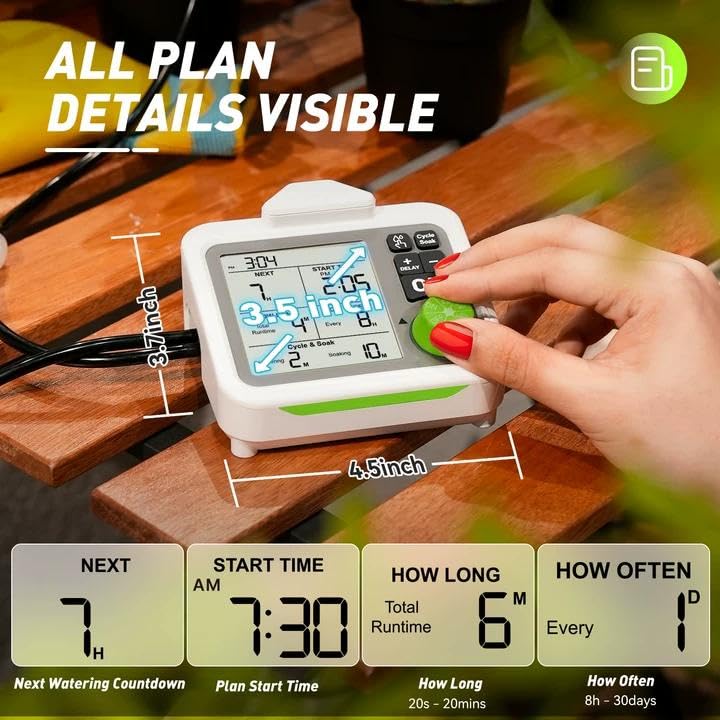
Image: The large LCD display of the RAINPOINT ITP153, highlighting various settings like next watering time, start time, duration, and frequency.
4.2 Setting Current Time
- Turn the knob to 'SET CLOCK'.
- Press '+' or '-' buttons to select 12H or 24H format. Press 'OK' to confirm.
- Press '+' or '-' buttons to set the hour. Press 'OK' to confirm.
- Press '+' or '-' buttons to set the minute. Press 'OK' to confirm.
4.3 Setting Auto Watering Plan
The system allows for flexible programming to meet diverse plant needs.
- Set Start Time: Turn the knob to 'START TIME'. Press '+' or '-' buttons to select the desired start time (hour and minute). Press 'OK' to confirm each setting.
- Set Watering Duration: Turn the knob to 'HOW LONG'. Press '+' or '-' buttons to set the watering duration. The duration can range from 20 seconds to 20 minutes. Press 'OK' to confirm.
- Set Watering Frequency: Turn the knob to 'HOW OFTEN'. Press '+' or '-' buttons to set the watering frequency. Options range from every 8 hours to once every 30 days. Press 'OK' to confirm.
4.4 Cycle & Soak Mode
This exclusive feature divides irrigation into shorter cycles with soak periods, saving water and promoting deeper root growth. It is available when the total watering duration is 2 minutes or more.
- To activate/deactivate, press the 'Cycle & Soak' button.
- When active, you can set watering and soaking intervals (e.g., 1 minute watering, 5 minutes soaking).

Image: The RAINPOINT ITP153 display illustrating the Cycle & Soak feature, showing alternating water and soak periods for optimal soil saturation.
Video: RAINPOINT Cycle & Soak Watering Mode Overview
Video Description: A brief overview demonstrating how to set and utilize the Cycle & Soak watering mode on the RAINPOINT ITP153.
4.5 Manual Watering
For temporary watering without interrupting your preset schedule:
- Ensure the knob is in the 'ON' position.
- Press the water drop icon button to activate manual watering mode.
- Press '+' or '-' buttons to set the desired duration.
- Press 'OK' to confirm. Manual watering will start immediately.
- Press the water drop icon button again to end the manual watering session.
4.6 Suspend Auto Watering Plan (Delay Function)
To conserve water or avoid over-watering (e.g., on rainy days):
- Ensure the knob is in the 'ON' position.
- Long press the 'DELAY' button to activate the delay function.
- Press '+' or '-' to choose the delay duration (24, 48, or 72 hours).
- Press 'OK' to confirm. 'Delay' will appear on the display.
- Long press 'DELAY' again to cancel the function.

Image: The RAINPOINT ITP153 display illustrating the Delay and Manual watering options, showing how to temporarily pause or initiate watering.
5. Specifications
| Feature | Detail |
|---|---|
| Product Dimensions | 6.3 x 5.71 x 4.72 inches |
| Item Model Number | ITP153 |
| Batteries | 1 Lithium Ion battery required (included) |
| Item Weight | 0.72 Kilograms (1.59 Pounds) |
| Watering Capacity | Up to 20 plants (with additional accessory kit) |
| Watering Duration | 20 seconds to 20 minutes |
| Watering Frequency | Every 8 hours to once every 30 days |
6. Troubleshooting
- No Water Flow: Check if the filter is submerged in water. Ensure tubing connections are secure and not kinked. Verify the pump is charged and the watering schedule is active.
- Uneven Water Distribution: Ensure the anti-siphon valve is correctly installed. Check for blockages in emitters or tubing. The system is designed for even flow, but extreme differences in plant height or tubing length can affect this.
- Pump Not Responding: Check battery level. Recharge the pump if necessary using the provided USB cable.
- Water Leakage: Ensure all tubing connections are tight. Soaking tubing ends in hot water before connecting can help create a tighter seal.
7. Warranty & Support
The RAINPOINT ITP153 Automatic Indoor Plant Watering System comes with a 3-year warranty.
For further assistance, troubleshooting, or warranty claims, please visit the official RAINPOINT website or contact their customer support.


