1. Important Safety Instructions
When using electrical appliances, basic safety precautions should always be followed to reduce the risk of fire, electric shock, and/or injury to persons, including the following:
- Read all instructions before using the coffee maker.
- Do not touch hot surfaces. Use handles or knobs.
- To protect against fire, electric shock, and injury to persons, do not immerse cord, plugs, or appliance in water or other liquid.
- Close supervision is necessary when any appliance is used by or near children.
- Unplug from outlet when not in use and before cleaning. Allow to cool before putting on or taking off parts, and before cleaning the appliance.
- Do not operate any appliance with a damaged cord or plug or after the appliance malfunctions, or has been damaged in any manner. Return appliance to the nearest authorized service facility for examination, repair, or adjustment.
- The use of accessory attachments not recommended by the appliance manufacturer may result in fire, electric shock, or injury to persons.
- Do not use outdoors.
- Do not let cord hang over edge of table or counter, or touch hot surfaces.
- Do not place on or near a hot gas or electric burner, or in a heated oven.
- Always attach plug to appliance first, then plug cord into the wall outlet. To disconnect, turn any control to "off", then remove plug from wall outlet.
- Do not use appliance for other than intended use.
2. Product Overview
The KOTLIE EM-308A is a versatile 5-in-1 single-serve coffee maker designed for various coffee preparations. It features 19 Bar pressure and a 1400W fast-heating system.
2.1 Components and Design

Figure 2.1: KOTLIE EM-308A Coffee Maker brewing iced coffee. This image shows the main unit with a transparent water tank, control panel, and a cup of iced coffee being dispensed.

Figure 2.2: KOTLIE EM-308A User-Friendly Design. This image highlights the machine's compact design, 1L water reservoir, sliding touch buttons, and cold/hot brewing capabilities.
The EM-308A is a versatile coffee maker compatible with various coffee formats:

Figure 2.3: KOTLIE EM-308A Coffee Maker with various capsule adapters. The image displays the coffee maker alongside adapters for Nespresso Original, Dolce Gusto, K-Cup, 44mm ESE pods, and ground coffee.
The machine includes dedicated adapters for:
- D*olce G*usto Capsules
- NES*presso Original Capsules
- K-Cup Capsules
- Ground Coffee
- 44mm ESE Coffee Pods

Figure 2.4: Compatibility table for various capsule types with the KOTLIE EM-308A.
2.2 Control Panel and Key Features

Figure 2.5: KOTLIE EM-308A Features Overview. This graphic highlights key features including 19 Bar pressure, pre-wetting function, 7-level water volume adjustment, and a smart touch panel.

Figure 2.6: KOTLIE EM-308A Temperature Options. This image illustrates the control panel with buttons for power, pre-soak, temperature selection (Cold, Green, Yellow, Red lights), and brew.
The control panel includes:
- Power button
- Pre-soak button
- Temperature button with four indicator lights:
- Blue light: Cold brewing (real-time water temperature)
- Green light: Medium-low temperature (65-70°C / 149-158°F)
- Yellow light: Medium-high temperature (70-80°C / 158-176°F)
- Red light: High temperature (80-85°C / 176-185°F)
- Brew button
- 7-level cup volume slider
3. Setup and First Use
3.1 Unpacking
Carefully remove all packaging materials and components from the box. Ensure all parts are present and undamaged. Retain packaging for future transport or storage.
3.2 Initial Cleaning
- Wash the water tank, drip tray, and capsule adapters with warm, soapy water. Rinse thoroughly and dry.
- Wipe the exterior of the machine with a damp cloth.
3.3 Filling the Water Tank
- Remove the water tank from the back of the machine.
- Fill the tank with fresh, cold drinking water up to the MAX fill line.
- Place the water tank back onto the machine, ensuring it is securely seated.
3.4 First Use (Priming the Machine)
Before brewing coffee for the first time, or if the machine has not been used for an extended period, prime the machine:
- Ensure the water tank is filled.
- Place an empty cup on the drip tray.
- Do not insert any capsule or ground coffee adapter.
- Plug the machine into a grounded electrical outlet.
- Press the Power button. The machine will heat up.
- Once heated, press the Brew button. The machine will dispense hot water. Repeat this process 2-3 times to flush the system.
- Discard the water. The machine is now ready for use.
4. Operating Instructions
4.1 General Brewing Steps
- Ensure the water tank is filled with fresh water.
- Plug in the machine and press the Power button. Wait for the machine to heat up (indicator lights will stabilize).
- Select the appropriate capsule adapter or ground coffee holder for your chosen coffee type.
- Insert the coffee capsule or ground coffee into the adapter, then place the adapter into the machine.
- Place your cup on the drip tray.
- Select your desired brewing temperature using the Temperature button (Blue for cold, Green for medium-low, Yellow for medium-high, Red for high).
- Adjust the water volume using the 7-level slider on the touch panel.
- Press the Brew button to start brewing.
- Once brewing is complete, carefully remove the used capsule/ground coffee adapter and discard the contents.
4.2 Pre-wetting Function
The pre-wetting function saturates the coffee grounds before full pressure brewing, which can lead to more uniform extraction and enhanced flavor. To activate, press the Pre-soak button before pressing the Brew button.
4.3 Temperature Selection
The machine offers four temperature settings:
- Blue Light: Cold Brewing - For iced coffee. Brew at real-time water temperature, then add ice.
- Green Light: Medium-Low Temperature - Approximately 65-70°C (149-158°F).
- Yellow Light: Medium-High Temperature - Approximately 70-80°C (158-176°F).
- Red Light: High Temperature - Approximately 80-85°C (176-185°F).
Figure 4.1: Temperature selection diagram on the control panel.
4.4 Water Volume Adjustment
The machine features a 7-level sliding touch button for adjusting the water volume. Slide your finger from bottom to top to increase the water amount. The illuminated lines indicate the selected level.
Important Notes:
- Keep fingers warm and dry when operating the touch panel.
- Avoid touching both lines simultaneously.
- Slide slowly from bottom to top for precise adjustment.
- For volumes exceeding 10oz, repeat the brewing process.

Figure 4.2: Illustration of the 7-level water volume adjustment slider.
4.5 Preparing Specialty Coffees (e.g., Latte, Cappuccino)
To prepare milk-based beverages:
- First, prepare milk froth or hot milk using compatible milk capsules (e.g., D*olce G*usto or S*tarbucks milk capsules).
- Then, brew a shot of espresso using your preferred coffee capsule or ground coffee.
- Combine the espresso with the prepared milk according to your desired recipe. Refer to capsule manufacturer websites for specific fancy coffee ratios.
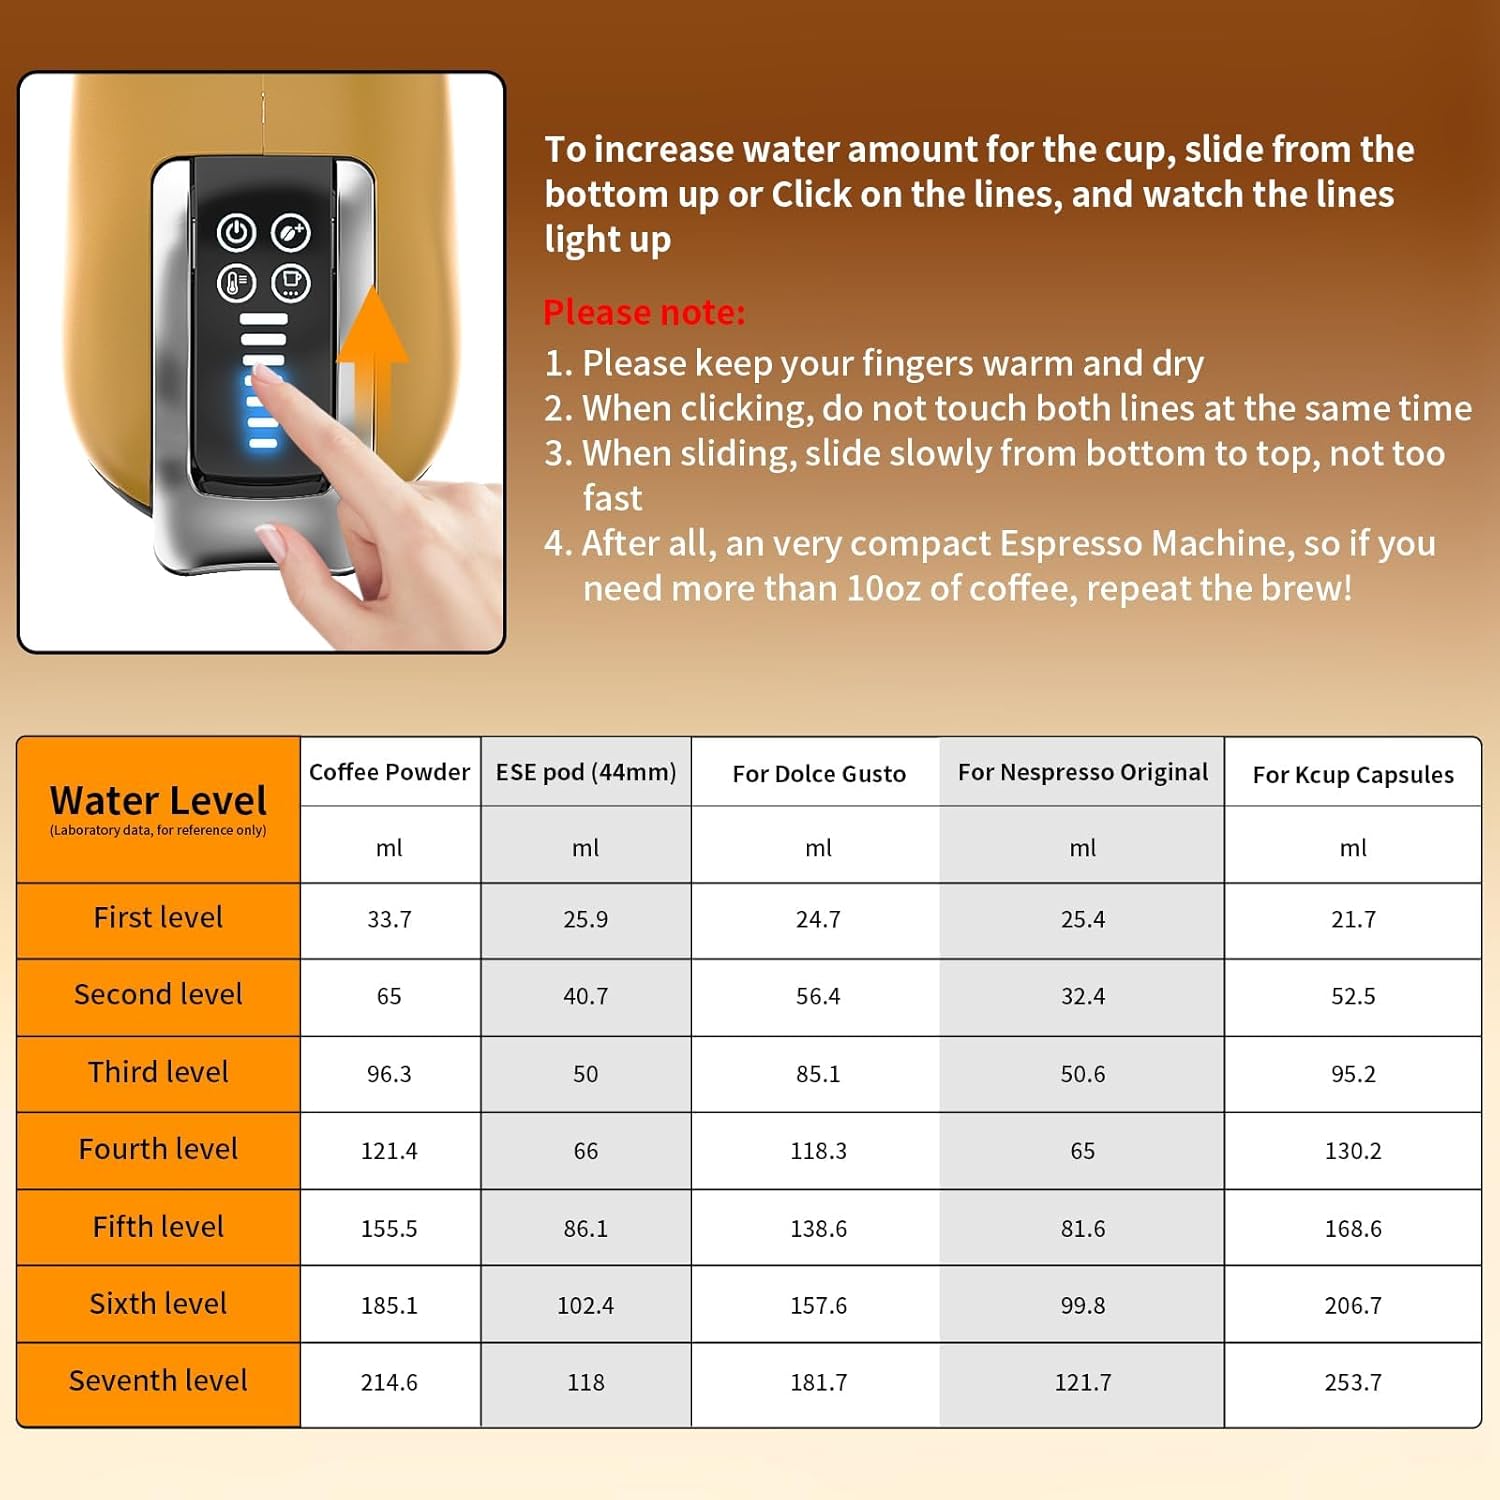
Figure 4.3: Visual guide for preparing a Latte or Cappuccino.
5. Maintenance and Cleaning
5.1 Daily Cleaning
- After each use, remove and empty the drip tray and used capsule/ground coffee adapter. Wash them with warm, soapy water and rinse thoroughly.
- Wipe the exterior of the machine with a soft, damp cloth. Do not use abrasive cleaners or scouring pads.
- Empty and rinse the water tank daily.
5.2 Cleaning Reminder
The machine is equipped with a cleaning reminder feature to ensure its longevity. When a cleaning cycle is recommended, all indicator lights will flash rapidly, and only the brew button will remain functional. This is not a malfunction. It indicates that descaling and cleaning are required to restore normal operation.
5.3 Descaling
Regular descaling is crucial to prevent mineral buildup and maintain optimal performance. The frequency depends on water hardness and usage. Follow these general steps for descaling:
- Empty the water tank and fill it with a descaling solution (e.g., white vinegar and water, or a commercial descaling agent) according to the descaling product's instructions.
- Place a large container under the coffee spout.
- Run several brewing cycles without a capsule until the water tank is empty.
- Rinse the water tank thoroughly and fill it with fresh water.
- Run several more brewing cycles with fresh water to flush out any remaining descaling solution.
- Repeat the fresh water rinse cycles until no descaling solution residue is detected.
Note: Always refer to the descaling solution manufacturer's instructions for specific ratios and procedures.
6. Troubleshooting
| Problem | Possible Cause | Solution |
|---|---|---|
| Machine does not turn on. | Not plugged in; power outlet malfunction. | Ensure the power cord is securely plugged into a working electrical outlet. Test the outlet with another appliance. |
| No water dispenses / Machine makes noise but no coffee. | Water tank empty; machine not primed; air in pump. | Fill the water tank. If new or unused for a while, prime the machine (Section 3.4). Run several cycles of hot water without a capsule. |
| All indicator lights flash rapidly, only brew button works. | Cleaning reminder activated. | This indicates the machine requires descaling and cleaning. Refer to Section 5.3 for descaling instructions. |
| Coffee is weak or watery. | Incorrect water volume; old/stale coffee; capsule not properly inserted. | Adjust water volume to a lower setting. Ensure fresh coffee is used. Check that the capsule/adapter is correctly seated. |
| Water leaking from the bottom of the machine. | Water tank not seated correctly; internal seal issue; machine malfunction. | Ensure the water tank is firmly and correctly seated. Check for any visible cracks or damage to the tank. If the issue persists, contact customer support. |
| Coffee grounds in cup (for ground coffee). | Ground coffee too fine; filter clogged. | Use a coarser grind for ground coffee. Clean the ground coffee filter thoroughly. |
7. Product Specifications
| Feature | Detail |
|---|---|
| Brand | KOTLIE |
| Model Number | EM-308A |
| Product Dimensions | 12.2"D x 4.5"W x 11.1"H (approx. 317mm D x 124mm W x 290mm H based on diagram) |
| Item Weight | 9.28 pounds (4.22 Kilograms) |
| Coffee Maker Type | Espresso Machine, Single-Serve |
| Pressure | 19 Bar |
| Power | 1400W (Fast-heating boiler) |
| Compatibility | K-Cup, NES*presso Original, D*olce G*usto, Ground Coffee, 44mm ESE Pods |
| Special Features | Portable, 4 Temperature Options, Pre-wetting Function, 7-Level Water Volume, Smart Touch Panel |

Figure 7.1: KOTLIE EM-308A dimensions diagram.
8. Warranty and Customer Support
For warranty information or if you encounter any issues not covered in this manual, please contact KOTLIE customer support. Details can typically be found on the product packaging or the official KOTLIE website.
When contacting support, please have your model number (EM-308A) and purchase date available.


