
SINOTIMER TM-619 Series
SINOTIMER 7-Day Digital Programmable Timer Switch
Model: TM-619 Series (120VAC Input)
1. Introduction
Thank you for choosing the SINOTIMER 7-Day Digital Programmable Timer Switch. This device is designed to provide precise, automated control over various electrical appliances and systems, such as pool pumps, gate openers, irrigation sprinklers, and lighting. With its advanced digital programming capabilities, you can set up to 28 events per day, ensuring efficient and convenient operation throughout the week. This manual provides detailed instructions for installation, programming, maintenance, and troubleshooting to help you get the most out of your timer switch.
2. Safety Information
WARNING: Risk of Electric Shock. Installation should only be performed by a qualified electrician or trained personnel. Disconnect power at the circuit breaker before installing or servicing the timer switch.
- Ensure the power supply matches the timer's voltage rating (120VAC for this model).
- Do not exceed the maximum load capacity of 10A @ 250VAC (2000 watts).
- Keep the device away from water and moisture unless specifically rated for outdoor or wet environments. While the device has some water resistance, it is not fully waterproof and should be protected from direct exposure to water.
- Do not attempt to disassemble or repair the unit yourself. Refer all servicing to qualified personnel.
- Ensure all wiring connections are secure and properly insulated to prevent short circuits.
3. Product Overview
3.1 Key Features
- 7-day digital programmable timer switch with LED power indicator.
- Internal battery backup for settings retention during power outages.
- Up to 28 events (ON/OFF programs) per day.
- Flexible 7-day programming blocks.
- 110/120V AC input.
- SPDT (Single Pole Double Throw) output: 1 Normally Open (NO) + 1 Normally Closed (NC) contact.
- Maximum load: 10 A @ 250VAC, 2000 watts.
- Selectable 12-hour or 24-hour time format.
- Two installation methods: screw mounting or standard panel mounted (72x72mm).
3.2 Package Contents

The package typically includes the following items:
- 1 x Timer Switch Unit
- 1 x Mounting Bracket
- 1 x Instruction Manual
- 1 x Transparent Dust Cover
- 1 x Internal Battery (pre-installed or separate)
- 1 x Disassembly Tool (small screwdriver)
- 2 x Mounting Screws
- 5 x Spade Connecting Wires
3.3 Product Components and Dimensions

The timer features a clear digital display showing the current time, day of the week, and programming status. Buttons for CLOCK, TIMER, DAY, HOUR, MIN, SEC, and MANUAL control are located on the front panel. An LED indicator shows the power status.
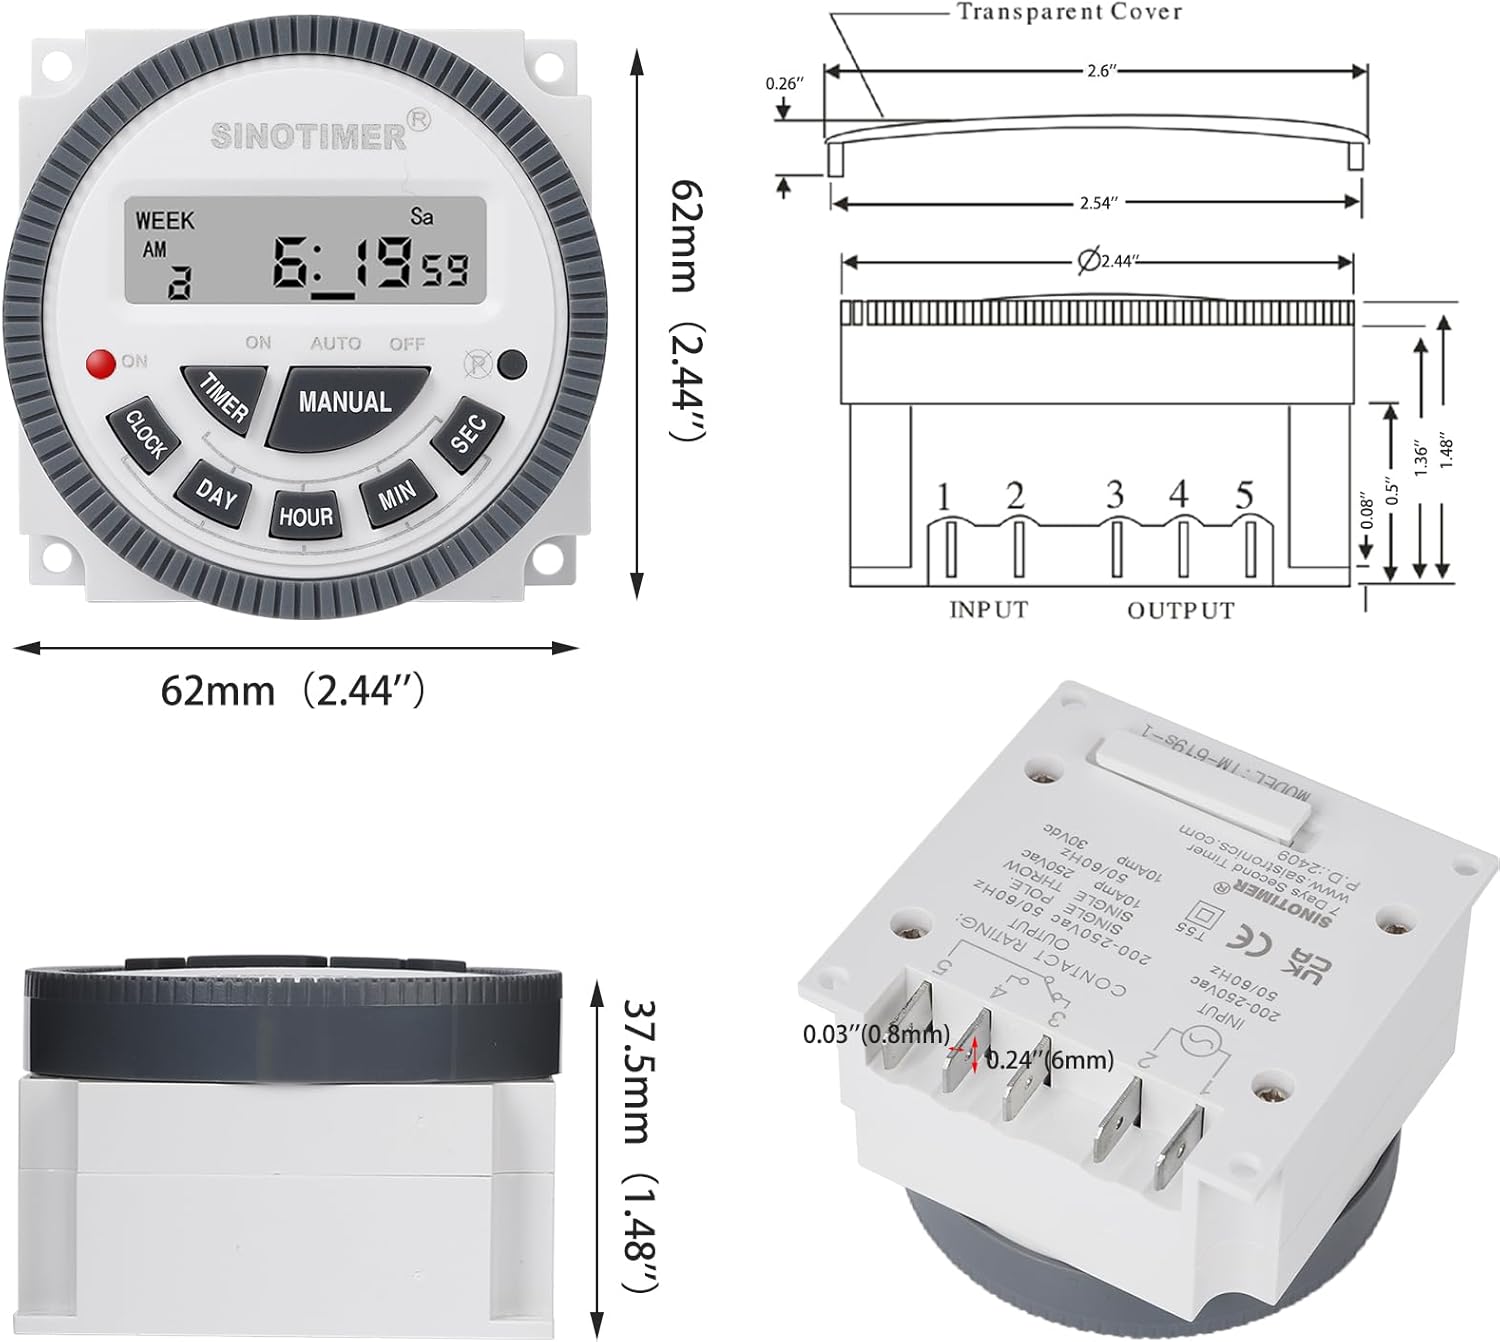
The timer unit measures approximately 62mm (2.44 inches) in width and height, with a depth of 37.5mm (1.48 inches). It features five terminals for input and output connections, clearly labeled for wiring.
4. Installation
The SINOTIMER TM-619 Series timer switch offers two primary installation methods: screw mounting or standard panel mounting. Always ensure power is disconnected before beginning installation.
4.1 Wiring Diagram

Refer to the diagram for proper wiring connections. The timer has two input terminals (for 120VAC power) and three output terminals for the SPDT (Single Pole Double Throw) relay. These are typically labeled as Common (COM), Normally Open (NO), and Normally Closed (NC).
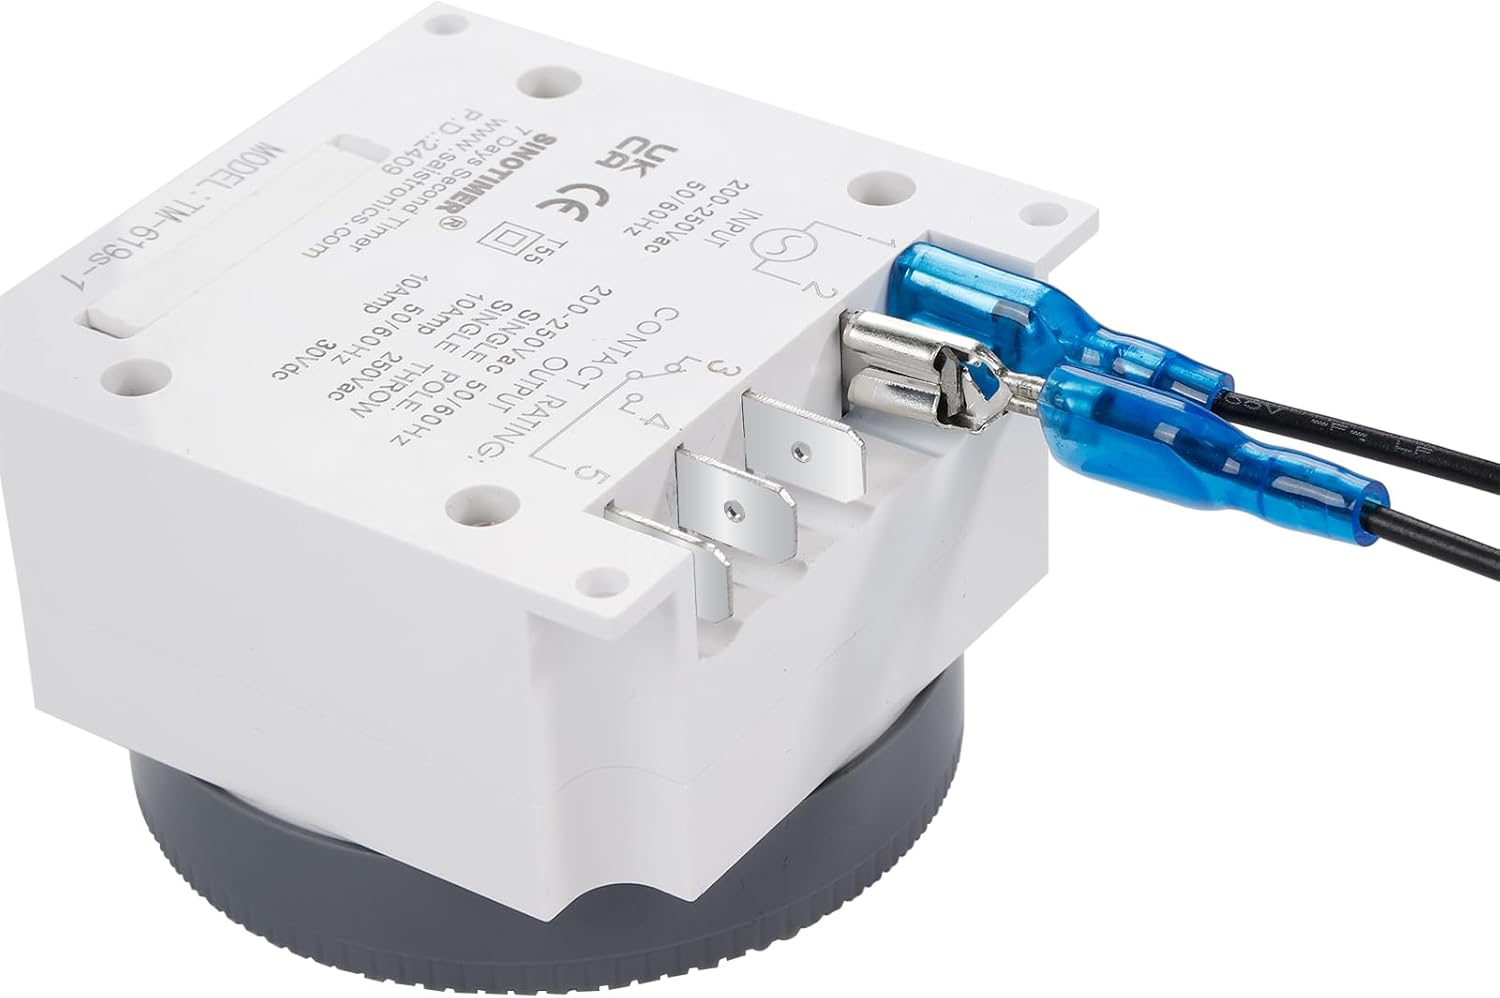
Use the provided spade connecting wires to ensure secure and reliable connections to the timer's terminals. Ensure all connections are tight and insulated.
4.2 Mounting Options
- Screw Mounting: Use the provided screws to mount the timer directly to a surface or inside an electrical enclosure. Ensure the mounting surface is stable and secure.
- Panel Mounting: The timer is designed to fit into a standard 72x72mm panel cutout. Insert the timer into the cutout and secure it using the appropriate mounting bracket or clips (if included or purchased separately).
After mounting and wiring, double-check all connections before restoring power. It is recommended to have installation verified by a qualified professional.
5. Operating and Programming
The timer allows for precise control with up to 28 ON/OFF programs per day across a 7-day cycle. Follow these steps to set up your timer.
5.1 Initial Setup and Time Setting
- Power On: Connect the timer to power. The display should light up. If not, check connections.
- Reset: Press the 'R' (Reset) button with a pointed object (like the provided disassembly tool) to clear all previous settings.
- Set Current Time:
- Press and hold the CLOCK button.
- While holding CLOCK, press DAY to set the current day of the week (Mo, Tu, We, Th, Fr, Sa, Su).
- While holding CLOCK, press HOUR to set the current hour (0-23 for 24-hour format).
- While holding CLOCK, press MIN to set the current minute (0-59).
- Release CLOCK. The time is now set.
- 12/24 Hour Format: To switch between 12-hour (AM/PM) and 24-hour format, press the HOUR button while holding the CLOCK button.
5.2 Programming ON/OFF Events
The timer allows for up to 28 ON/OFF programs. Each program consists of an ON time and an OFF time.
- Press the TIMER button. The display will show "1 ON".
- Press DAY to select the day(s) for this program. You can choose a single day, weekdays, weekends, or various combinations (e.g., Mo-Fr, Sa-Su, Mo-Sa, Mo-Su, etc.).
- Press HOUR to set the desired ON hour.
- Press MIN to set the desired ON minute.
- Press TIMER again. The display will show "1 OFF".
- Repeat steps 2-4 to set the desired OFF day(s), hour, and minute.
- Continue pressing TIMER to cycle through program 2 ON, 2 OFF, and so on, up to 28 programs. Set only the programs you need.
- To exit programming mode and return to the current time display, press the CLOCK button.
5.3 Manual Control
The MANUAL button allows you to override the programmed settings temporarily.
- Press MANUAL repeatedly to cycle through the modes: ON (always on), AUTO (follows programmed schedule), OFF (always off).
- For normal operation, ensure the timer is set to AUTO mode.
6. Maintenance
- Cleaning: Wipe the timer's exterior with a soft, dry cloth. Do not use abrasive cleaners or solvents.
- Battery Backup: The internal battery ensures settings are retained during power outages. If the display is blank or settings are lost frequently after power interruptions, the battery may need replacement. Consult a qualified technician for battery replacement.
- Dust Protection: The timer includes a transparent dust cover. Ensure it is properly installed to protect the display and buttons from dust and debris.
7. Troubleshooting
| Problem | Possible Cause | Solution |
|---|---|---|
| Timer display is blank. | No power supply; internal battery depleted. | Check power connections and circuit breaker. If power is present, the internal battery may need replacement (consult technician). |
| Timer does not turn ON/OFF at programmed times. | Incorrect programming; timer in MANUAL ON/OFF mode; incorrect current time/day. | Verify programmed ON/OFF times and days. Ensure timer is in AUTO mode. Check and correct current time and day. |
| Settings are lost after power outage. | Internal battery backup is depleted or faulty. | The internal battery needs to be charged (by keeping the timer powered) or replaced. If issues persist, contact support. |
| Output device (e.g., light) does not turn on. | Incorrect wiring; faulty output device; timer not supplying power. | Check wiring connections (input and output). Test the output device directly. Ensure the timer is programmed correctly and in AUTO or MANUAL ON mode. |
8. Specifications
| Attribute | Value |
|---|---|
| Model | TM-619 Series |
| Input Voltage | 120VAC |
| Output Type | SPDT (1NO + 1NC) |
| Max Load Current | 10A @ 250VAC |
| Max Load Power | 2000 Watts |
| Programmable Events | Up to 28 ON/OFF per day |
| Programming Cycle | 7 Days |
| Time Format | 12-hour / 24-hour selectable |
| Product Dimensions | 1.77"D x 2.83"W x 2.83"H (45mm D x 72mm W x 72mm H) |
| Item Weight | 4.6 ounces (130g) |
| Manufacturer | SINOTIMER |
9. Warranty and Support
For warranty information and technical support, please refer to the contact details provided with your purchase or visit the official SINOTIMER website. Keep your purchase receipt as proof of purchase for any warranty claims.
Related documentsTM-619 Series


Ask a question about this manual
Ask about setup, troubleshooting, compatibility, parts, safety, or missing instructions. Manuals+ will review the question and use this page’s manual context to help answer it.