Introduction
Thank you for choosing the RAINPOINT Sprinkler Timer. This programmable hose controller is designed to simplify your garden watering, offering automatic, manual, and rain delay functions. Featuring a 100% metal water pipe construction, it ensures durability and efficient water flow for your lawn and garden irrigation needs.
Official product video showcasing the RAINPOINT Sprinkler Timer's features and benefits, including its metal construction and various watering modes.
Key Features
- 100% Metal Water Pipes: Upgraded internal water pipes made entirely of metal, designed to withstand water pressure up to 140 PSI and offer a longer service life compared to plastic alternatives.
- Full-Flow Design: Utilizes a full-bore metal ball valve and larger water pipe diameter to provide a higher water flow (up to 10 Gal/min at 100 PSI) and minimize pressure loss.
- Automatic Watering Mode: Allows setting flexible watering frequencies (1-12 hours or 1-7 days) and durations (1 minute to 3 hours 59 minutes) for automated irrigation.
- Rain Delay & Manual Mode: Features a rain delay function (24H, 48H, or 72H) to pause scheduled watering during rainfall, and a manual mode for temporary watering needs (1 minute to 8 hours) without affecting the main schedule.
- Leak-Proof Brass Water Inlet & Outlet: Equipped with pure brass ¾" standard threaded connections for quick and secure attachment to garden hoses. Anti-twist lock thread design withstands 2000N tensile force, ensuring IP65 waterproof performance for outdoor use.
- 2.5" LCD Display: Large, easy-to-read display for clear programming and status monitoring.
- Low Power Protection: Automatically turns off the valve to prevent continuous watering when battery is low.
Package Contents
Please ensure all items are present upon unboxing:
- 1 x RAINPOINT Sprinkler Timer (Model: RP-MIN)
- 1 x User Manual
- (Batteries not included - Requires 2 AA batteries)
Setup Guide
1. Battery Installation
The timer requires 2 AA alkaline batteries (not included). Ensure correct polarity when inserting.
- Locate the battery compartment on the back of the timer.
- Slide the battery cover open.
- Insert 2 new AA alkaline batteries, observing the +/- markings.
- Close the battery cover securely to ensure the IP65 waterproof seal is maintained.

Image showing the timer's features including IP65 waterproof rating and low power protection, which relates to battery life.
2. Connecting the Timer
Connect the timer to your outdoor faucet and garden hose.
- Ensure the faucet is turned off.
- Thread the brass inlet of the timer onto your outdoor faucet. Hand-tighten firmly. The ¾" standard GHT fitting ensures compatibility with most garden hoses.
- Thread your garden hose onto the brass outlet of the timer. Hand-tighten firmly.
- Slowly turn on your outdoor faucet. The timer is designed to withstand up to 140 PSI.

The main product image showing the timer connected to a hose and faucet, illustrating proper setup.

Detailed view of the durable brass inlet and outlet connections, highlighting the quality of the fittings.
3. Setting the Clock
Before programming, set the current time.
- Turn the dial to "SET CLOCK".
- Use the "+" and "-" buttons to adjust the hour. Press "OK" to confirm.
- Use the "+" and "-" buttons to adjust the minute. Press "OK" to confirm.
- Turn the dial to "ON" to save the settings and return to normal operation.
Operating Instructions
Automatic Watering Mode
Program your timer for automatic, scheduled watering.
- Turn the dial to "START TIME". Use "+" and "-" to set the desired start time for watering. Press "OK".
- Turn the dial to "HOW LONG". Use "+" and "-" to set the watering duration (1 minute to 3 hours 59 minutes). Press "OK".
- Turn the dial to "HOW OFTEN". Use "+" and "-" to set the watering frequency (every 1-12 hours or every 1-7 days). Press "OK".
- Turn the dial to "ON" to activate the programmed schedule.
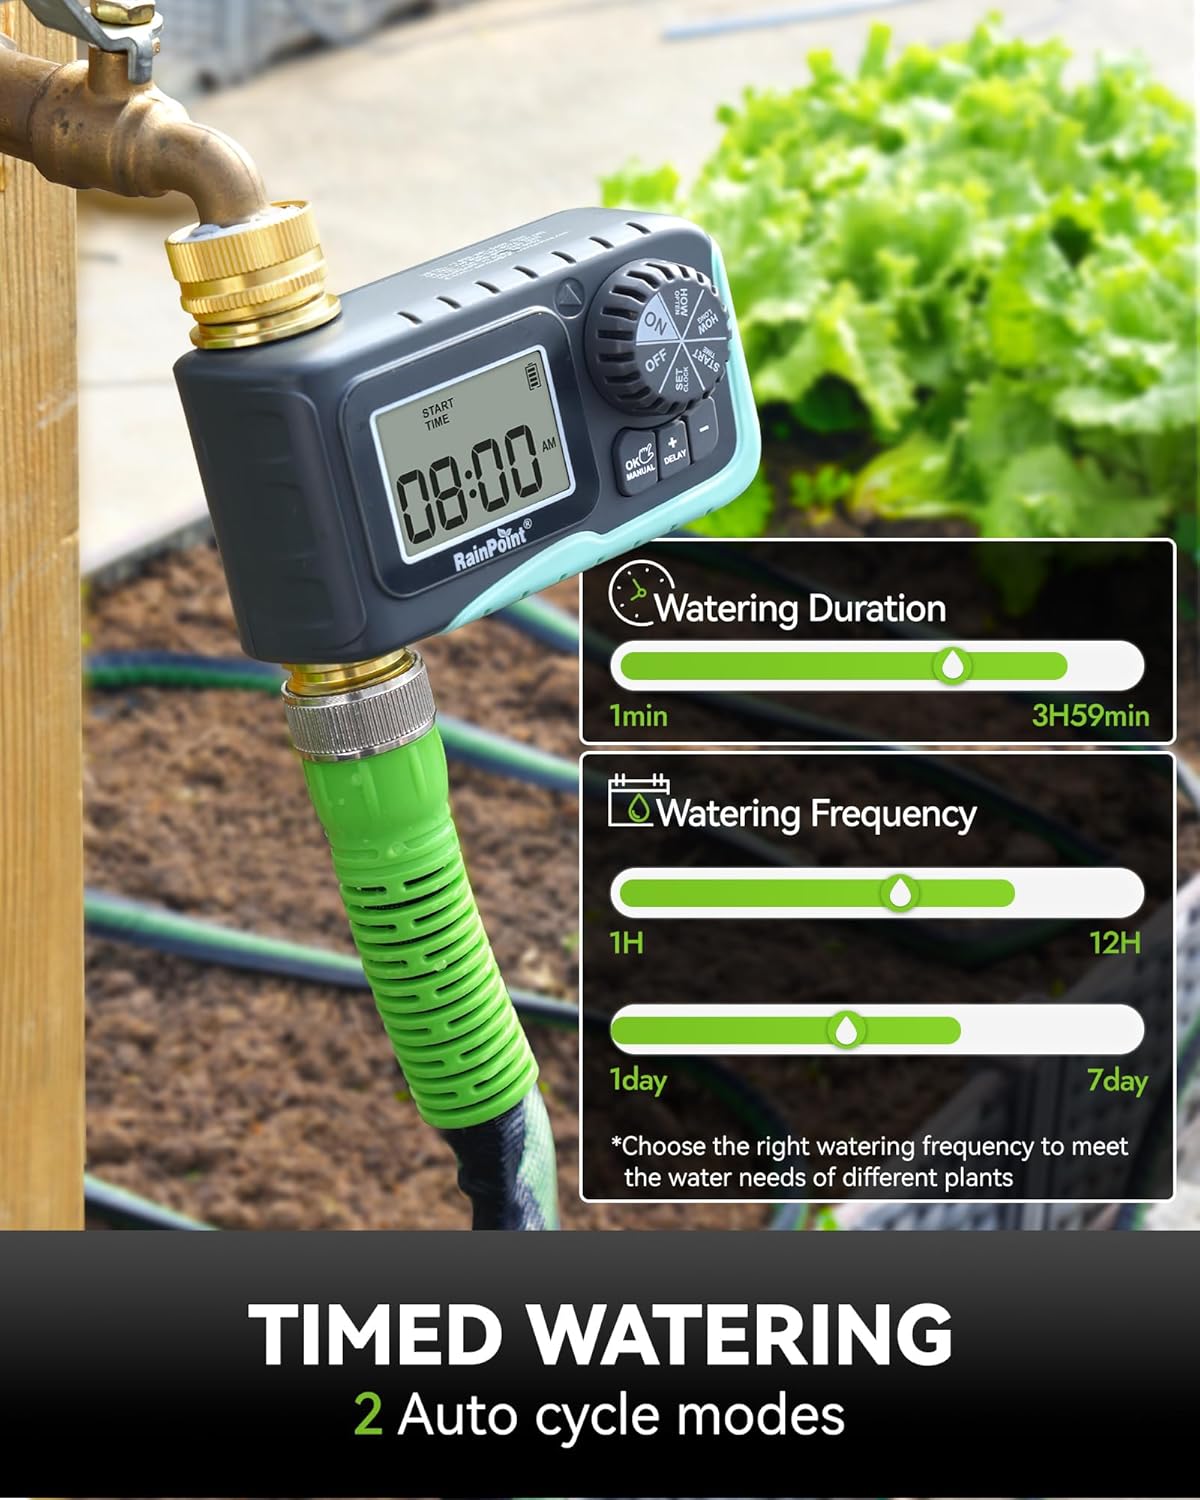
The timer's display showing options for setting watering duration and frequency for automatic cycles.
Rain Delay Mode
Temporarily pause your watering schedule due to rain.
- With the dial set to "ON", press the "DELAY" button.
- Each press of the "DELAY" button will cycle through delay options: 24H, 48H, 72H.
- The timer will pause for the selected duration and automatically resume the programmed schedule afterward.

Visual representation of the rain delay function, allowing users to prevent overwatering during rainy periods.
Manual Watering Mode
Initiate immediate watering without affecting your programmed schedule.
- With the dial set to "ON", press the "MANUAL" button.
- Use the "+" and "-" buttons to set the desired manual watering duration (1 minute to 8 hours).
- Press "OK" to start manual watering.
- To stop manual watering early, press "MANUAL" again or turn the dial to "OFF" and then back to "ON".

An image demonstrating the manual watering feature, showing a user watering plants directly.
Turning Off the Timer
To stop all watering functions, turn the dial to "OFF". The display will show "OFF".
Maintenance
- Battery Replacement: Replace batteries when the low power indicator appears on the display to ensure continuous operation and prevent unexpected watering.
- Cleaning: Periodically clean the filter washer located at the inlet to prevent debris from entering the timer and affecting water flow.
- Winterization: Before the first frost, disconnect the timer from the faucet and hose. Drain any remaining water from the timer and store it indoors in a dry, protected area to prevent freezing damage.
- Leak Prevention: Ensure all connections are hand-tightened securely. The anti-leak seal ring and robust brass fittings are designed to prevent leaks, but proper installation is crucial.

An illustration highlighting the durable 100% metal water pipe construction, emphasizing its resistance to high pressure and long lifespan.
Troubleshooting
| Problem | Possible Cause | Solution |
|---|---|---|
| Timer not turning on/display blank. | Dead or incorrectly installed batteries. | Replace with 2 new AA alkaline batteries, ensuring correct polarity. |
| No water flow. | Faucet is off; low water pressure; clogged filter; timer is off or not programmed. | Ensure faucet is fully open. Check water pressure. Clean the filter washer at the inlet. Set the dial to "ON" and verify programming. |
| Water leaking from connections. | Loose connection; missing or damaged washer. | Hand-tighten all connections firmly. Check that the rubber washer is properly seated in the inlet. Replace if damaged. |
| Timer not following schedule. | Incorrect programming; rain delay active; low battery. | Review and re-program the schedule. Check if rain delay is active. Replace batteries. |
Specifications
| Attribute | Detail |
|---|---|
| Brand | RAINPOINT |
| Model | RP-MIN (1 Outlet) |
| Material | Brass, Metal |
| Product Dimensions | 4.5"D x 2.6"W x 4.5"H |
| Water Pressure Resistance | Up to 140 PSI |
| Tensile Force Resistance | 2000N (Anti-twist lock thread) |
| Water Flow Rate | Up to 10 Gal/min at 100 PSI |
| Watering Frequency | 1-12 hours or 1-7 days |
| Watering Duration | 1 minute - 3 hours 59 minutes (Automatic); 1 minute - 8 hours (Manual) |
| Waterproof Rating | IP65 |
| Display | 2.5" LCD |
| Power Source | 2 x AA Batteries (not included) |
| Item Weight | 12.6 ounces |
| Country of Origin | China |
Warranty and Support
For warranty information, technical support, or any inquiries regarding your RAINPOINT Sprinkler Timer, please refer to the official RAINPOINT website or contact their customer service directly. Contact details are typically provided on the product packaging or the manufacturer's official online channels.
You can also visit the RAINPOINT Store on Amazon for additional product information and support resources.


