1. Introduction
The ELEGOO Mercury Plus 3.0 is a dual-function wash and cure station designed for post-processing resin 3D prints. It integrates washing and UV curing capabilities into a single unit, streamlining the workflow for resin model finishing. This manual provides detailed instructions for safe and effective operation, maintenance, and troubleshooting.

Image: Overview of the ELEGOO Mercury Plus 3.0 Wash and Cure Station, showing the washing bucket and curing unit.
2. Safety Information
Please read all safety warnings and instructions before operating the device to prevent injury or damage. Keep this manual for future reference.
- UV Light Exposure: The curing function uses powerful UV light. Never look directly at the UV light source when the cover is removed or during operation. The yellow cover effectively blocks 99.9% of UV light. Ensure the cover is properly in place during curing.
- Chemical Handling: When using the washing function, always handle cleaning solutions (e.g., isopropyl alcohol, resin cleaner) in a well-ventilated area. Wear appropriate personal protective equipment, including gloves and eye protection.
- Flammable Liquids: Many resin cleaning solutions are flammable. Keep the station away from open flames, heat sources, and sparks. Do not smoke near the device.
- Electrical Safety: Ensure the power supply is correctly connected and the voltage matches your local power grid. Do not operate with wet hands or in wet conditions.
- Children and Pets: Keep the device out of reach of children and pets.
- Ventilation: Operate the device in a well-ventilated area to dissipate fumes from cleaning solutions and resin.

Image: The yellow cover of the curing station, designed to block 99.99% of UV light for user safety. A micro switch immediately stops curing if the cover is removed.
3. Product Components
Familiarize yourself with the components included with your ELEGOO Mercury Plus 3.0 Wash and Cure Station:
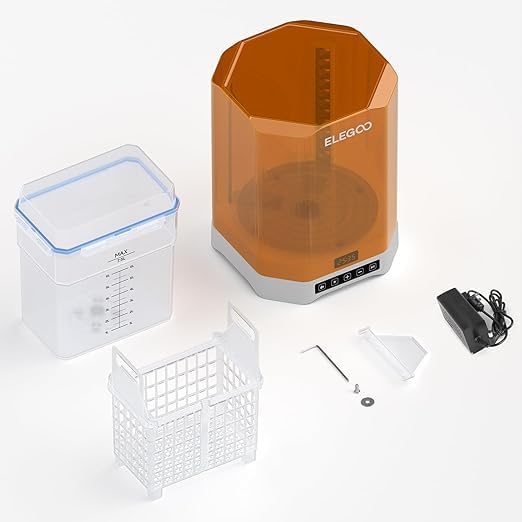
Image: All components of the ELEGOO Mercury Plus 3.0 Wash and Cure Station, including the main unit, washing bucket, cleaning basket, power adapter, and tools.
- Main Unit: Contains the control panel, UV light array, and rotating platform.
- Washing Bucket: A transparent container for holding cleaning solution and models during washing. Features a blue rubber sealing strip for splash prevention.
- Cleaning Basket: Used to hold 3D prints during the washing process. It is adjustable to accommodate different build plate sizes.
- Curing Platform: A transparent turntable within the main unit for 360° UV curing.
- Power Adapter: For connecting the unit to a power source.
- Tools: Hex wrench and other small accessories for assembly and maintenance.
4. Setup
- Unpacking: Carefully remove all components from the packaging. Inspect for any damage.
- Placement: Place the main unit on a stable, level surface in a well-ventilated area, away from direct sunlight and heat sources.
- Power Connection: Connect the power adapter to the main unit and then plug it into a suitable power outlet.
- Prepare Washing Bucket:
- Fill the washing bucket with your preferred cleaning solution (e.g., 95% Isopropyl Alcohol or specialized resin cleaner). Do not exceed the MAX fill line.
- Ensure the blue rubber sealing strip is properly seated on the lid to prevent leaks and splashes.
- Prepare Cleaning Basket: If washing models directly, place them into the cleaning basket. If washing with the build plate attached, adjust the cleaning basket to securely hold the build plate.

Image: The adjustable cleaning basket, showing how it can be configured to hold a build plate or models directly for washing.
5. Operating Instructions
5.1 Washing Mode
The washing mode effectively removes uncured resin from your 3D prints.
- Prepare Model: Remove the 3D print from the build plate. If washing with the build plate, ensure it is securely attached to the cleaning basket.
- Place in Bucket: Carefully place the cleaning basket with the model(s) into the washing bucket filled with cleaning solution. Close the lid securely.
- Position Bucket: Place the sealed washing bucket onto the main unit's platform.
- Select Mode: Press the "Wash" button on the control panel.
- Set Time: Use the "+" and "-" buttons to set the desired washing time. Typical washing times range from 2 to 10 minutes, depending on the resin and model size.
- Start Washing: Press the "Start/Pause" button to begin the washing cycle. The internal turbine will agitate the cleaning solution.
- Finish: Once the cycle is complete, carefully remove the washing bucket. Take out the cleaned model(s) and allow them to air dry or use compressed air. Ensure the model is completely dry before proceeding to curing.

Image: Top-down view of the washing bucket showing the turbine in action, highlighting the POM bearing design for smooth rotation and efficient cleaning.

Image: Comparison of cleaning volumes between Mercury Plus 2.0 (3.5L) and Mercury Plus 3.0 (7.5L), illustrating the increased capacity for larger prints.

Image: Diagram illustrating the maximum washing sizes: 230mm (L) x 135mm (W) x 260mm (H) without build plate cleaning, and 214mm (L) x 135mm (W) x 180mm (H) with build plate cleaning.
5.2 Curing Mode
The curing mode uses UV light to fully harden your resin prints, improving their strength and finish.
- Prepare Model: Ensure the model is completely dry after washing. Remove any supports if necessary.
- Place on Platform: Place the model directly onto the transparent rotating curing platform inside the main unit.
- Close Cover: Carefully place the yellow UV-blocking cover over the main unit. Ensure it is properly seated.
- Select Mode: Press the "Cure" button on the control panel.
- Set Time: Use the "+" and "-" buttons to set the desired curing time. Curing times vary based on resin type, model size, and desired hardness, typically ranging from 2 to 30 minutes.
- Start Curing: Press the "Start/Pause" button to begin the curing cycle. The platform will rotate, and UV lights will activate.
- Finish: Once the cycle is complete, the UV lights will turn off. Carefully remove the yellow cover and retrieve your fully cured model.

Image: The curing station with a model on the rotating platform, illuminated by UV lights from two lamp posts and a mirrored bottom, ensuring 360-degree full curing without dead angles.
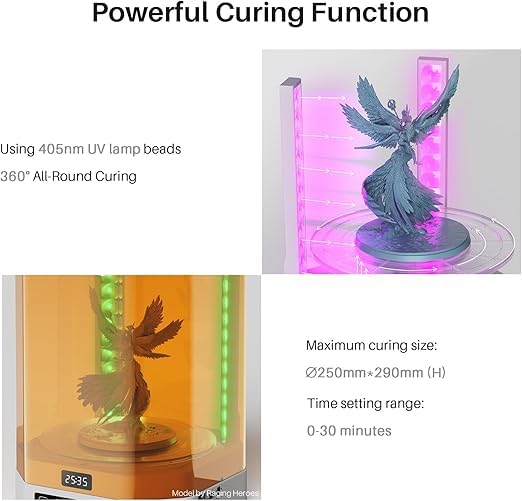
Image: Details of the powerful curing function, showing 405nm UV lamp beads, 360° all-round curing, a maximum curing size of Ø250mm x 290mm (H), and a time setting range of 0-30 minutes.

Image: Comparison of curing volumes between Mercury Plus 2.0 (140mm x 165mm) and Mercury Plus 3.0 (250mm x 290mm), highlighting a 460% increase in curing size.
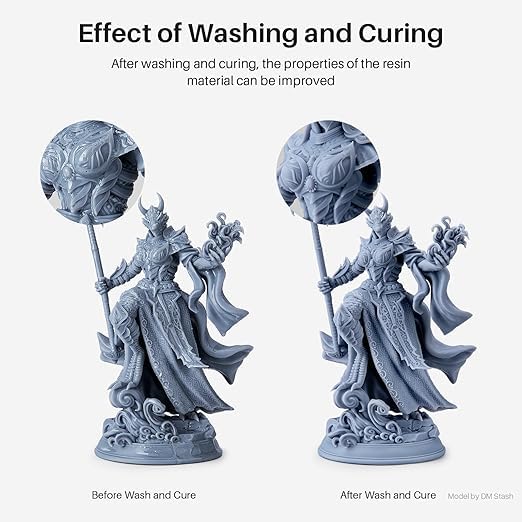
Image: Side-by-side comparison of a resin model before and after washing and curing, demonstrating improved surface finish and material properties.
6. Maintenance
- Cleaning the Washing Bucket: After several uses, the cleaning solution will become saturated with resin. Dispose of used solution responsibly according to local regulations. Clean the bucket and cleaning basket with fresh cleaning solution or water.
- Cleaning the Main Unit: Wipe down the exterior of the main unit with a soft, dry cloth. If resin spills occur, clean immediately with a small amount of cleaning solution on a cloth. Avoid getting liquids into the control panel or electrical components.
- UV Lamp Maintenance: Keep the UV lamp beads and the transparent curing platform clean to ensure optimal curing performance. Use a soft cloth to gently wipe away any dust or resin residue.
- Storage: When not in use, store the ELEGOO Mercury Plus 3.0 in a cool, dry place, away from direct sunlight.
7. Troubleshooting
| Problem | Possible Cause | Solution |
|---|---|---|
| Unit does not power on. | Power cable not connected; power outlet issue. | Check power cable connection. Try a different power outlet. |
| Washing turbine not rotating. | Washing bucket not properly seated; foreign object obstructing turbine. | Ensure the washing bucket is correctly placed. Check for and remove any obstructions. |
| UV lights not activating during curing. | Yellow cover not properly closed; curing mode not selected. | Ensure the yellow cover is fully seated. Select the curing mode. The safety micro switch prevents UV activation if the cover is open. |
| Models are still sticky after washing/curing. | Insufficient washing time; cleaning solution saturated; insufficient curing time; model not dry before curing. | Increase washing/curing time. Replace cleaning solution. Ensure models are completely dry before curing. |
8. Specifications
- Model: ELEGOO Mercury Plus 3.0
- Product Dimensions: 25 x 25 x 40 cm (Main Unit)
- Item Weight: 15 kg
- Material: Metal, PP (Polypropylene for washing bucket)
- Washing Volume: Max 7.5L
- Maximum Washing Size (without build plate): 230mm (L) x 135mm (W) x 260mm (H)
- Maximum Washing Size (with build plate): 214mm (L) x 135mm (W) x 180mm (H)
- Maximum Curing Size: Ø250mm x 290mm (H)
- UV Light Wavelength: 405nm
- Time Setting Range: 0-30 minutes
- Connector Type: USB (for internal components, not user-accessible for data transfer)
- Country of Origin: China
9. Warranty and Support
For warranty information, technical support, or service inquiries, please refer to the official ELEGOO website or contact your authorized reseller. Keep your purchase receipt as proof of purchase for warranty claims.
Online Resources: For additional resources, FAQs, and community forums, visit the official ELEGOO support page. You may also find helpful tutorials and tips from other users.


