Product Overview
The Mesqool CR1025 is a versatile alarm clock radio designed to provide multiple functionalities in a compact form factor. It integrates an alarm clock, Bluetooth speaker, FM radio, LED night light, and dual USB charging ports for convenience.
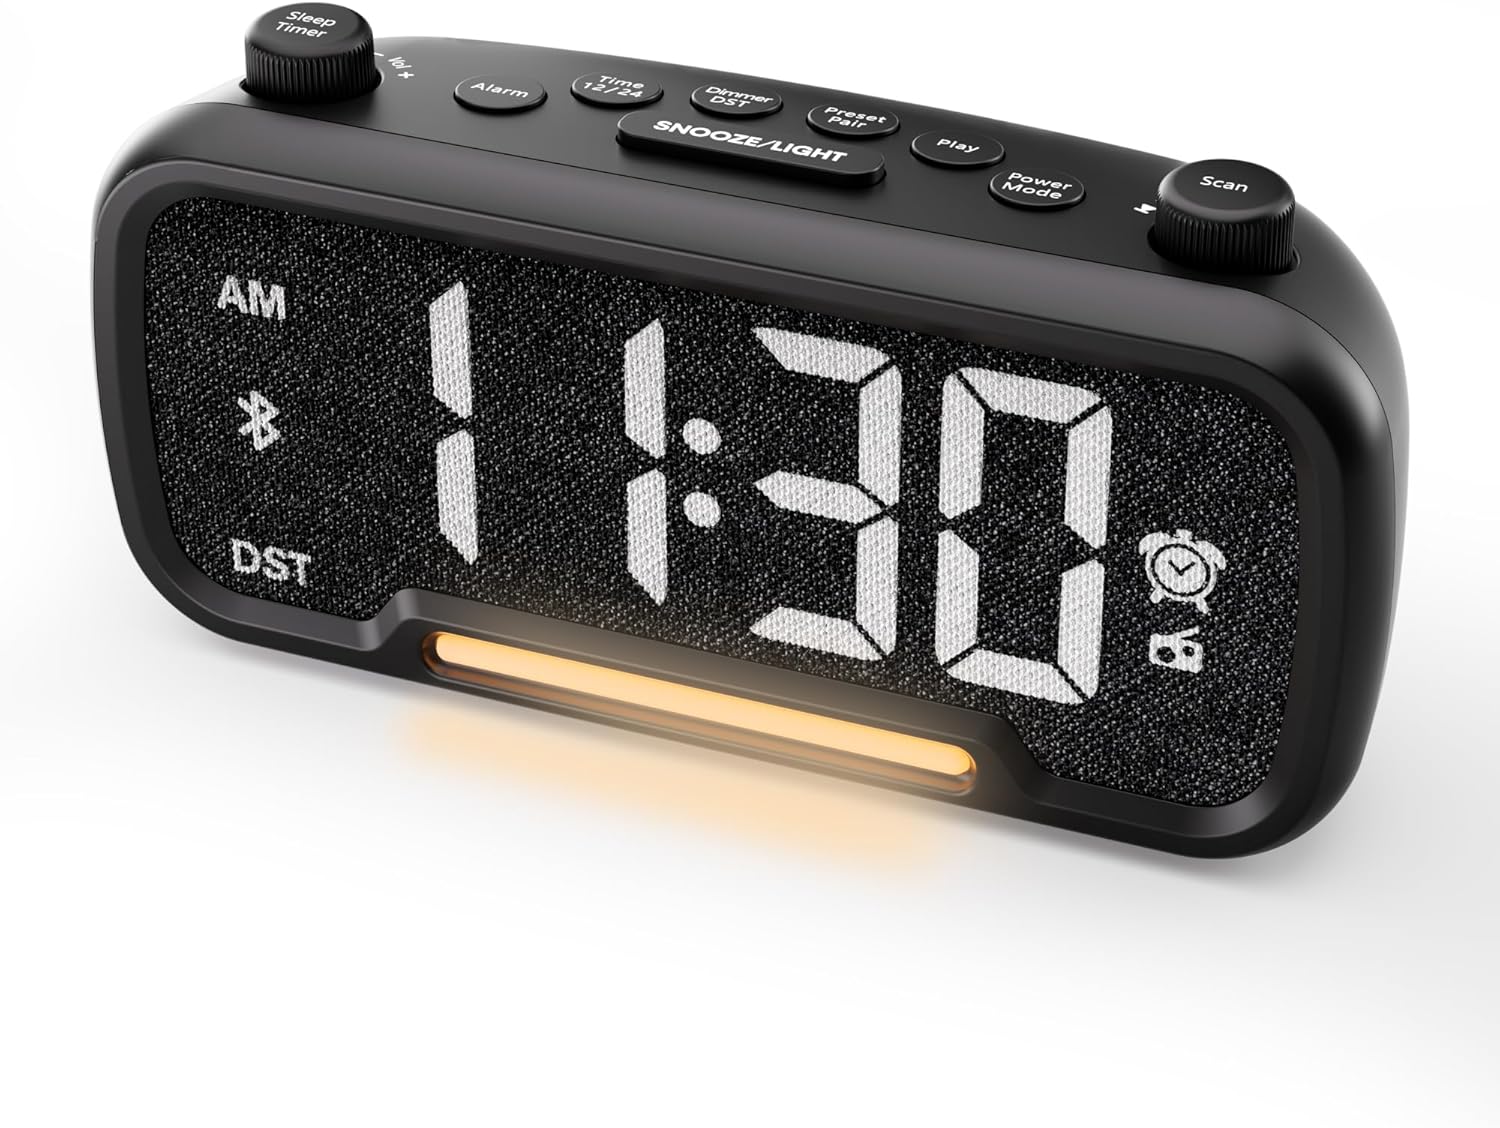
Figure 1: Front view of the Mesqool CR1025 Alarm Clock Radio, displaying the digital time and control layout.

Figure 2: Key features of the Mesqool CR1025, highlighting its multi-functional design.
Setup Guide
1. Power Connection
- Connect the provided power adapter to the DC IN port on the back of the alarm clock.
- Plug the adapter into a standard electrical outlet. The clock will power on and the display will illuminate.

Figure 3: The alarm clock radio connected to power, ready for use.
2. Battery Backup Installation
- The unit includes a CR2032 lithium battery for backup. This battery retains alarm settings and time during a power outage, but the display will not show the time and the alarm will not sound until power is restored.
- Locate the battery compartment on the bottom of the unit.
- Insert the CR2032 battery with the correct polarity (+ side up).
- Close the battery compartment securely.
3. Initial Time Setting
- Press the Time 12/24 button. The hour digits will flash.
- Rotate the Scan knob (right knob) to adjust the hour.
- Press the Time 12/24 button again. The minute digits will flash.
- Rotate the Scan knob to adjust the minute.
- Press the Time 12/24 button once more to confirm and exit time setting.
4. 12/24 Hour Time Format
- To switch between 12-hour and 24-hour time formats, press and hold the Time 12/24 button for 2 seconds.
- In 12-hour format, 'AM' or 'PM' indicators will appear on the display.

Figure 4: Display options for 12-hour and 24-hour time formats.
5. Daylight Saving Time (DST) Mode
- To activate or deactivate Daylight Saving Time, press and hold the Dimmer DST button for 2 seconds.
- The time will adjust by one hour forward or backward, and the 'DST' indicator will appear or disappear.
Operating Instructions
1. Alarm Setting
- Press and hold the Alarm button for 2 seconds. The hour digits will flash.
- Rotate the Vol -/+ knob (left knob) to adjust the alarm hour.
- Press the Alarm button again. The minute digits will flash.
- Rotate the Vol -/+ knob to adjust the alarm minute.
- Press the Alarm button again. The alarm source icon will flash. Rotate the Vol -/+ knob to select between buzzer or FM radio as the alarm sound.
- Press the Alarm button again. The volume level will flash. Rotate the Vol -/+ knob to adjust the alarm volume (L01-L16).
- Press the Alarm button once more to confirm and activate the alarm. The alarm icon will appear on the display.
Canceling the Alarm
- To cancel the alarm, press the Alarm button. The alarm icon will turn off, indicating the alarm has been deactivated.
Snooze Function
- When the alarm sounds, press the SNOOZE/LIGHT button to activate the snooze function. The alarm will pause for 9 minutes and then sound again.
- This can be repeated up to 9 times. To stop the alarm for the day, press the Alarm button.

Figure 5: The alarm clock radio offers two alarm sound options: radio or buzzer.
2. Bluetooth Speaker Operation
- Press the Power Mode button repeatedly until 'bt' appears on the display and the Bluetooth icon starts flashing. This indicates the clock is in Bluetooth pairing mode.
- On your mobile device, enable Bluetooth and search for available devices. Select 'CR1025' from the list.
- Once connected, the Bluetooth icon on the clock's display will stop flashing and remain solid. You can now play audio from your device through the clock's speaker.

Figure 6: Bluetooth 5.0 connectivity for wireless audio streaming.
3. FM Radio Operation
- Press the Power Mode button repeatedly until the radio icon lights up on the display, indicating FM radio mode.
- Auto-Scan: Press the Scan button to automatically search for and store up to 20 FM radio stations. The clock will cycle through frequencies and save strong signals as presets (P01, P02, etc.).
- Manual Search: Rotate the Scan knob to manually browse FM frequencies.
- Save Preset: To save a manually found station, press and hold the Preset Pair button for 2 seconds. The preset number will flash. Rotate the Scan knob to select a preset slot, then press Preset Pair again to save.
- Recall Preset: In FM mode, short press the Preset Pair button to cycle through saved stations.
- Adjust Volume: Rotate the Vol -/+ knob to adjust the radio volume (16 levels).

Figure 7: Enjoying FM radio with a wide frequency range and 20 presets.
4. Night Light and Brightness Dimmer
- The clock features a built-in LED night light.
- Press the SNOOZE/LIGHT button to cycle through 5 adjustable brightness levels for the main display and the night light.
- The lowest setting is suitable for sleeping, while the brightest is for daytime visibility.

Figure 8: The 5-level brightness dimmer allows customization for various lighting conditions.
5. Phone Charging Ports
- The Mesqool CR1025 is equipped with two USB charging ports: one USB-C and one USB-A.
- Connect your devices (e.g., smartphone, smartwatch) to these ports using appropriate charging cables.
- The clock must be powered via its AC adapter for the charging ports to function.
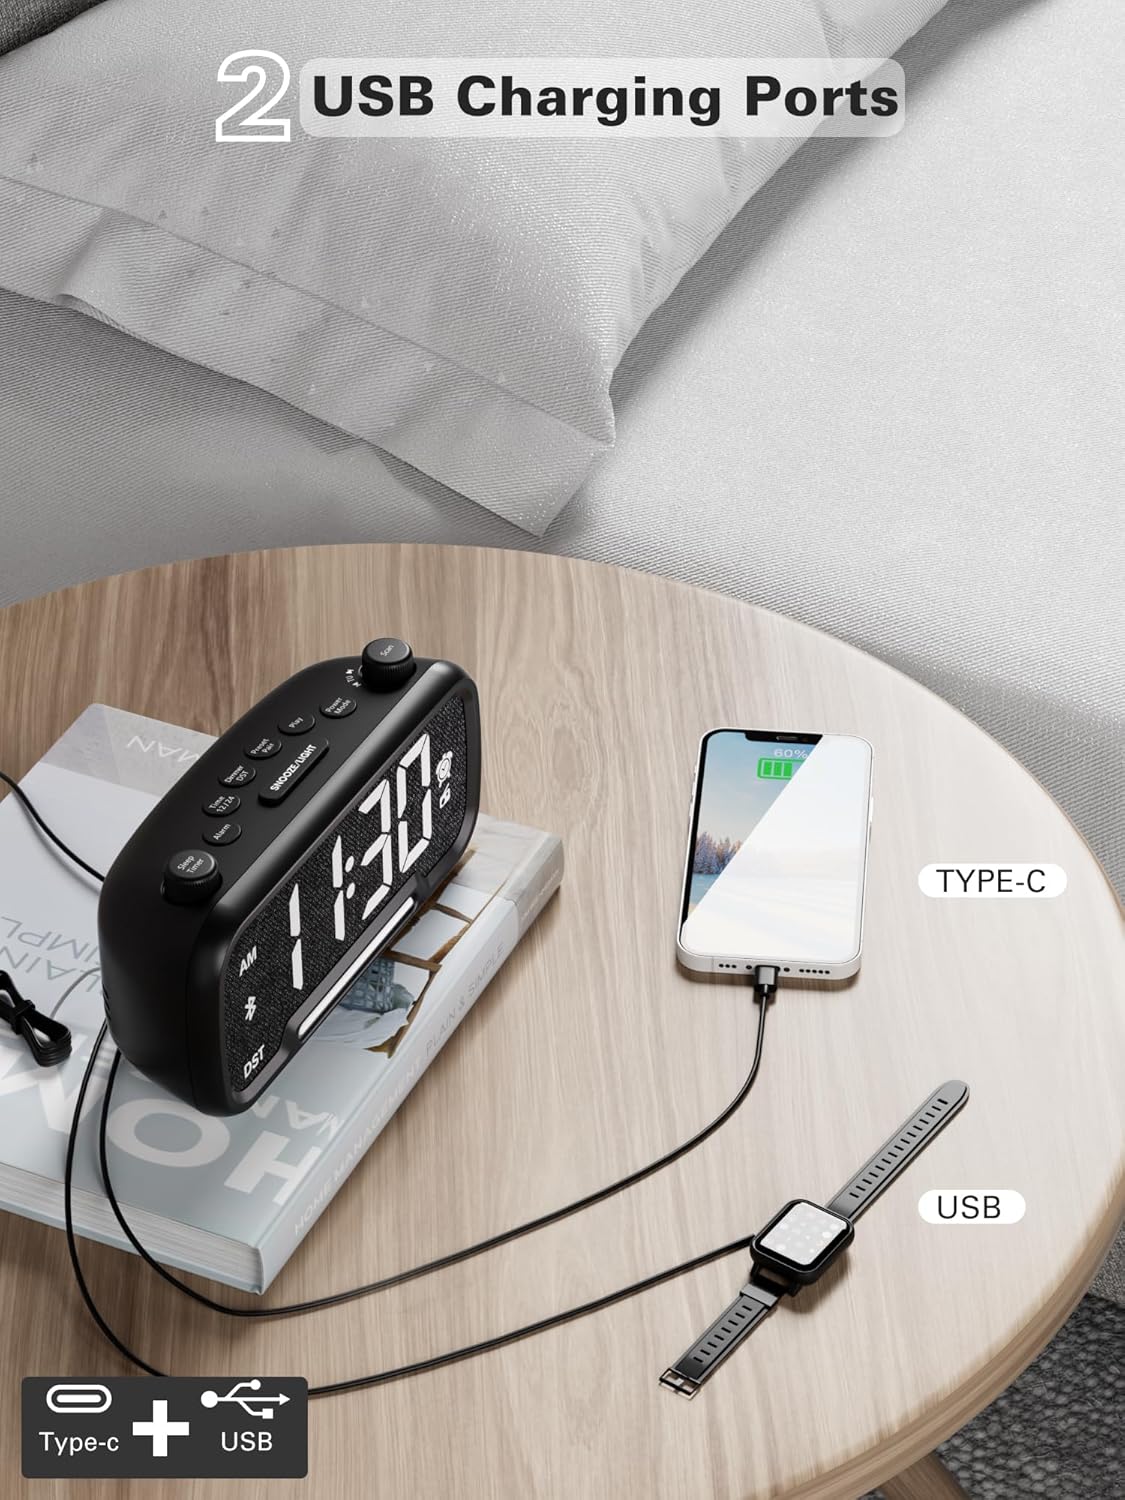
Figure 9: Dual USB charging ports for convenient device power.
6. Sleep Timer Setting
- When using the FM radio or Bluetooth speaker, you can set a sleep timer to automatically turn off playback after a set duration.
- Press the Sleep Timer button (left knob) to access the settings.
- Rotate the Sleep Timer knob to select the desired duration: 15, 30, 60, 90, or 120 minutes, or OFF.
- The display will show the selected duration, and then return to the current time. The music/radio will play for the set time and then automatically turn off.
Instructional Video
Video 1: This instructional video demonstrates various settings for the Mesqool CR1025, including alarm setting, time setting, 12/24H format, DST mode, dimmer setting, Bluetooth pairing, FM radio operation, and sleep timer. Refer to the specific sections above for detailed steps.
Maintenance
- Cleaning: Use a soft, dry cloth to clean the surface of the alarm clock. Do not use liquid cleaners or abrasive materials.
- Battery Replacement: If the battery backup is no longer retaining settings during power outages, replace the CR2032 battery in the compartment on the bottom of the unit. Ensure correct polarity.
- Storage: If storing the unit for an extended period, disconnect it from power and remove the backup battery.
Troubleshooting
- No Power/Display Off: Ensure the power adapter is securely connected to both the clock and a working electrical outlet. Check if the outlet has power.
- Alarm Not Sounding: Verify that the alarm is set correctly (time, source, volume) and that the alarm icon is visible on the display. Ensure the alarm volume is not set to L00.
- Poor FM Radio Reception: Extend the FM antenna fully. Try repositioning the clock to improve signal reception. Perform an auto-scan to find stronger stations.
- Bluetooth Not Connecting: Ensure the clock is in Bluetooth pairing mode (flashing 'bt' icon). Make sure your device's Bluetooth is enabled and within range. Forget the device on your phone and try pairing again.
- USB Charging Not Working: Confirm the clock is connected to AC power. Check if the charging cable is functional and properly connected to both the clock and your device.
- Display Too Bright/Dim: Press the SNOOZE/LIGHT button to adjust the brightness level.
Specifications
| Feature | Specification |
|---|---|
| Brand | Mesqool |
| Model Number | CR1025 |
| Product Dimensions | 5.9 x 3.81 x 8.4 cm |
| Item Weight | 216 g |
| Material | Fabric |
| Display Type | Digital LED |
| Special Features | Radio Clock, LED Display, Bluetooth Speaker, Night Light, Phone Charger |
| FM Radio Frequency | 87.5MHz - 108.0MHz |
| Alarm Volume Levels | 16 (L01-L16) |
| Display Brightness Levels | 5 |
| USB Charging Output | USB-C and USB-A ports |
| Battery Backup | CR2032 (for settings retention) |
Warranty and Support
For warranty information, technical support, or further assistance, please refer to the contact details provided with your product packaging or visit the official Mesqool website.


