
ieGeek ZY-C2
ieGeek Solar Camera Outdoor Wireless User Manual
Model: ZY-C2
Brand: ieGeek
Introduction
This manual provides comprehensive instructions for the ieGeek Solar Camera Outdoor Wireless (Model: ZY-C2). It covers essential information regarding setup, installation, operation, maintenance, and troubleshooting to ensure optimal performance and security for your home. This 2K WiFi camera features 360° PTZ control, color night vision, PIR motion detection, siren, and two-way audio, powered by both solar and battery for continuous operation.
What's in the Box
The ieGeek ZY-C2 camera package includes the following components:
- ieGeek ZY-C2 Camera (Gray Black)
- Solar Panel
- User Manual
- Charging Cable
- Solar Panel Mounting Bracket
- Camera Mounting Bracket
- Mounting Screws and Wall Plugs
Video: Unboxing the ieGeek ZY-C2 Wireless Security Camera, showing all included components.
Setup
Before installation, ensure the camera is fully charged. The camera is battery-powered and can be charged via the provided USB cable. For continuous power, connect the included solar panel.
- Download the App: Download the "ieGeek Cam" app from your smartphone's app store (available for Android and iOS).
- Power On: Press and hold the power button on the camera to turn it on. The indicator light will flash slowly.
- Connect to Wi-Fi: Open the "ieGeek Cam" app and follow the on-screen instructions to connect the camera to your 2.4GHz Wi-Fi network. Ensure your phone is on the same network.
- Scan QR Code: The app will display a QR code. Position your camera to scan this QR code. You will hear a confirmation tone when successfully scanned.
- Device Reset: If connection issues occur, long press the "Reset" button on the camera for 4-6 seconds until the red indicator light flashes quickly. Then, retry the connection process.

Image: Visual guide for connecting the ieGeek camera to 2.4GHz Wi-Fi via the ieGeek Cam app.
Video: Detailed steps for installing and connecting the ieGeek ZY-C2 Solar Camera.
Installation
The ieGeek ZY-C2 camera is designed for easy installation and can be mounted on walls or ceilings. The solar panel should be placed in an area with ample sunlight for optimal charging.
- Mount the Camera Bracket: Use the provided screws to fix the camera mounting bracket to your desired location (wall or ceiling).
- Attach the Camera: Align the camera base with the bracket and press down until you hear a "click," indicating it's securely snapped into place.
- Mount the Solar Panel: Install the solar panel bracket in a south-facing location (in the Northern Hemisphere) to maximize sun exposure. Attach the solar panel to its bracket.
- Connect Solar Panel: Plug the solar panel's cable into the camera's small waterproof port. Ensure the large waterproof port remains closed for optimal waterproofing.

Image: Wall and ceiling mounting options for the ieGeek camera and solar panel.

Image: The solar panel provides continuous power to the camera for 365 days of operation.
Operating
The ieGeek ZY-C2 camera offers a range of features for comprehensive home security, all controllable via the "ieGeek Cam" app.
- PTZ Remote Control: Control the camera's movement with 355° pan and 120° tilt capabilities directly from the app, providing 360° surveillance.
- 2K Full Color Image & Night Vision: Experience clear 2K (3MP) resolution. Built-in IR lights and white lights provide both black-and-white infrared night vision and full-color night vision.
- Smart PIR Motion Detection: Customize motion zones and schedule alert plans to reduce false alarms. When motion is detected, the camera sends instant notifications, records video, and can activate the siren and spotlights. The AI detection can differentiate between persons, pets, packages, and vehicles.
- Two-Way Audio: Utilize the built-in speaker and microphone for two-way communication, allowing you to speak to visitors or deter unwanted guests.
- Wi-Fi 6 Technology: Enhanced connectivity with Wi-Fi 6 for improved security, efficiency, and faster performance.
- Storage Options: Recorded video can be saved to a local memory card (up to 128GB, not included) or to the free lifetime cloud storage service (6s & 7 days loop coverage).
- Multi-User Access: Easily share camera access with family and friends via QR scan. All video is encrypted for privacy.
- Alexa Integration: Compatible with Alexa for voice control and viewing live feeds on compatible smart displays.
- IP65 Waterproof: Designed to withstand outdoor elements, including heavy rain and sun exposure, ensuring reliable operation in various weather conditions.

Image: Remote control of pan and tilt functions via the mobile app.
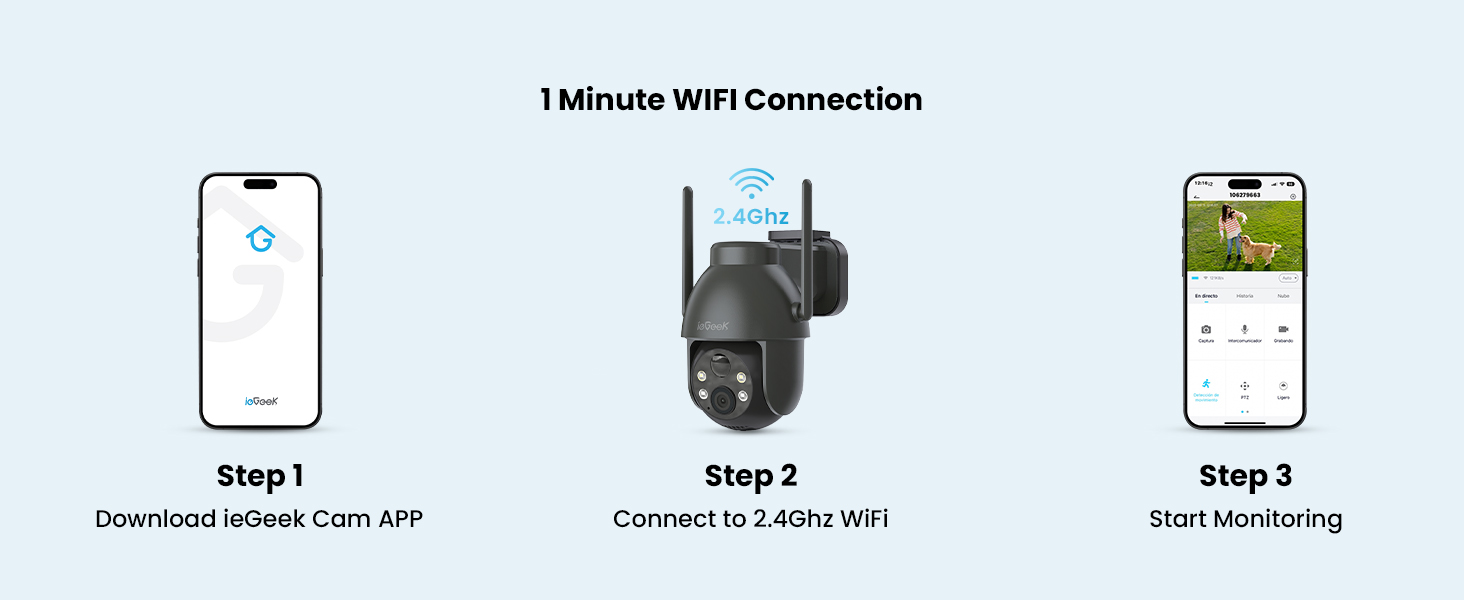
Image: The camera offers clear 2K resolution with infrared and color night vision modes.

Image: Smart PIR motion detection triggers siren and spotlight alarms upon detection.

Image: Two-way audio feature allows communication through the camera.
Image: The camera integrates with Alexa for convenient voice control and viewing.

Image: The camera is IP65 waterproof, suitable for all outdoor weather conditions.
Maintenance
To ensure the longevity and optimal performance of your ieGeek Solar Camera, follow these maintenance guidelines:
- Solar Panel Care: Regularly clean the surface of the solar panel to remove dust, dirt, or debris that may hinder its charging efficiency. A clean panel ensures continuous power to the camera.
- Battery Life: The camera's built-in rechargeable battery provides up to 180 days of runtime on a single charge without the solar panel. With the solar panel connected and sufficient sunlight, the camera can operate continuously for 365 days without manual charging.
- Environmental Conditions: The camera is designed to operate in temperatures ranging from -4°F to 140°F (-20°C to 60°C). Ensure it is installed within these temperature limits for reliable performance.
- Firmware Updates: Periodically check the "ieGeek Cam" app for firmware updates. Keeping the camera's firmware updated ensures you have the latest features, security patches, and performance improvements.
Troubleshooting
If you encounter issues with your ieGeek Solar Camera, refer to the following common troubleshooting steps:
- Wi-Fi Connectivity Issues:
- Ensure your home network is in good condition and the camera is within range of your 2.4GHz Wi-Fi router.
- Move the camera closer to the network source if the signal is weak.
- Verify that the Wi-Fi password entered during setup is correct.
- Confirm that your router supports 2.4GHz Wi-Fi, as the camera does not support 5GHz networks.
- Motion Detection False Alarms:
- Adjust the PIR motion detection sensitivity settings in the app. Lowering sensitivity can reduce triggers from minor movements like swaying branches or small animals.
- Utilize customized motion zones to exclude areas where unwanted triggers might occur (e.g., busy streets).
- Enable "humanoid detection" if available in the app to filter out non-human movements.
- Battery Not Charging:
- Ensure the solar panel is clean and receiving direct sunlight for several hours daily.
- Check the connection between the solar panel and the camera's charging port.
- Verify that the camera's battery icon in the app indicates charging when connected to the solar panel or USB charger.
- Poor Video Quality:
- Check your Wi-Fi signal strength in the app; a weak signal can affect video streaming quality.
- Ensure the camera lens is clean and free from dust or smudges.
- Verify that the camera's resolution setting in the app is set to 2K for the highest quality.
Specifications
| Feature | Specification |
|---|---|
| Model Number | ZY-C2 |
| Indoor/Outdoor Usage | Outdoor |
| Power Source | Battery & Solar Powered |
| Connectivity Protocol | Wi-Fi (2.4GHz only) |
| Video Capture Resolution | 2K (3MP) |
| PTZ Rotation | 355° Pan, 120° Tilt |
| Night Vision | Color Night Vision (2 IR lights + 2 white lights) |
| Motion Detection | PIR Motion Detection Sensor with AI (Person, Pet, Package, Vehicle) |
| Audio | 2-Way Audio |
| Waterproof Rating | IP65 |
| Operating Temperature | -4°F to 140°F (-20°C to 60°C) |
| Storage | Micro SD Card (up to 128GB, not included) & Free Cloud Storage |
| Dimensions (L x W x H) | 5.3 x 4.48 x 2.5 inches |
| Item Weight | 1.87 pounds |
Warranty and Support
ieGeek offers a 2-year warranty for this product. If you encounter any problems using your ieGeek Solar Camera, please do not hesitate to contact our customer support team. We are committed to providing satisfactory solutions.
Contact Information:
- Email: service@iegeek.com
- Our support team aims to reply within 24 working hours.

Image: ieGeek customer support information.
Related documentsZY-C2


Ask a question about this manual
Ask about setup, troubleshooting, compatibility, parts, safety, or missing instructions. Manuals+ will review the question and use this page’s manual context to help answer it.