
Walrus Audio 900-1051mkII
Walrus Audio Mako Series MKII D1 High-Fidelity Delay Pedal
Model: 900-1051mkII
Introduction
The Walrus Audio Mako Series MKII D1 is a high-fidelity stereo delay pedal designed to provide a wide range of delay effects for musical applications. It features six distinct delay algorithms, comprehensive control over delay parameters, and advanced connectivity options including MIDI and presets. This manual provides detailed instructions for setting up, operating, and maintaining your D1 MKII pedal.
Key Features
- Six carefully crafted delay algorithms: Digital, Mod, Vintage, Dual, Reverse, and Grain.
- Complete BPM control with on-screen readout and up to 128 presets.
- New Grain Delay Program and redesigned Dual Mode for unique tap divisions on each channel.
- Modulation capabilities with six wave shapes (sine, square, triangle, ramp, reverse ramp, random).
- Navigation menu screen for easy adjustment of secondary controls, BPM, and preset access.
- High-fidelity stereo input and output.
- MIDI In/Thru and USB-C connectivity for advanced control and firmware updates.
Controls and Connections

Figure 1: Front view of the Walrus Audio D1 MKII pedal, showing all top-panel controls and footswitches.
Top Panel Controls
- TIME Knob: Adjusts the delay time.
- REPEATS Knob: Controls the number of delay repeats (feedback).
- MIX Knob: Sets the blend between the dry signal and the wet (effected) signal.
- TWEAK Knob: Multi-function knob for adjusting secondary parameters depending on the selected algorithm.
- PROGRAM Selector: Rotary switch to select one of the six delay algorithms: Digital, Mod, Vintage, Dual, Reverse, Grain.
- ATTACK Knob: Multi-function knob for adjusting secondary parameters, often related to the attack or character of the delay.
- BYPASS Footswitch: Engages or disengages the effect.
- TAP Footswitch: Used for tap tempo input and preset cycling.
- OLED Display: Shows current settings, BPM, and menu navigation.

Figure 2: Input side view of the D1 MKII pedal, showing the Mono (L) and Stereo (R) input jacks.
Side Panel Connections (Input)
- IN (Mono L) Jack: Main audio input. Use this for mono input.
- STEREO (R) Jack: Right channel audio input. Use in conjunction with the Mono (L) jack for stereo input.

Figure 3: Output side view of the D1 MKII pedal, showing the Mono (L) and Stereo (R) output jacks and power input.
Side Panel Connections (Output & Power)
- OUT (Mono L) Jack: Main audio output. Use this for mono output.
- STEREO (R) Jack: Right channel audio output. Use in conjunction with the Mono (L) jack for stereo output.
- 9VDC, 300mA Power Input: Connect a standard 9V DC power supply (center negative, 300mA minimum).
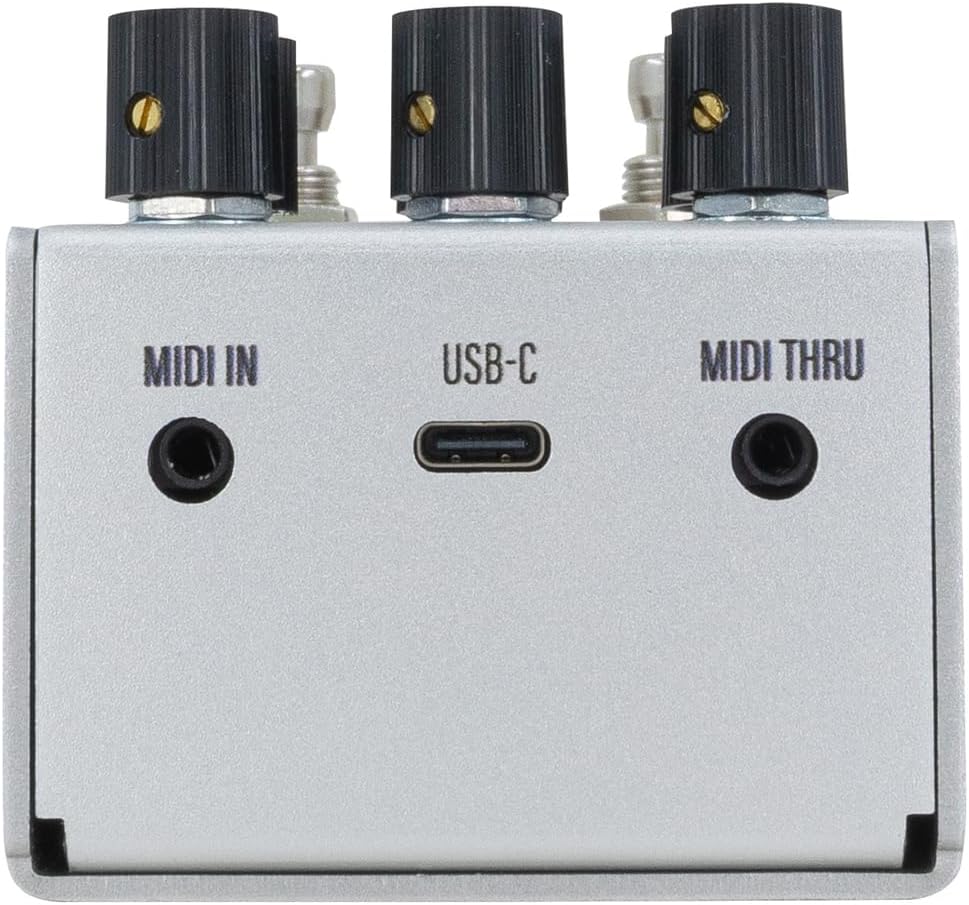
Figure 4: Rear view of the D1 MKII pedal, showing MIDI In, USB-C, and MIDI Thru ports.
Rear Panel Connections
- MIDI IN: Connect to a MIDI controller for external control.
- USB-C: For firmware updates and potential future functionality.
- MIDI THRU: Passes MIDI data to other MIDI devices in a chain.
Setup
- Power Connection: Connect a 9V DC (center negative, 300mA minimum) power supply to the 9VDC input jack.
- Audio Input:
- For mono operation, connect your instrument or preceding effects pedal to the IN (Mono L) jack.
- For stereo operation, connect the left channel to IN (Mono L) and the right channel to STEREO (R).
- Audio Output:
- For mono output, connect the OUT (Mono L) jack to your amplifier or next effects pedal.
- For stereo output, connect the left channel to OUT (Mono L) and the right channel to STEREO (R).
- MIDI (Optional): If using MIDI control, connect your MIDI controller to the MIDI IN port.
Operating Modes (Delay Algorithms)
The D1 MKII offers six distinct delay algorithms, each with unique characteristics and adjustable parameters via the TWEAK and ATTACK knobs.
1. Digital
A pristine, clear delay with high-fidelity repeats. Ideal for rhythmic delays where clarity is paramount.
2. Mod
Adds modulation to the delay repeats, creating lush, swirling textures. The TWEAK and ATTACK knobs control modulation depth and rate.
3. Vintage
Emulates the warm, decaying repeats of analog and tape delays. Repeats gradually lose fidelity and clarity.
4. Dual
Features two independent delay lines that can be set to different subdivisions, creating complex rhythmic patterns. The redesigned Dual mode allows for unique tap divisions on each channel.

Figure 5: OLED display showing parameters for the Dual delay algorithm.
5. Reverse
Plays delay repeats backward, creating ethereal and atmospheric effects. The TWEAK and ATTACK knobs can control the attack and decay of the reversed repeats.
6. Grain
A granular delay algorithm that slices the audio into small "grains" and manipulates them to create unique textures, from shimmering ambient washes to glitchy stutters. This is an all-new program for the MKII.

Figure 6: OLED display showing parameters for the Grain delay algorithm.
Presets
The D1 MKII allows users to save and recall up to 128 presets, providing quick access to your favorite delay settings. Presets can be accessed and managed via the OLED display and footswitches, or through MIDI control.
- Saving a Preset: Adjust the pedal to your desired settings. Refer to the on-screen menu for specific instructions on how to save the current state to a preset slot.
- Recalling a Preset: Use the TAP footswitch to cycle through presets or navigate the menu to select a specific preset.
MIDI Control
The D1 MKII supports MIDI control for advanced integration into your rig. MIDI allows for remote control of parameters, program changes (preset recall), and synchronization with other MIDI-enabled devices.
- Connect your MIDI controller to the MIDI IN port.
- The MIDI THRU port can be used to daisy-chain MIDI data to other pedals.
- Refer to the Walrus Audio website for detailed MIDI implementation charts and CC messages.
Maintenance
- Cleaning: Use a soft, dry cloth to clean the pedal's exterior. Avoid abrasive cleaners or solvents.
- Storage: Store the pedal in a cool, dry place away from direct sunlight and extreme temperatures when not in use.
- Power Supply: Always use a regulated 9V DC, center-negative power supply with a minimum of 300mA. Using an incorrect power supply can damage the unit and void the warranty.
- Firmware Updates: Periodically check the Walrus Audio website for firmware updates via the USB-C port to ensure optimal performance and access to new features.
Troubleshooting
| Problem | Possible Cause / Solution |
|---|---|
| No sound or weak signal. |
|
| Unexpected noise or hum. |
|
| Pedal does not respond to footswitches. |
|
Specifications
| Feature | Detail |
|---|---|
| Model Number | 900-1051mkII |
| Dimensions | 5.8 x 4.2 x 2.7 inches (14.7 x 10.7 x 6.9 cm) |
| Item Weight | 12.7 ounces (361 Grams) |
| Power Requirement | 9V DC, 300mA minimum, center-negative |
| Connectivity | Stereo In/Out, MIDI In/Thru, USB-C |
| Presets | Up to 128 |
| UPC | 810424036352 |
Warranty and Support
Walrus Audio products are built with quality and care. For information regarding warranty coverage, product registration, and technical support, please visit the official Walrus Audio website or contact their customer service department. Keep your proof of purchase for warranty claims.
For the latest firmware updates and detailed MIDI implementation, please visit: www.walrusaudio.com
Related documents900-1051mkII


Ask a question about this manual
Ask about setup, troubleshooting, compatibility, parts, safety, or missing instructions. Manuals+ will review the question and use this page’s manual context to help answer it.