Introduction
Thank you for choosing the Mesqool CR1025 Digital Alarm Clock Radio. This device combines multiple functions including a digital alarm clock, Bluetooth 5.0 speaker, FM radio, night light, and dual USB charging ports. This manual provides detailed instructions to help you set up and operate your new device effectively.
Package Contents
- Mesqool CR1025 Digital Alarm Clock Radio
- Power Adapter
- User Manual
- C Battery (for backup)
Product Overview
Familiarize yourself with the components and controls of your Mesqool CR1025 Digital Alarm Clock Radio.
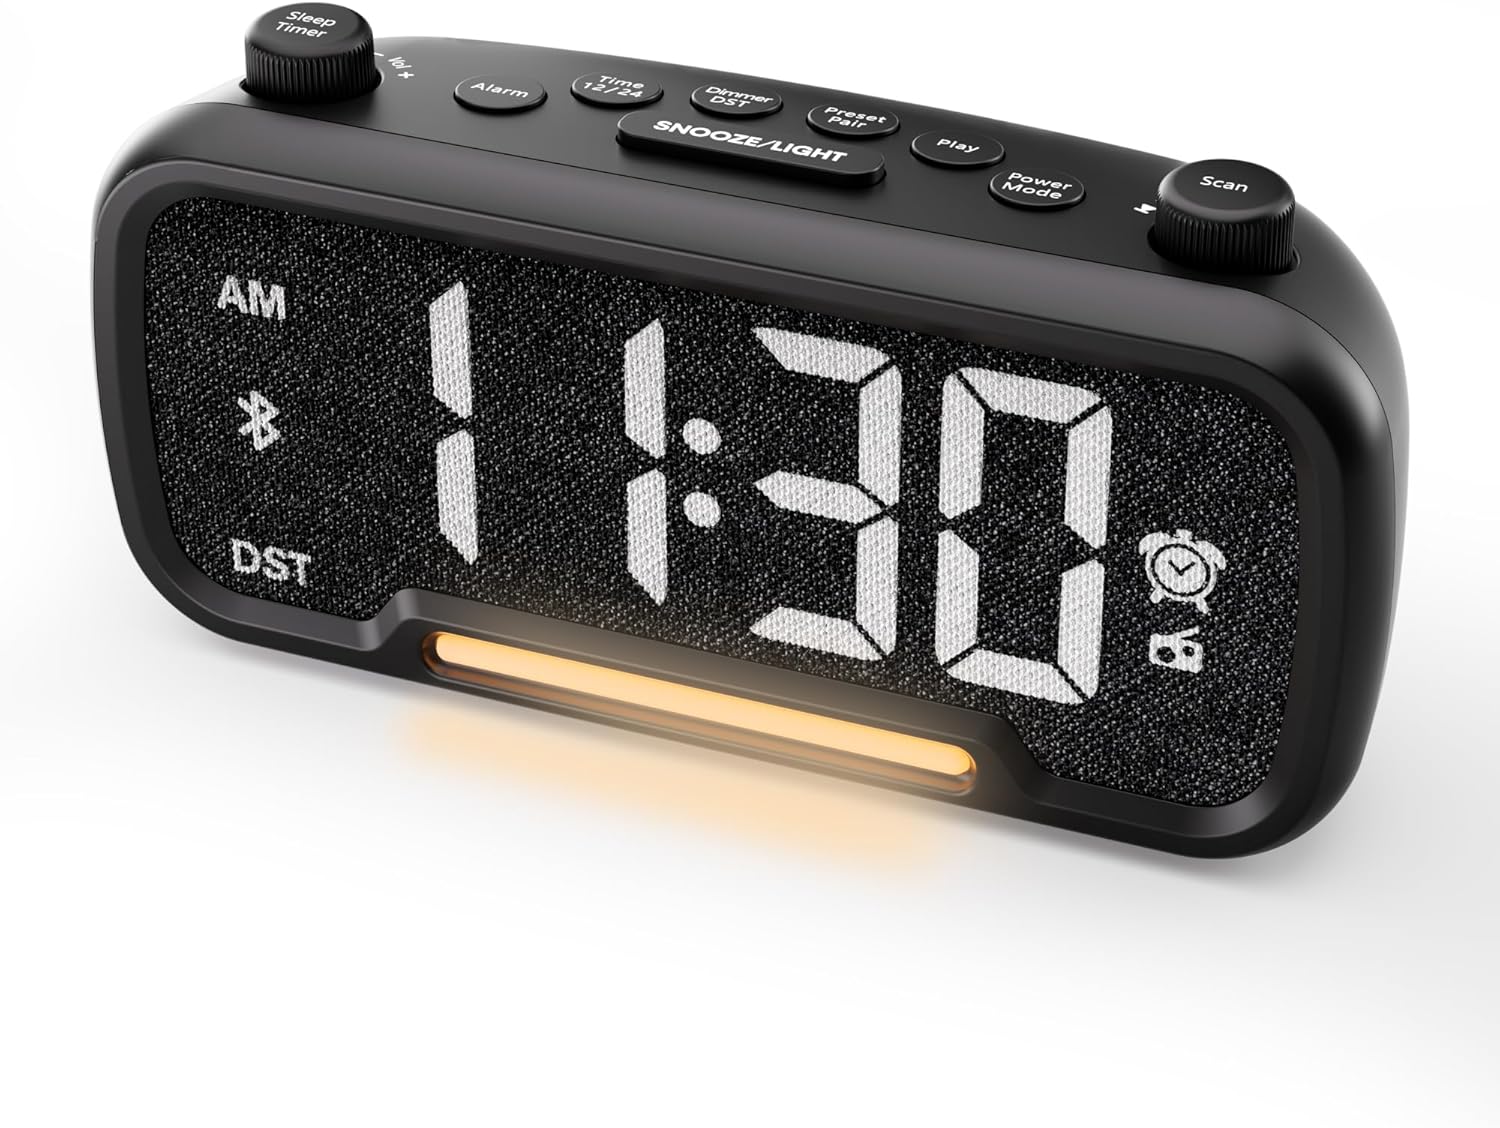

Control Buttons and Knobs:
- Sleep Timer / Vol +/- Knob (Left): Adjusts volume, sets sleep timer duration.
- Alarm Button: Sets and activates/deactivates alarms.
- Time 12/24 Button: Switches between 12-hour and 24-hour time formats.
- Dimmer / DST Button: Adjusts display brightness, activates/deactivates Daylight Saving Time (DST).
- Preset / Pair Button: Saves FM radio presets, initiates Bluetooth pairing.
- Play Button: Plays/pauses media in Bluetooth mode.
- Power Mode Button: Cycles through operating modes (FM, Bluetooth, AUX).
- Scan / TU +/- Knob (Right): Scans FM radio stations, manually tunes FM frequency.
- SNOOZE/LIGHT Button: Activates snooze function, turns night light on/off.

Setup
1. Initial Power-Up
Connect the provided power adapter to the DC 5V IN port on the back of the alarm clock and plug it into a standard wall outlet. The display will light up. Ensure the C battery is installed for backup in case of power outage.

2. Time Setting
- Press and hold the Time 12/24 button for 2 seconds. The hour digits will begin to flash.
- Rotate the Vol +/- knob (left knob) to adjust the hour.
- Press the Time 12/24 button again. The minute digits will begin to flash.
- Rotate the Vol +/- knob to adjust the minute.
- Press the Time 12/24 button once more to confirm the time setting.
Video demonstrating how to set the time on the Mesqool Digital Alarm Clock Radio.
3. 12/24 Hour Time Format
To switch between 12-hour and 24-hour time formats, short press the Time 12/24 button. The display will change accordingly.
4. Daylight Saving Time (DST) Adjustment
To activate or deactivate DST, press and hold the Dimmer / DST button for 2 seconds. The time will adjust by one hour forward or backward, and the DST indicator will appear or disappear on the display.
Operating Instructions
1. Alarm Setting
- Press and hold the Alarm button for 2 seconds. The hour digits will flash.
- Rotate the Vol +/- knob to adjust the desired alarm hour.
- Press the Alarm button again. The minute digits will flash.
- Rotate the Vol +/- knob to adjust the desired alarm minute.
- Press the Alarm button again. The alarm sound selection will flash (bell icon for buzzer, radio icon for FM radio). Rotate the Vol +/- knob to choose between buzzer or FM radio as the alarm sound.
- If FM radio is selected, press the Alarm button again. The volume level will flash (L01-L16). Rotate the Vol +/- knob to set the desired alarm volume.
- Press the Alarm button once more to confirm and activate the alarm. The alarm icon will appear on the display.
To deactivate the alarm, short press the Alarm button. The alarm icon will disappear from the display.

Snooze Function:
When the alarm sounds, press the SNOOZE/LIGHT button to activate the snooze function for 9 minutes. The alarm will sound again after 9 minutes. To turn off the alarm completely, press any other button except SNOOZE/LIGHT.

2. FM Radio Operation
- Press the Power Mode button repeatedly until the radio icon lights up on the display, indicating FM radio mode.
- Auto-Scan and Save Presets: Press the Scan / TU +/- knob (right knob) to automatically search for available FM stations and save them as presets (up to 20 stations). The display will show "P01", "P02", etc., as stations are saved.
- Manual Tuning: Rotate the Scan / TU +/- knob to manually browse frequencies.
- Recall Presets: Short press the Preset / Pair button to cycle through saved preset stations.
- Adjust Volume: Rotate the Vol +/- knob (left knob) to adjust the radio volume (L01-L16).

Video demonstrating how to set the FM radio alarm on the Mesqool Digital Alarm Clock Radio.
3. Bluetooth Speaker Operation
- Press the Power Mode button repeatedly until the Bluetooth icon (bt) starts flashing on the display, indicating pairing mode.
- On your mobile device, enable Bluetooth and search for "CR1025" in the list of available devices.
- Select "CR1025" to pair. Once connected, the Bluetooth icon will stop flashing and remain solid.
- You can now play audio from your device through the alarm clock's speaker.
- Use the Vol +/- knob on the alarm clock or your mobile device to adjust the volume.
- Press the Play button to play or pause audio.

Video demonstrating how to set up Bluetooth on the Mesqool Digital Alarm Clock Radio.
4. Night Light Operation
The alarm clock features a gentle night light. To turn the night light on or off, short press the SNOOZE/LIGHT button.

5. Dimmer Setting
The display brightness can be adjusted to 5 levels. Short press the Dimmer / DST button to cycle through the brightness levels (L01-L05). Select the level that best suits your environment.

6. Sleep Timer Setting
The sleep timer allows you to set a duration for the FM radio or Bluetooth speaker to play before automatically turning off. This is useful for falling asleep to music or podcasts.
- While in FM radio or Bluetooth mode, press the Sleep Timer button. The display will show the current sleep timer duration (e.g., "30" for 30 minutes).
- Rotate the Sleep Timer / Vol +/- knob to select the desired duration: 15, 30, 60, 90, or 120 minutes. You can also select "OFF" to disable the sleep timer.
- The timer will start counting down, and the device will automatically turn off after the selected duration.
7. USB Charging Ports
The alarm clock is equipped with two USB charging ports (Type-C and USB-A) on the back, each providing 5V/1A output. These ports can be used to conveniently charge your smartphone, tablet, or other USB-powered devices.

Troubleshooting
| Problem | Possible Solution |
|---|---|
| Clock display is blank. | Ensure the power adapter is securely connected to both the clock and a working power outlet. Check if the power outlet is functional. |
| Alarm does not sound. | Verify that the alarm is set and activated (alarm icon visible on display). Check the alarm volume level. Ensure the correct alarm sound (buzzer or FM radio) is selected. |
| Poor FM radio reception. | Extend the FM antenna fully. Try repositioning the antenna or the clock for better signal. Perform an auto-scan again to find stronger stations. |
| Cannot pair Bluetooth device. | Ensure the clock is in Bluetooth pairing mode (flashing 'bt' icon). Make sure Bluetooth is enabled on your mobile device and it is within range. Forget "CR1025" from your device's Bluetooth list and try pairing again. |
| USB charging ports not working. | Confirm the alarm clock is powered on. Ensure the charging cables are properly connected to both the clock and your device. Try a different USB cable or device to rule out cable/device issues. |
Specifications
| Feature | Detail |
|---|---|
| Brand | Mesqool |
| Model Number | CR1025 |
| Color | Black |
| Display Type | Digital LED |
| Product Dimensions | 6.61"L x 3.31"W x 2.32"H |
| Power Source | Corded Electric (AC adapter included) |
| Battery Backup | 1 C battery (included) |
| Bluetooth Version | V5.0 |
| FM Radio Frequency | 87.5-108MHz |
| FM Presets | Up to 20 stations |
| Display Dimmer | 5 levels |
| Alarm Sounds | Buzzer, FM Radio |
| Snooze Duration | 9 minutes |
| USB Charging Output | Type-C & USB-A, 5V/1A each |
| Material | Plastic |
| Item Weight | 0.48 Pounds (approx. 7.7 ounces) |
Maintenance
- Clean the device with a soft, dry cloth. Do not use liquid cleaners or abrasive materials.
- Keep the device away from direct sunlight, extreme temperatures, and high humidity.
- Ensure proper ventilation around the device to prevent overheating.
- If the device will not be used for an extended period, remove the backup battery.
Safety Information
- Do not expose the device to water or moisture.
- Do not attempt to disassemble or repair the device yourself. Refer to qualified service personnel.
- Keep the device out of reach of children.
- Use only the provided power adapter. Using unauthorized adapters may damage the device and void the warranty.
- Avoid placing the device near heat sources or open flames.
Warranty and Support
Specific warranty details are not provided in the product information. For warranty claims, technical support, or further assistance, please contact Mesqool customer service through their official website or the retailer where the product was purchased. Please retain your proof of purchase for any warranty-related inquiries.
Visit the Mesqool Store for more information: Mesqool Official Store


