Introduction
This manual provides essential information for the safe and efficient installation, operation, and maintenance of your Ledvion 1M LED Track Lighting System. This modern and flexible single-phase track lighting system, equipped with GU10 fittings, allows you to create a customized lighting atmosphere in any space. Please read these instructions carefully before proceeding with installation or use.

Image: The Ledvion 1M LED Track Lighting System with three white spotlights mounted on a white track.
What's in the Box
Verify that all components are present before beginning installation:
- 1x 1-meter Track Rail
- 3x Track Spotlights (5W, 2700K, Dimmable)
- 3x GU10 LED Bulbs
- 3x Anti-glare Grids (optional use)
- Mounting Hardware (screws, wall plugs)
- 1x Power Connector

Image: A visual representation of all components included in the product box, laid out on a grey surface. This includes the track, three spotlights, three GU10 bulbs, three anti-glare grids, mounting screws, wall plugs, and a power connector.
Setup and Installation
The Ledvion track lighting system is designed for easy, plug-and-play installation. Ensure power is disconnected at the main circuit breaker before starting any electrical work.
- Mount the Track Rail: Securely attach the 1-meter track rail to your ceiling or desired surface using the provided mounting hardware. Ensure the track is level and firmly fixed.
- Connect Power: Connect the power connector to the track rail and wire it to your electrical supply. This should be performed by a qualified electrician to ensure safety and compliance with local regulations.
- Install Spotlights: Insert the GU10 LED bulbs into the track spotlights. Then, attach each spotlight to the track rail. The plug-and-play locking system allows for effortless addition, removal, or repositioning of spotlights along the track. Simply align the spotlight connector with the track, push up, and turn the locking mechanism to secure it.

Image: A four-panel diagram illustrating the plug-and-play installation process for the track spotlights. It shows how to insert the spotlight into the track and lock it into place with a simple turn.
Optional System Expansion
You can expand your track system with optional accessories (sold separately) to create more complex lighting layouts:
- Powerfeeder with Coverplate: For discreet power connection.
- Powerfeeder with I-Connector: To connect multiple track sections in a straight line.
- X-Connector: For creating a cross-shaped track layout.
- T-Connector: For creating a T-shaped track layout.
- Pendant Spot Adjustable Cord: To add hanging pendant lights to the track.

Image: A graphic displaying various optional accessories for the track lighting system, including different types of power feeders and connectors (X-connector, T-connector) and a pendant spot with an adjustable cord.
Operation
Once installed, the Ledvion track lighting system offers flexible control over your illumination.
- Power On/Off: Use your wall switch to turn the track lighting system on or off.
- Adjustable and Rotatable Spotlights: Each spotlight can be tilted 350 degrees in all directions and rotated to direct light precisely where needed. This allows for versatile illumination of specific areas or objects.
- Dimmable Functionality: The included GU10 LED bulbs are dimmable. If connected to an external dimmer switch (not included), you can adjust the light intensity to suit any occasion or mood.

Image: A graphic demonstrating the adjustable and rotatable features of the track spotlight, showing it can be tilted 350 degrees and rotated to direct light.

Image: The Ledvion track lighting system installed in a modern closet, illuminating clothing and shelves, demonstrating its practical application.
Maintenance
Regular maintenance ensures optimal performance and longevity of your track lighting system.
- Cleaning: Disconnect power before cleaning. Wipe the track and spotlights with a soft, dry cloth. Avoid abrasive cleaners or solvents.
- Bulb Replacement: Ensure power is off and bulbs have cooled before replacing. Twist the GU10 bulb counter-clockwise to remove and clockwise to install a new one.
- Anti-Glare Grid: An optional anti-glare grid is included to prevent harsh glare. It is easy to add and remove as needed.

Image: A close-up of a track spotlight with an anti-glare grid, demonstrating how the grid can be easily added or removed to reduce glare.
Troubleshooting
If you encounter issues with your Ledvion track lighting system, refer to the following common solutions:
- Light Not Working:
- Check if the power supply is connected and the wall switch is on.
- Ensure the spotlight is correctly inserted and locked into the track.
- Verify that the GU10 bulb is properly seated and not faulty. Try replacing it with a known working bulb.
- Flickering Light:
- Ensure the bulb is fully screwed in.
- If using a dimmer, ensure it is compatible with LED bulbs and correctly installed.
- Spotlight Not Adjusting:
- Check for any obstructions.
- Ensure the spotlight is securely attached to the track but not overtightened, which could restrict movement.
If problems persist, contact Ledvion customer support for assistance.
Specifications
| Attribute | Detail |
|---|---|
| Brand | Ledvion |
| Model Number | LVT10002_1m3s_2700K |
| Product Dimensions (L x W x H) | 105 x 15 x 10 cm |
| Item Weight | 1.35 Kilograms |
| Number of Items | 1 |
| Style | Railverlichting SET 2 |
| Color Temperature | 2700K (Warm White) |
| Number of Bulbs | 3 |
| Voltage | 230 Volts |
| Plug Type | Electrical |
| Power (per bulb) | 5 Watts (LED) |
| Energy Efficiency Rating | D |
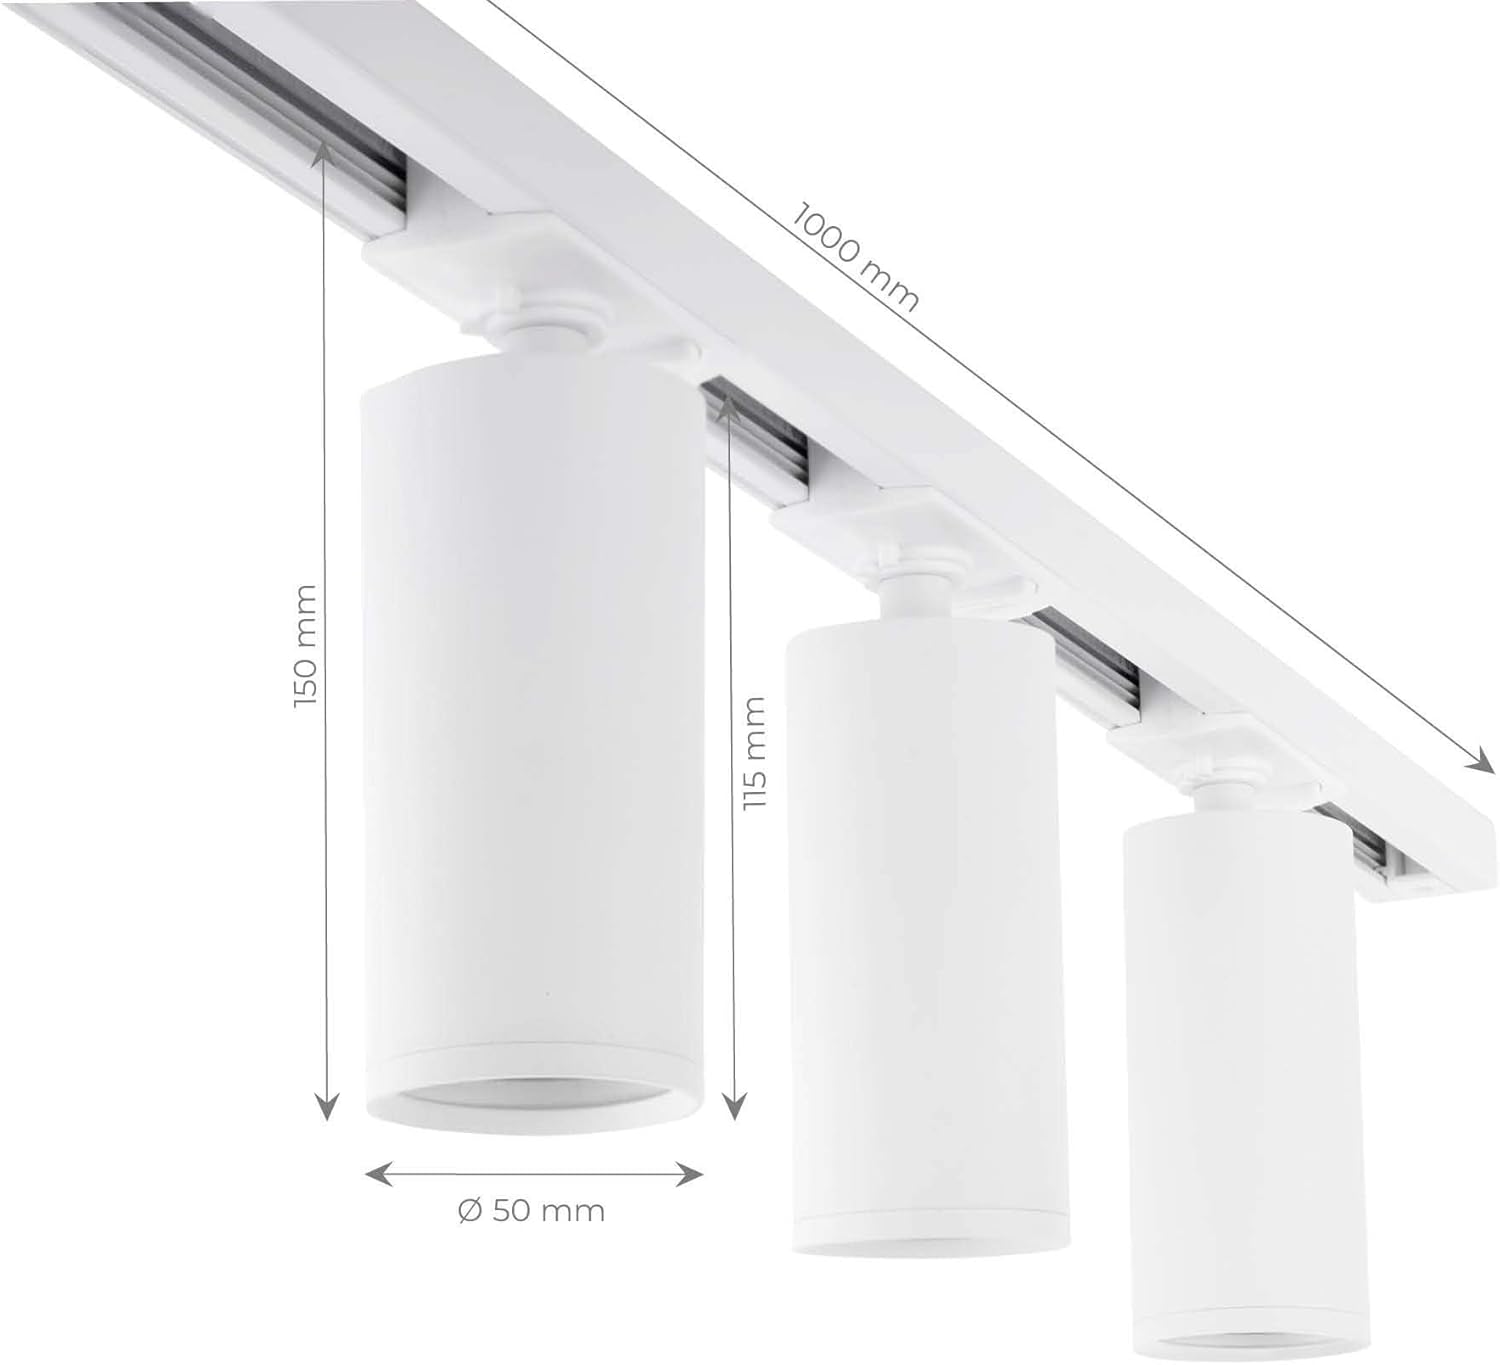
Image: A technical diagram illustrating the dimensions of the track rail (1000 mm length) and the spotlights (150 mm height, 50 mm diameter).

Image: The EU energy label for the Ledvion lighting product, showing an energy efficiency class of D and energy consumption of 3 kWh/1000h. For more details, visit eprel.ec.europa.eu/qr/2042892.
Safety Information and Warranty
Safety Precautions
- This device is intended for indoor use only. Do not use in damp or wet locations.
- Always disconnect power at the main circuit breaker before installation, maintenance, or bulb replacement.
- Do not touch the lamp when it is operating or hot.
- Ensure proper grounding. Installation should be performed by an authorized electrician.
- Any changes or modifications to the product will void the warranty and may pose safety risks.
Warranty Information
Ledvion products are manufactured to high-quality standards and conform to all relevant EU directives. For detailed warranty terms and conditions, please refer to the official Ledvion website or contact customer support. Keep your proof of purchase for warranty claims.

Image: The product packaging box displaying safety warnings, conformity statements, and general warranty information in multiple languages, along with a QR code.
Support
For further assistance, technical support, or to explore other Ledvion products, please visit our official store or contact customer service:
- Ledvion Store: Visit the Ledvion Store on Amazon
- Customer Service: Refer to your product packaging or the Ledvion website for contact details.


