
Metro Mobility M1 Lite
Metro Mobility M1 Lite Folding Mobility Scooter User Manual
Model: M1 Lite
Introduction
The Metro Mobility M1 Lite Folding Mobility Scooter is designed to provide convenient and independent mobility for seniors and adults. This manual provides essential information for the safe and effective operation, maintenance, and care of your scooter. Please read it thoroughly before first use.
Key Features
- Compact Folding Design: Easily foldable and lightweight for effortless transport and storage.
- Removable Seat & Backrest: Adjustable seat and backrest for customized comfort and support.
- Motorized Mobility: Powered by a rechargeable battery, providing convenient mobility for users.
- Durable Construction: Sturdy frame and wheels designed for stability and longevity.
- Safety Features: Equipped with safety features like electromagnetic brakes and speed control for added peace of mind.
Setup & Assembly
The M1 Lite scooter is designed for quick and efficient assembly, requiring no tools for basic setup.
- Unpack Components: Carefully remove all parts from the packaging.
- Install Seat: Insert the seat post into the designated slot on the scooter base. Ensure it is securely locked in place. The seat height is adjustable for user comfort.
- Attach Basket: Secure the front basket to the handlebar assembly.
- Connect Battery: Ensure the battery box is properly connected and secured. The battery is detachable for off-board charging and easy transport.
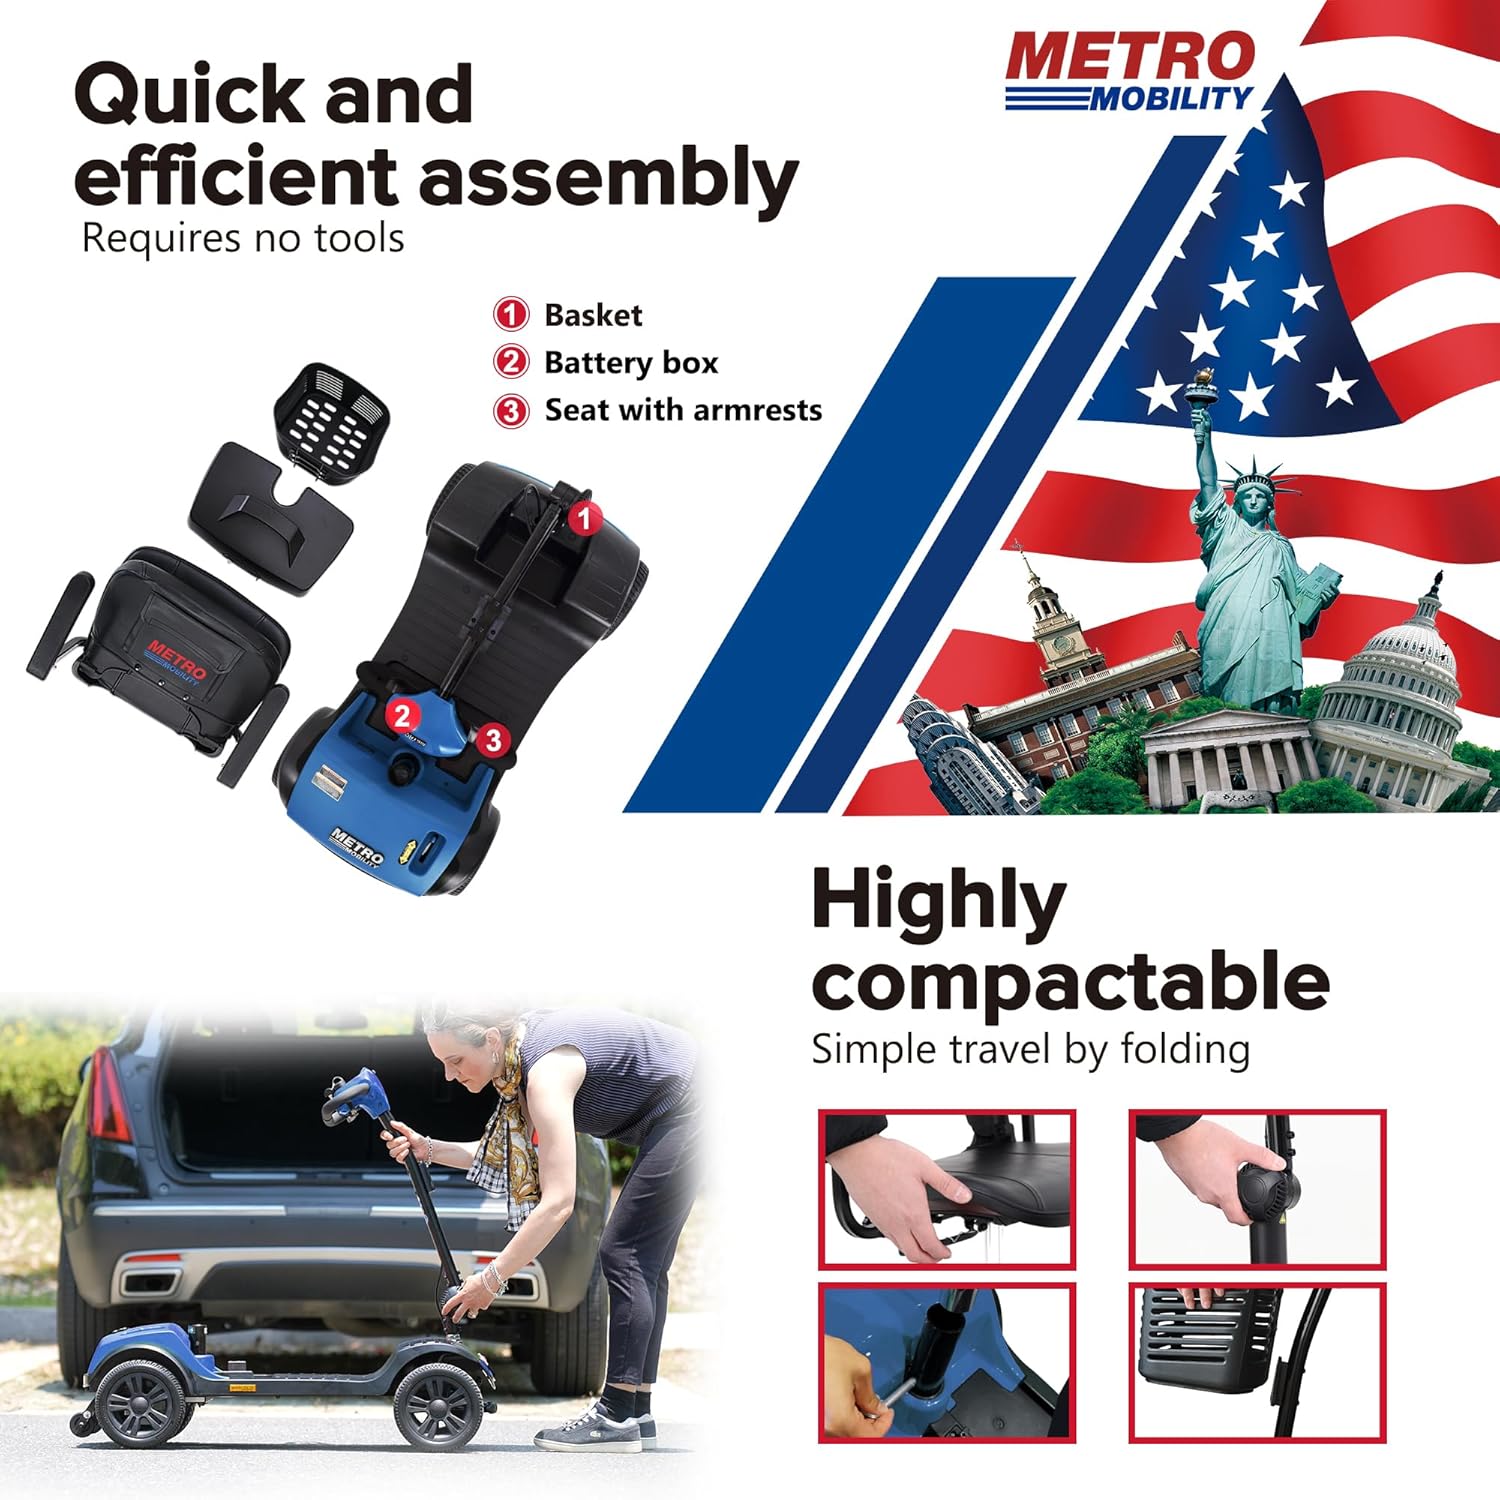
Figure 1: Quick and efficient assembly of the M1 Lite scooter. Components include the basket, battery box, and seat with armrests.

Figure 2: Adjustable features for personalized comfort and control, including seat height, tiller tilt, and armrest width.
Operating Instructions
Familiarize yourself with the controls and features before operating the scooter.
- Intuitive Controls: The control panel includes a battery level indicator, power switch, speed control dial, and horn button.

Figure 3: Overview of the intuitive control panel.
- Starting the Scooter: Turn the power switch to the 'ON' position.
- Speed Control: Use the speed control dial to adjust your desired speed. The scooter has a top speed of up to 4.9 mph.
- Steering: Gently twist the handle to steer the scooter flexibly. The 360-degree swivel seat allows for easy entry and exit.
- Braking: The scooter features an automatic electromagnetic braking mechanism for reliable stopping.
- Terrain Navigation: Equipped with anti-flat tires and a robust design, the M1 Lite can navigate various surfaces including bumpy ground, rough grasslands, and even moderate slopes (up to 8° climbing ability).
Video 1: Demonstrates the Metro Mobility M1 Lite scooter's features, including adjustable seat height, speed control, terrain navigation, 360-degree swivel seat, and detachable battery box. It highlights its ease of use and portability.
Battery & Charging
- The M1 Lite features a detachable battery box, making it easy to remove for charging or transport.
- A full charge provides a maximum driving range of approximately 10 miles.
- Always use the charger provided by Metro Mobility to ensure optimal battery life and safety.

Figure 4: The scooter offers a maximum driving range of 10 miles on a single charge.
Portability & Storage
The M1 Lite is designed to be highly compactable for simple travel and storage.
- The scooter can be easily folded for transport in a vehicle trunk or for storage in small spaces.
- The lightweight design facilitates easy lifting and handling.
Figure 5: The scooter folds compactly for easy traveling and storage.
Maintenance
Regular maintenance ensures the longevity and safe operation of your Metro Mobility M1 Lite scooter.
- Cleaning: Wipe down the scooter with a damp cloth. Avoid using abrasive cleaners or excessive water.
- Battery Care: Charge the battery regularly, even if the scooter is not in frequent use, to maintain battery health. Store the battery in a cool, dry place.
- Tire Inspection: Periodically check the anti-flat tires for any signs of wear or damage.
- General Check: Ensure all bolts and fasteners are tight. Inspect the seat, armrests, and tiller for stability.
Troubleshooting
If you encounter issues with your scooter, refer to the following common troubleshooting tips:
- Scooter Not Turning On: Check if the battery is properly connected and charged. Ensure the power switch is in the 'ON' position.
- Reduced Performance: This may indicate a low battery charge. Fully charge the battery.
- Unusual Noises: Discontinue use and inspect for any loose parts or obstructions. If the noise persists, contact customer support.
For issues not covered here, please contact Metro Mobility customer support.
Specifications
| Attribute | Detail |
|---|---|
| Brand | Metro Mobility |
| Model Name | M1 Lite |
| Color | Blue |
| Style | Modern |
| Brake Style | Electromagnetic |
| Manufacturer | Metro Mobility USA LLC |
| Date First Available | May 31, 2024 |
Warranty & Support
Your Metro Mobility M1 Lite scooter comes with a return policy of 30 days for refund/replacement. For specific warranty details, technical support, or service inquiries, please contact the manufacturer, Metro Mobility USA LLC, or the seller, Mobility Scooters sell USA LLC.
For additional information, you may visit the Metro Mobility Store on Amazon.
Related documentsM1 Lite


Ask a question about this manual
Ask about setup, troubleshooting, compatibility, parts, safety, or missing instructions. Manuals+ will review the question and use this page’s manual context to help answer it.