
Restmo O-HTB-1A
RESTMO Sprinkler Timer User Manual
Model: O-HTB-1A
Brand: Restmo
Introduction
The RESTMO Sprinkler Timer is an advanced ball valve water timer designed for efficient and automatic watering of gardens, lawns, and various irrigation systems. It is particularly effective with zero or low water pressure setups, including rain barrels. This multi-functional timer offers automatic, manual, and rain delay modes, providing flexible control over your watering schedule.

Figure 1: RESTMO Sprinkler Timer, showing the main unit with LCD display and control dial.
Features
- Zero and Low Pressure Watering: Optimized to work efficiently with low-pressure drip irrigation systems and zero-pressure setups, such as rain barrels, due to its ball valve mechanism.
- Multi-Functional Watering Modes: Includes Auto, Manual, and Rain Delay modes for versatile watering control.
- Easy Setup and Operation: Features an oversized dial and a large, easy-to-read LCD screen for intuitive programming of watering duration, frequency, and start times.
- Durable Construction: Built with a robust ball valve and rated IP54 for water and leak resistance.
- Wide Application: Suitable for garden hoses, outdoor faucets, lawn sprinkler controllers, greenhouse mist systems, pool filling, birdbath drippers, and pet drinking systems.

Figure 2: Key features highlighting zero water pressure compatibility, ball valve, ease of use, and various watering modes.
Package Contents
- 1 x RESTMO Sprinkler Timer (Model O-HTB-1A)
- 1 x User Manual
- Note: 2 x AA Alkaline Batteries are not included.
Specifications
| Specification | Value |
|---|---|
| Watering Frequency | 1-23 hours or 1-7 days |
| Watering Duration | 1 minute to 4 hours 59 minutes |
| Rain Delay Options | 12 / 24 / 48 / 72 hours |
| Working Pressure | 0 - 120 PSI (0 - 8 Bar) |
| Maximum Flow Rate | 10 GPM (35 LPM) |
| Working Temperature | 38 - 120°F (3 - 50°C) |
| Battery Type | 2 x AA Alkaline Batteries (not included) |
| Approx. Battery Life | 1 year |
| Dimensions (L x W x H) | 4.7 x 4.3 x 2.2 inches (12 x 11 x 5.5 cm) |
| Weight | 9 oz (254 g) |
| Waterproof Rating | IP54 |
| Faucet Compatibility | Standard 3/4" Garden Hose & Faucet |

Figure 3: Exploded view of the timer showing components like filter washer, LCD screen, ball valve, and control buttons, along with key specifications.
Setup
- Install Batteries: Open the battery compartment. Insert 2 x AA alkaline batteries (not included), ensuring correct polarity. Close the compartment securely. Important: Do not moisten the battery or battery compartment. Keep your hands dry during installation.
- Attach to Faucet: Connect the timer to your standard 3/4" garden faucet. Ensure the connection is tight to prevent leaks. The timer is designed to work with 0-120 PSI water pressure.
- Attach Hose: Connect your garden hose or irrigation system to the bottom outlet of the timer.
- Turn on Faucet: Fully open your faucet to allow water pressure to the timer. The timer's ball valve will control the water flow according to your programmed schedule.
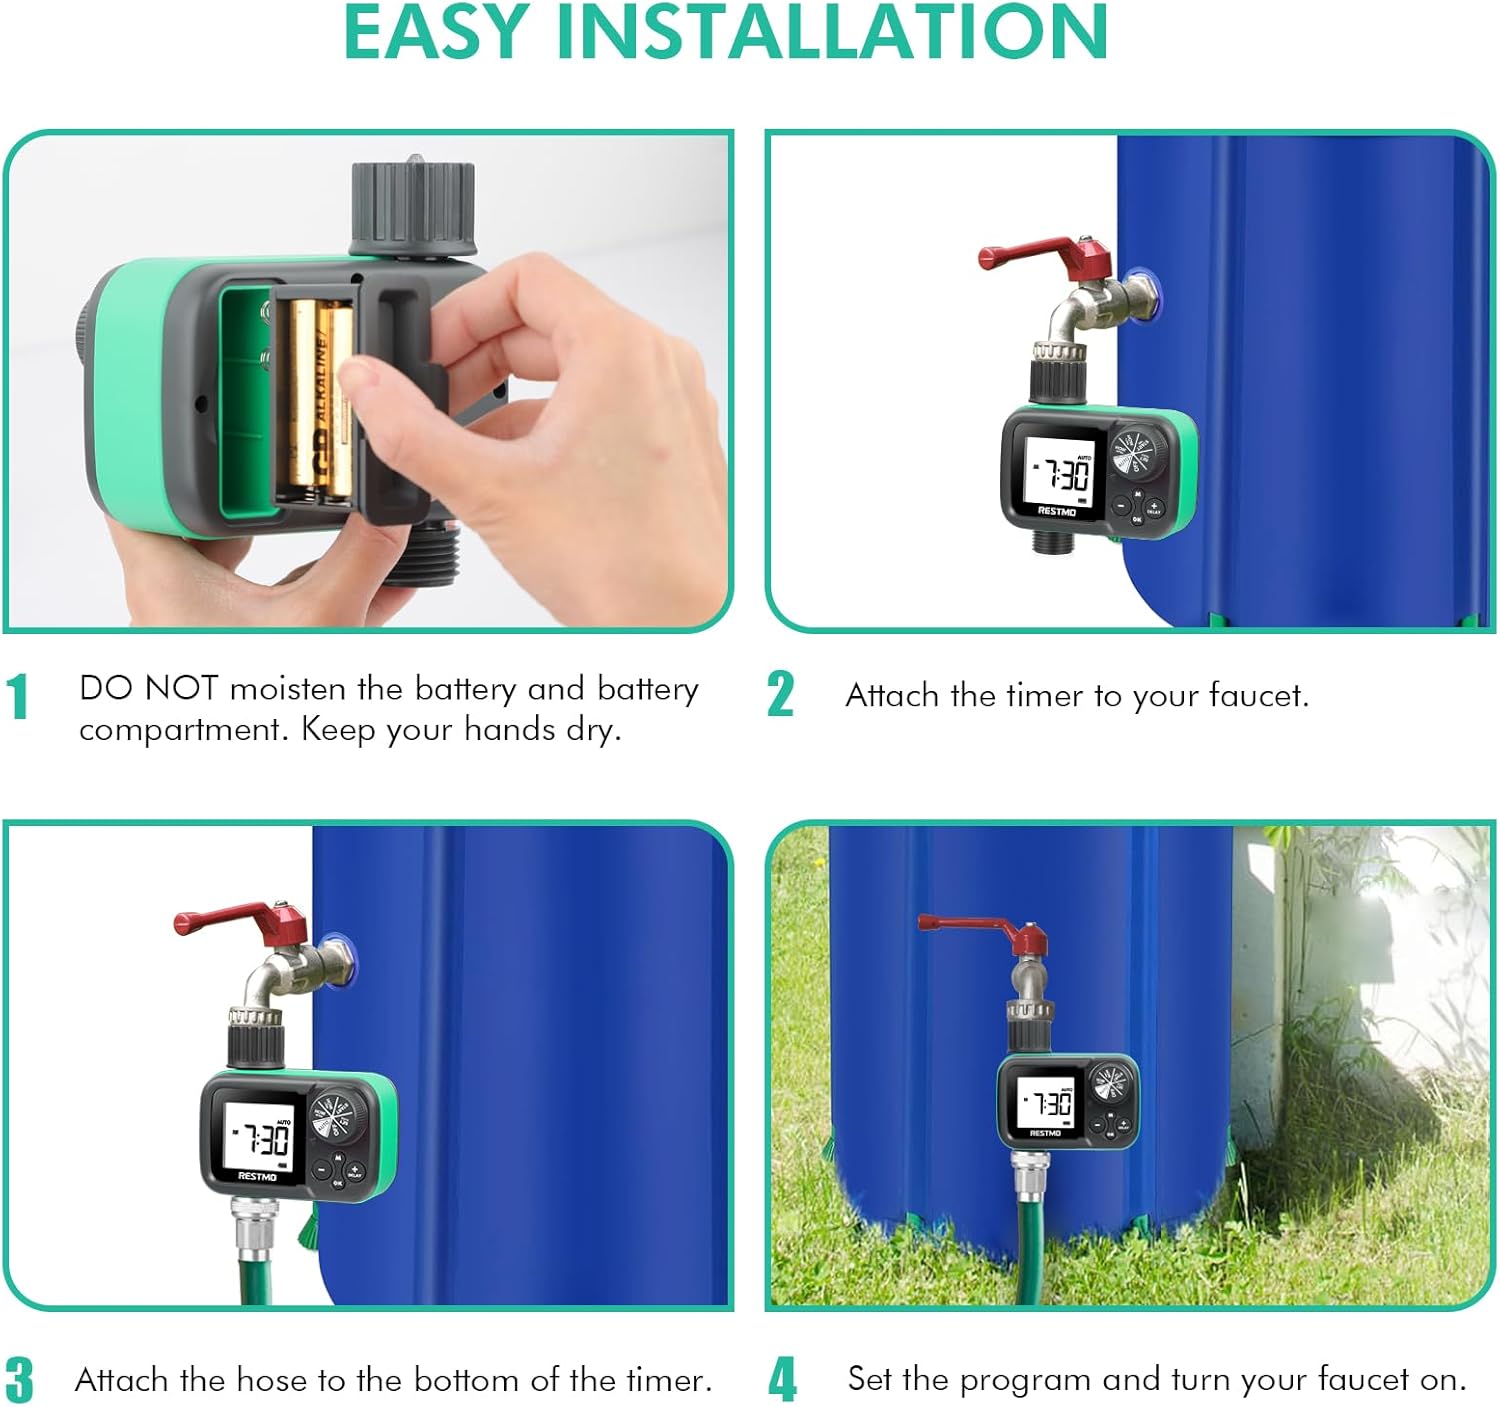
Figure 4: Visual guide for installing the timer, including battery insertion, attaching to faucet, connecting the hose, and turning on the faucet.
Operation
The RESTMO Sprinkler Timer features a large dial for selecting different settings and buttons for adjustment. Rotate the dial to navigate through the programming options.
Dial Positions:
- SET CLOCK: Set the current time.
- START TIME: Set the desired start time for watering.
- HOW LONG: Set the duration of each watering cycle (1 minute to 4 hours 59 minutes).
- HOW OFTEN: Set the frequency of watering (every 1-23 hours or every 1-7 days).
- AUTO: Activates the automatic watering schedule based on your settings.
- OFF: Turns off all watering functions.
Programming Steps:
- Set Clock: Rotate the dial to "SET CLOCK". Use the + and - buttons to adjust the current time. Press OK to confirm.
- Set Start Time: Rotate the dial to "START TIME". Use the + and - buttons to set the desired time for watering to begin. Press OK to confirm.
- Set Watering Duration (HOW LONG): Rotate the dial to "HOW LONG". Use the + and - buttons to set how many minutes or hours the timer should water. Press OK to confirm.
- Set Watering Frequency (HOW OFTEN): Rotate the dial to "HOW OFTEN". Use the + and - buttons to set how often the watering cycle should repeat (e.g., every 12 hours, every 2 days). Press OK to confirm.
- Activate Automatic Mode: Once all settings are confirmed, rotate the dial to "AUTO". The timer will now operate according to your programmed schedule.
Manual Watering:
To initiate manual watering outside of the programmed schedule:
- Ensure the dial is set to "AUTO" and the timer is not in "DELAY" mode.
- Press the M (Manual) button.
- Use the + and - buttons to set the desired manual watering duration (1 minute to 299 minutes).
- Press OK to start manual watering. The timer will water for the set duration and then return to its automatic schedule.
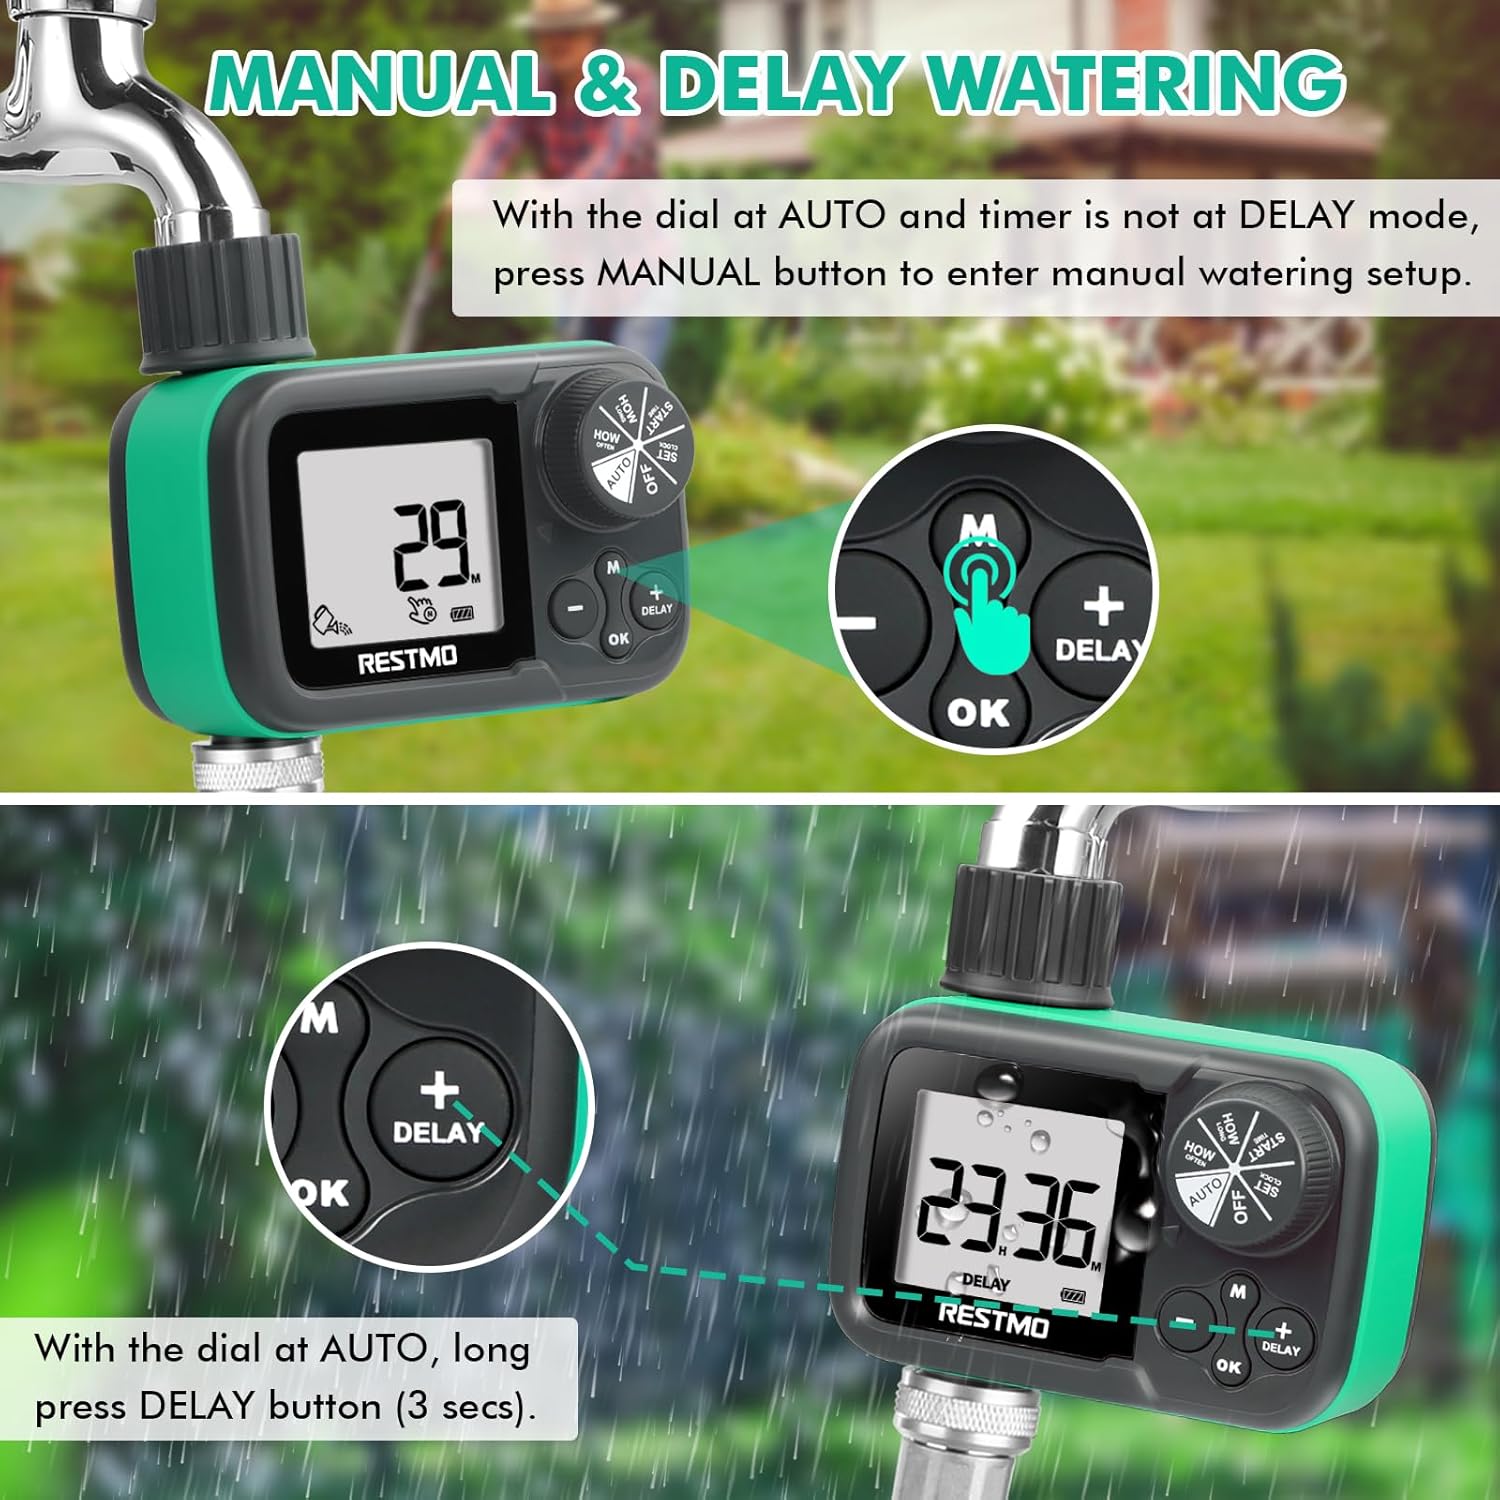
Figure 5: Visual guide for activating manual watering and rain delay functions.
Rain Delay Function:
To temporarily pause your watering schedule due to rain or other reasons:
- Ensure the dial is set to "AUTO".
- Long press the DELAY button (for 3 seconds).
- Use the + and - buttons to select the desired delay period (12, 24, 48, or 72 hours).
- The timer will pause for the selected duration and then resume its programmed schedule automatically.
Maintenance
- Winter Storage: To prevent freezing damage, remove the timer from the faucet before the first frost. Dry the timer thoroughly and store it indoors in a dry, protected area during winter months.
- Battery Replacement: Replace batteries annually or when the low battery indicator appears on the LCD screen to ensure continuous operation.
- Filter Washer: Periodically check the filter washer at the inlet connection for debris. Clean if necessary to maintain optimal water flow and prevent blockages.
- Cleaning: Clean the exterior of the timer with a soft, damp cloth. Do not use abrasive cleaners or immerse the unit in water.

Figure 6: Important warning regarding winter storage to prevent freezing damage.
Troubleshooting
| Problem | Possible Cause | Solution |
|---|---|---|
| Timer not turning on / LCD blank | Dead or incorrectly installed batteries. | Replace with fresh AA alkaline batteries, ensuring correct polarity. |
| No water flow / Low water flow | Faucet not fully open; clogged filter washer; low water pressure (if not using rain barrel); incorrect program setting. | Ensure faucet is fully open. Check and clean the filter washer. Verify water pressure is within 0-120 PSI. Confirm program settings are correct and timer is in "AUTO" mode. |
| Water leakage from connections | Loose connections; missing or damaged washer. | Tighten all connections. Ensure rubber washers are properly seated and not damaged. Replace if necessary. |
| Timer not watering at scheduled time | Incorrect clock or start time setting; timer in "OFF" or "DELAY" mode; low battery. | Verify clock and start time. Ensure dial is set to "AUTO". Check battery level. |
Warranty & Support
RESTMO is committed to customer satisfaction and product quality.
- Warranty: The product comes with a 100% satisfaction guarantee, a 45-day money-back guarantee, and an 18-month worry-free replacement service.
- Customer Support: For any questions, issues, or support needs, please reach out to our 24/7 local customer service team.
Contact Information:
- Email: support@restmo-link.com
- Phone (Toll-Free): +1 866-876-6888
- Phone: +1 929-329-4398

Figure 7: Product packaging displaying contact details for customer support and key specifications.
Related documentsO-HTB-1A


Ask a question about this manual
Ask about setup, troubleshooting, compatibility, parts, safety, or missing instructions. Manuals+ will review the question and use this page’s manual context to help answer it.