Hisencn 1500W 110V
Hisencn Grill Heating Element & Adjustable Thermostat Cord Controller User Manual
Model: 1500W 110V
1. Introduction
Thank you for choosing the Hisencn Grill Heating Element and Adjustable Thermostat Cord Controller. This product is designed as a high-quality replacement part for compatible electric smokers and grills, ensuring efficient and precise temperature control for your cooking needs. This manual provides essential information for safe and effective use.
What's Included:
- 1 x Grill Heating Element
- 1 x Adjustable Thermostat Cord Controller
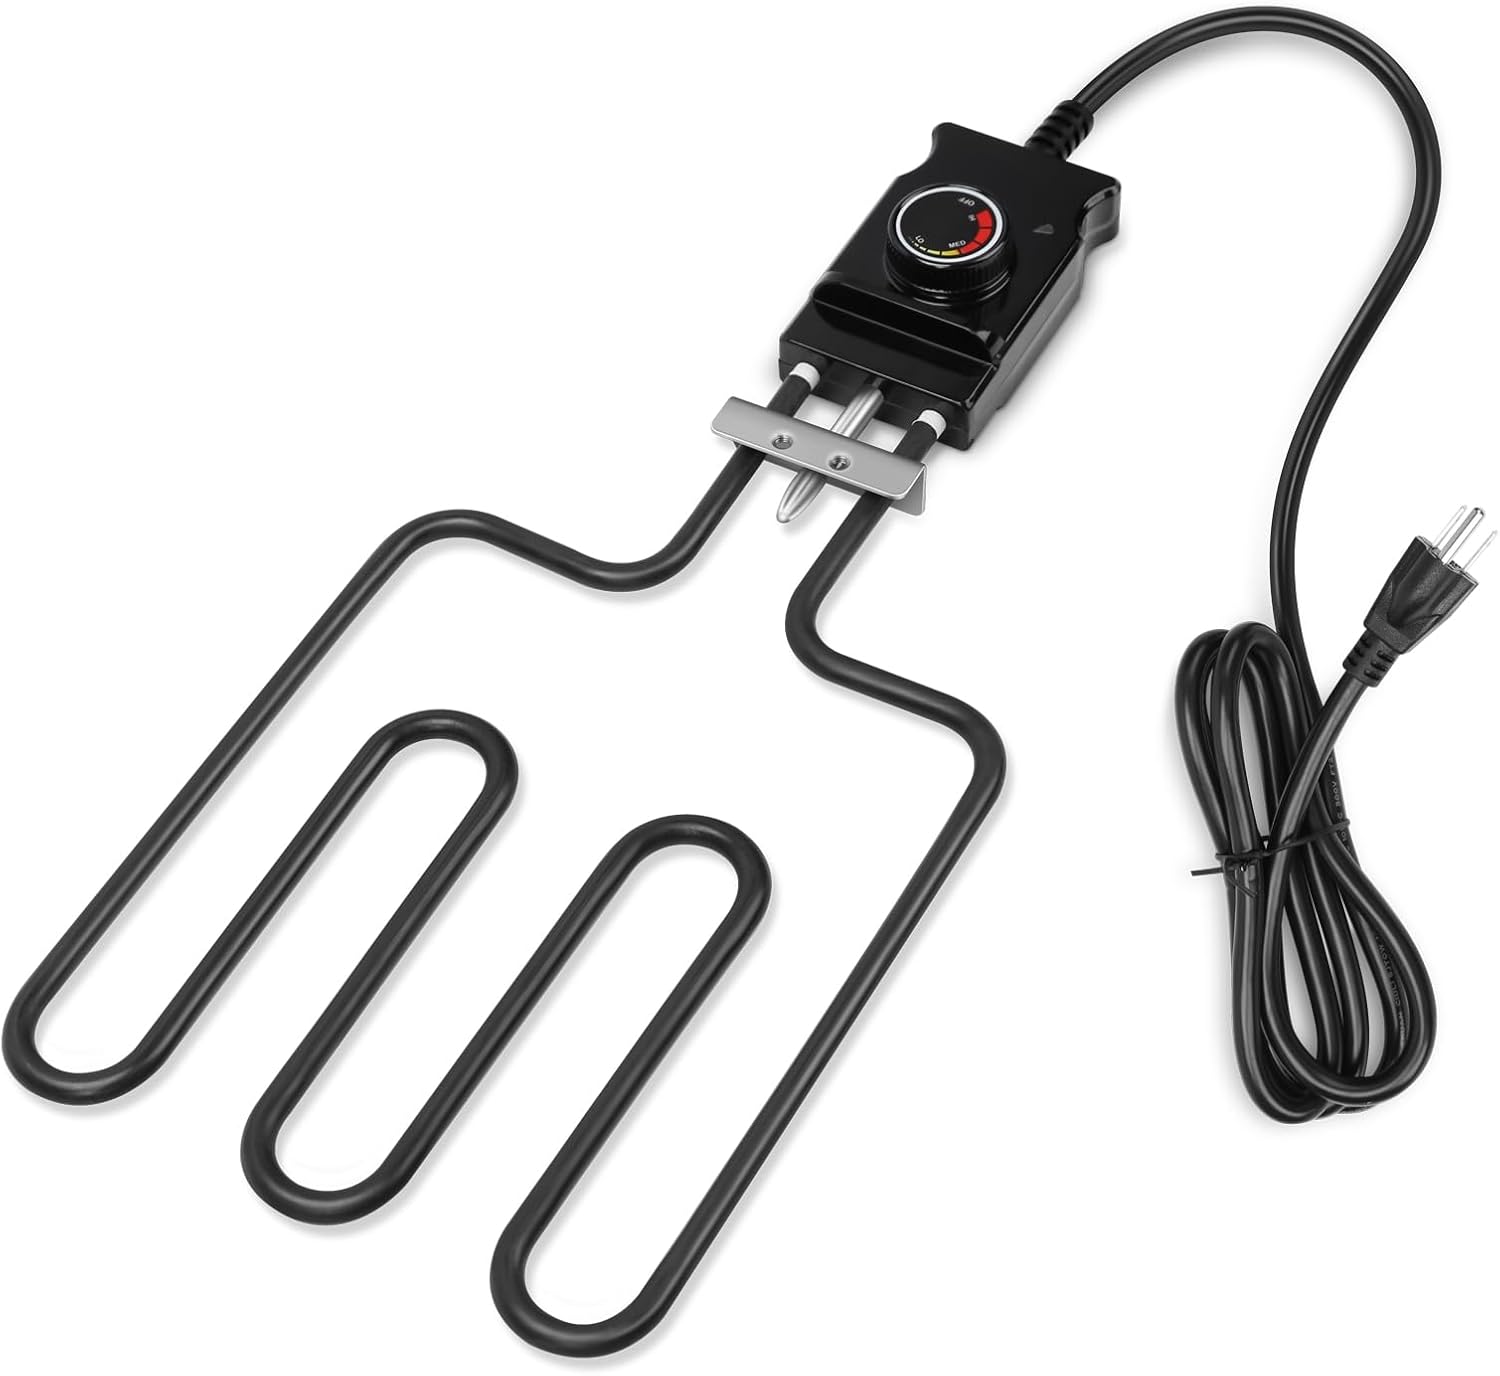
Figure 1.1: Hisencn Grill Heating Element and Adjustable Thermostat Cord Controller.
2. Compatibility
This Hisencn heating element and controller are compatible with various Masterbuilt electric smoker models. Please verify your smoker model number before installation to ensure proper fit and function.
Compatible Masterbuilt Smoker Models:
- 20070210, 20070410, 20070610, 20070612, 20070712, 20070812, 20071012, 20074316, 20074416, 20074516, 20074616, 20070410R, 20070610R, 20070610SD, 20070712R, 20075517
- MB20070210, MB21071012, MB25075517
Original Replacement Part Numbers:
- Heating Element: Model # 9907150018
- 6-foot Power Cord: Replacement Part Number: 9007160016
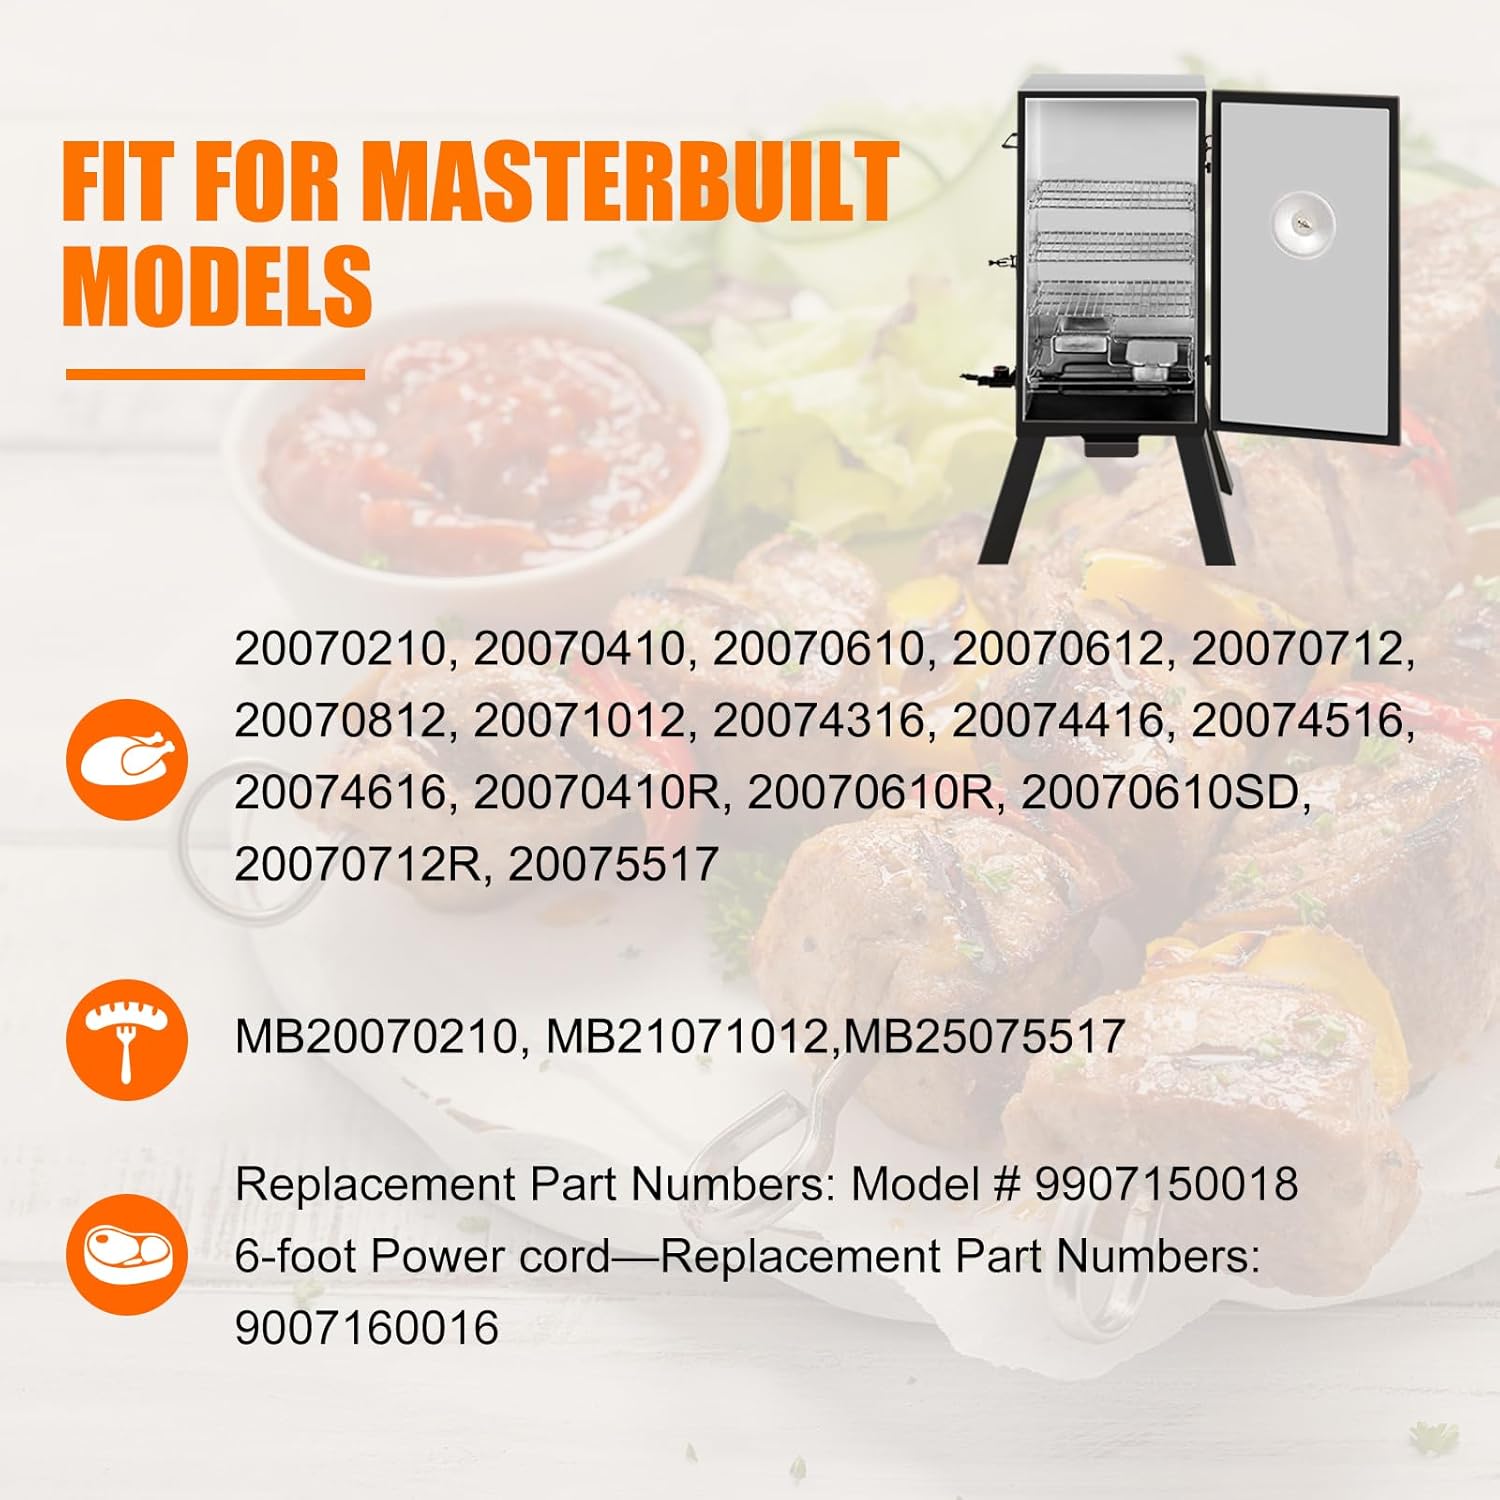
Figure 2.1: Visual guide to compatible Masterbuilt smoker models and original part numbers.
3. Specifications
| Feature | Specification |
|---|---|
| Operating Voltage | 110V |
| Power | 1500W |
| Adjustable Temperature Range | 50°F - 450°F (10°C - 232°C) |
| Heating Element Material | Stainless Steel |
| Thermostat Cord Length | 55 inches (approx. 1.4 meters) |
| Product Dimensions (Heating Element) | Approx. 12.95 x 7.48 x 0.5 inches |
| Product Weight | 1.87 pounds |
Key Features:
- Ear-shaped Heating Element: Designed for enhanced heat distribution and efficient wood chip combustion.
- Durable Construction: Electronic components are made from stainless steel for wear resistance and extended lifespan.
- High-Quality Cord: The temperature control wire features a thick, durable rubber cable for safe operation.
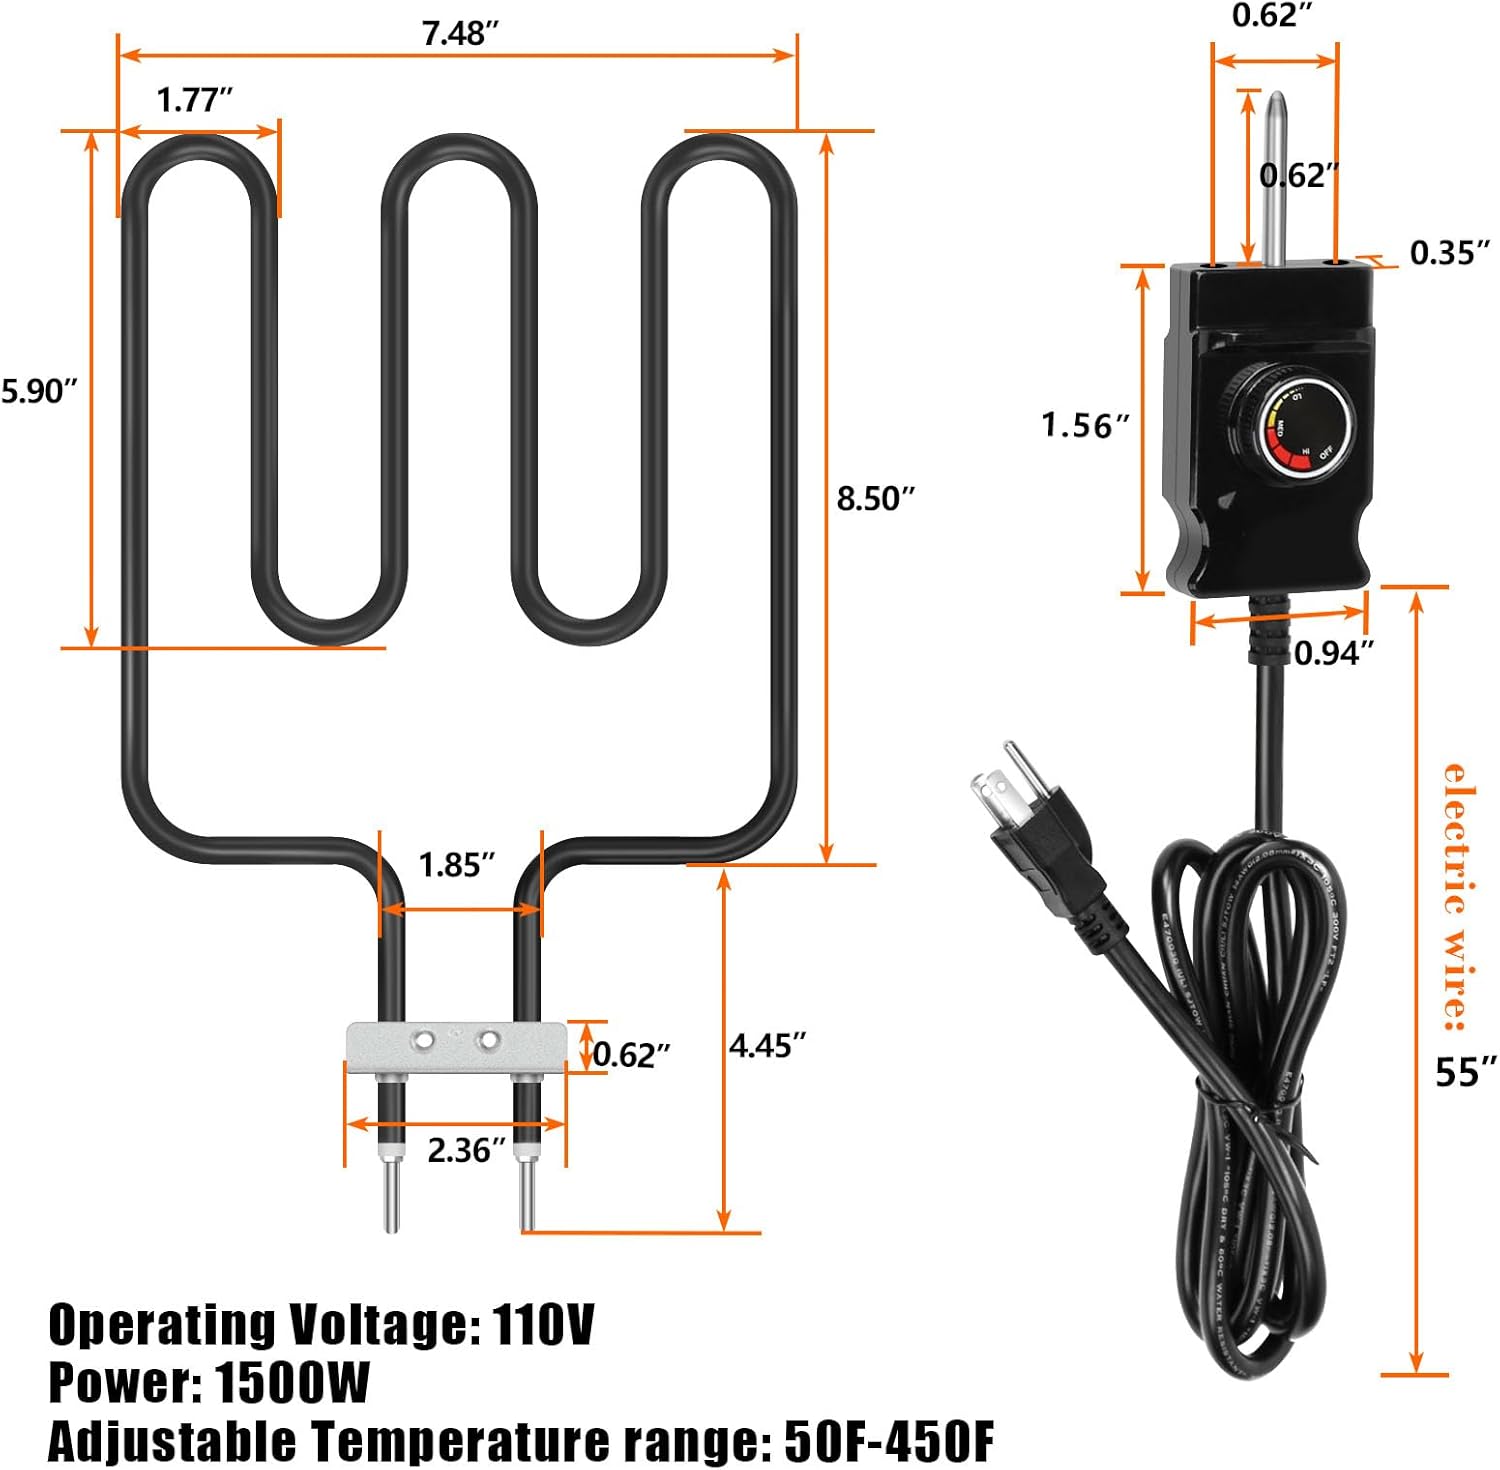
Figure 3.1: Detailed dimensions and electrical specifications of the product.
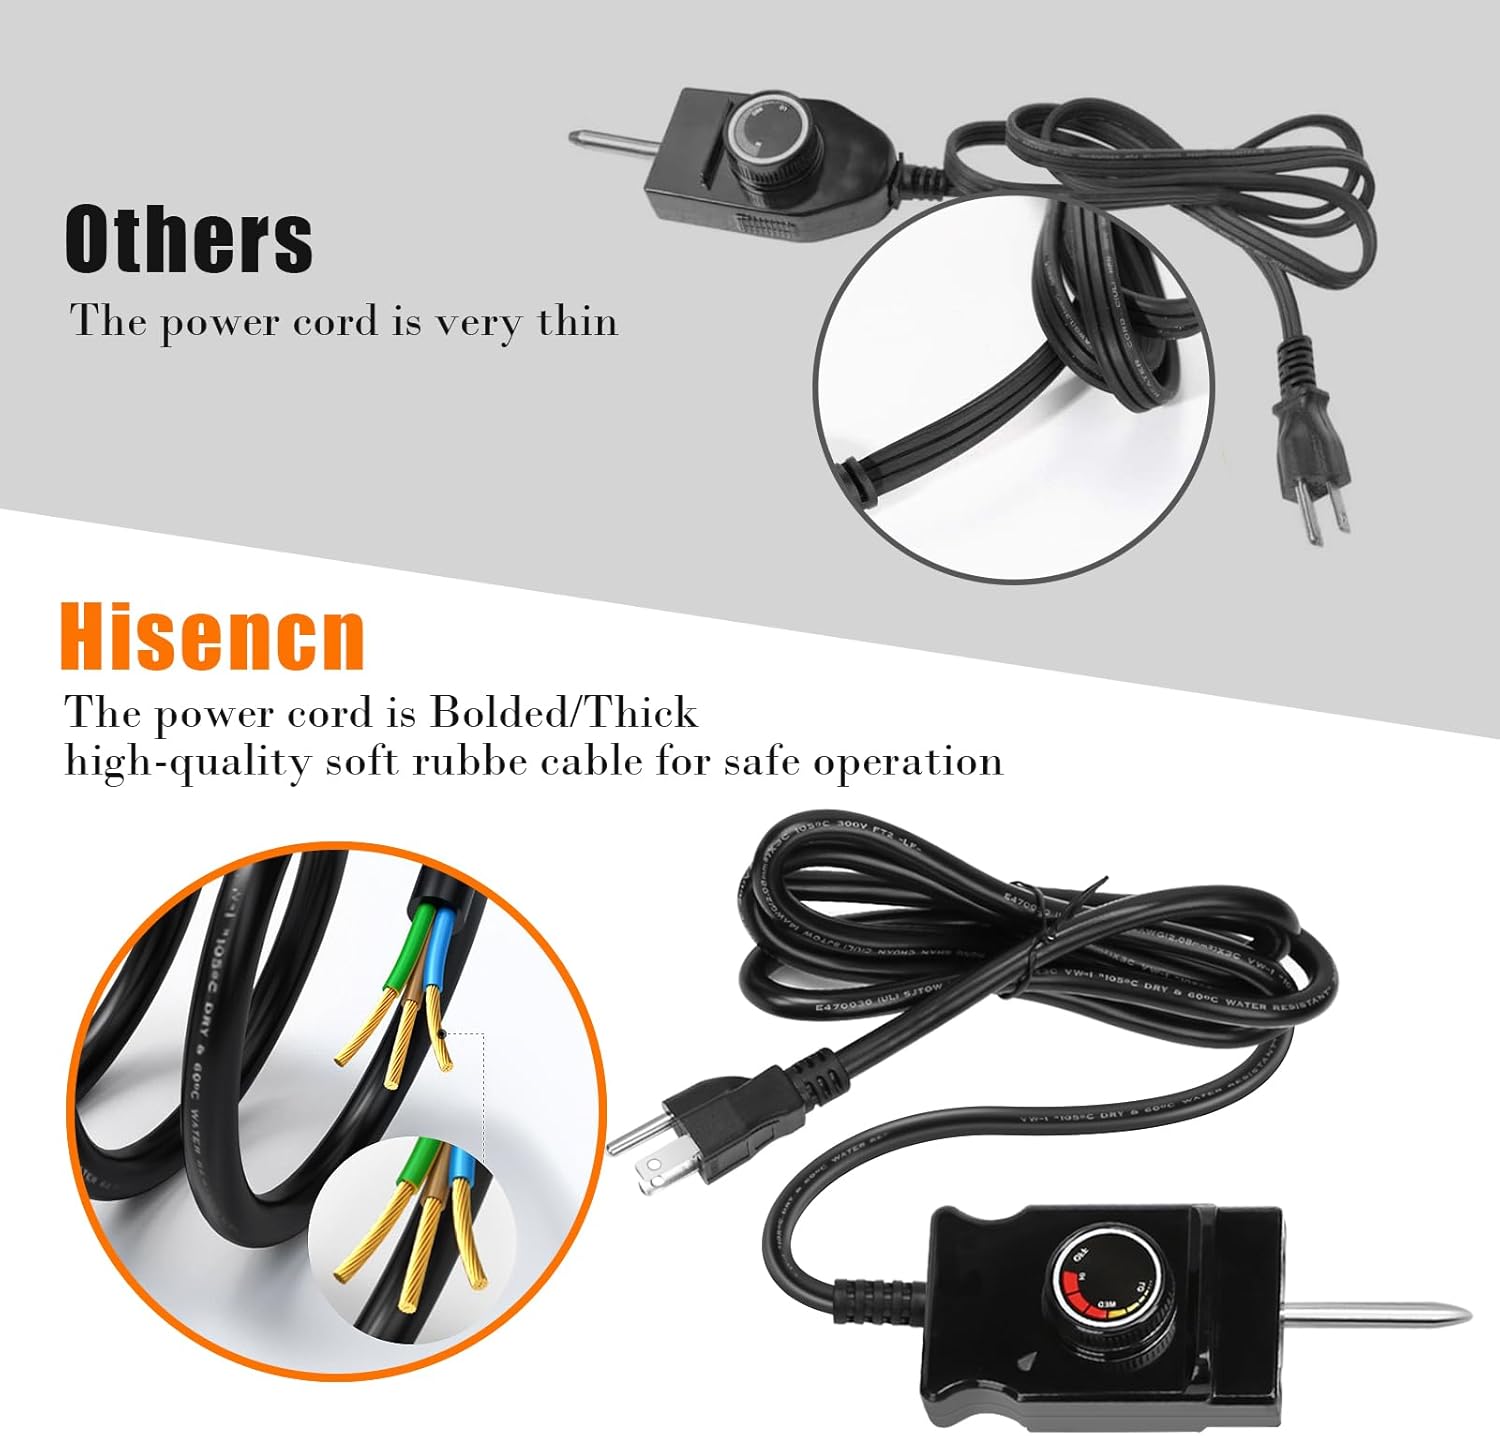
Figure 3.2: Illustration highlighting the robust quality of the Hisencn power cord.
4. Installation (Setup)
Replacing your smoker's heating element is a straightforward process. Always ensure the smoker is unplugged and cool before beginning any installation or maintenance.
Installation Steps:
- Disconnect Power: Ensure your electric smoker is completely unplugged from the power outlet.
- Allow Cooling: If the smoker has been in use, allow it to cool down completely to prevent burns.
- Access Heating Element: Open the smoker door and locate the existing heating element at the bottom. Depending on your model, you may need to remove racks or a drip pan to access it.
- Disconnect Old Element: Carefully disconnect the old heating element from its power connections and remove any mounting hardware. Note how it was connected for reference.
- Install New Element: Position the new Hisencn heating element in the same location as the old one. Secure it with the appropriate mounting hardware.
- Connect Thermostat Cord: Insert the probe of the adjustable thermostat cord controller into the designated receptacle on the heating element. Ensure a secure connection.
- Route Cord: Route the power cord safely, ensuring it is not pinched or exposed to excessive heat.
- Verify Installation: Double-check all connections and ensure the heating element is securely in place before proceeding.
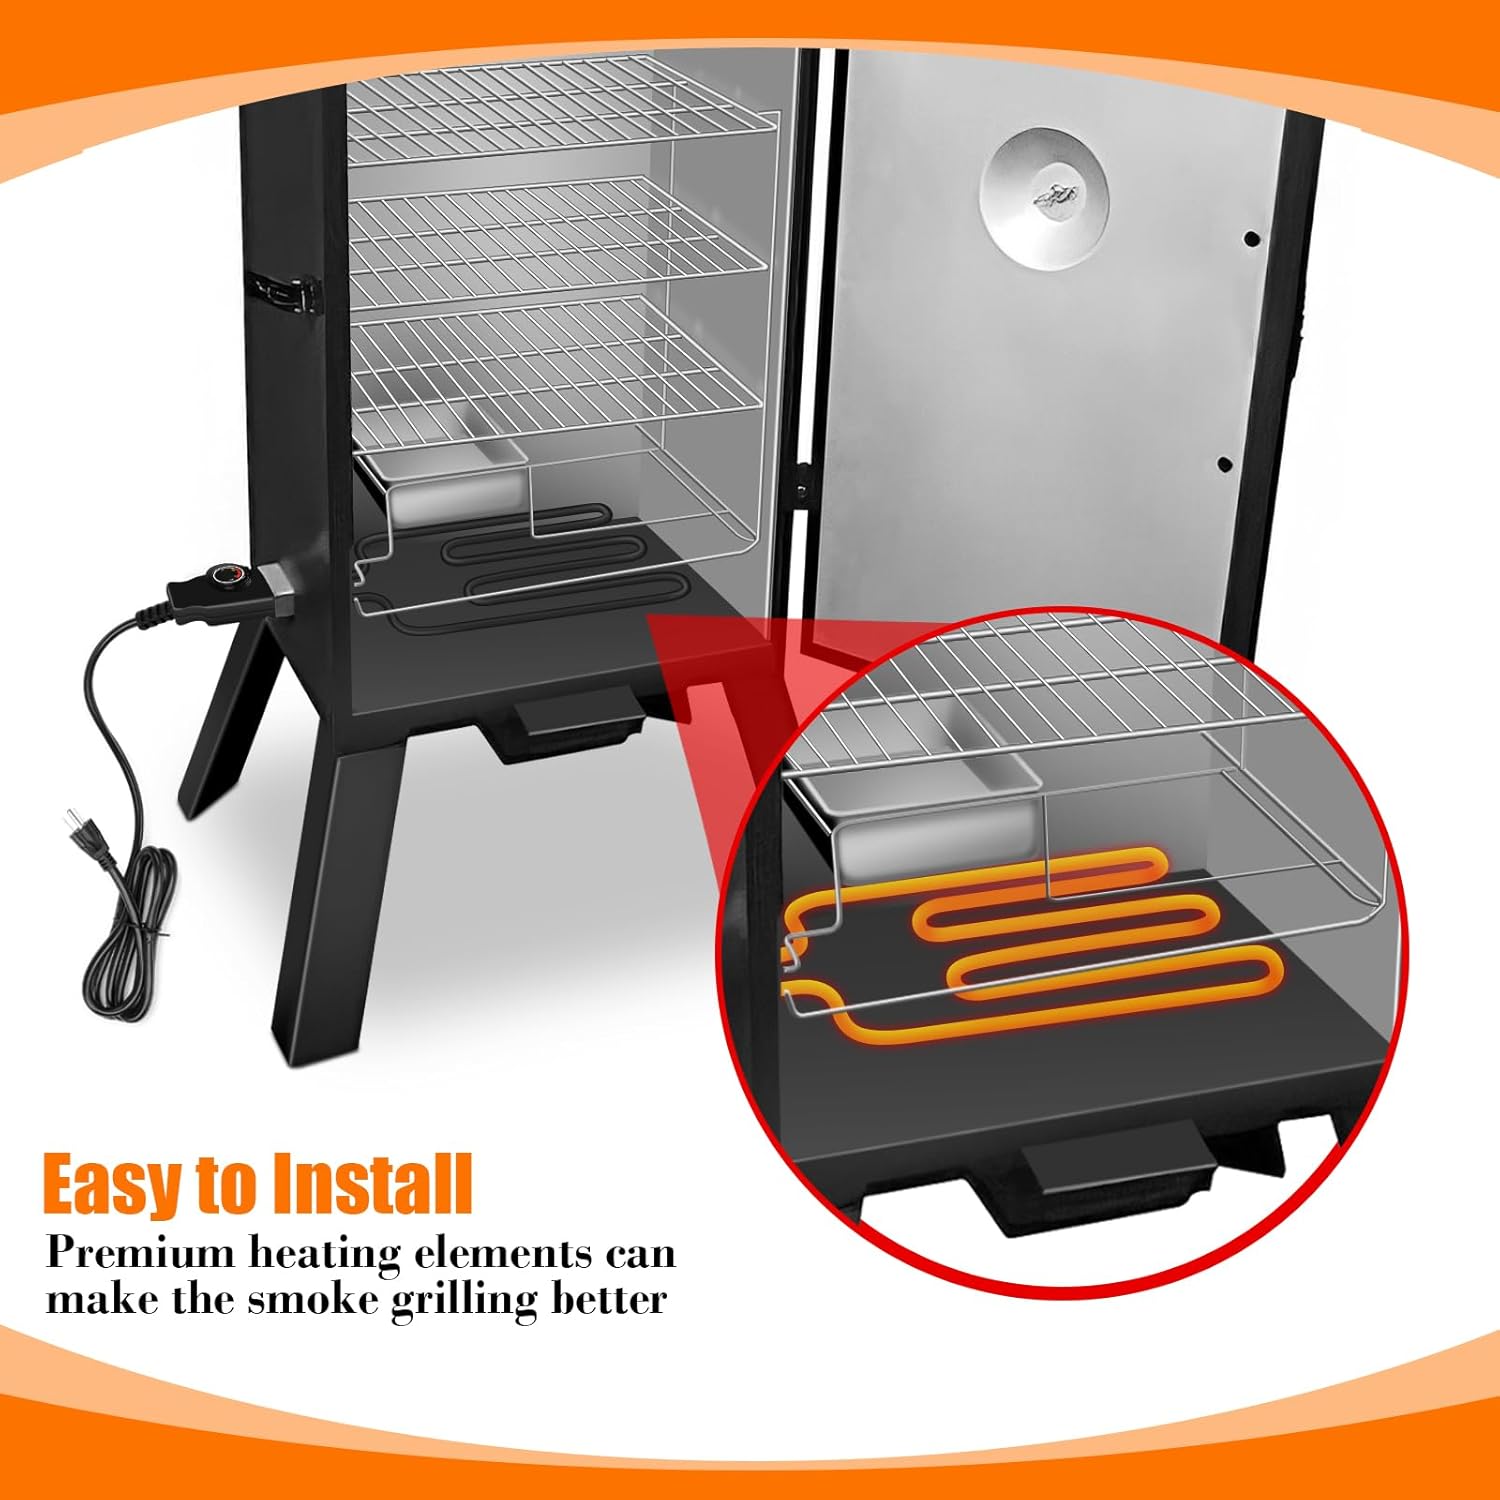
Figure 4.1: Visual representation of the heating element installation process within a smoker.

Figure 4.2: The heating element ready for installation into a smoker.
5. Operation
The adjustable thermostat cord controller allows you to set and maintain your desired cooking temperature with ease.
Using the Thermostat Controller:
- Plug In: Once the heating element is installed and securely connected to the thermostat cord, plug the controller's power cord into a standard 110V electrical outlet.
- Set Temperature: Rotate the dial on the thermostat controller to your desired temperature setting. The range is from 50°F to 450°F.
- Monitor Indicator Light: The built-in heating indicator light will illuminate when the heating element is active and heating. It will cycle on and off as the controller maintains the set temperature.
- Preheat: Allow the smoker to preheat to the desired temperature before adding food. This ensures consistent cooking.
- Adjust as Needed: During cooking, you can adjust the dial to increase or decrease the temperature as required.
Important Safety Note:
- Do not immerse the thermostat cord controller in water or any other liquid.
- Always ensure the controller and cord are kept away from direct heat sources and sharp objects.
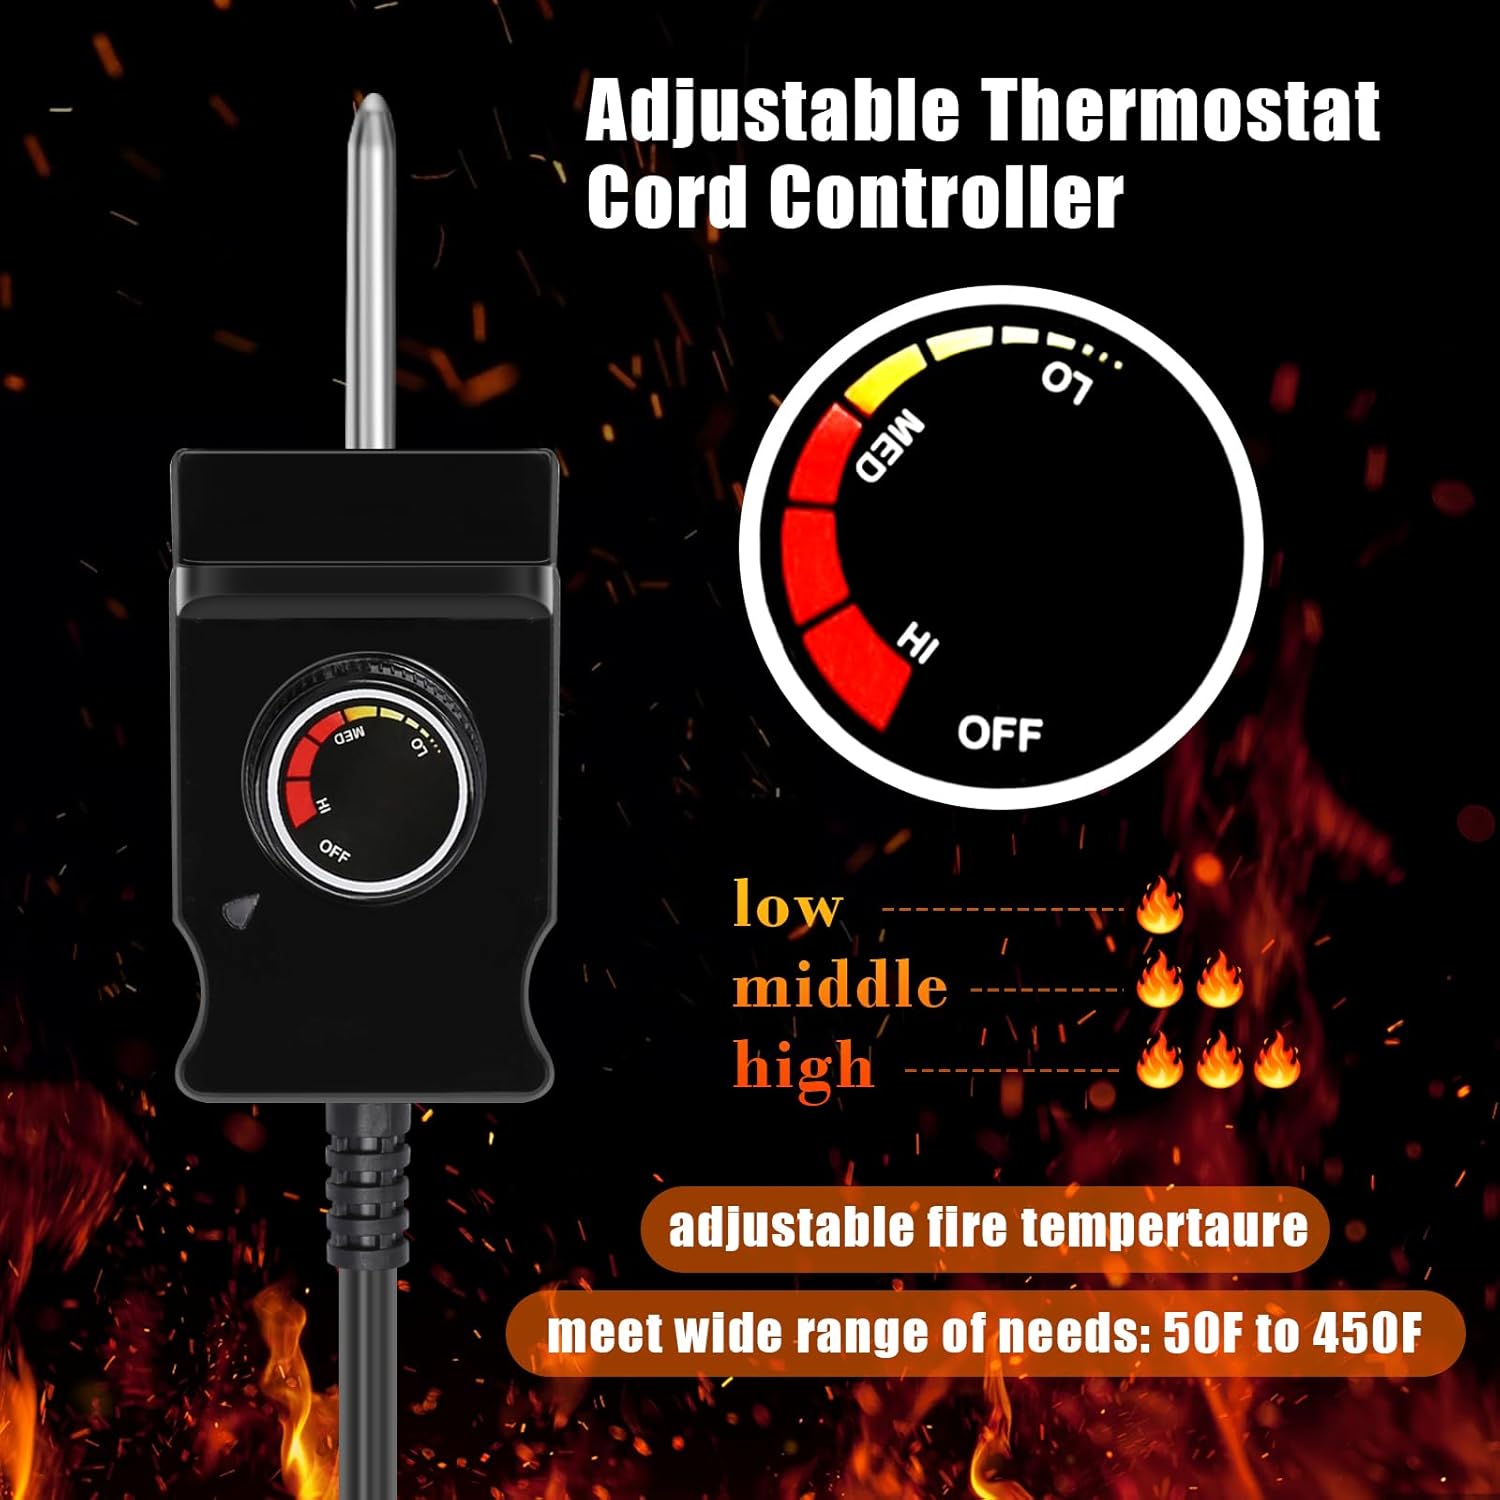
Figure 5.1: Close-up of the adjustable thermostat dial and temperature ranges.
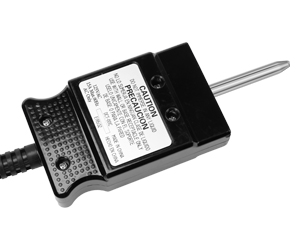
Figure 5.2: Rear view of the controller, including important safety warnings.
6. Maintenance
Proper maintenance will extend the life of your heating element and ensure optimal performance.
Cleaning and Care:
- Disconnect Power: Always unplug the smoker and allow the heating element to cool completely before cleaning.
- Clean Heating Element: Use a soft brush or cloth to gently wipe away any food residue, grease, or ash from the heating element. Avoid using abrasive cleaners or harsh chemicals, as they can damage the stainless steel.
- Clean Controller: Wipe the thermostat cord controller with a damp cloth. Do not submerge it in water.
- Inspect Cord: Periodically inspect the power cord and controller for any signs of damage, fraying, or exposed wires. If damage is found, discontinue use and replace the unit.
- Storage: When not in use for extended periods, store the heating element and controller in a dry, clean place, protected from extreme temperatures and moisture.
7. Troubleshooting
If you encounter issues with your Hisencn heating element and controller, refer to the following common problems and solutions:
| Problem | Possible Cause | Solution |
|---|---|---|
| Heating element not heating | Not plugged in; loose connection; power outage; faulty outlet; controller set to OFF. | Ensure controller is plugged into a working outlet. Check all connections. Turn controller dial to a temperature setting. Test outlet with another appliance. |
| Temperature is inconsistent | Smoker door not sealed; excessive opening of door; external temperature fluctuations. | Check smoker door seal. Minimize opening the door during cooking. Adjust temperature setting as needed for ambient conditions. |
| Indicator light not on | Element not heating; controller set to OFF; light malfunction. | Verify the element is heating. Ensure controller is set to a temperature. If element heats but light is off, the light may be faulty (does not affect heating). |
| Smoke production is low | Insufficient wood chips; wood chips too wet; low temperature setting. | Add more dry wood chips. Increase temperature setting to promote combustion. |
If the problem persists after attempting these solutions, please contact customer support.
8. Warranty Information
Hisencn products are manufactured to high-quality standards. While specific warranty details are not provided in this manual, most products come with a limited manufacturer's warranty covering defects in materials and workmanship under normal use. Please retain your proof of purchase for any warranty claims.
For detailed warranty terms and conditions, please refer to the product packaging or contact Hisencn customer support.
9. Customer Support
Should you have any questions, require assistance with installation, or encounter issues not covered in this manual, please do not hesitate to contact Hisencn customer support.
Contact Information:
- Refer to the contact details provided on your product packaging or the Hisencn official website.
- When contacting support, please have your product model number (1500W 110V) and purchase information ready.
Ask a question about this manual
Ask about setup, troubleshooting, compatibility, parts, safety, or missing instructions. Manuals+ will review the question and use this page’s manual context to help answer it.