1. Introduction
Thank you for choosing the PawHut Metal Chicken Coop. This manual provides essential information for the safe assembly, operation, and maintenance of your new poultry enclosure. Please read these instructions carefully before assembly and retain them for future reference.

Image 1.1: The PawHut Metal Chicken Coop (Model D51-277V01) installed in a garden environment.
2. Safety Information
Always prioritize safety during assembly and use. Failure to follow these instructions may result in injury or damage to the product.
- Ensure all components are present and undamaged before beginning assembly.
- Wear appropriate safety gear, such as gloves, during assembly to prevent cuts from metal edges.
- Assembly requires at least two adults.
- Place the coop on a level, stable surface.
- Regularly inspect the coop for loose parts, sharp edges, or damage. Repair or replace as necessary.
- Do not allow children to play unsupervised near or inside the coop.
- Secure the coop to the ground using appropriate anchors (e.g., ground nails with fixing feet) to prevent tipping in strong winds.
3. Package Contents
Verify that all parts are included before starting assembly. If any parts are missing or damaged, contact customer support.
- Galvanized steel frame components
- Hexagonal wire mesh
- UV and water-resistant protective cover (PE awning)
- Door assembly with locking mechanism
- Connecting hardware (bolts, nuts, clips)
- Ground fixing feet
4. Setup and Assembly
Assembly typically takes approximately 2 hours with two people. Follow the steps below for proper installation.

Image 4.1: Assembly is recommended for two people.
- Frame Assembly: Connect the galvanized steel pipes to form the main structure. Ensure all connections are secure. The pipe diameter is approximately 1 inch for sturdiness.
- Mesh Installation: Attach the hexagonal wire mesh to the assembled frame. The mesh is made of durable steel wire. Ensure the mesh is taut and covers all open sides to prevent escape or intrusion.
- Door Installation: Install the walk-in door assembly. Ensure the door opens and closes smoothly and the locking mechanism functions correctly.
- Protective Cover Attachment: Secure the UV and water-resistant PE awning to the roof of the coop using the provided spring button clips. This cover provides shade and protection from rain.
- Ground Anchoring: Utilize the fixing feet and ground nails to anchor the coop securely to the ground.

Image 4.2: Detail of a secure frame connection.

Image 4.3: The durable hexagonal wire mesh provides protection.

Image 4.4: The door features a secure locking mechanism.

Image 4.5: The protective cover offers waterproof and UV protection.

Image 4.6: Spring button clips make fixing the cover easy.

Image 4.7: Fixing feet are designed for use with ground nails to enhance stability.
5. Operating Instructions
This walk-in metal chicken coop is designed to provide a secure and spacious environment for various poultry and small animals.
- Animal Capacity: The coop is suitable for housing 8-12 chickens comfortably. It can also accommodate rabbits, ducks, or other small animals.
- Access: Use the walk-in door for easy access to feed, water, and care for your animals. Always ensure the door is securely latched to prevent escapes or predator entry.
- Weather Protection: The UV and water-resistant cover provides essential shade and protection from light rain. During severe weather conditions (heavy rain, strong winds, snow), it is recommended to remove the canopy to prevent damage to the structure.
- Integration: This run can be attached to an existing small coop or nesting area to expand the living space for your animals.
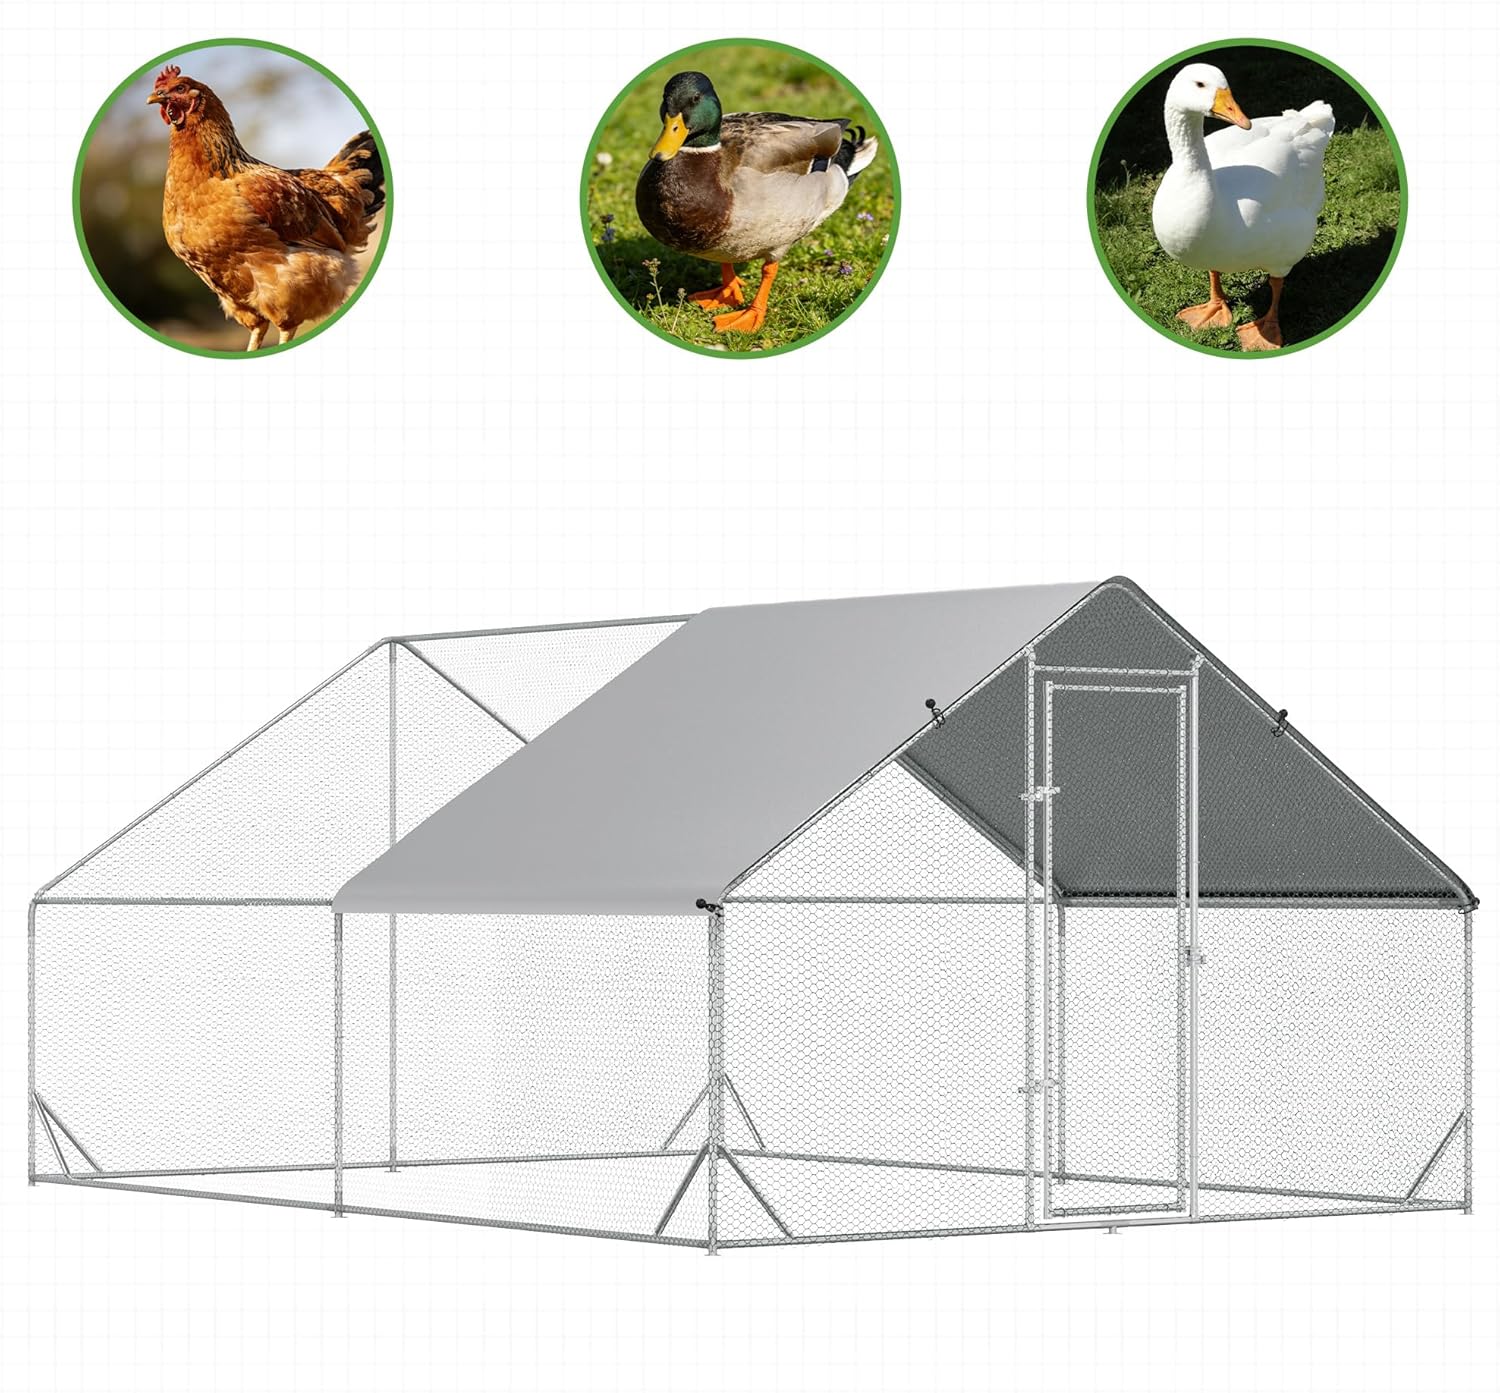
Image 5.1: The coop is suitable for chickens, ducks, and other small animals.

Image 5.2: The PE awning provides protection from sun and rain.

Image 5.3: The run can be used in conjunction with a wooden chicken coop.
6. Maintenance
Regular maintenance will extend the lifespan of your chicken coop and ensure the safety of your animals.
- Cleaning: Periodically clean the wire mesh and frame with mild soap and water. Rinse thoroughly.
- Inspection: Routinely check all bolts, nuts, and connections for tightness. Tighten any loose fasteners.
- Mesh Integrity: Inspect the wire mesh for any damage, such as tears or bent sections, which could allow animals to escape or predators to enter. Repair or replace damaged sections promptly.
- Cover Care: Clean the protective cover as needed. Remove the cover during extreme weather conditions to prevent damage. Store the cover indoors during winter months if not in use.
7. Troubleshooting
If you encounter issues with your PawHut Metal Chicken Coop, refer to the following common solutions:
- Instability: Ensure the coop is on level ground and all ground anchors are properly installed and secured. Check all frame connections for tightness.
- Door Malfunction: If the door does not close or latch properly, check for obstructions in the frame or latch mechanism. Ensure the frame is square and not twisted.
- Cover Damage: Small tears in the cover can be repaired with waterproof tape. For significant damage, a replacement cover may be necessary.
8. Specifications
| Feature | Detail |
|---|---|
| Model Number | D51-277V01 |
| Overall Dimensions (L x W x H) | 400L x 300W x 200H cm (9.8' W x 13.1' D x 6.6' H) |
| Material | Alloy Steel (frame), PE (cover) |
| Color | Silver (frame), Grey/White (cover) |
| Item Weight | 33.02 kg |
| Special Features | Lockable, Spacious, Weather Resistant (cover) |
| Target Species | Chicken, Duck, Rabbit |
| Included Components | Cover, Door |

Image 8.1: Detailed dimensions of the chicken coop.
9. Warranty and Support
This product comes with a 90-day warranty against manufacturer defects.
For customer support, missing parts, or warranty claims, please contact Aosom Canada:
- Place of Business: Markham, Ontario, CA
- Telephone: 1-416-792-6088
10. Product Video Overview
Watch this short video for a visual overview of the PawHut Chicken Coop.
Video 10.1: A brief preview demonstrating the PawHut Chicken Coop in use.


