
Introduction
This manual provides instructions for the Truma Aventa Remote Control, designed for use with Truma Aventa Eco and Truma Aventa Comfort rooftop air conditioning units. This remote allows for convenient control of various air conditioning functions from a distance.
Setup
1. Battery Installation
The Truma Aventa Remote Control requires two AAA batteries for operation. Follow these steps to install them:
- Locate the battery compartment cover on the back of the remote control.
- Slide or unclip the cover to open the compartment.
- Insert two AAA batteries, ensuring correct polarity (+/-) as indicated inside the compartment.
- Replace the battery compartment cover securely.
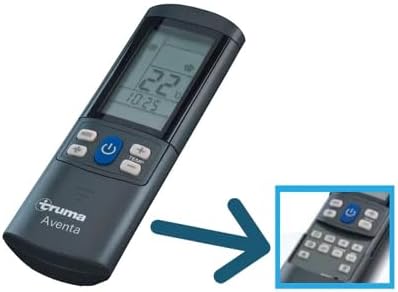
Image: The Truma Aventa Remote Control, showing its ergonomic design and display. This is the device for which batteries are installed.
2. Pairing with the Air Conditioning Unit
To establish communication between the remote control and your Truma Aventa air conditioning unit, follow the pairing procedure outlined in your air conditioning unit's manual. Typically, this involves a synchronization process that may utilize multiple channel options. Ensure the remote has fresh batteries before attempting to pair.
Operating the Remote Control
The Truma Aventa Remote Control features an easy-to-read LCD display and two button panels. The most frequently used functions are readily visible, while advanced functions are concealed under a sliding cover.
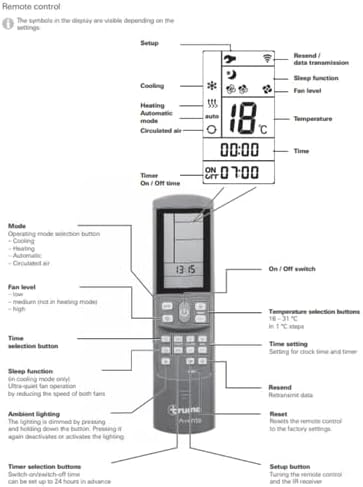
Image: A detailed diagram of the Truma Aventa Remote Control, illustrating the display symbols and the function of each button. Key elements include the On/Off switch, mode selection, temperature controls, fan level, timer, sleep function, and ambient lighting controls.
Basic Functions
- On / Off Switch: Press the power button to turn the air conditioning unit on or off.
- Mode Selection: Use the mode button to cycle through available operating modes:
- Cooling: Reduces the interior temperature.
- Heating: Increases the interior temperature (if supported by your Aventa unit).
- Automatic Mode: The unit automatically selects cooling or heating based on the set temperature and ambient conditions.
- Circulated Air: Operates the fan without cooling or heating.
- Fan Level: Adjust the fan speed (low, medium, high) using the dedicated fan button. Note that 'medium' may not be available in heating mode.
- Temperature Selection: Use the temperature up/down buttons to set your desired temperature between 16 – 31 °C in 1 °C steps.
Advanced Functions
These functions are typically accessed by sliding open the lower panel of the remote control.
- Sleep Function: Activates ultra-quiet fan operation by reducing the speed of both fans, ideal for nighttime use (in cooling mode only).
- Timer: Set an On/Off time for the air conditioning unit. This can be configured up to 24 hours in advance.
- Resend / Data Transmission: This button allows for re-transmission of data to the air conditioning unit, useful if a command was not received.
- Reset: Resets the remote control to its factory settings.
- Ambient Lighting: The lighting can be dimmed by pressing and holding the button. Pressing it again deactivates or activates the lighting.

Image: A person comfortably using the Truma Aventa Remote Control to adjust settings for their rooftop air conditioning unit inside a vehicle, demonstrating typical usage.
Maintenance
Battery Replacement
When the remote control display becomes dim or unresponsive, it is time to replace the AAA batteries. Follow the battery installation steps outlined in the Setup section.
Cleaning
To clean the remote control, use a soft, dry cloth. Do not use liquid cleaners, aerosols, or solvents, as these can damage the device. Keep the remote control dry and away from extreme temperatures.
Troubleshooting
- Remote Control Not Responding:
- Check if the batteries are correctly installed and have sufficient charge. Replace them if necessary.
- Ensure there are no obstructions between the remote control and the air conditioning unit's infrared receiver.
- Try resetting the remote control to factory settings (refer to Advanced Functions).
- No Connection with Air Conditioning Unit:
- Re-attempt the pairing procedure as described in your air conditioning unit's manual.
- Verify that the air conditioning unit itself is powered on and functioning correctly via its manual controls.
- Ensure the remote control is within the operational range of the air conditioning unit.
- Infrared Signal Issues:
- Confirm that the remote's infrared emitter (usually at the top) is clean and unobstructed.
- Point the remote directly at the air conditioning unit's receiver.
If problems persist after following these steps, please contact Truma customer support or your authorized dealer.
Specifications
| Product Dimensions | 9 x 2 x 5 inches |
| Item Weight | 8 ounces |
| Model Number | Aventa Remote |
| Compatible Devices | Truma Aventa Eco, Truma Aventa Comfort rooftop air conditioners |
| Max Number of Supported Devices | 1 |
| Color | Black |
| Special Feature | Ergonomic |
| Batteries Required | 2 x AAA (not included) |
Warranty & Support
Warranty Information
For detailed warranty information regarding your Truma Aventa Remote Control, please refer to the documentation provided with your purchase or contact Truma North America directly. Warranty terms and conditions may vary.
Customer Support
If you require further assistance, have questions about your remote control, or need to report a defect, please contact Truma North America. You can typically find their contact information on their official website or through your product's packaging.


