1. Introduction
This manual provides essential information for the installation, operation, and maintenance of your EPLO Smart Toilet DP7 PR0. Please read these instructions thoroughly before installation and use to ensure proper function and safety. Keep this manual for future reference.
Safety Information
- Ensure all electrical connections comply with local codes and regulations. A GFI 110V outlet is required within 3 feet of the toilet.
- Do not immerse the product in water or spray water directly onto electrical components.
- Disconnect power before performing any maintenance or cleaning.
- This product is designed for indoor use only.
2. Setup and Installation
2.1 Unpacking
Carefully remove all components from the packaging. Inspect for any damage. Retain packaging materials for potential future transport or service.
2.2 Installation Steps
- Prepare the Installation Area: Ensure the existing floor flange is clean and clear. The toilet is designed to use standard existing flanges.
- Water Connection: Connect the water supply line. This model uses 1/2 inch compression fittings. Ensure adequate water pressure for optimal performance.
- Electrical Connection: Connect the toilet to a dedicated GFI 110V electrical outlet located within 3 feet of the toilet.
- Positioning the Toilet: Due to its weight and integrated design, installation typically requires two people. Carefully lower the toilet onto the floor flange, aligning the T-bolts. If using a metal flange, the sides of the T-bolts may need slight adjustment to fit within the plastic wings provided for mounting.
- Securing the Toilet: Install the supplied screws into the mounting wings to secure the toilet to the floor. For additional stability, apply a bead of caulk around the base of the toilet where it meets the floor.
- Initial Power-On: After installation, power on the toilet. It will perform a self-test to ensure all functions are operational.
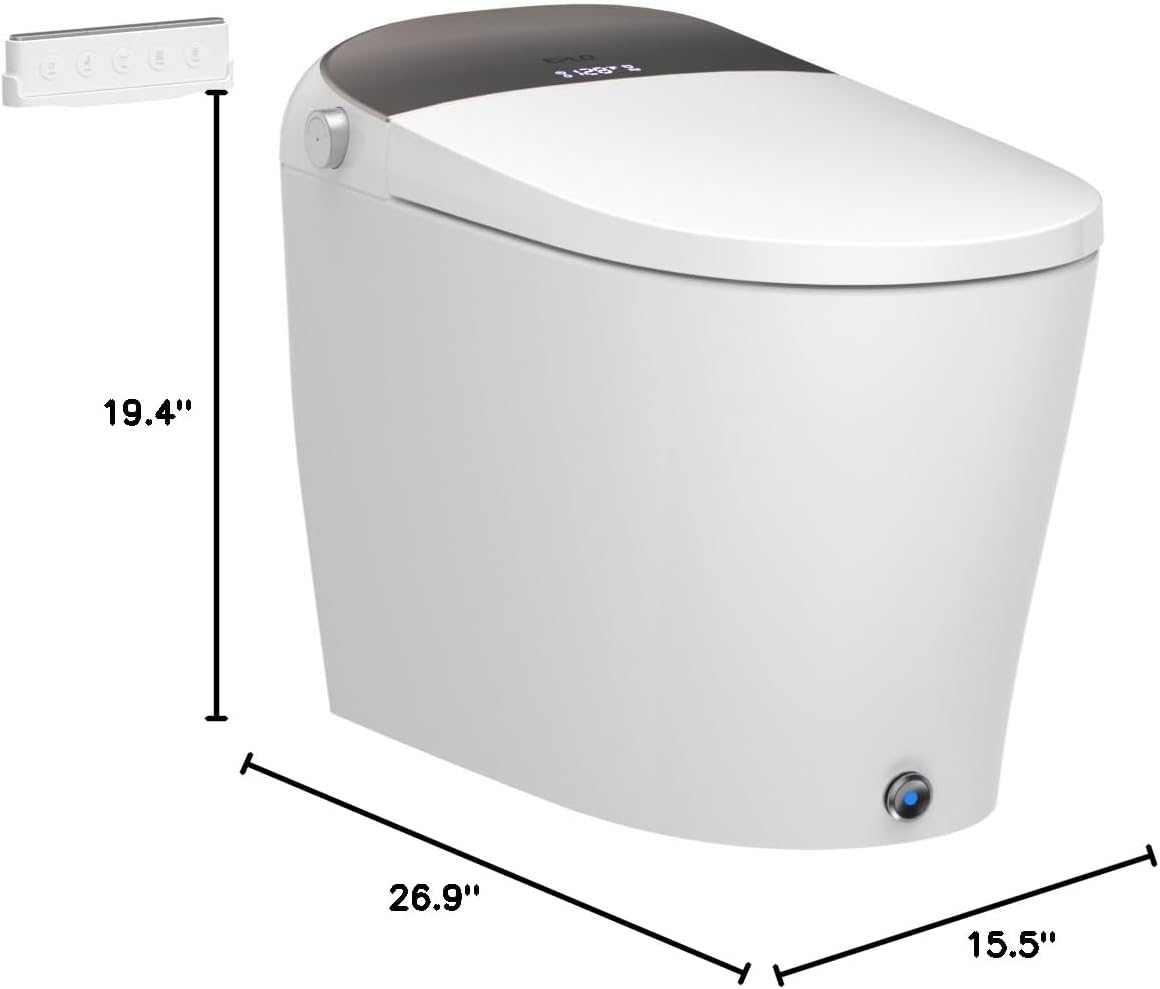
Figure 2.2.1: Product dimensions for installation planning. The toilet measures approximately 26.9 inches deep, 15.5 inches wide, and 19.4 inches high.

Figure 2.2.2: Illustration of the built-in tank (less than 4L capacity) and silent booster pump, which ensures consistent flushing performance regardless of external water pressure.
3. Operating Instructions
3.1 Flushing Mechanisms
- Remote Control Flush: Use the provided wireless remote control to activate flushing.
- Press Knob Flush: A knob located on the side of the toilet allows for manual flushing.
- Foot Kick Flush: Gently kick the sensor at the base of the toilet to initiate a flush.
- Off-Seat Auto Flush: The toilet automatically flushes after the user stands up and moves away from the seat.
- Blackout Flushing: In the event of a power outage, a backup battery ensures normal flushing operation. Press the knob on the side of the toilet to activate.

Figure 3.1.1: Depicts the four primary flushing methods: remote control, press knob, foot kick, and off-seat automatic flush. Also illustrates user interaction for men and women.

Figure 3.1.2: Shows the blackout flushing feature, activated by pressing the knob, and the integrated backup battery. The knob also controls bidet functions (rotate forward for rear wash, backward for female wash).
3.2 Bidet Functions
The hygienic nozzle provides various washing options:
- Rear Wash: For posterior cleansing.
- Female Wash: A softer spray for feminine hygiene.
- Warm Nozzle Water Wash: Water temperature is adjustable for comfort.
- Moving Wash: The nozzle oscillates for a wider cleaning area.
- Auto Clean Before/After Use: The nozzle self-cleans before and after each use.
- Movable Nozzle: The stainless steel wand is detachable for easy manual cleaning.
- Adjustable Pressure: Water pressure can be adjusted via the remote control.
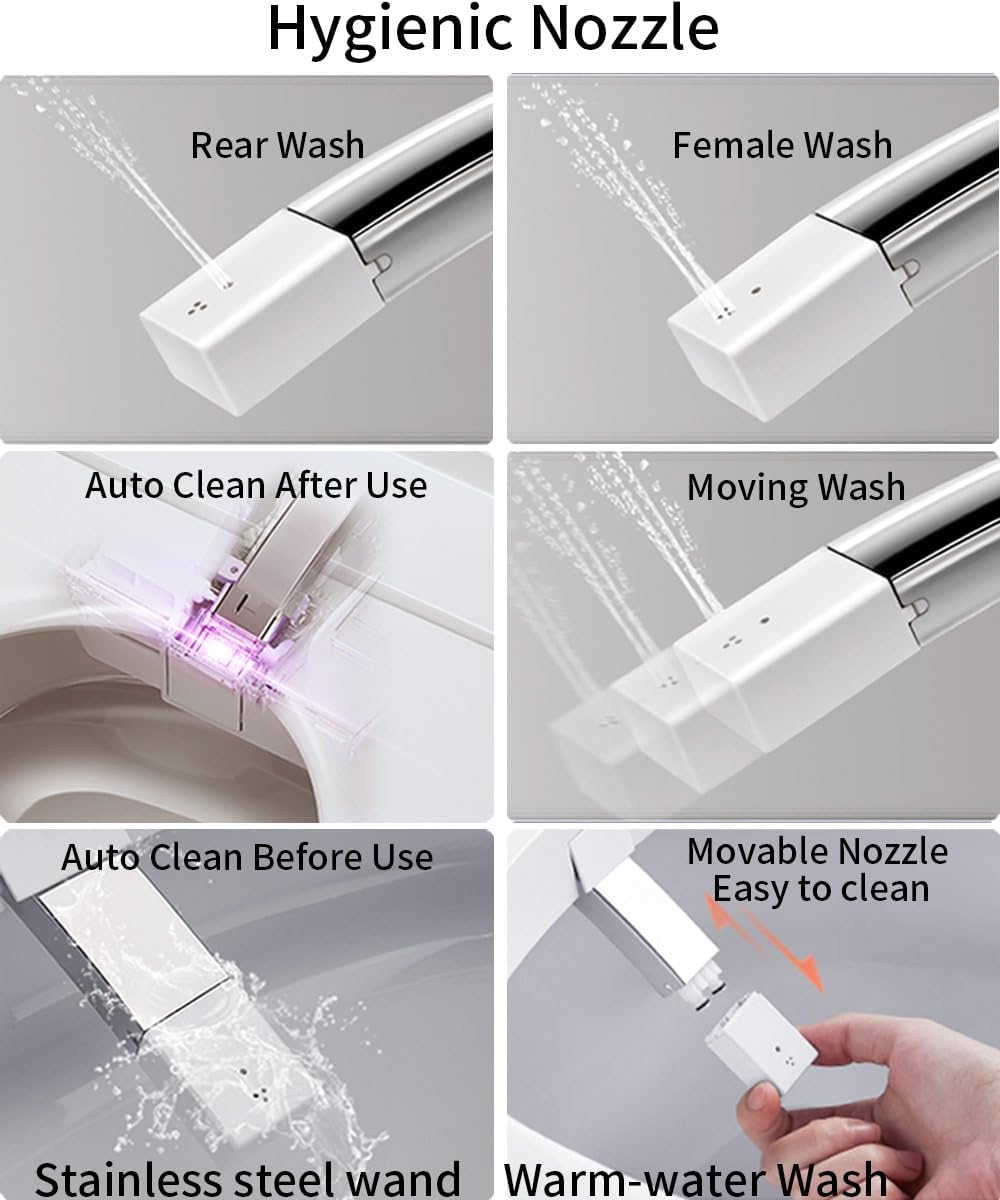
Figure 3.2.1: Detailed view of the hygienic nozzle features, including Rear Wash, Female Wash, Auto Clean, Moving Wash, Movable Nozzle, and Warm-water Wash.
3.3 Comfort Features
- Heated Seat: The seat temperature is adjustable (OFF, 93°F, 102°F, 4 levels).
- Warm Air Dryer: Provides a warm air stream for drying. Both temperature (OFF, 95°F, 113°F, 131°F) and air speed (up to 25000rpm) are adjustable.
- Night Light: An LED night light illuminates the bowl and floor for visibility in the dark.
- Auto Open/Close Lid: The lid automatically opens and closes upon approach or departure. This function can be toggled ON/OFF. Foot kick or remote control can also operate the lid.
- Auto Deodorization: A deodorizing fan automatically activates when the seat is occupied to reduce odors.

Figure 3.3.1: Illustrates the Warm Dryer, Warm Clear (water), Heated Seat, and Night Light features for enhanced user comfort.

Figure 3.3.2: Shows the adjustable temperature and high-speed air dryer, with speeds ranging from 9000rpm to 25000rpm.
3.4 LED Display
The lid features an LED digital display that indicates the real-time water, seat, and dryer temperatures. This display is active when the unit is powered on.
4. Maintenance
4.1 Cleaning
- Exterior: Wipe the exterior surfaces with a soft, damp cloth and mild, non-abrasive cleaner. Avoid harsh chemicals.
- Nozzle: The stainless steel nozzle performs an auto-clean cycle. For deeper cleaning, the nozzle is movable and can be detached for manual cleaning.
- Bowl: Clean the toilet bowl with standard toilet bowl cleaner and a brush.
4.2 Backup Battery Replacement
The toilet includes a replaceable backup battery to ensure flushing during power outages. Refer to the specific instructions provided with the battery for replacement procedures. Access to the battery is typically gained by removing the top section (bidet unit) of the toilet.
4.3 Water Filter Screen
Periodically check and clean the filter screen located in the hose T-connection to prevent mineral deposits and maintain optimal water flow. There is also a screen within the bidet circuit that may require cleaning, which involves removing the bidet assembly.
5. Troubleshooting
If you encounter issues with your EPLO Smart Toilet, please refer to the following common troubleshooting steps:
| Problem | Possible Cause | Solution |
|---|---|---|
| Toilet does not flush. | No power, backup battery depleted, sensor obstruction. | Check power connection. Replace backup battery if needed. Clear any obstructions from sensors. |
| Bidet water pressure is low. | Water filter screen clogged, low household water pressure. | Clean the water filter screen. Ensure adequate household water pressure. |
| Lid does not auto open/close. | Auto open/close function disabled, sensor obstruction. | Check remote settings to ensure auto open/close is enabled. Clear any obstructions around the sensor. |
| Heated seat not warming. | Heated seat function off, temperature setting too low. | Adjust heated seat settings via remote or control panel. |
For issues not listed above or if troubleshooting steps do not resolve the problem, please contact EPLO customer support.
6. Specifications
| Feature | Specification |
|---|---|
| Model | DP7 PR0 |
| Product Dimensions (D x W x H) | 26.9" x 15.5" x 19.4" |
| Item Weight | 112 Pounds |
| Installation Type | Floor Mounted |
| Shape | Oval |
| Seat Material Type | Plastic |
| Water Consumption | 1.06 GPF (Gallons Per Flush) |
| Weight Capacity | 460 LBS |
| Power Requirement | GFI 110V Outlet |
| UPC | 711523571570 |
7. Warranty and Support
7.1 Warranty Information
EPLO products are manufactured to high-quality standards. For specific warranty terms and conditions, please refer to the warranty card included with your product or visit the official EPLO website. Keep your proof of purchase for warranty claims.
7.2 Customer Support
If you require assistance with installation, operation, maintenance, or troubleshooting, please contact EPLO customer support. Contact details can be found on the EPLO website or in the product packaging.


