Introduction
Thank you for choosing the HiOazo Programmable Water Timer with Flow Meter. This device is designed to automate your watering tasks, ensuring your plants receive optimal hydration while conserving water. Please read this manual thoroughly to understand the features and proper operation of your new water timer.

Image: The HiOazo Programmable Water Timer with Flow Meter, showing its display and control dial.
Setup
1. Battery Installation
The water timer requires two (2) AA batteries (not included). Open the battery compartment on the back of the device, insert the batteries according to the polarity markings, and securely close the compartment. The device will retain settings even if batteries run out, but fresh batteries are needed for operation.
2. Attaching the Water Timer
- Ensure your outdoor faucet is turned off.
- Screw the water timer's inlet (NH3/4"-11.5) onto your outdoor faucet. Hand-tighten firmly. A 3/4" standard hose adapter is included for compatibility.
- If you experience leaks, apply Teflon tape (not included) to the faucet threads before attaching the timer.
- Connect your garden hose to the outlet of the water timer.
- Turn on your outdoor faucet completely. The timer will control the water flow.
3. Setting the Clock
- Turn the dial to the SET CLOCK position.
- Use the + and - buttons to select either 12H or 24H format. Press OK to confirm.
- Adjust the current hour using + and -. Press OK.
- Adjust the current minute using + and -. Press OK to save.
4. Initial Programming
The timer supports three independent watering plans (P1, P2, P3). You can set the start time, watering duration, and frequency for each plan.
For a visual guide on setting up your timer, please refer to the official setup video:
Video: HiOazo Sprinkler Timer HO-WT-1 With Flow Meter Setup Guide. This video demonstrates the step-by-step process of installing and initially configuring the water timer, including setting the clock and basic watering schedules.
Operating Instructions
1. Programming Watering Plans
The timer offers three flexible programming modes:
- Scientific Intermittent Watering: This mode includes a soaking function, allowing soil to absorb water effectively and preventing runoff. You can set watering and soaking times within a defined period.
- Interval Watering: Set the timer to water every X hours (e.g., every 12 hours).
- Assigned-day Watering: Select specific days of the week for watering.
- Everyday Watering: Water daily at your set times.
To set a plan:
- Turn the dial to START TIME, HOW LONG, or HOW OFTEN.
- Use the ZONE button to select the desired watering plan (P1, P2, or P3).
- Use + and - buttons to adjust the settings (start time, duration in hours/minutes, frequency). Press OK to confirm each step.

Image: Diagram illustrating the Scientific Intermittent Watering Program with alternating watering and soaking periods.

Image: Examples of three independent watering plans (P1, P2, P3) for different garden areas.

Image: Visual representation of Interval, Assigned-day, and Everyday watering frequency modes.
2. Manual Watering
To water manually without affecting your programmed schedule:
- Press and hold the MANUAL button.
- Use the ZONE button to select the desired zone.
- Use + and - to set the desired watering duration (from 1 minute to 23 hours 59 minutes).
- Press OK to start manual watering. The timer will automatically turn off after the set duration.
- For unlimited manual watering, simply press MANUAL once, then press OK. The timer will run until manually turned off.
3. Rain Delay Function
To temporarily pause your watering schedule due to rain:
- Press the DELAY button.
- Use + and - to select a delay period (24 hours, 48 hours, or 72 hours).
- Press OK to activate the rain delay. The schedule will automatically resume after the selected period.

Image: The water timer displaying the Rain Delay function and Child Lock icon.
4. Child Lock
To prevent accidental changes to your watering program:
- Press and hold the LOCK button for 3 seconds to activate the child lock. A lock icon will appear on the screen.
- Repeat the process (press and hold LOCK for 3 seconds) to deactivate the child lock.
5. Accurate Water Measurement
The integrated flow meter provides real-time water usage data:
- The screen displays water flow speed, single water flow, the average water flow of the last 7 days (excluding today), and total water flow.
- Water flow data refreshes every 1 minute.

Image: The water timer displaying water flow information on its screen, with key specifications listed.
6. Low Battery Protection
When the battery power is low, the timer automatically closes the water valve to prevent water waste. All your programmed settings are preserved even when the batteries run out, eliminating the need for re-programming after battery replacement.

Image: The water timer showing a low battery indicator on its screen, with a visual representation of the valve closing.
For a quick guide on setting the watering frequency, please watch this video:
Video: How to set How Often to days. This short video demonstrates how to adjust the watering frequency settings on the timer.
Maintenance
1. Winterization
If temperatures are expected to drop below freezing, disconnect the water timer from the faucet and store it indoors in a dry, frost-free location. Freezing water inside the timer can cause irreparable damage.
2. Battery Replacement
Replace the two (2) AA batteries annually or when the low battery indicator appears to ensure continuous operation. All settings will be saved during battery replacement.
3. Cleaning
The timer features IP54 waterproof construction. Clean the exterior with a damp cloth. Do not use abrasive cleaners or immerse the unit in water.
Troubleshooting
| Problem | Possible Cause | Solution |
|---|---|---|
| Water leaking from faucet connection | Loose connection, worn washer, or insufficient sealing. | Ensure the connection is hand-tight. Replace the rubber washer if worn. Apply Teflon tape to the faucet threads before attaching the timer. |
| Low water flow or pressure | Obstruction at the inlet, or internal diameter restriction. | Check the screen washer at the timer's inlet for debris and clean if necessary. Be aware that the timer's internal diameter may slightly reduce flow compared to a direct hose connection. |
| Timer not watering as programmed | Incorrect programming, child lock active, or low batteries. | Review your watering program settings (start time, duration, frequency). Check if the child lock is active (unlock if necessary). Replace batteries if low. |
| Timer display is blank | Dead batteries. | Replace the two (2) AA batteries. |
Specifications
- Brand: HiOazo
- Model Number: HO-WTUS-1
- Color: Blue
- Material: Metal, Plastic
- Product Dimensions: 2"D x 5.5"W x 5.5"H
- Item Weight: 8.8 ounces (0.55 Pounds)
- Number of Settings: 3 independent watering plans
- Water Pressure Range: 1 to 10 bar (15~145psi)
- Water Inlet: NH3/4"-11.5 (fits most water taps)
- Hose Adapter: Included for 3/4" standard hose
- Waterproof Rating: IP54
- Water Flow Measurement: 0-9999 GAL
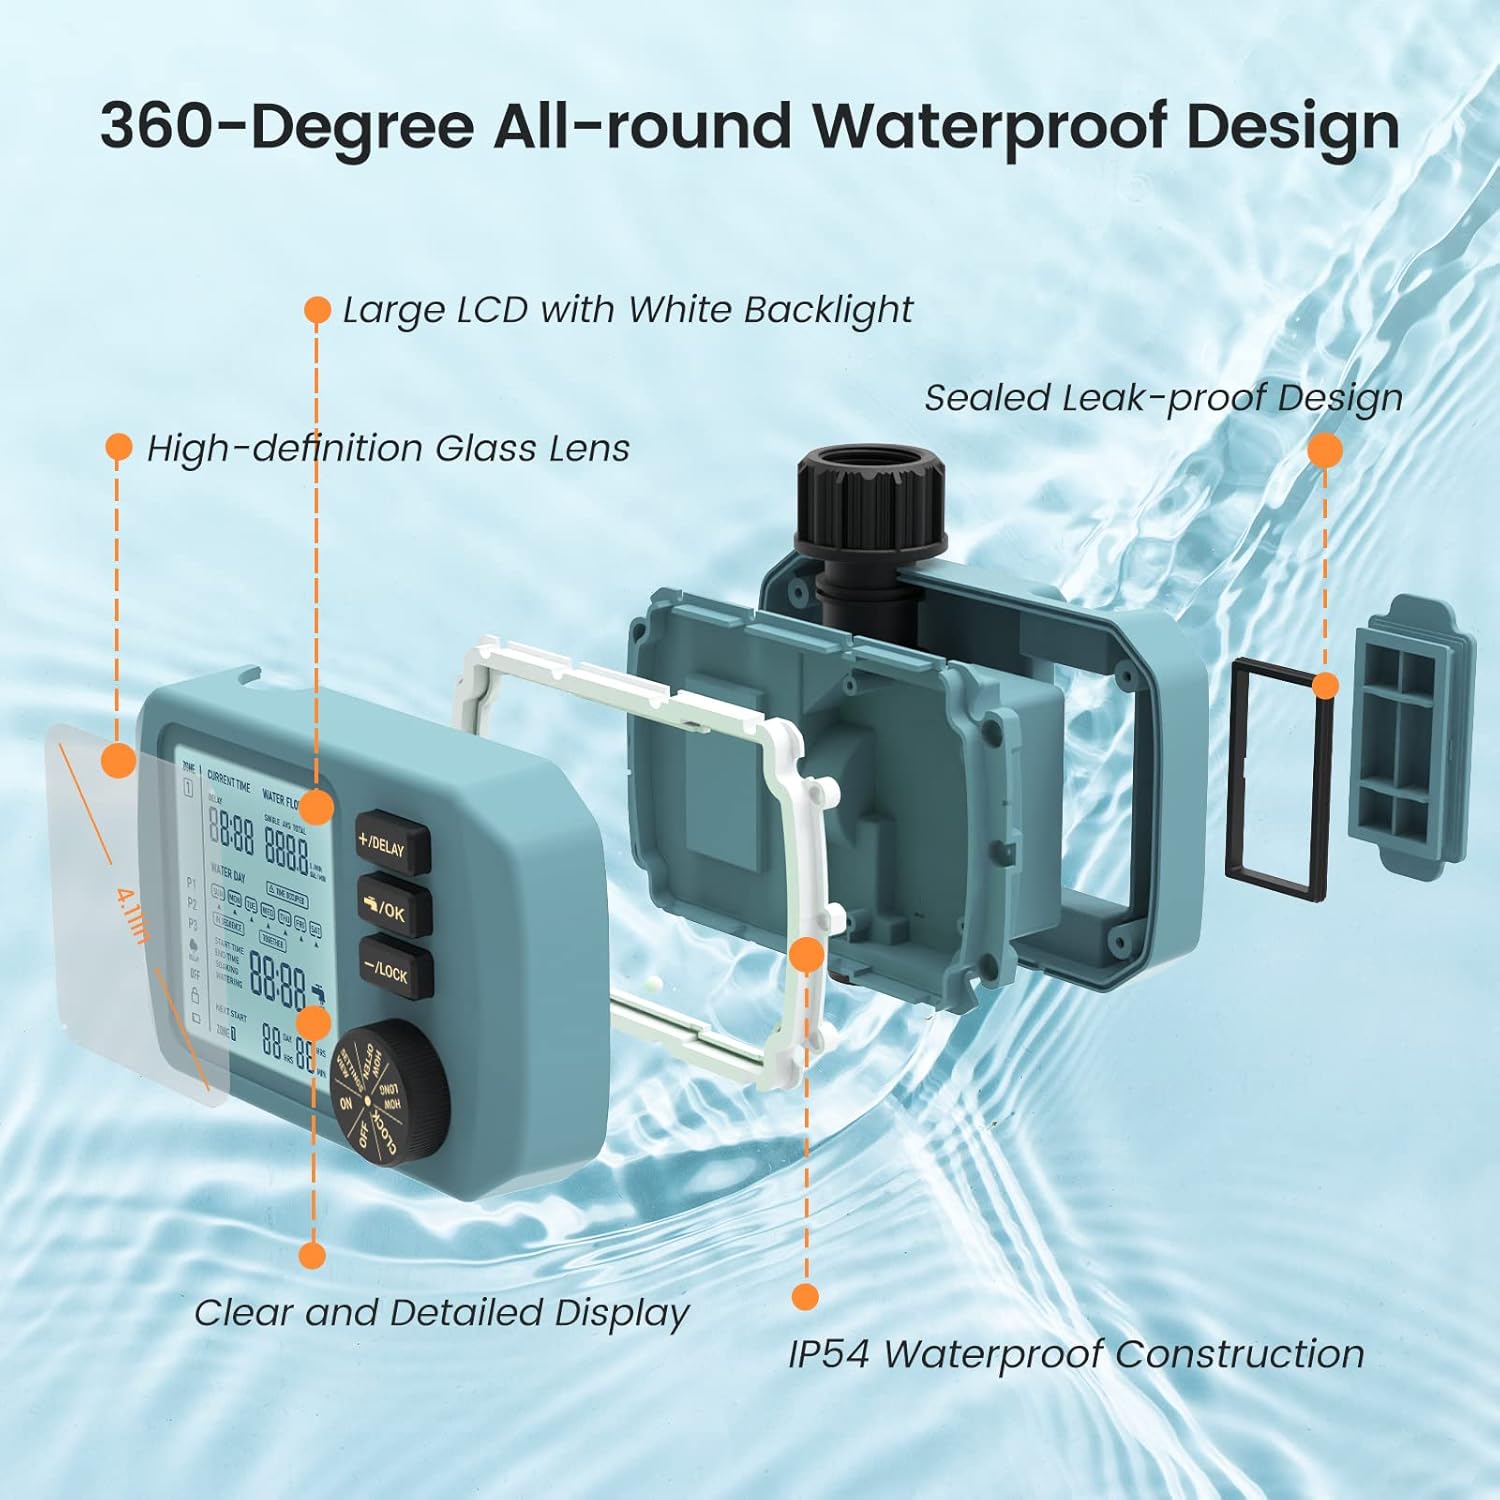
Image: Exploded view of the water timer highlighting its waterproof design features.
Warranty and Support
The HiOazo Programmable Water Timer comes with a TWO-YEAR Quality Promise. We stand behind our products. If you have any questions, concerns, or require assistance, please do not hesitate to contact our customer service team. We are committed to ensuring your satisfaction.


