
ieGeek ZS GX4S
ieGeek ZS-GX4S Wireless WiFi Surveillance Camera User Manual
Model: ZS-GX4S
1. Introduction
This manual provides comprehensive instructions for the installation, operation, and maintenance of your ieGeek ZS-GX4S Wireless WiFi Surveillance Camera. This 5MP solar-powered camera offers advanced features such as 355° pan and 120° tilt, PIR human detection, color night vision, and two-way audio, ensuring robust security for your property.

Figure 1.1: ieGeek ZS-GX4S Camera with Solar Panel
2. Safety Information
- Ensure the camera is installed in a location where it is protected from extreme weather conditions beyond its IP65 rating.
- Do not attempt to disassemble or modify the camera. This will void the warranty and may cause damage.
- Use only the provided charging cable and solar panel.
- Keep the camera and its components out of reach of children.
- Avoid pointing the camera directly at strong light sources, such as the sun, as this may damage the image sensor.
3. Setup Guide
3.1 Package Contents
Before beginning installation, please verify that all components are present:
- ieGeek ZS-GX4S Camera x1
- Solar Panel & Bracket x1
- User Manual x1
- Solar Panel Manual x1
- Mounting Screws and Wall Plugs
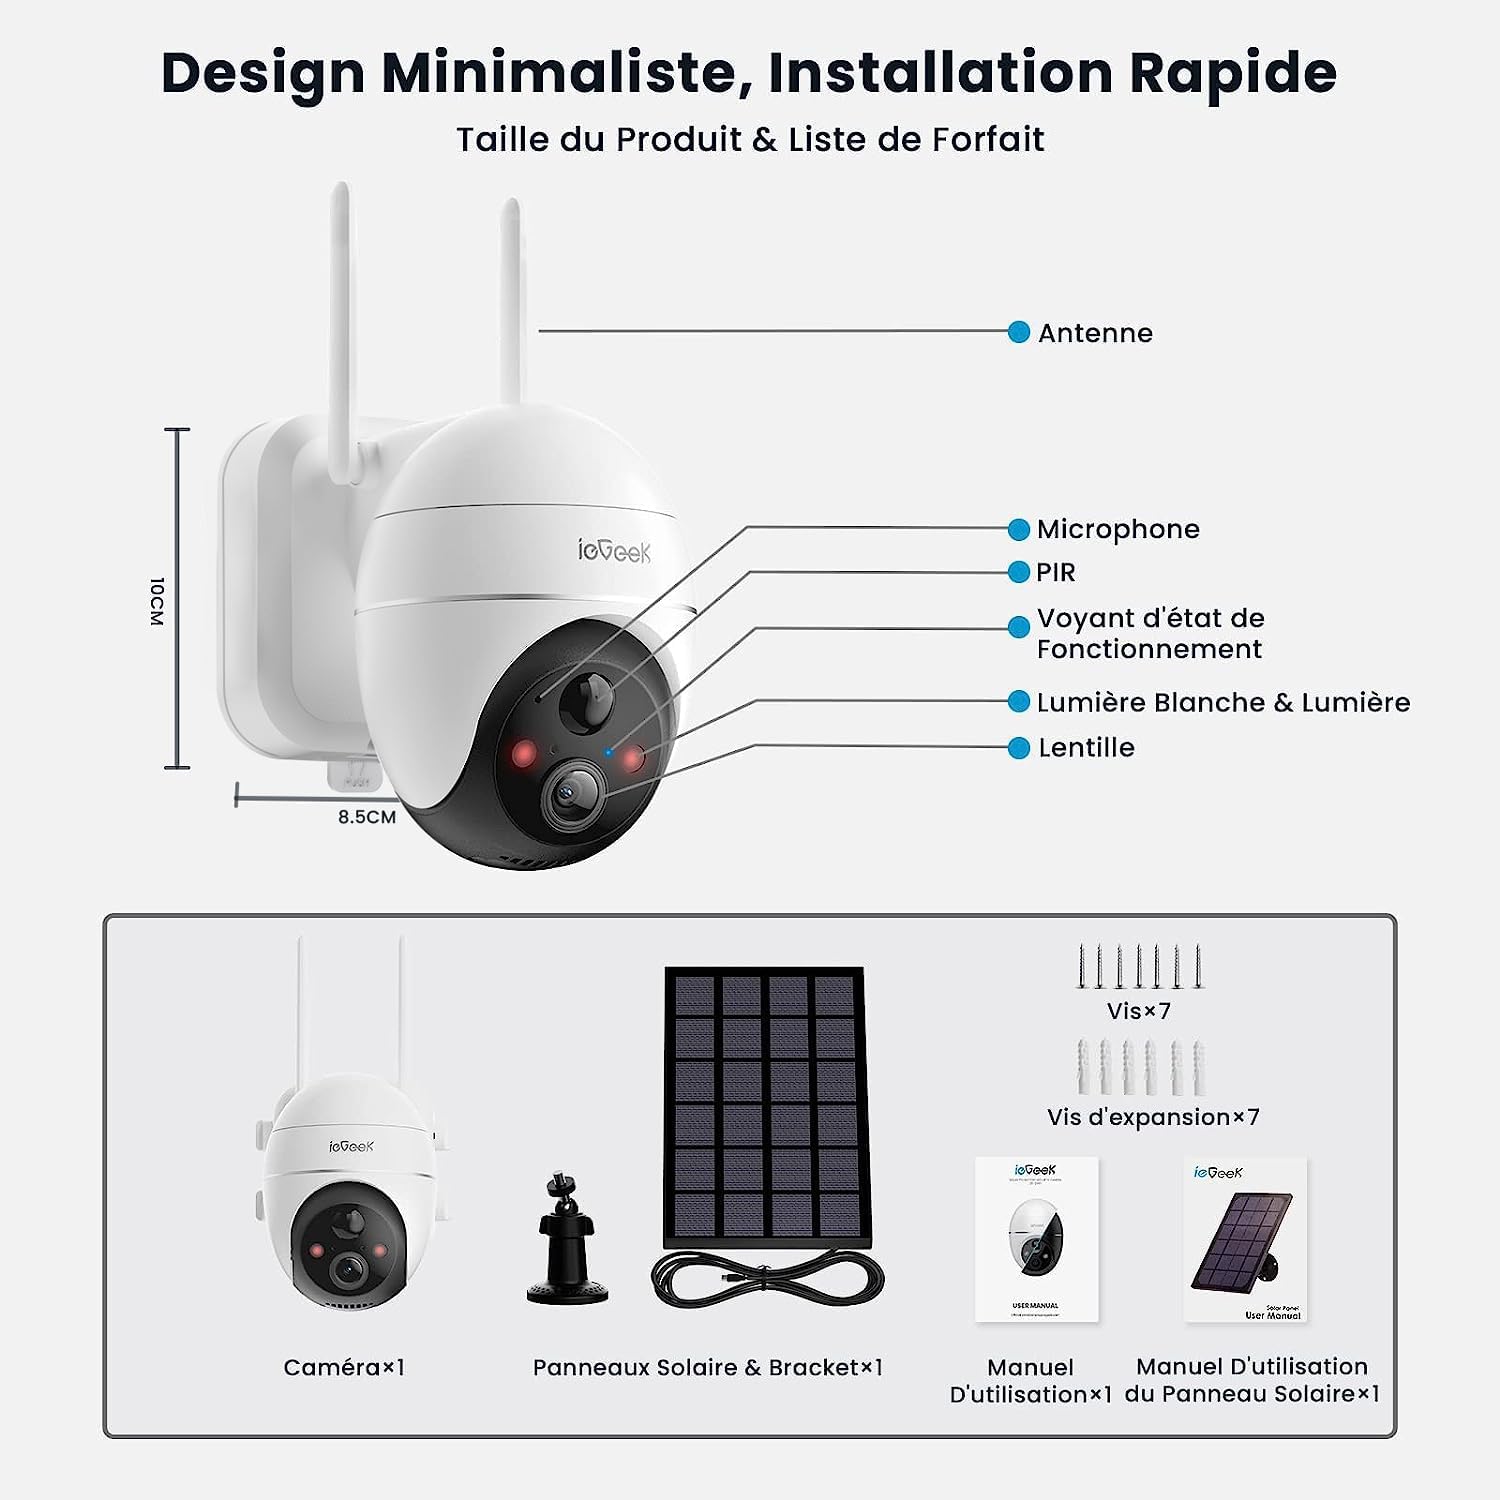
Figure 3.1: Package Contents and Camera Overview
3.2 Initial Charging
The camera contains a built-in 10000mAh rechargeable battery. For optimal performance, fully charge the camera using the provided USB cable before the first use. Connect the USB cable to the camera's charging port and a 5V/2A power adapter (not included). The charging indicator will show the battery status.
3.3 App Installation
Download the "ieGeek Cam" application from your mobile device's app store (iOS or Android). Alternatively, scan the QR code below to download the app.

Figure 3.2: ieGeek Cam App Download Information
3.4 Camera Pairing and Network Connection
- Open the ieGeek Cam app and register an account.
- Tap the "+" icon to add a new device.
- Follow the on-screen instructions to power on the camera and reset it if necessary.
- Select your 2.4GHz Wi-Fi network and enter the password. The camera does not support 5GHz Wi-Fi.
- Scan the QR code displayed on your phone screen with the camera lens.
- Once connected, the camera will indicate successful pairing, and you can name your device.
3.5 Mounting the Camera and Solar Panel
Choose a suitable location for installation. The camera is designed for outdoor use (IP65 rated). Ensure the solar panel receives adequate direct sunlight for continuous charging.
- Camera Placement: Mount the camera at a height of 2-3 meters (7-10 feet) for optimal detection range and field of view.
- Solar Panel Placement: Position the solar panel in an area that receives maximum direct sunlight throughout the day. Connect the solar panel cable to the camera's charging port.
- Use the provided screws and wall plugs to securely mount the camera and solar panel brackets to a wall or other stable surface.

Figure 3.3: Example of Camera and Solar Panel Installation
4. Operating Instructions
4.1 Live View and Playback
Open the ieGeek Cam app and select your camera to access the live view. From here, you can monitor your property in real-time. You can also access recorded footage from the cloud or local SD card storage.

Figure 4.1: Live View and Pan/Tilt Control Interface
4.2 Pan and Tilt Control
The camera supports 355° horizontal pan and 120° vertical tilt. Use the directional controls within the app's live view interface to adjust the camera's angle and cover a wider area.
4.3 Two-Way Audio
The built-in microphone and speaker allow for two-way communication. Tap the microphone icon in the app to speak through the camera, and listen to audio from the camera's surroundings.

Figure 4.2: Two-Way Audio Feature
4.4 Night Vision Modes
The camera offers three night vision modes:
- Smart Night Vision: Automatically switches between black and white and color night vision based on detected motion.
- Color Night Vision: Provides full-color images even in low-light conditions when triggered by human detection.
- Black and White Night Vision: Standard infrared night vision for clear black and white images.

Figure 4.3: 5MP Resolution and Night Vision Features
4.5 PIR Human Detection & Custom Area Monitoring
The camera uses an upgraded AI algorithm for PIR (Passive Infrared) human detection, reducing false alarms. You can customize detection zones and adjust sensitivity levels (1-10) within the ieGeek Cam app to focus on specific areas of interest.

Figure 4.4: PIR Human Detection and Custom Zones
4.6 Smart Alarm & Instant Message Notification
Configure alarm modes (sound, light, or both) in the app. When an intruder is detected, the camera can emit a sound alarm and/or turn on its white light to deter them, while simultaneously sending an instant notification to your phone via Cloudedge (or ieGeek Cam).
4.7 Storage Options
The camera supports local storage via a Micro SD card (up to 128GB, not included) and cloud storage. Cloud storage offers secure, encrypted recording with options for continuous loop recording.
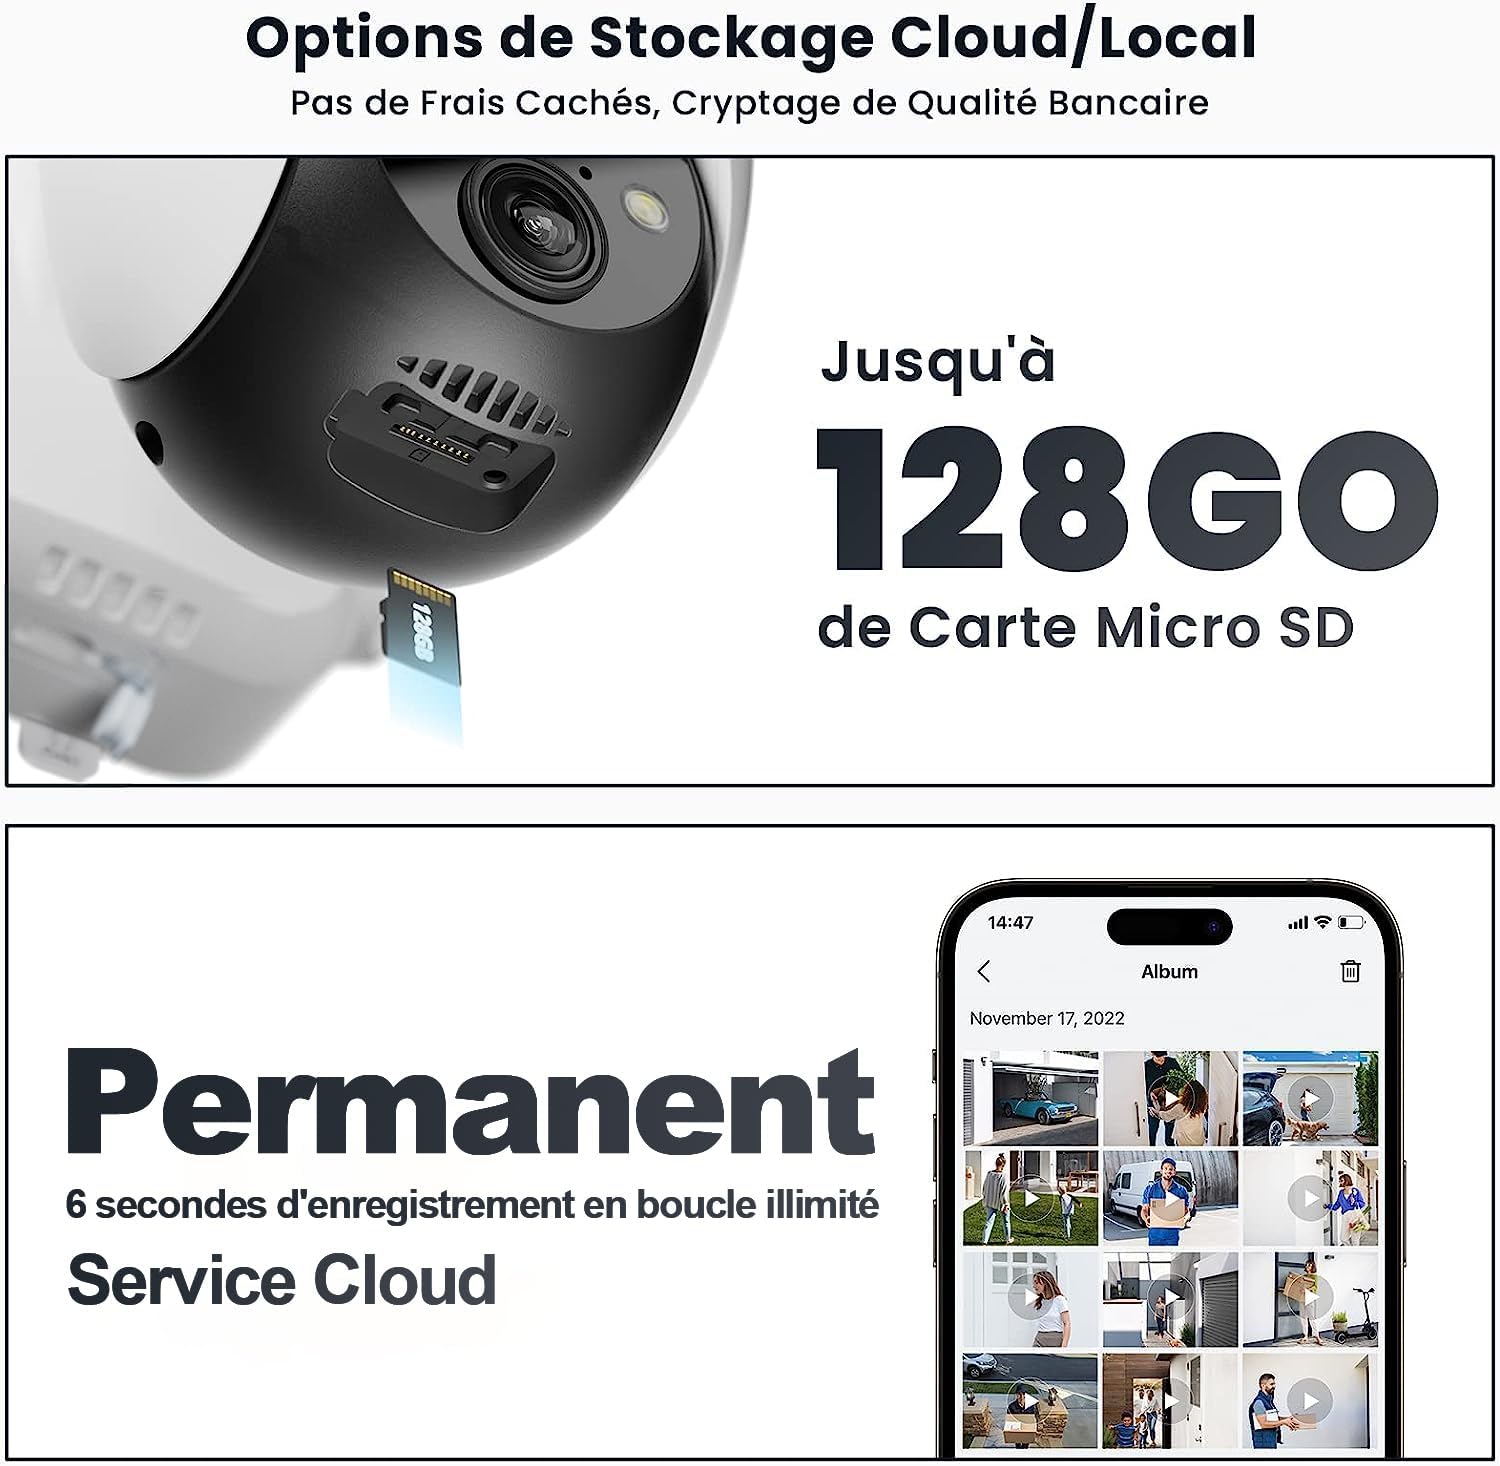
Figure 4.5: Local and Cloud Storage Options
5. Maintenance
- Cleaning: Regularly wipe the camera lens and solar panel with a soft, damp cloth to ensure clear vision and efficient charging. Do not use harsh chemicals.
- Battery Care: Ensure the solar panel is free from obstructions (e.g., leaves, snow) to maximize charging efficiency. In prolonged periods of low sunlight, you may need to manually charge the camera via USB.
- Firmware Updates: Check the ieGeek Cam app periodically for firmware updates. Keeping the firmware updated ensures optimal performance and access to new features.
6. Troubleshooting
| Problem | Possible Cause | Solution |
|---|---|---|
| Camera fails to connect to Wi-Fi. | Incorrect Wi-Fi password; 5GHz Wi-Fi network selected; camera too far from router; weak signal. | Ensure correct 2.4GHz Wi-Fi password. Move camera closer to router. Check router settings. Reset camera and try pairing again. |
| Frequent false alarms. | High PIR sensitivity; detection zone includes moving objects (trees, traffic). | Adjust PIR sensitivity in the app. Refine custom detection zones to exclude irrelevant areas. |
| Battery not charging via solar panel. | Insufficient sunlight; dirty solar panel; faulty connection. | Ensure solar panel is in direct sunlight. Clean the solar panel surface. Check cable connection between panel and camera. |
| Poor image quality. | Dirty lens; low network bandwidth; camera resolution settings. | Clean the camera lens. Ensure stable Wi-Fi connection. Check resolution settings in the app. |
| Two-way audio issues. | Microphone/speaker blocked; network delay. | Ensure no obstructions. Check network stability. Adjust volume settings in the app. |
7. Specifications
| Feature | Detail |
|---|---|
| Model | ZS-GX4S |
| Resolution | 5MP (2560*1920) |
| Pan/Tilt Angle | Horizontal 355°, Vertical 120° |
| Night Vision Range | Up to 10 meters |
| Battery Capacity | 10000mAh Lithium Ion |
| Connectivity | 2.4GHz Wi-Fi |
| Storage | Micro SD Card (Max 128GB), Cloud Storage |
| Waterproof Rating | IP65 |
| Dimensions (L x W x H) | 18 x 17 x 13 cm |
| Weight | 1.02 kg |
8. Warranty and Support
ieGeek products come with a standard manufacturer's warranty. For specific warranty terms and conditions, please refer to the warranty card included with your product or visit the official ieGeek website.
For technical support, troubleshooting assistance, or any product-related inquiries, please contact ieGeek customer service. Contact details can typically be found on the product packaging or the official ieGeek website.

Figure 8.1: Manufacturer Information and Support QR Codes
Related documentsZS GX4S


Ask a question about this manual
Ask about setup, troubleshooting, compatibility, parts, safety, or missing instructions. Manuals+ will review the question and use this page’s manual context to help answer it.