1. Introduction
Thank you for purchasing the Yaheetech 72" H Horticulture Garden Planter with Trellis. This product is designed to provide a versatile and functional space for growing various plants, including climbing vines, flowers, herbs, and vegetables. Constructed from durable fir wood, it features a built-in trellis for plant support and drainage holes to promote healthy root growth. This manual provides detailed instructions for assembly, operation, maintenance, and troubleshooting to ensure optimal use and longevity of your garden planter.
2. Safety Information
Please read and understand all safety warnings and instructions before assembling and using this product. Failure to follow these instructions may result in injury or product damage.
- This product is intended for outdoor use only.
- Ensure proper assembly and maintenance to prevent instability.
- Be cautious of sharp edges and heavy weight when the planter is filled with soil and plants.
- Do not exceed the maximum weight capacity of 100 kg (220 lb) for the bottom board.
- Keep away from children and pets during assembly and ensure stable placement during use.
- Always follow the manufacturer's instructions for proper use and care.
- Regularly inspect the planter for any signs of wear or damage. Discontinue use if significant damage is found.
3. Parts List
Before assembly, verify that all parts are present and undamaged. If any parts are missing or damaged, please contact customer support.

Components:
- Wooden Side Panels (various sizes)
- Trellis Sections
- Bottom Boards with Drainage Holes
- Connecting Bars/Brackets
- Screws and Fasteners
- Optional: Wheels (if included with your model)
4. Assembly Instructions
Follow these steps carefully to assemble your Yaheetech Garden Planter with Trellis. It is recommended to have a second person assist with assembly.
Step 1: Assemble the Planter Box Base
Connect the wooden side panels to form the rectangular planter box. Ensure all connections are secure using the provided screws.
Step 2: Install Bottom Boards
Place the bottom boards into the assembled planter box. These boards feature pre-drilled drainage holes. Ensure they fit snugly.

Step 3: Attach the Trellis
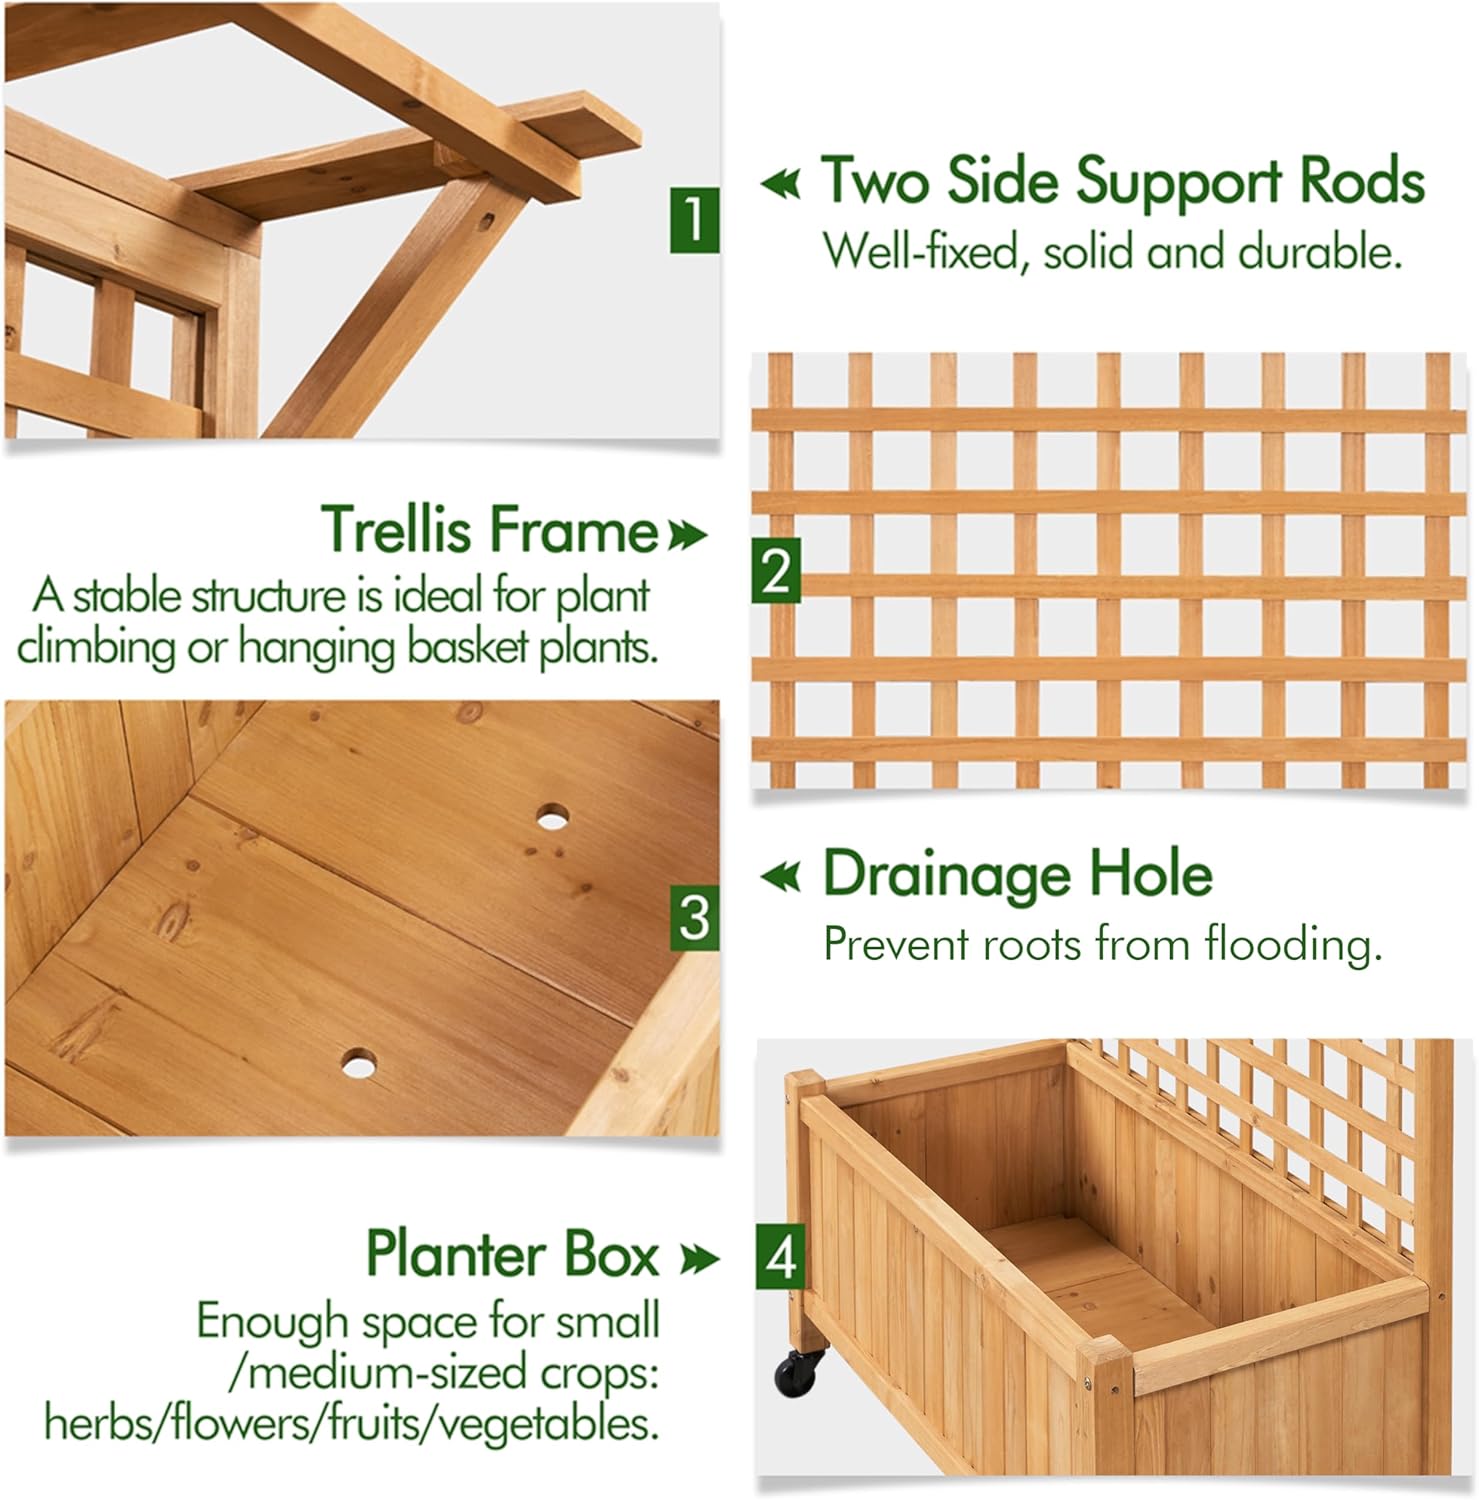
Secure the trellis section to the back of the planter box using the provided hardware. Ensure the trellis is upright and stable.

Step 4: Install Optional Wheels
If your model includes wheels, attach them to the bottom of the planter legs using the provided screws and wrench. Ensure all wheels are securely fastened and can rotate freely.

Assembly Video Guide:
5. Operating Instructions
Once assembled, your garden planter is ready for use. Follow these guidelines for optimal plant growth.
Filling the Planter:
- Fill the planter box with a suitable potting mix or soil. The 10-inch depth provides ample space for healthy root development.
- Consider adding a layer of gravel or coarse material at the bottom before soil to enhance drainage, though the built-in drainage holes are effective.
Planting:
- Plant your desired flowers, herbs, or vegetables according to their specific spacing and depth requirements.
- For climbing plants, gently guide their tendrils onto the trellis as they grow. The trellis is designed to support vines and creeping plants.
- The top extended design allows for hanging basket plants, creating a floral waterfall effect. Ensure hanging items do not exceed the top shelf load capacity of 10 kg (22 lb).


Watering:
- Water plants regularly, ensuring the soil remains moist but not waterlogged. The drainage holes will help prevent overwatering.

Mobility:
- If equipped with wheels, unlock them to easily move the planter to different locations for optimal sunlight or aesthetic placement. Lock the wheels once the planter is in its desired position for stability.
Product Overview Video:
6. Maintenance
Proper maintenance will extend the life of your garden planter.
- Cleaning: Clean the wooden surfaces periodically with a damp cloth to remove dirt and debris. Avoid harsh chemicals that may damage the wood finish.
- Wood Protection: Although made from durable fir wood, applying a wood sealant or outdoor-grade paint/stain annually can further protect it from weather elements and prolong its lifespan.
- Drainage: Ensure drainage holes remain clear of obstructions to prevent water accumulation.
- Hardware: Periodically check all screws and fasteners to ensure they are tight. Retighten if necessary.
- Winter Care: In colder climates, consider emptying the planter and storing it in a sheltered area during winter months to prevent damage from freezing and thawing cycles.
7. Troubleshooting
Here are solutions to common issues you might encounter:
- Problem: Water is not draining from the planter.
Solution: Check if the drainage holes at the bottom are clogged with soil or debris. Clear any obstructions. Ensure the planter is on a level surface to allow proper drainage. - Problem: The planter feels unstable or wobbly.
Solution: Verify that all screws and fasteners are securely tightened. If your model has wheels, ensure they are locked when the planter is stationary. Place the planter on a firm, level surface. - Problem: Wood appears to be weathering or fading.
Solution: This is normal for natural wood exposed to the elements. Apply a wood sealant, stain, or outdoor paint to protect the wood and restore its appearance. - Problem: Climbing plants are not attaching to the trellis.
Solution: Gently guide the plant's tendrils through the trellis openings and secure them loosely with soft ties until they can grip on their own.
8. Specifications
| Feature | Detail |
|---|---|
| Color | Light Brown |
| Material | Fir Wood |
| Product Dimensions | 35.5"W x 72"H |
| Item Weight | 21.05 Pounds |
| Style | Modern |
| Finish Type | Painted |
| Shape | Rectangular |
| Assembly Required | Yes |
| Bottom Board Capacity | Up to 100 kg / 220 lb |
| Top Shelf Load | Up to 10 kg / 22 lb |
9. Warranty & Support
For warranty information or customer support, please refer to the product packaging or contact Yaheetech directly through their official website or the retailer where the product was purchased. Please have your model number and purchase date available when contacting support.


