1. Introduction
Thank you for choosing the WORKPRO 3.6V Electric Staple Gun and Brad Nailer. This versatile 2-in-1 tool is designed for various DIY, craft, and light woodworking projects, offering convenience and efficiency. To ensure safe and effective operation, please read this instruction manual thoroughly before using the tool and keep it for future reference.
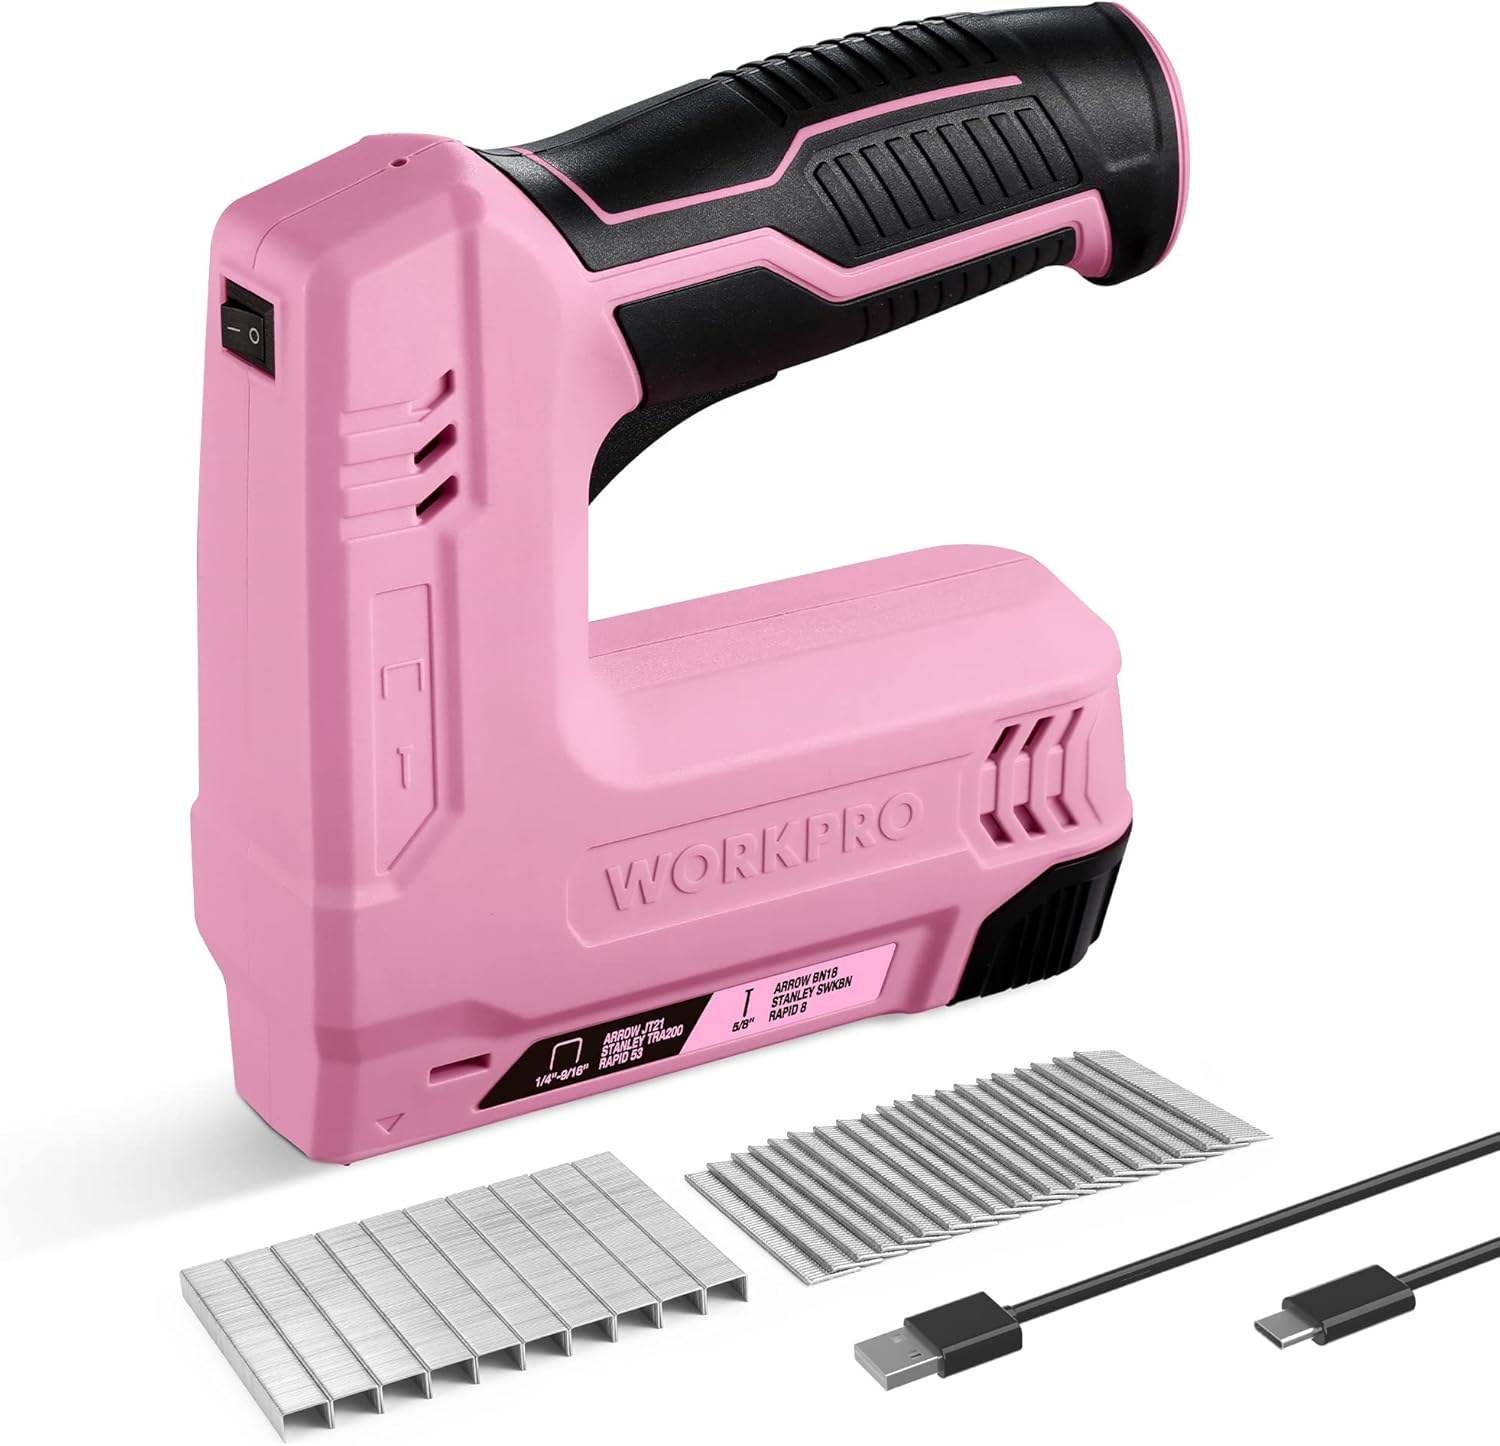
Image 1: WORKPRO 3.6V Electric Staple Gun and Brad Nailer with included accessories.
2. Package Contents
The following items are included in your WORKPRO Electric Staple Gun and Brad Nailer package:
- 1 x WORKPRO 3.6V Electric Staple Gun
- 1000 x JT21 Staples
- 1000 x BN18 Nails
- 1 x USB Charging Cable
3. Product Features
- 2-in-1 Functionality: This tool functions as both a staple gun and a brad nailer. It is compatible with 1/4 inch to 9/16 inch JT21 staples and 5/8 inch 18GA brad nails. Note: Only use the specified staple and nail types. T50 staples are not compatible.
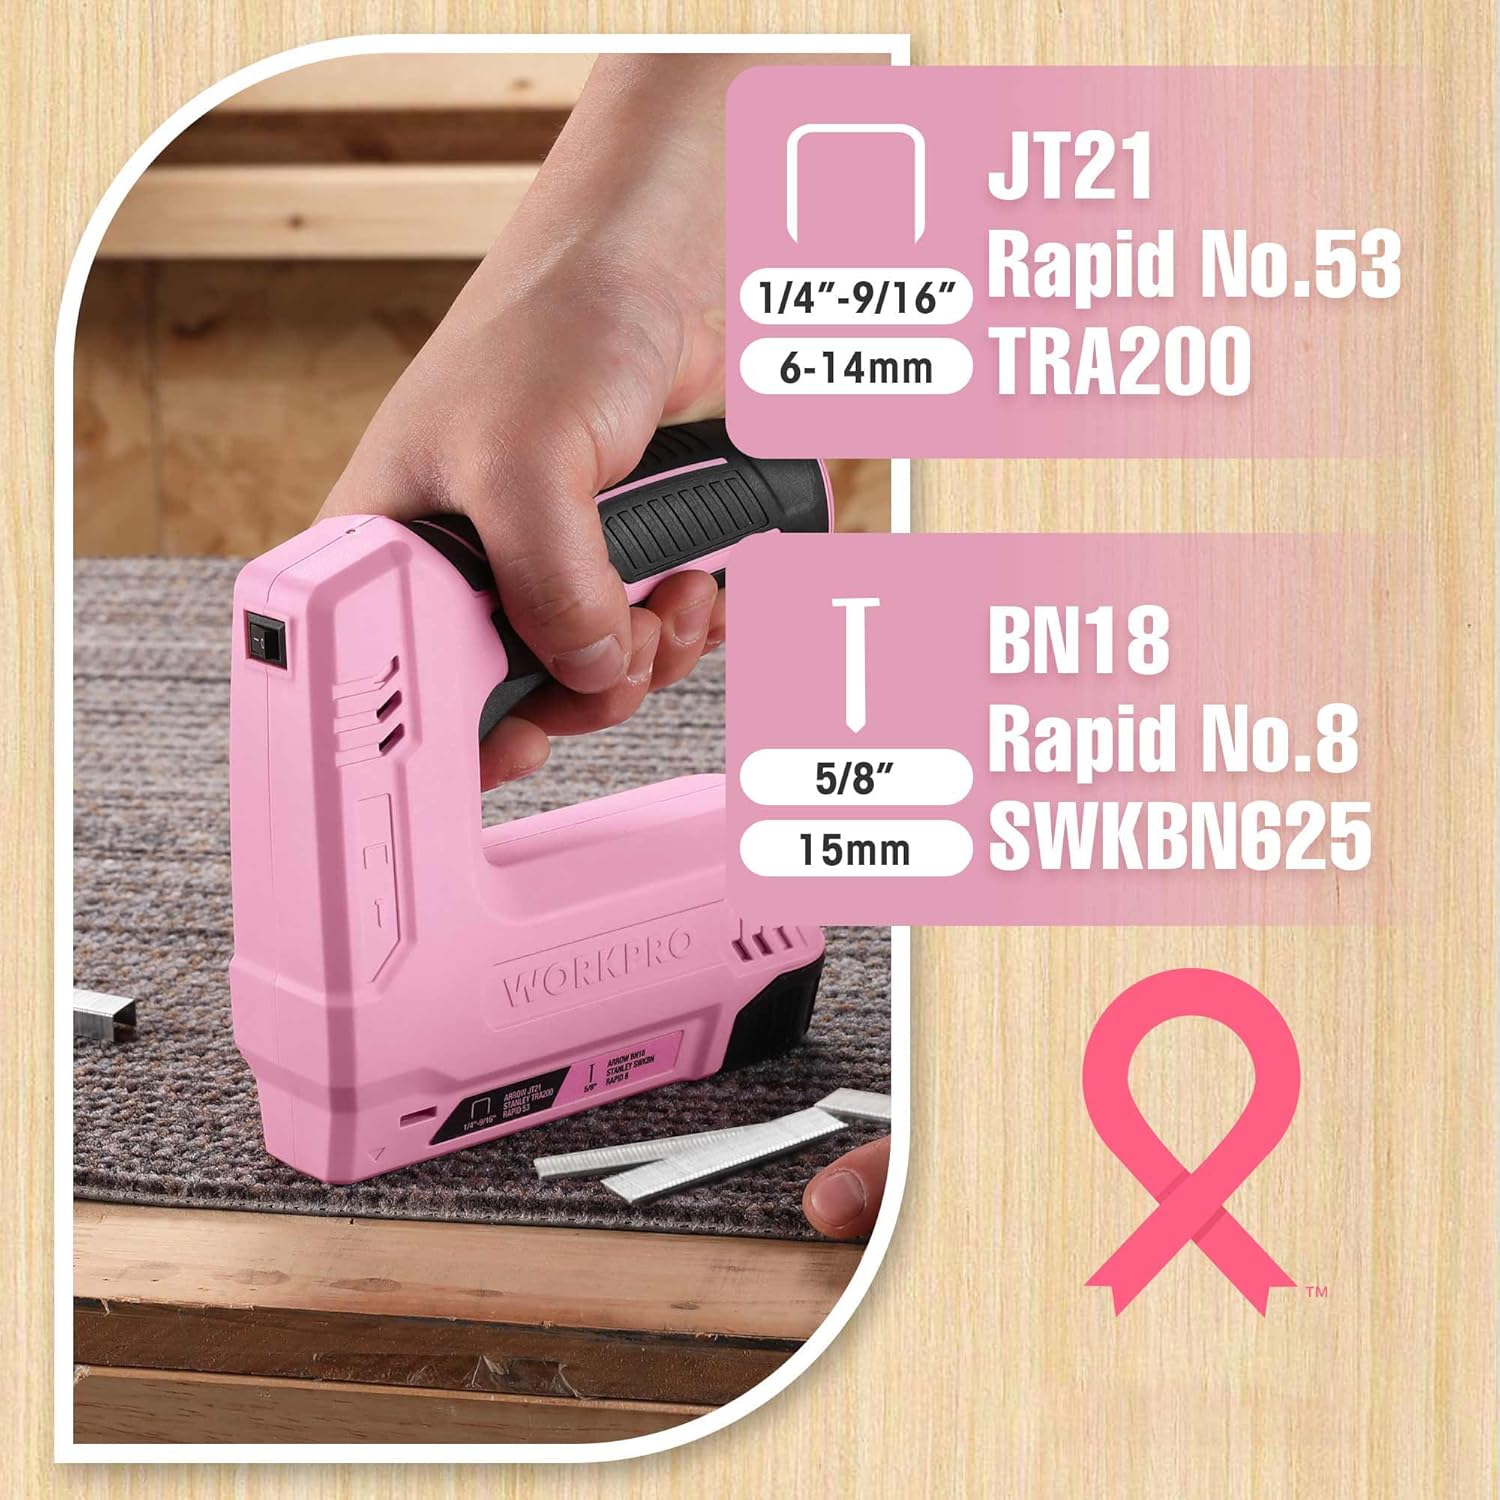
Image 2: Compatible staple (JT21) and nail (BN18) types.
- Compact and Lightweight Design: Measuring approximately 5.75 inches in length and width, and weighing 1.8 pounds (0.8 kg), this cordless tool is designed for easy handling and effective use in narrow spaces.
- Efficient Battery Performance: The integrated 3.6V 2000mAh lithium battery fully charges in 1-2 hours and can fire up to 1000 fasteners on a single charge.
- Triple Safety Mechanism: Equipped with three safety switches, including a contact safety device, to prevent accidental firing and ensure user safety.
- Wide Range of Applications: Ideal for interior decoration, material repair, light woodworking, furniture assembly, DIY projects, and various renovation needs. Suitable for fastening materials such as fabric, paper, leather, and softwood products. Not suitable for professional heavy-duty carpentry or nailing into hardwood.

Image 3: Overview of the staple gun's components.
4. Safety Instructions
Always follow basic safety precautions when using electric tools to reduce the risk of fire, electric shock, and personal injury.
- Wear Eye Protection: Always wear safety glasses or goggles to protect your eyes from flying debris.
- Keep Work Area Clear: Ensure your work area is well-lit and free from clutter.
- Secure Workpiece: Always secure the material you are working on to prevent movement.
- Keep Hands Away: Never place your hands or fingers near the firing mechanism or the workpiece contact area.
- Power Off When Not in Use: When the tool is not in use, or before performing any adjustments or maintenance, always turn off the power switch (position "O").
- Avoid Overheating: To prevent machine damage from overheating, do not fire more than 30 fasteners per minute. Take a 1-minute break after every 100 fasteners.
- Triple Safety Mechanism: The tool is equipped with an ON/OFF switch, a trigger, and a contact safety device. The tool will only fire when the ON switch is engaged, the trigger is pressed, AND the contact safety device is fully pressed against the workpiece. This design prevents accidental firing.

Image 4: Steps for engaging the triple safety mechanism and firing the tool.
5. Setup
5.1. Charging the Device
- Locate the charge port on the tool (refer to Image 3).
- Connect the provided USB charging cable to the charge port and a suitable USB power source (e.g., computer, USB wall adapter).
- The LED indicator (refer to Image 3) will show red during charging.
- A full charge typically takes 1-2 hours. The LED indicator will turn green when fully charged.
5.2. Loading Staples and Nails
Ensure the power switch is in the "O" (OFF) position before loading fasteners.
- Pull out the magazine cover: Locate the quick release magazine at the bottom rear of the tool and pull out its cover.
- Load Staples: For staples (JT21), place them into the magazine with their points facing upwards.
- Load Nails: For brad nails (BN18), place them into the left side of the magazine with their points facing upwards.
- Close the magazine cover: Push the magazine cover back into place until it locks securely.
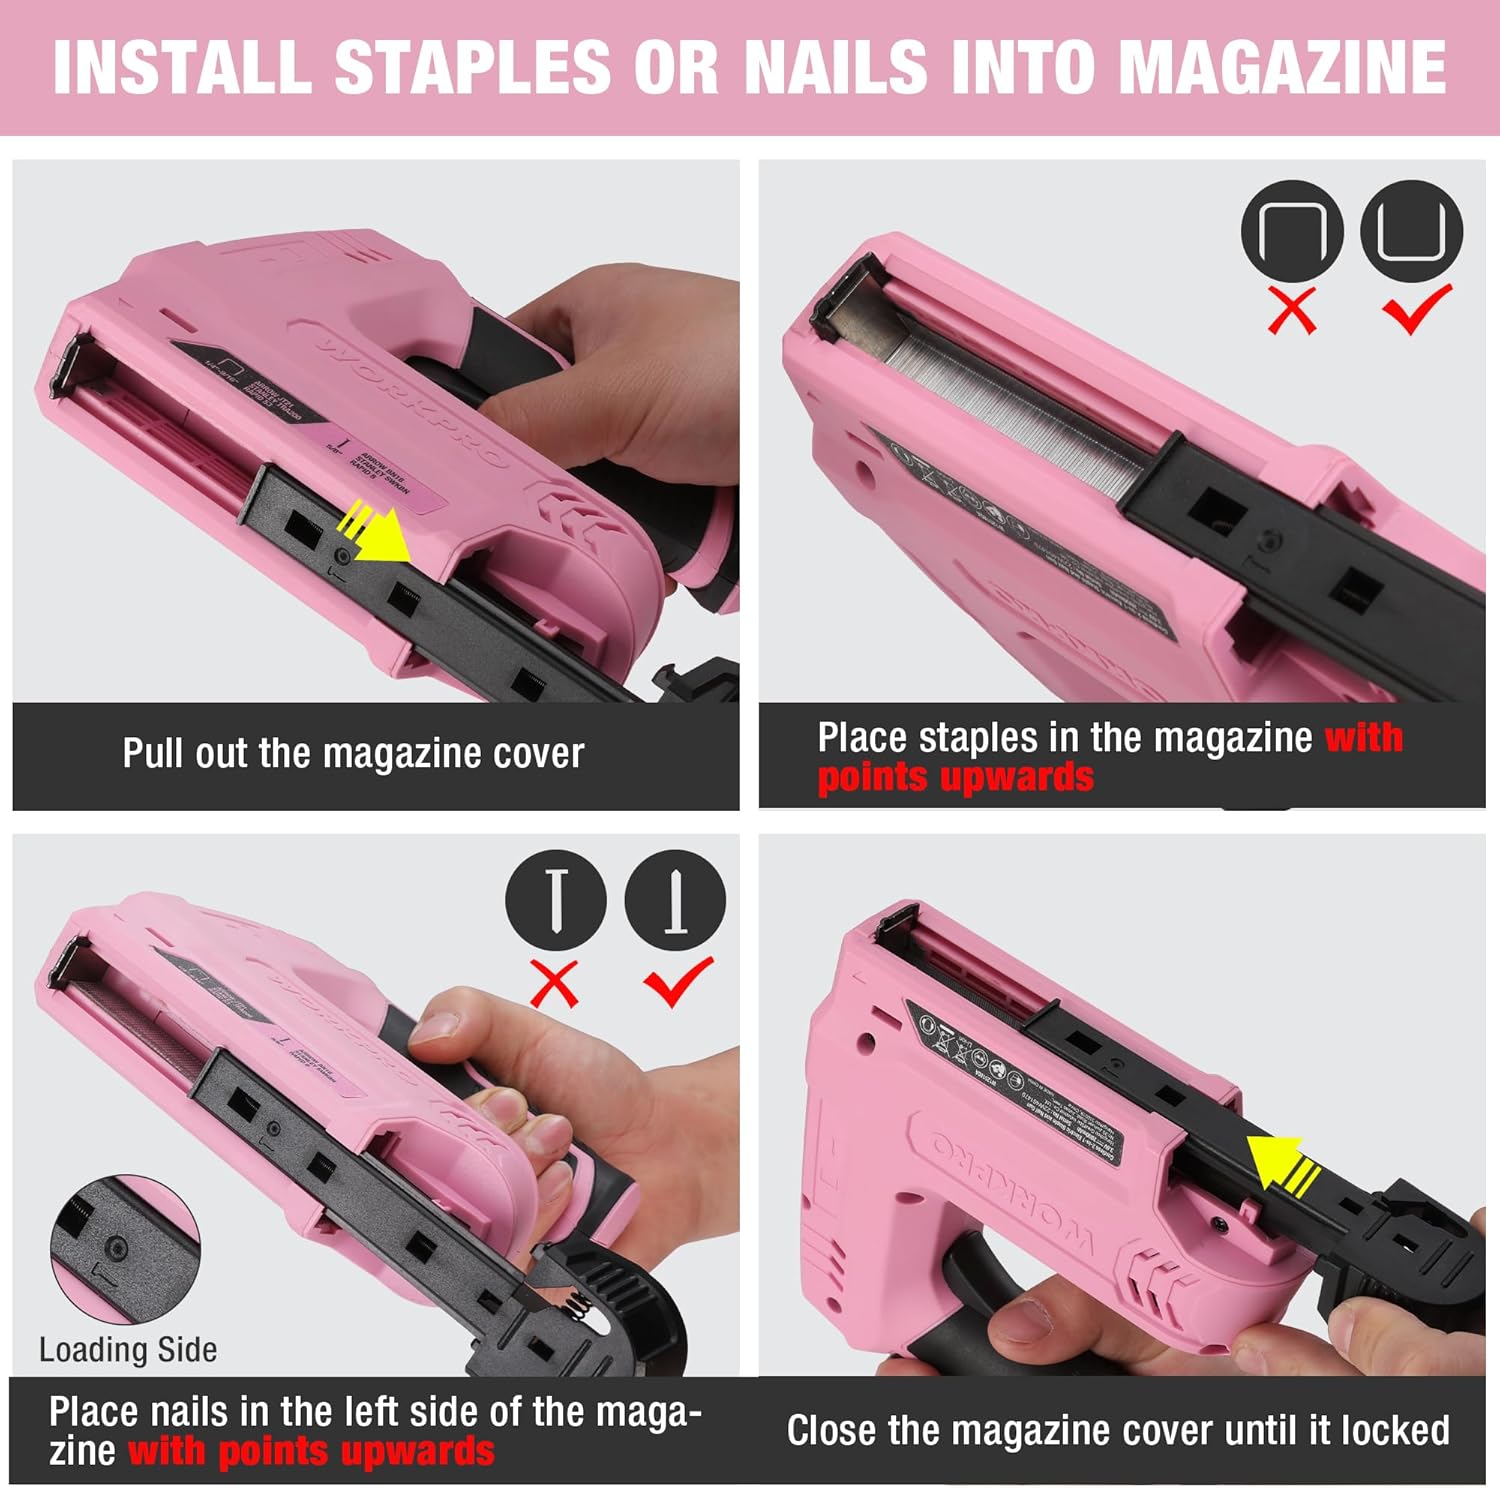
Image 5: Step-by-step guide for loading staples and nails.
6. Operating Instructions
6.1. Powering On/Off
- To turn the tool ON, slide the power switch (refer to Image 3) to the "I" position. The LED indicator will show green if the battery has sufficient charge.
- To turn the tool OFF, slide the power switch to the "O" position.
6.2. Firing the Tool
Once fasteners are loaded and the tool is powered on:
- Position the tool over the desired fastening location on your workpiece.
- Press the contact safety device firmly against the surface of the workpiece until it is fully depressed.
- Squeeze the trigger to fire a staple or nail.
- Release the trigger and lift the tool from the workpiece.
6.3. Recommended Usage
To ensure optimal performance and tool longevity:
- Do not exceed a firing rate of 30 fasteners per minute.
- Take a 1-minute break after every 100 fasteners fired to prevent the machine from overheating.
7. Maintenance
7.1. Battery Care
- To maintain the battery's health, charge the tool every 3-6 months even if it is not in use.
- Avoid allowing the battery to completely discharge for extended periods, as this can reduce its lifespan.
7.2. Cleaning
- Ensure the tool is turned OFF and disconnected from any power source before cleaning.
- Wipe the tool's exterior with a clean, damp cloth. Do not use harsh chemicals or abrasive cleaners.
- Periodically check the magazine for any debris or jammed fasteners and clear them carefully.
8. Troubleshooting
- Tool Not Firing:
- Check if the power switch is in the "I" (ON) position.
- Ensure the battery is charged (LED indicator should be green).
- Verify that the contact safety device is fully pressed against the workpiece.
- Check if the magazine is properly loaded with compatible fasteners and securely closed.
- Fasteners Getting Stuck/Jammed:
- Ensure you are using the correct type and size of staples (JT21) or nails (BN18).
- Check the magazine for any bent or improperly loaded fasteners.
- If a jam occurs, turn off the tool, remove the battery (if removable, otherwise ensure power is off), and carefully clear the jam.
- Tool Overheating:
- This can occur if fasteners are fired too rapidly. Adhere to the recommended firing rate of no more than 30 shots per minute, with a 1-minute break every 100 shots.
- Allow the tool to cool down before resuming operation.
9. Specifications
| Feature | Specification |
|---|---|
| Brand | WORKPRO |
| Model | B0B9SCGJJK |
| Voltage | 3.6V |
| Battery Capacity | 2000mAh 3.6V 18650 (Lithium) |
| Charging Voltage | 5V DC |
| Charging Time | 1-2 hours |
| Max Shot Rate | 30 shots/min |
| Weight | 0.8 kg (1.76 lbs) |
| Product Dimensions | 14.5 x 14.4 x 2.95 cm (approx. 5.71 x 5.67 x 1.16 inches) |
| Compatible Staples | JT21 (1/4" - 9/16", 6-14mm) |
| Compatible Nails | 18GA Brad Nails (5/8", 15mm) |
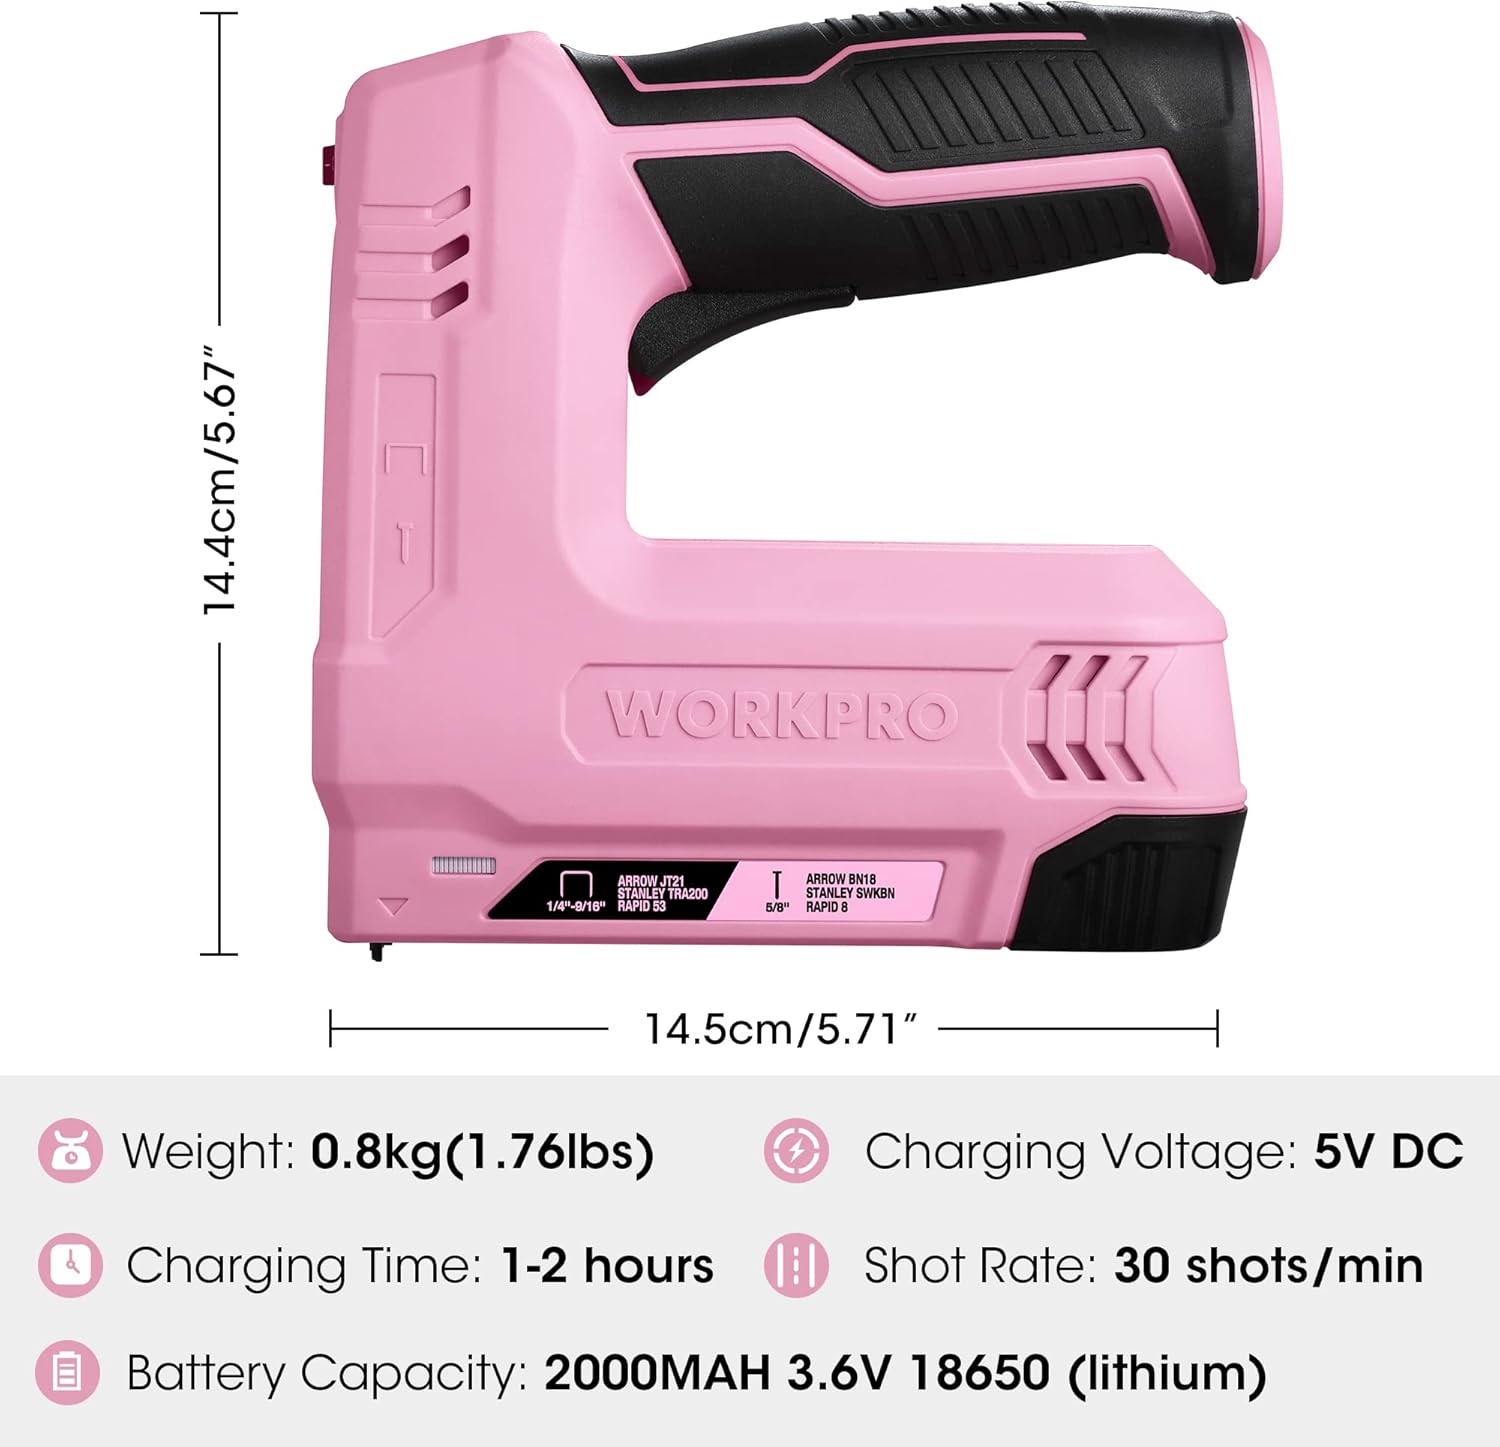
Image 6: Key specifications and dimensions of the tool.
10. Warranty and Support
Information regarding product warranty and customer support was not available in the provided product data. Please refer to the product packaging or the manufacturer's official website for details on warranty coverage and how to contact customer support for assistance.


