Introduction
This manual provides comprehensive instructions for the safe and effective operation of your Renkforce RF-5044476 Digital Night Vision Device. Please read this manual thoroughly before using the device and retain it for future reference.
The Renkforce RF-5044476 is a durable and robust digital night vision device featuring 10x magnification and a 25mm objective lens, designed for clear vision in low-light and complete darkness conditions.
Safety Information
Always observe the following safety precautions to prevent damage to the device or personal injury:
- Do not look directly at strong light sources (e.g., sun, laser) through the device, as this can cause permanent eye damage and damage to the device's sensor.
- Keep the device away from extreme temperatures, humidity, and dust.
- Do not attempt to disassemble or repair the device yourself. Refer all servicing to qualified personnel.
- Ensure batteries are inserted correctly according to polarity markings. Remove batteries if the device will not be used for an extended period.
- Use only specified power sources and accessories.
Package Contents
Verify that all items are present in the package:
- Renkforce RF-5044476 Digital Night Vision Device
- Installation Material (as per specifications)
- User Manual (this document)
- (Note: Batteries are not included)
Product Overview
Familiarize yourself with the components of your night vision device.

Figure 1: Front view of the Renkforce RF-5044476, showing the objective lenses and the Renkforce logo.

Figure 2: Top view of the device, highlighting the control buttons for power, mode, zoom, and navigation.
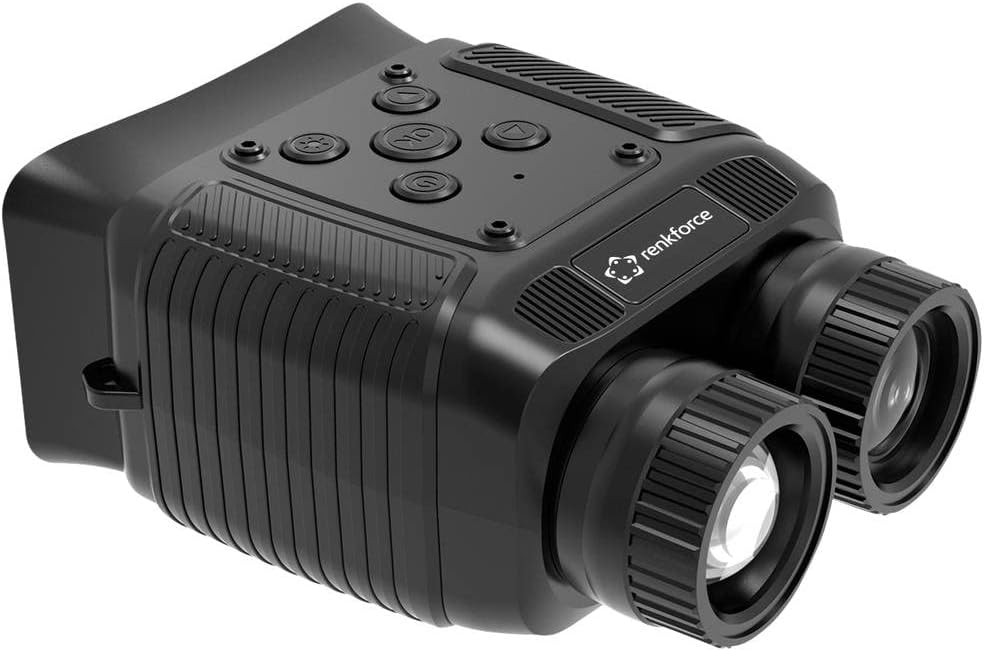
Figure 3: Angled view of the Renkforce RF-5044476, showing the ergonomic design and textured grip areas.
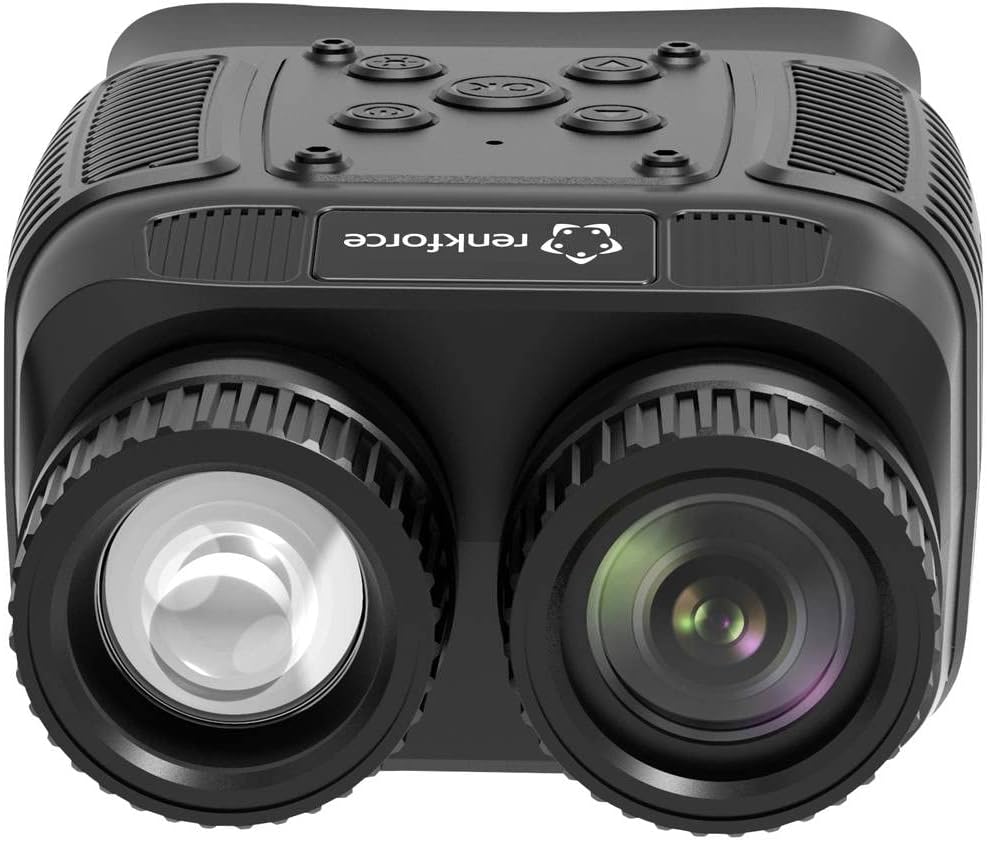
Figure 4: Close-up front view emphasizing the objective lenses and their protective caps.
Key components include:
- Objective Lenses: Capture light from the scene.
- Eyepiece: For viewing the digital display.
- Control Buttons: Power, Mode, IR Level, Zoom, OK/Menu, Up/Down.
- Battery Compartment: Houses the power source.
- USB Port: For data transfer and charging (if applicable).
- SD Card Slot: For storing photos and videos.
Setup
1. Battery Installation
- Locate the battery compartment cover, typically on the underside or side of the device.
- Open the cover.
- Insert the required batteries (e.g., AA, AAA, or rechargeable pack) according to the polarity markings (+/-) inside the compartment.
- Close the battery compartment cover securely.
2. Powering On/Off
- To power on, press and hold the Power button until the display illuminates.
- To power off, press and hold the Power button again until the display shuts down.
3. Initial Focus Adjustment
- Once powered on, look through the eyepiece.
- Rotate the eyepiece diopter adjustment ring (if present) until the on-screen text or icons appear sharp.
- Rotate the objective lens focus ring to bring distant objects into clear focus.
Operating
1. Basic Viewing
Point the device towards the area you wish to observe. Adjust the focus as needed for optimal clarity.
2. Digital Zoom
The device features an 8x digital zoom. Use the Zoom buttons (often marked with '+' and '-') to increase or decrease the magnification. Note that digital zoom may reduce image quality at higher levels.
3. Infrared (IR) Illuminator
For viewing in complete darkness, activate the built-in 850nm infrared illuminator. The device has 7 adjustable IR levels.
- Press the IR button (often marked with a sun or IR symbol) to cycle through IR levels.
- Higher IR levels provide greater illumination range but consume more battery power.
4. Photo and Video Recording
The device supports photo and video capture with its 1.3 MP FHD CMOS sensor.
- Insert a compatible SD card into the designated slot.
- Press the Mode button to switch between Photo mode and Video mode. The current mode will be indicated on the display.
- In Photo mode, press the OK button to take a picture.
- In Video mode, press the OK button to start recording. Press it again to stop recording.
5. Menu Navigation
Access the device settings via the menu.
- Press the Menu button (often combined with the OK button, press and hold).
- Use the Up/Down navigation buttons to scroll through menu options.
- Press OK to select an option or enter a sub-menu.
- Press Menu again to exit the current menu level.
Common menu settings may include:
- Date/Time setting
- Language selection
- Video resolution
- Photo resolution
- Format SD card
- Default settings reset
Maintenance
1. Cleaning
- Use a soft, lint-free cloth to clean the exterior of the device.
- For lenses, use a specialized lens cleaning cloth and lens cleaning solution. Do not use abrasive materials or harsh chemicals.
- Gently blow off any loose dust or debris from the lenses before wiping.
2. Storage
- Store the device in a cool, dry place, away from direct sunlight and extreme temperatures.
- If storing for an extended period, remove the batteries to prevent leakage.
- Use the provided protective case or a padded bag to prevent scratches and impacts.
Troubleshooting
| Problem | Possible Cause | Solution |
|---|---|---|
| Device does not power on. | Low or dead batteries; incorrect battery insertion. | Replace batteries; ensure correct polarity. |
| Image is blurry or out of focus. | Focus rings not adjusted; eyepiece diopter not set. | Adjust objective lens focus and eyepiece diopter. |
| Poor image quality in darkness. | IR illuminator off or set too low; too far from subject. | Increase IR level; ensure subject is within effective range. |
| Cannot take photos/videos. | No SD card; SD card full or corrupted; incorrect mode. | Insert SD card; delete files or format card; switch to Photo/Video mode. |
Specifications
| Feature | Detail |
|---|---|
| Model Number | RF-5044476 |
| Brand | Renkforce |
| Magnification | 10x (Optical), 8x (Digital) |
| Objective Lens Diameter | 25 mm |
| Sensor | 1.3 MP FHD CMOS |
| Infrared Illuminator | 850 nm, 7 adjustable levels |
| Night Vision Range | Up to 300 m (in 100% darkness) |
| Display | 6.1 cm (2.4") TFT IPS |
| Photo/Video Support | Yes |
| Power Source | Electrical operation (Batteries not included) |
| Dimensions (L x W x H) | 11.3 x 8.7 x 5.2 cm |
| Weight | 227 grams |
| Compatible Devices | Camera |
Warranty and Support
Spare Parts Availability: 1 Year (as per product information).
For technical support, warranty claims, or service inquiries, please contact your retailer or the manufacturer directly. Retain your proof of purchase for warranty validation.
Do not attempt to repair the device yourself, as this may void the warranty.


