1. Introduction
Thank you for choosing the MTG 22-inch Full HD LED Monitor. This manual provides essential information for the safe and efficient use of your new monitor. Please read it thoroughly before installation and operation, and retain it for future reference.
This monitor is designed for general commercial and household use, offering a 1920x1080 resolution, 75Hz refresh rate, and 3ms response time for a smooth visual experience. It features a bezel-less design and supports VESA mounting for flexible placement.
2. Safety Information
- Power Source: Use only the power adapter supplied with the monitor. Ensure the power outlet is properly grounded.
- Ventilation: Do not block ventilation openings. Allow adequate space around the monitor for proper airflow to prevent overheating.
- Liquid Exposure: Keep the monitor away from water or excessive moisture. Do not place objects filled with liquids on or near the monitor.
- Cleaning: Disconnect the power cord before cleaning. Use a soft, dry cloth. Avoid liquid cleaners or aerosol sprays.
- Placement: Place the monitor on a stable, flat surface. Avoid direct sunlight, heat sources, or extreme temperatures.
- Servicing: Do not attempt to service this product yourself. Refer all servicing to qualified service personnel.
3. Package Contents
Please check the package contents to ensure all items are present:
- MTG 22-inch LED Monitor
- Monitor Stand (Base and Neck)
- Power Adapter
- HDMI Cable
- User Manual
4. Product Overview
The MTG 22-inch monitor features a sleek, bezel-less design for an immersive viewing experience. Key features include:
- Full HD (1920x1080) resolution
- 75Hz refresh rate and 3ms response time
- Wide viewing angles
- Flicker-free display technology
- VESA mountable (100x100mm)
- Connectivity: 1x HDMI, 1x VGA
4.1. Monitor Components and Ports
Familiarize yourself with the monitor's components and connection ports.
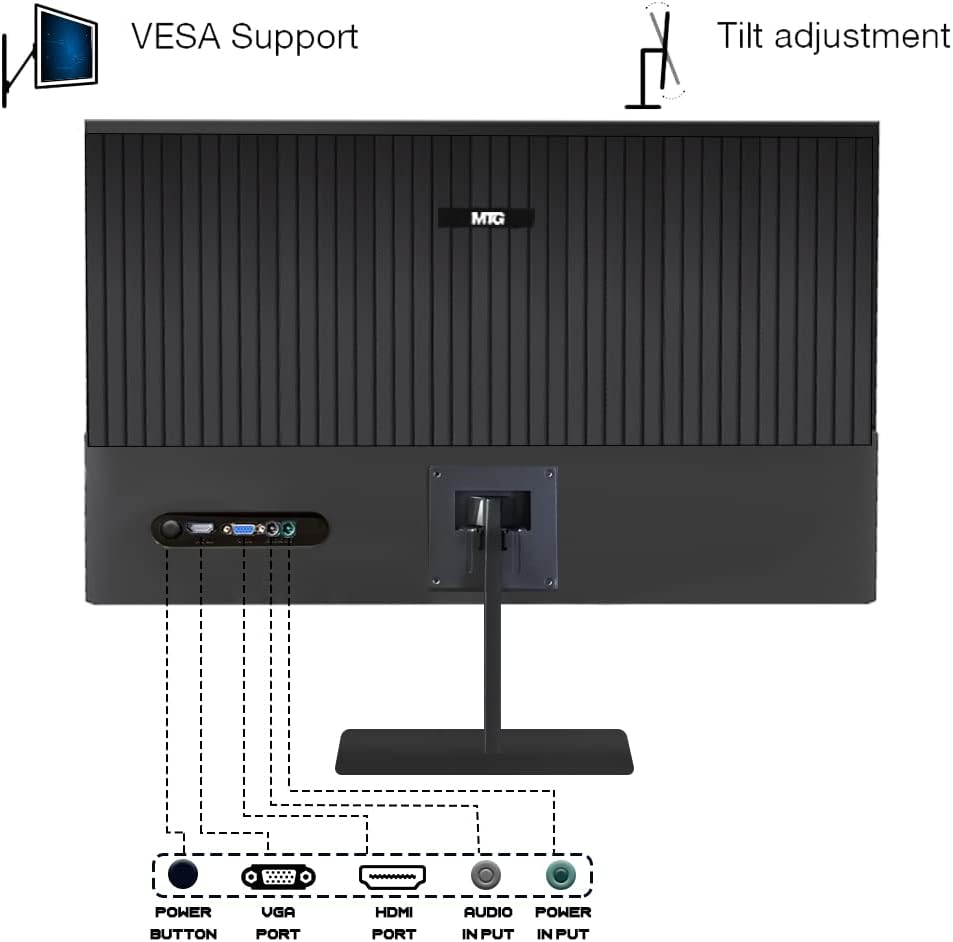
Figure 4.1: Rear view of the monitor with labeled ports and VESA mounting points.
The rear of the monitor includes a power button, VGA port, HDMI port, audio input, and power input. It also shows the VESA mounting holes and indicates the tilt adjustment capability.
4.2. Display Features
The monitor is designed for optimal visual clarity and comfort.
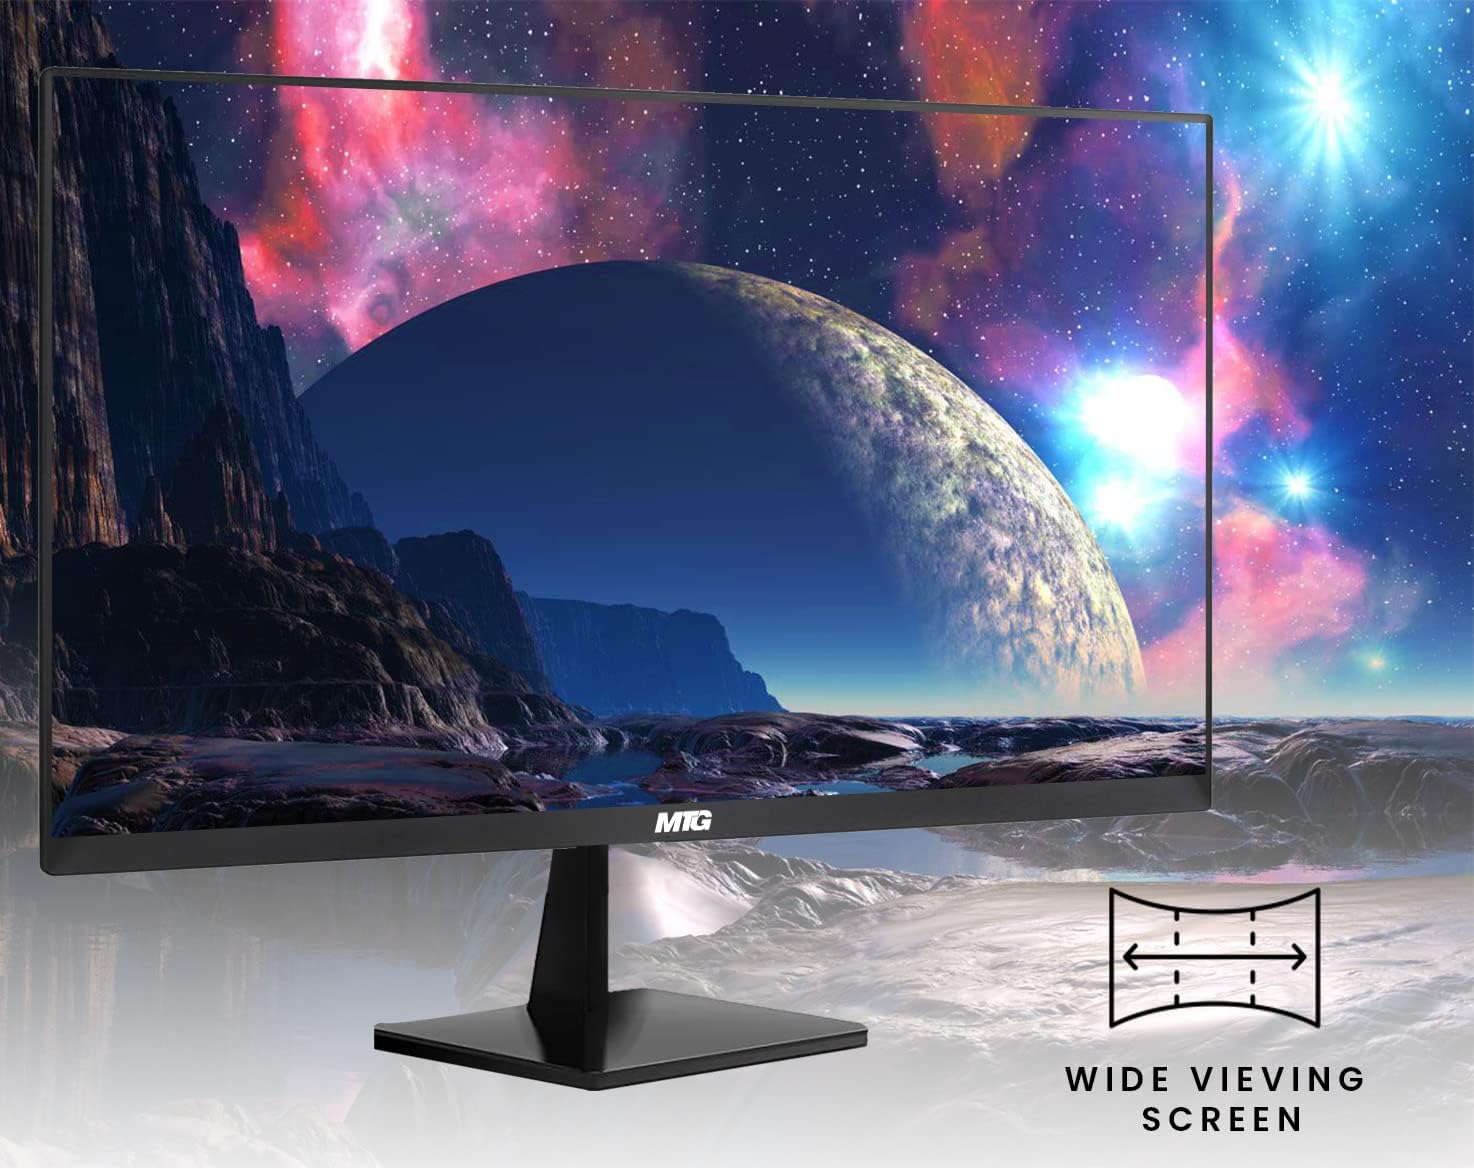
Figure 4.2: The monitor offers wide viewing angles for consistent image quality from various positions.

Figure 4.3: The flicker-free display technology helps reduce eye strain during extended use.

Figure 4.4: Free Sync technology synchronizes the monitor's refresh rate with the graphics card for smooth, tear-free visuals, especially in gaming.
5. Setup
5.1. Attaching the Stand
- Carefully remove the monitor and stand components from the packaging.
- Attach the stand neck to the monitor panel. Ensure it clicks securely into place or is fastened with screws if provided.
- Attach the stand base to the stand neck. Tighten any screws at the bottom of the base to secure it.
- Place the assembled monitor on a stable, flat surface.
5.2. Connecting Cables
- Power Connection: Connect the power adapter to the monitor's power input port, then plug the other end into a power outlet.
- Video Connection: Connect one end of the HDMI cable (or VGA cable) to the corresponding port on your computer's graphics card and the other end to the HDMI (or VGA) port on the monitor.
- Audio Connection (Optional): If your computer has an audio output and you wish to use the monitor's audio input (if available), connect an audio cable from your computer to the monitor's audio input port.
5.3. VESA Wall Mounting (Optional)
The monitor supports a 100mm x 100mm VESA mounting interface. A standard VESA wall mount (not included) is required for this option.
- Remove the stand from the monitor if it is already attached.
- Attach the VESA wall mount bracket to the four screw holes on the back of the monitor using appropriate screws (M4*24 for upper holes, M4*12 for lower holes).
- Follow the instructions provided with your VESA wall mount for installation on the wall.
6. Operating Instructions
6.1. Powering On/Off
Press the power button located on the monitor to turn it on or off. The power indicator light will illuminate when the monitor is on.
6.2. Screen Tilt Adjustment
The monitor screen can be adjusted by tilting it forward or backward. Grasp both sides of the monitor with both hands and gently tilt it to the desired angle. The typical adjustment range is 5±2 degrees forward and 15±2 degrees backward.
6.3. On-Screen Display (OSD) Menu
The OSD menu allows you to adjust various display settings. The control buttons are typically located on the bottom or rear of the monitor.
- Accessing the OSD: Press the Menu button to open the OSD menu.
- Navigation: Use the navigation buttons (e.g., Up/Down, Left/Right arrows) to move through menu options.
- Selection: Press the Select/OK button to enter a sub-menu or confirm a setting.
- Exit: Press the Exit button to close the OSD menu or go back to the previous level.
Common OSD settings include:
- Brightness/Contrast: Adjust the overall luminance and contrast of the display.
- Color Settings: Modify color temperature, hue, and saturation.
- Input Select: Manually switch between HDMI and VGA input sources.
- Picture Mode: Select preset display modes (e.g., Standard, Game, Movie).
- Audio: Adjust volume or mute the monitor's speakers (if applicable).
7. Maintenance
7.1. Cleaning the Monitor
- Always unplug the monitor from the power outlet before cleaning.
- Use a soft, lint-free cloth to gently wipe the screen and exterior surfaces.
- For stubborn marks, lightly dampen the cloth with water or a mild, non-abrasive screen cleaner. Do not spray liquid directly onto the screen.
- Avoid using benzene, thinner, ammonia-based cleaners, or abrasive cleaning agents.
7.2. Storage
If storing the monitor for an extended period, unplug it, clean it, and store it in a cool, dry place, preferably in its original packaging to protect it from dust and physical damage.
8. Troubleshooting
If you encounter issues with your monitor, refer to the following common problems and solutions:
| Problem | Possible Solution |
|---|---|
| No power | Ensure the power cable is securely connected to both the monitor and a working power outlet. Check if the power adapter is functioning. |
| No signal | Verify that the video cable (HDMI/VGA) is correctly connected to both the monitor and the computer. Ensure the correct input source is selected in the OSD menu. Check if the computer is powered on and not in sleep mode. |
| Image is too dark/bright | Adjust the brightness and contrast settings through the OSD menu. |
| Image is blurry or distorted | Ensure the monitor's resolution is set to its native resolution (1920x1080) in your computer's display settings. Check the video cable for damage. |
| Screen flickering | Check the video cable connection. Ensure the refresh rate is set correctly (75Hz). The monitor features flicker-free technology, but external factors can sometimes cause issues. |
| No sound (if applicable) | Check the audio cable connection. Adjust the volume in the OSD menu and on your computer. |
If the problem persists after trying these solutions, please contact customer support.
9. Specifications
| Feature | Description |
|---|---|
| Model Name | 657477962104 |
| Screen Size | 22 Inches |
| Display Type | LED |
| Resolution | 1920x1080 Pixels (Full HD) |
| Refresh Rate | 75Hz |
| Response Time | 3ms |
| Connectivity | HDMI, VGA |
| VESA Mount | 100x100mm |
| Special Features | Tilt Adjustment, Wall Mountable, Bezel-Less Design |
| Color | Black |
| Manufacturer | MTG |
10. Additional Information
10.1. Product Video Overview
Watch this video for a visual overview of MTG monitors and their features. Please note that while this video highlights general MTG monitor features, the specific model shown might be a 24-inch version, not the 22-inch model covered in this manual. However, the core features like refresh rate, response time, viewing angle, and display quality are representative.
Video 10.1: Overview of MTG monitor features, including 75Hz refresh rate, 3ms response time, wide viewing angles, and Full HD display.
10.2. General Product View

Figure 10.2: Front view of the MTG 22-inch monitor.

Figure 10.3: Angled view showcasing the monitor's sleek design.
11. Warranty and Support
For warranty information and technical support, please refer to the warranty card included with your product or visit the official MTG website. Keep your purchase receipt as proof of purchase for warranty claims.
For further assistance, you may contact MTG customer service through their official channels.


