
1. Introduction
This manual provides essential instructions for the safe and effective use of your FUTABA Challenger FP T5NH T6NHP RC Controller Set, designed for helicopter and aircraft applications. Please read this manual thoroughly before operating the device to ensure proper function and to prevent damage or injury.

Figure 1: Rear view of two FUTABA Challenger RC controllers (T5NH and T6NHP models). Both controllers are black with extended antennas and feature various switches and ports on their back panels. One controller has a yellow label indicating "60-750" and another has a white label with "051954".
2. Safety Precautions
WARNING: Failure to follow these safety instructions may result in injury, damage to the product, or property damage.
- Always operate your RC equipment in a safe and open area, away from people, animals, and obstacles.
- Ensure all batteries are fully charged and properly installed before each use.
- Never operate your RC model near power lines, roads, or bodies of water.
- Keep the controller dry and away from moisture.
- Do not attempt to modify or disassemble the controller. Refer all servicing to qualified personnel.
- Always turn on the transmitter (controller) first, then the receiver in the model. When turning off, turn off the receiver first, then the transmitter.
- Regularly inspect the controller for any signs of damage or wear.
3. Package Contents
Verify that all items listed below are present in your package. If any items are missing or damaged, please contact your retailer.
- FUTABA Challenger FP T5NH RC Controller
- FUTABA Challenger FP T6NHP RC Controller
- Receiver (specific model may vary)
- Instruction Manual (this document)
- Frequency Crystals (if applicable, for older models)
4. Setup
4.1 Battery Installation
The FUTABA Challenger controllers require AA batteries for operation. Follow these steps to install the batteries:
- Locate the battery compartment cover on the back of the controller.
- Slide or unclip the cover to open the compartment.
- Insert the required number of AA batteries (typically 8) according to the polarity markings (+ and -) inside the compartment.
- Ensure all batteries are seated correctly and make good contact with the terminals.
- Replace the battery compartment cover, ensuring it clicks securely into place.

Figure 2: Close-up view of an open battery compartment on a FUTABA Challenger RC controller. The compartment is empty, showing the metal contacts and the internal structure designed to hold multiple AA batteries. The cover is detached and visible below the compartment.
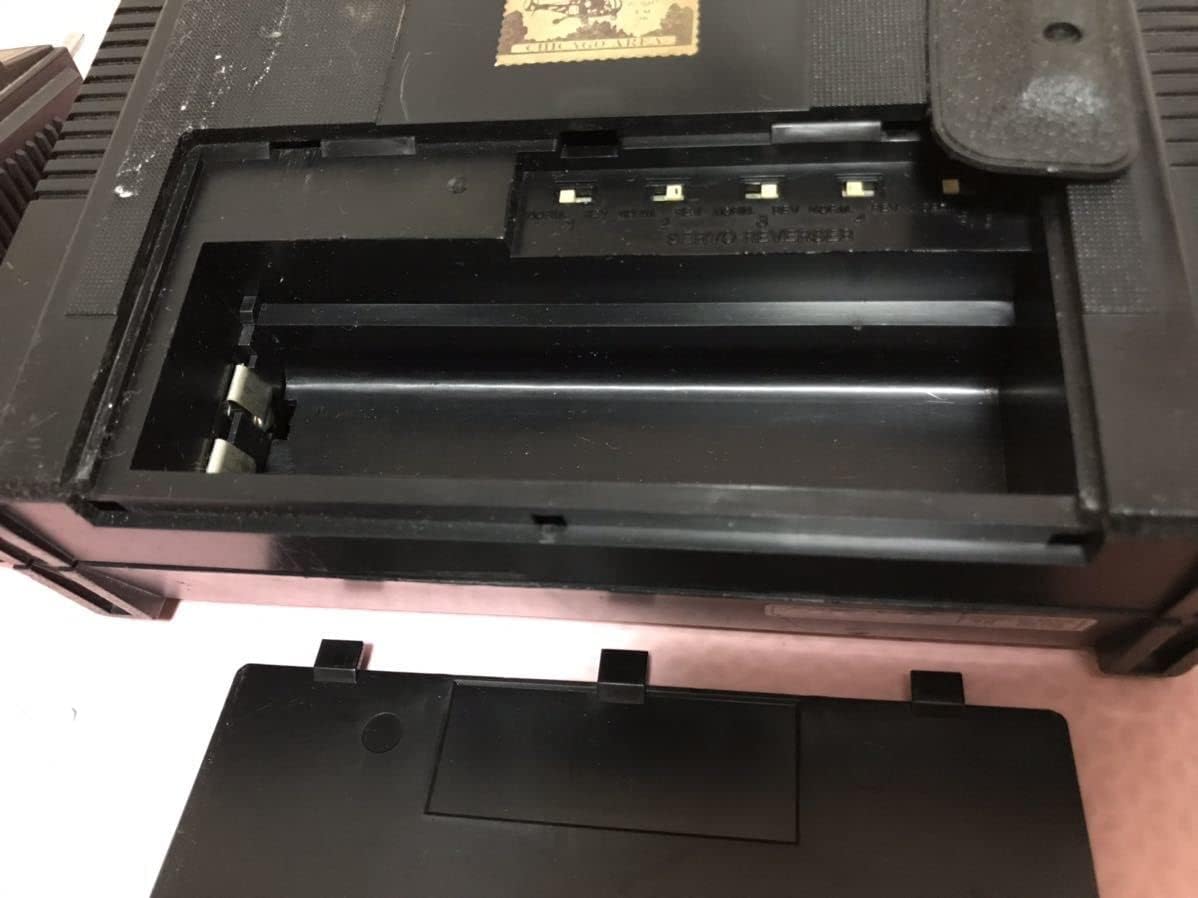
Figure 3: Another view of the open battery compartment of a FUTABA Challenger RC controller. This angle provides a clearer view of the "SERVO REVERSER" switches located above the battery slots, indicating channels for servo reversal settings.
4.2 Binding (Pairing) the Controller and Receiver
For proper operation, the controller must be bound to its corresponding receiver. Refer to your receiver's specific manual for detailed binding instructions, as the process can vary. Generally, it involves:
- Ensure both the controller and receiver are powered off.
- Connect the receiver to a power source (e.g., ESC with BEC, separate receiver battery).
- Activate the binding mode on the receiver (often by pressing a button or inserting a bind plug).
- Turn on the controller while holding its bind button (if applicable) or activating its bind mode through the menu.
- Observe the indicator lights on both devices to confirm successful binding.
- Once bound, power cycle both devices and test control inputs.
4.3 Initial Checks
Before operating your model, perform these checks:
- Verify that all control surfaces (ailerons, elevator, rudder, throttle) respond correctly to controller inputs.
- Check for correct servo direction. Use the "SERVO REVERSER" switches (visible in Figure 3) if a servo needs to be reversed.
- Ensure all linkages are secure and move freely.
- Confirm battery levels for both the controller and the model are sufficient.
5. Operating Instructions
5.1 Powering On/Off
- To Power On: Turn on the controller's power switch first. Then, connect the battery to your model's receiver/ESC.
- To Power Off: Disconnect the battery from your model's receiver/ESC first. Then, turn off the controller's power switch.
IMPORTANT: Always follow the correct power-on/off sequence to prevent loss of control or damage.
5.2 Basic Controls
The FUTABA Challenger controllers typically feature two primary control sticks and several auxiliary switches and trim levers.
- Left Stick (Mode 2): Controls throttle (up/down) and rudder (left/right).
- Right Stick (Mode 2): Controls elevator (up/down) and ailerons (left/right).
- Trim Levers: Used for fine-tuning control surface neutral positions. Adjust these to ensure the model flies straight without constant stick input.
- Switches: Various switches may be present for functions like dual rates, gear retraction, or flight mode selection. Refer to your model's specific setup for their functions.
5.3 Pre-Flight Checks
Before every flight, perform a thorough pre-flight check:
- Confirm all control surfaces move freely and in the correct direction.
- Check for any loose wires or connections.
- Ensure propellers/rotors are securely attached and undamaged.
- Verify sufficient battery charge in both the controller and the model.
- Perform a range check if recommended by your model's manufacturer.
6. Maintenance
6.1 Cleaning
Wipe the controller with a soft, dry cloth. Do not use solvents or abrasive cleaners, as they can damage the plastic and electronic components.
6.2 Storage
- Store the controller in a cool, dry place, away from direct sunlight and extreme temperatures.
- Remove batteries from the controller if it will not be used for an extended period to prevent leakage.
- Keep the antenna retracted or protected during storage.
6.3 Battery Care
- Always use fresh, high-quality batteries.
- Do not mix old and new batteries, or different types of batteries.
- Dispose of used batteries responsibly according to local regulations.
7. Troubleshooting
| Problem | Possible Cause | Solution |
|---|---|---|
| Controller does not power on. | Dead or incorrectly installed batteries. | Check battery polarity, replace with fresh batteries. |
| No control response from model. | Not bound, receiver not powered, out of range, interference. | Re-bind controller and receiver. Check receiver power. Ensure model is within operating range. Avoid areas with strong interference. |
| Erratic control or glitches. | Low battery, interference, loose connections. | Replace controller/model batteries. Move to a different operating location. Check all wiring. |
| Servo moves in wrong direction. | Incorrect servo reversal setting. | Adjust the corresponding "SERVO REVERSER" switch on the back of the controller (refer to Figure 3). |
If you encounter problems not listed here, or if the suggested solutions do not resolve the issue, please contact FUTABA customer support or your retailer.
8. Specifications
- Model: FUTABA Challenger FP T5NH, T6NHP
- Application: Helicopter, Aircraft
- Power Source: AA Batteries (typically 8)
- ASIN: B09ZDZW99T
- First Available on Amazon.co.jp: 2022/05/03
- Channels: Varies by specific model (T5NH/T6NHP typically 5 or 6 channels)
- Frequency: (Not specified in provided data, typically 27MHz, 72MHz, or 2.4GHz for older/newer models)
Note: Specifications are subject to change without notice.
9. Warranty and Support
Specific warranty information for the FUTABA Challenger FP T5NH T6NHP RC Controller Set is not provided in this document. For details regarding warranty coverage, duration, and terms, please refer to the documentation included with your purchase or contact the retailer where the product was acquired.
For technical support, spare parts, or service inquiries, please contact FUTABA customer service directly or visit their official website. Keep your purchase receipt as proof of purchase for any warranty claims.


