1. Product Overview
The VSYSTO 4CH Truck Dash Cam System V7 provides comprehensive 360-degree surveillance for vehicles such as semi-trucks, trailers, buses, RVs, and more. This system includes a 7.0-inch monitor and four 1080P waterproof cameras for front, left, right, and rear views. It features advanced functionalities like GPS tracking, infrared night vision, loop recording, and G-sensor emergency recording to enhance driving safety and provide critical evidence when needed.

Image: Overview of the VSYSTO 4CH Truck Dash Cam System V7, highlighting the 7-inch screen, four cameras, Full HD 1080P recording, G-sensor, GPS tracking, night vision, loop recording, 256GB support, and waterproof cameras.
Key Features:
- 4-Channel 1080P Camera System: Includes four waterproof Full HD cameras for comprehensive front, left, right, and rear surveillance. Records from two cameras simultaneously.
- 7.0-inch HD IPS Monitor: Provides real-time clear footage in single full view or 2-way split-screen options. Automatically switches to relevant camera view for turning or reversing.
- Enhanced Night Vision: Side and rearview cameras are equipped with four powerful IR LED lights for clear nighttime image capture.
- IP67 Waterproof Design: All cameras are rated IP67, suitable for use in various weather conditions.
- Backup Camera Functionality: Connects to the reverse trigger wire for automatic display of the rear view with distance grid lines when reversing.
- Driving Assistance with GPS: Displays battery voltage, driving speed, altitude, and atmospheric pressure via the included GPS tracker on the monitor.
- Loop Recording: Continuously captures footage, automatically overwriting older files when the MicroSD card is full. Supports up to 256GB MicroSD card.
- Emergency Recording (G-Sensor): Built-in G-sensor detects collisions and automatically locks corresponding video files to prevent accidental deletion.
2. Package Contents
Please check the package contents upon receipt to ensure all items are present and undamaged:
- 7.0-inch Monitor
- Cameras (4 units)
- Extension Cables (4 units)
- Power Cable
- 2.4G Wireless Remote Control
- GPS Tracker Module
- Sun Visor for Monitor
3. Installation and Setup
3.1 Mounting the Monitor and Cameras
- Monitor Placement: Securely mount the 7.0-inch monitor on your dashboard using the provided mount. Ensure it does not obstruct your view of the road.
- Camera Placement: Install the four cameras in their designated positions: one for the front, one for the left side, one for the right side, and one for the rear. Ensure cameras are securely fastened and have a clear, unobstructed view. The side and rear cameras are designed for exterior mounting due to their waterproof rating.
3.2 Wiring Connections
Follow the wiring diagram carefully to connect all components. The system is compatible with 12-24V vehicle power supplies.
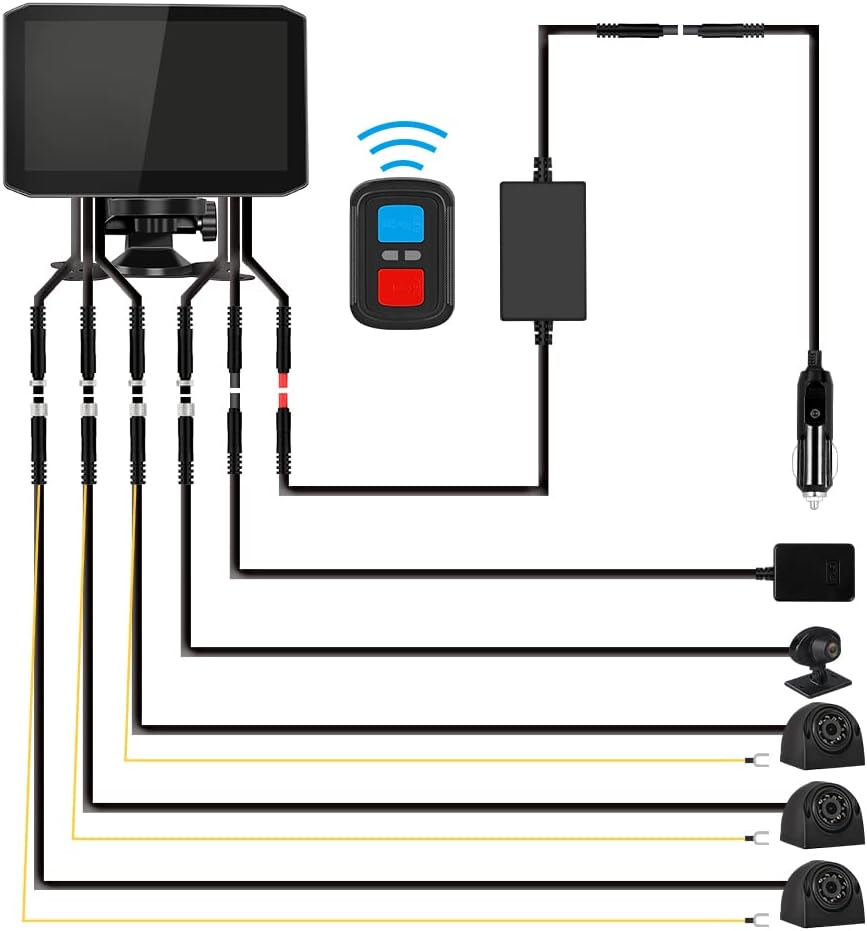
Image: Detailed wiring diagram illustrating how to connect the monitor, four cameras with extension cables, power cable, 2.4G remote, and GPS tracker to the vehicle's power source.
- Connect each camera to its respective extension cable.
- Plug the extension cables into the corresponding ports on the monitor.
- Connect the power cable to the monitor and then to your vehicle's power outlet (e.g., cigarette lighter socket) or hardwire it according to professional installation guidelines.
- Connect the GPS tracker module to its designated port on the system.
- For automatic backup camera functionality, connect the yellow wire from the rear camera to your vehicle's reverse trigger wire.
3.3 MicroSD Card Insertion
Insert a MicroSD card (up to 256GB, Class 10 or higher recommended) into the designated slot on the monitor. Ensure the card is inserted correctly. It is recommended to format the MicroSD card within the device settings before first use.
4. Operating Instructions
4.1 Powering On/Off
The system will typically power on automatically when the vehicle's ignition is turned on and power is supplied. To manually power off, disconnect the power cable or use the designated power button if available.
4.2 Monitor Display Modes
The 7.0-inch monitor supports various display modes:
- Single Full View: Displays footage from one camera in full screen.
- 2-Way Split Screen: Displays footage from two cameras simultaneously.

Image: The monitor showing how to switch between different camera views (front, rear, left, right) using the wireless remote control or by activating the vehicle's turn signals or reverse gear.
4.3 Switching Camera Views
You can switch between camera views using the following methods:
- Wireless Remote Control: Use the provided 2.4G wireless remote to manually select any view in full-screen or split-screen mode. Double-click any button on the remote to quickly access the rear camera display.
- Automatic Switching: The monitor automatically switches to the relevant camera view when you activate a turn signal (left/right camera) or engage reverse gear (rear camera).
4.4 Recording Functions
- Loop Recording: The system continuously records footage. When the MicroSD card is full, the oldest files are automatically overwritten by new recordings, ensuring continuous operation.
- Emergency Recording (G-Sensor): In the event of a sudden impact or collision, the built-in G-sensor detects the event and automatically locks the current video segment, preventing it from being overwritten. These files are saved in a separate event folder.
4.5 GPS Data Display
With the GPS tracker connected, the monitor will display real-time driving data including speed, altitude, and atmospheric pressure. This information is recorded along with the video footage and can be viewed during playback using compatible software.
4.6 Night Vision
The side and rearview cameras are equipped with infrared (IR) LED lights, which activate automatically in low-light conditions to provide clear black-and-white images for enhanced visibility at night.
5. Maintenance
5.1 MicroSD Card Management
- Formatting: Regularly format the MicroSD card (at least once a month) through the monitor's settings menu to ensure optimal performance and prevent data corruption.
- Replacement: If the MicroSD card shows signs of degradation or error, replace it with a new high-quality card (Class 10 or higher, up to 256GB).
5.2 Cleaning
- Cameras: Gently wipe camera lenses with a soft, damp cloth to remove dirt or water spots. Do not use harsh chemicals.
- Monitor: Clean the monitor screen with a soft, lint-free cloth. For stubborn smudges, use a screen-cleaning solution designed for electronics.
5.3 Connection Checks
Periodically check all cable connections to ensure they are secure and free from damage. Loose connections can lead to intermittent operation or loss of footage.
6. Troubleshooting
6.1 System Does Not Power On
- Check the power cable connection to both the monitor and the vehicle's power source.
- Ensure the vehicle's power outlet is functioning.
- Verify the vehicle's battery voltage is within the 12-24V operating range.
6.2 No Recording or Recording Stops
- Ensure a MicroSD card is inserted correctly.
- Format the MicroSD card through the monitor's settings.
- Check if the MicroSD card is full; loop recording should overwrite old files, but a faulty card might prevent this. Replace the card if necessary.
- Ensure the recording function is enabled in the system settings.
6.3 Poor Image Quality
- Clean the camera lenses and monitor screen.
- Ensure camera connections are secure.
- Check for any physical obstructions blocking the camera's view.
- In rural areas or extremely low light, image quality may appear different (e.g., black and white for IR night vision). This is normal operation.
6.4 GPS Signal Issues
- Ensure the GPS module is securely connected.
- Place the GPS module in an area with a clear view of the sky, away from metal obstructions.
- Allow sufficient time for the GPS module to acquire a signal after powering on.
7. Specifications

Image: Dimensions of the VSYSTO 7-inch monitor, individual camera, and remote control, provided in millimeters.
| Feature | Detail |
|---|---|
| Model Name | V7 (RM) |
| Product Dimensions | 7.09 x 4.39 x 0.41 inches |
| Item Weight | 5.59 pounds |
| Video Capture Resolution | 1080p |
| Number of Cameras | 4 (Front, Left, Right, Rear) |
| Monitor Size | 7.0 inch HD IPS Screen |
| Field Of View | 170 Degrees |
| Special Features | 4CH 1080P cameras, GPS module, IR night vision, Sound record, Wireless controller, Compatible for 12-24V vehicles |
| Connectivity Technology | Hard-wired connection |
| Mounting Type | Dashboard Mount |
| MicroSD Card Support | Up to 256GB (not included) |
| Waterproof Rating | IP67 (Cameras) |
| Batteries | 1 Lithium Metal battery required (included) |
| Color | Black |
| Manufacturer | VSYSTO |
| Vehicle Service Type | Truck, Bus, ATV, Minivan, RV, Tractor, UTV, Pickup |
8. Warranty and Support
For warranty information, technical support, or any inquiries regarding your VSYSTO 4CH Truck Dash Cam System V7, please contact VSYSTO customer service directly. You can often find support contact details on the official VSYSTO website or through the retailer where the product was purchased.
Visit the official VSYSTO Store for more information and support resources: VSYSTO Store on Amazon


