
1. Introduction
This manual provides essential instructions for the safe and efficient operation, installation, maintenance, and troubleshooting of your Euhomy Commercial Ice Maker. Please read this manual thoroughly before using the appliance and retain it for future reference.
The Euhomy Commercial Ice Maker is designed to produce up to 84 pounds of ice per 24 hours, with an ice storage capacity of 8.8 pounds. It is suitable for various settings including homes, small businesses, bars, and parties.
2. Safety Instructions
- Ensure the ice maker is connected to a grounded power outlet with the correct voltage (115 Volts).
- Do not operate the appliance with a damaged cord or plug. If damaged, contact qualified service personnel.
- Keep ventilation openings clear of obstructions.
- Do not store explosive substances such as aerosol cans with a flammable propellant in this appliance.
- This appliance is not intended for use by persons (including children) with reduced physical, sensory or mental capabilities, or lack of experience and knowledge, unless they have been given supervision or instruction concerning use of the appliance by a person responsible for their safety.
- Always unplug the ice maker before cleaning or performing any maintenance.
- Do not immerse the appliance, cord, or plug in water or other liquids.
- Use only potable water for ice production.
3. Setup and Installation
Before first use, ensure the ice maker is placed on a stable, level surface away from direct sunlight and heat sources. Allow at least 4 inches of space around the unit for proper ventilation.
3.1 Water Supply Connection
Your Euhomy ice maker supports two methods for water supply: manual addition or direct connection to a water inlet pipe.

Figure 3.1: Illustration of the two water supply methods for the ice maker. Water can be added manually from the top or connected via a water inlet pipe at the rear.
For direct water inlet pipe connection, follow these steps:

Figure 3.2: Detailed steps for connecting the water inlet pipe. This involves removing a plug, inserting the pipe, and securing it with a blue ring.
- Remove Blue Ring and Plug: Locate the water inlet port at the back of the machine. Carefully remove the blue retaining ring and the plug.
- Insert Pipe: Insert the water inlet pipe firmly into the port.
- Secure Blue Ring: Push the blue retaining ring back into place to secure the pipe connection.
3.2 Product Dimensions
Ensure adequate space for the ice maker. The dimensions are approximately 13.4 inches (D) x 13.6 inches (W) x 24 inches (H).

Figure 3.3: Overview of the ice maker's dimensions and included accessories like the ice scoop and water hoses.
3.3 Adjustable Feet
The ice maker is equipped with adjustable feet to ensure stability on uneven surfaces.

Figure 3.4: Adjustable foot for leveling the appliance.
4. Operating Instructions
4.1 Control Panel Overview
The ice maker features an intuitive LCD control panel for easy operation.

Figure 4.1: LCD Control Panel with indicators and buttons.
- LIGHT: Activates the internal light.
- TIMER: Sets a timer for operation.
- CLEAN: Initiates the self-cleaning program.
- ON/OFF: Powers the unit on or off.
- +/- Buttons: Used for adjusting settings, such as ice thickness or timer duration.
Indicator Symbols:
- Flashing Snowflake: Indicates the de-icing process is active.
- Rotating Fan: Indicates the self-cleaning program is running.
- Full Ice Bucket: Indicates the ice storage bin is full, and the machine has stopped ice production.
To switch between water tank supply and faucet connection, press the ON/OFF button for 5 seconds.
4.2 Ice Production
The ice maker produces 32 ice cubes per cycle and has an automatic overflow feature to prevent overfilling.

Figure 4.2: Ice production capacity and automatic overflow mechanism.
The machine is designed for high efficiency and low noise operation.

Figure 4.3: Ice maker in a kitchen environment, demonstrating its quiet operation.
4.3 Ice Cube Characteristics
The ice maker produces cube-type ice that is easy to break and crystal clear. An average cycle produces 32 ice cubes in approximately 13 minutes.
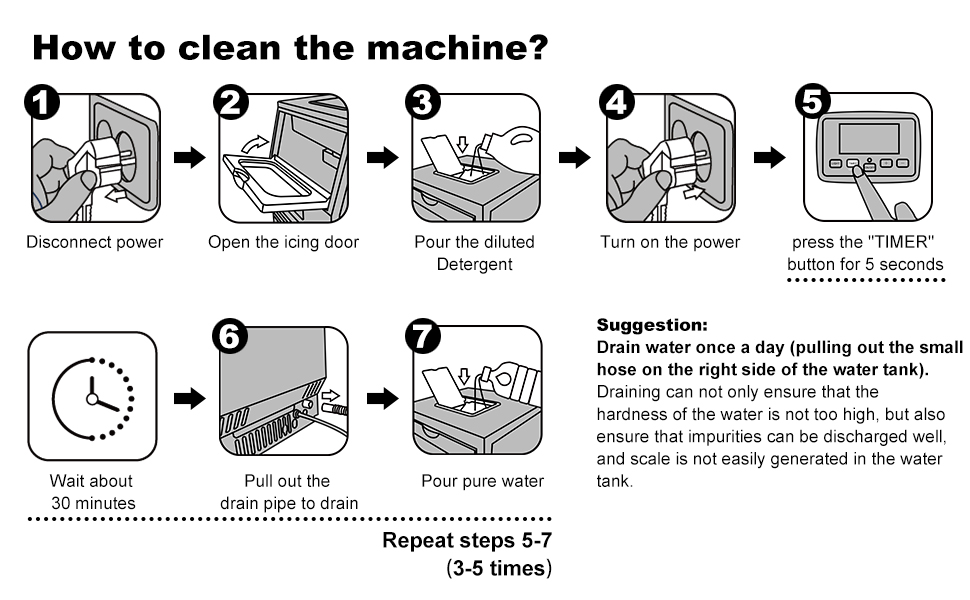
Figure 4.4: Features of the ice cubes and production process.
4.4 Curved Flip Cover Design
The ice maker features a curved flip cover for easy access to the ice bin.

Figure 4.5: Curved flip cover for convenient access.
4.5 Nano Blue Light
The interior of the ice maker is equipped with a Nano Blue Light.

Figure 4.6: Interior with Nano Blue Light.
5. Maintenance
Regular cleaning and maintenance are crucial for the longevity and optimal performance of your ice maker.
5.1 Cleaning Procedure

Figure 5.1: Step-by-step guide for cleaning the ice maker.
- Disconnect Power: Unplug the ice maker from the power outlet.
- Open Icing Door: Open the front door to access the ice-making components.
- Pour Diluted Detergent: Pour a diluted cleaning solution (e.g., food-grade citric acid solution) into the water tank.
- Turn On Power: Plug the ice maker back in.
- Initiate Cleaning: Press the "TIMER" button for 5 seconds to start the self-cleaning cycle.
- Wait: Allow the cleaning cycle to run for approximately 30 minutes.
- Drain: Pull out the drain pipe located on the right side of the water tank to drain the cleaning solution.
Suggestion: Drain water once a day by pulling out the small hose on the right side of the water tank. Regular draining helps prevent the buildup of impurities and scale, ensuring optimal ice quality and machine performance. After draining, pour pure water into the tank and repeat steps 5-7 (3-5 times) to thoroughly rinse the system.
6. Troubleshooting
If you encounter issues with your ice maker, refer to the following common troubleshooting steps:
| Problem | Possible Cause | Solution |
|---|---|---|
| Ice maker not producing ice | No water supply; Water pump malfunction; Refrigerant leak; Ambient temperature too high. | Check water connection/fill water tank; Contact customer support; Ensure proper ventilation. |
| Ice cubes are too small or soft | Water temperature too high; Ambient temperature too high; Insufficient water flow. | Use colder water; Ensure proper ventilation; Check water supply. |
| Machine is noisy | Unit not level; Fan obstruction; Normal operating sounds. | Adjust leveling feet; Clear obstructions from fan; Some noise is normal during operation. |
| "Ice Full" indicator is on, but bin is not full | Ice sensor obstructed or dirty. | Clean the ice sensor. |
| Water leakage | Loose water connections; Damaged drain pipe. | Tighten all water connections; Inspect and replace drain pipe if damaged. |
If the problem persists after attempting these solutions, please contact Euhomy customer support.
7. Specifications
| Feature | Specification |
|---|---|
| Brand | EUHOMY |
| Model Name | Commercial Ice Maker |
| Product Dimensions (D x W x H) | 13.4" x 13.6" x 24" |
| Ice Production Capacity | 84 lbs / 24 Hours |
| Ice Storage Capacity | 8.8 lbs |
| Voltage | 115 Volts |
| Refrigerant | R134a |
| Material Type | Stainless Steel |
| ASIN | B0912YPBL1 |
8. Warranty and Support
For warranty information and customer support, please refer to the documentation included with your product or visit the official Euhomy brand store.

Figure 8.1: Customer Support Icon.
Visit the EUHOMY Store for more information.


