
1. Introduction
This manual provides detailed instructions for the installation, operation, and maintenance of your VINGLI 4Ft x 12Ft Black Pool Fence. This safety fence is designed to help prevent accidental drowning by creating a barrier around your pool area, keeping children and pets safe. Please read all instructions carefully before beginning installation and retain this manual for future reference.

Image: VINGLI pool fence providing a safety barrier around a swimming pool, with children playing nearby.
2. Package Contents
Verify that all components are present before beginning installation. If any parts are missing, please contact VINGLI customer support.
- Mesh Fence Panels (4ft tall, 12ft long each)
- Aluminum Poles (integrated into fence panels)
- Plastic Sleeves (for ground installation)
- Caps for Plastic Sleeves
- Hook and Eye Latches (pre-attached for connecting panels)
- Installation Hardware (screws, drill guide ruler)

Image: Detailed view of the fence components: durable aluminum poles, plastic sleeves for ground insertion, secure hook and eye latches, and premium Textilene mesh.
3. Setup and Installation
The VINGLI pool fence is designed for straightforward installation. A 5/8-inch drill bit is required for drilling holes into your pool deck. Follow these steps carefully:
- Plan Your Layout: Determine the desired perimeter for your pool fence. The fence panels are 12 feet long. Use the provided drill guide ruler to mark the positions for drilling holes, ensuring proper spacing for a taut fence.
- Drill Holes: Using a hammer drill and a 5/8-inch drill bit, drill holes at the marked positions. Ensure the holes are deep enough to accommodate the plastic sleeves.
- Clear Debris: After drilling, remove any remaining drilling debris from the holes. A water gun or air compressor can be used for this.
- Insert Plastic Sleeves: Remove the caps from the plastic sleeves and insert the sleeves into the drilled holes. Keep the caps for future reuse if the fence is disassembled.
- Install Fence Panels: Insert the aluminum poles of the fence panels into the installed plastic sleeves. Connect adjacent panels using the pre-attached hook and eye latches. Ensure all connections are secure.
- Adjust and Secure: Adjust the fence panels to ensure they are taut and upright. The design allows for flexibility to accommodate irregularly shaped pool areas.

Image: Easy DIY installation process, illustrating the use of a 5/8-inch drill bit and guide ruler to prepare the ground for fence poles.

Image: The VINGLI pool fence installed around an irregularly shaped pool, showcasing its flexible design.
Installation Video Guide
Video: Official VINGLI Pool Fence Installation Guide. This video demonstrates the step-by-step process for setting up your pool fence.
4. Operation
The VINGLI pool fence is designed for easy removal and reinstallation by a single person when access to the pool area is needed, or when children and pets are not present.
Connecting and Disconnecting Panels
Each fence panel features a hook and eye latch system for secure connection. To connect two panels, simply align the hook from one panel with the eye on the adjacent panel and secure it. To disconnect, unlatch the hook from the eye.
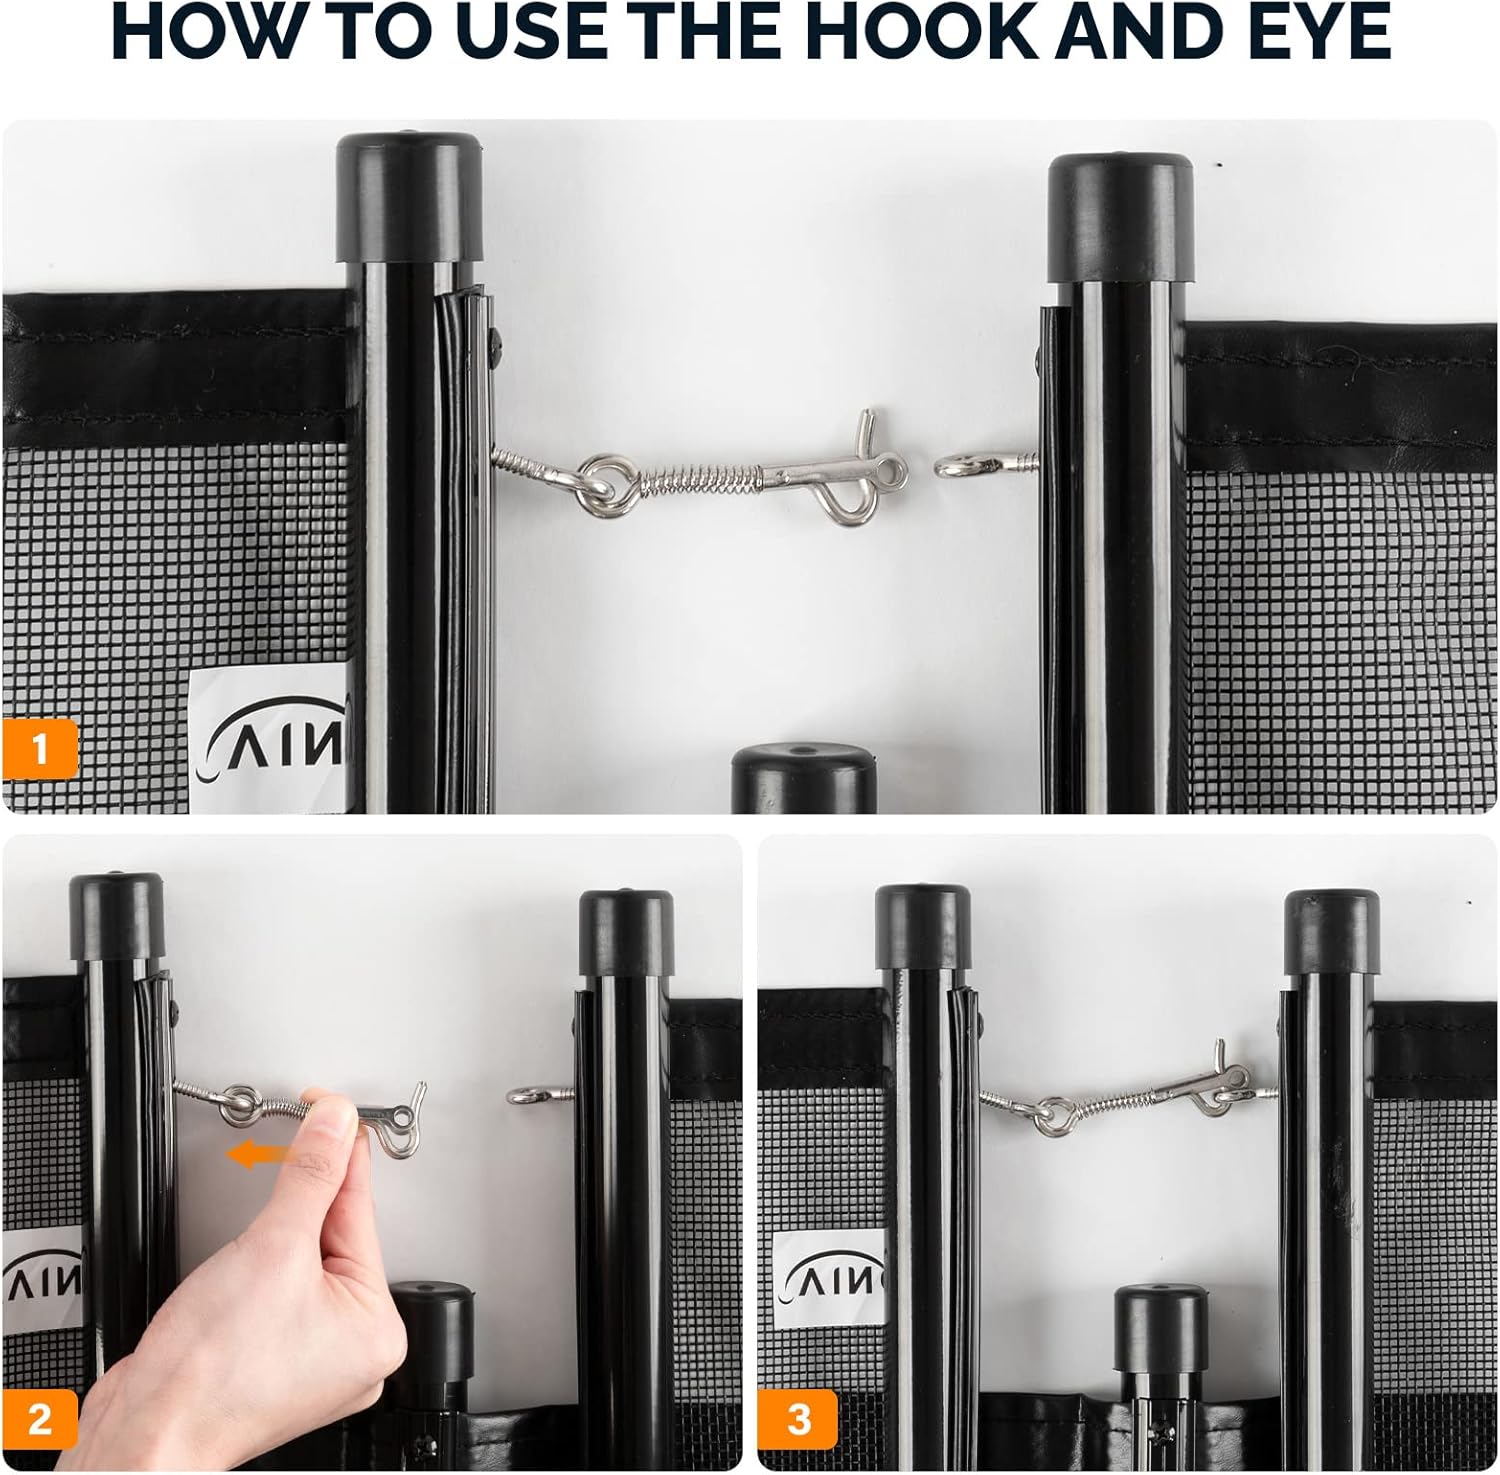
Image: Instructions on how to properly engage and disengage the hook and eye latches for connecting fence sections.
Temporary Removal and Storage
When the fence is not needed, it can be easily removed from the ground sleeves. The flexible mesh material allows the fence sections to be rolled up for compact storage, saving space.
5. Maintenance
Regular maintenance will ensure the longevity and effectiveness of your VINGLI pool fence.
- Cleaning: Clean the mesh fabric and aluminum poles periodically with mild soap and water. Rinse thoroughly and allow to air dry. Avoid harsh chemicals or abrasive cleaners that could damage the material.
- Inspection: Regularly inspect the fence for any signs of wear, tear, or damage to the mesh, poles, or latches. Ensure all connections are secure and the fence remains taut.
- Storage: If removing the fence for extended periods, clean it thoroughly, roll up the sections, and store them in a dry, protected area to prevent damage and prolong life. Ensure the plastic sleeve caps are in place to prevent debris from entering the ground holes.
6. Troubleshooting
Here are solutions to common issues you might encounter:
| Problem | Possible Cause | Solution |
|---|---|---|
| Fence is not standing straight or is sagging. | Improper hole alignment; insufficient tension; damaged poles. | Ensure holes are drilled precisely according to the guide. Check that all poles are fully inserted into sleeves. Verify latches are securely fastened. Inspect poles for bends or damage. |
| Difficulty connecting panels. | Misalignment of panels; bent hooks/eyes. | Ensure panels are aligned correctly before attempting to latch. Straighten any bent hooks or eyes carefully. |
| Fence material appears damaged (tears, fraying). | Sharp objects; excessive force; prolonged exposure to harsh elements. | Avoid contact with sharp objects. Do not apply excessive force. For significant damage, consider replacing the affected panel to maintain safety. |
7. Specifications
- Brand: VINGLI
- Model Number: VINGLI992
- Product Dimensions: 144"L x 48"W (12 feet long x 4 feet high per section)
- Material: Aluminum (poles), Premium Mesh Fabric (fence)
- Color: Black
- Item Weight: 12.1 Pounds
- Required Assembly: Yes
- Included Components: Fence panel with poles, plastic sleeves, hardware bag
8. Warranty
VINGLI is committed to providing quality products. This in-ground swimming pool fence is covered by a manufacturer's warranty. If you encounter any issues or find a part missing upon delivery, please contact our customer support team immediately. We are dedicated to offering the best solution and ensuring your satisfaction.
9. Customer Support
For any questions, assistance, or to report missing parts, please contact VINGLI customer support. Refer to your purchase documentation or the VINGLI official website for specific contact details.
We recommend keeping your purchase receipt and model number (VINGLI992) handy when contacting support.
