Introduction
Thank you for choosing the AECOJOY Metal Patio Table and Chairs Set. This manual provides essential information for the safe assembly, operation, and maintenance of your new outdoor dining furniture. Please read these instructions thoroughly before beginning assembly and retain this manual for future reference.
Safety Information
- Always assemble the product on a soft, non-abrasive surface to prevent damage.
- Ensure all bolts and screws are securely tightened before use. Periodically check and re-tighten as necessary.
- Do not exceed the maximum weight capacity of 350 lbs (158.8 kg) per chair.
- Keep children and pets away from the assembly area.
- Use caution when handling components to avoid pinching or injury.
- Do not use the table or chairs for purposes other than their intended use as outdoor dining furniture.
Parts List
Your AECOJOY Patio Dining Set will arrive in two separate boxes. Please ensure you have received both Box A (1/2) and Box B (2/2) before beginning assembly, as all hardware is contained within Box B.
| Component | Quantity | Box |
|---|---|---|
| Round Patio Table | 1 | B (2/2) |
| Patio Dining Chairs | 4 | A (1/2) |
| Assembly Hardware (Bolts, Washers, Wrench) | 1 Set | B (2/2) |
Setup and Assembly
Follow these steps carefully for proper assembly. It is recommended to have two people for assembly.
Step 1: Unpacking and Preparation
Carefully remove all components from the packaging. Lay them out on a clean, soft surface to prevent scratches. Verify all parts listed above are present.

Image: The patio set components are shipped in two separate boxes. Ensure both are received before starting assembly.
Step 2: Assembling the Table
- Place the round table top upside down on your prepared surface.
- Attach the table legs to the underside of the table top. Insert bolts loosely at first.
- Once all legs are in place, gently flip the table upright.
- On a level surface, gradually tighten all bolts using the provided wrench. Ensure the table is stable and does not wobble.

Image: Visual guide for attaching the table legs and ensuring stability.

Image: The table features adjustable screws on its legs to adapt to uneven ground conditions.
Step 3: Assembling the Chairs
- For each chair, attach one side frame to the seat part, inserting bolts loosely.
- Repeat for the other side frame.
- Attach the backrest to the assembled seat and side frames, again inserting bolts loosely.
- Once all parts are aligned, place the chair on a level surface and gradually tighten all bolts until secure.

Image: Step-by-step illustration for assembling the patio chairs.
Important Note: Some users have found that using personal tools (e.g., a socket wrench) can make tightening bolts easier than the provided tool, especially for the table. Ensure all connections are firm for stability.
Operating Instructions
Umbrella Hole Usage
The table features a 1.73-inch (4.4 cm) umbrella hole, suitable for most standard patio umbrellas. The double holes on the table's underside help secure the umbrella in place, providing shade for comfortable outdoor enjoyment.

Image: The patio table is designed with a central hole for an umbrella (umbrella not included).
Adjusting for Uneven Surfaces
All four table legs are equipped with adjustable screws. Rotate these screws at the base of each leg to level the table on uneven patio or garden surfaces, ensuring absolute stability.
Maintenance
- Cleaning: The mesh design of the chairs and tabletops allows rainwater to pass through easily. Clean the furniture with a dry or damp cloth. Avoid harsh chemicals or abrasive cleaners that could damage the finish.
- Weather Protection: Made of powder-coated steel, the set is designed to be weather and rust-proof. However, for extended longevity, consider covering the furniture during extreme weather conditions or prolonged periods of non-use.
- Storage: The chairs are stackable, greatly saving storage space when not in use. Store in a dry, protected area during off-season to preserve the material.

Image: The chairs are designed to be stackable for convenient storage.
Troubleshooting
| Problem | Possible Cause | Solution |
|---|---|---|
| Difficulty assembling / Bolts not fitting | Misalignment of parts; coating interfering with threads; inadequate tools. | Ensure all bolts are loosely inserted before tightening any. Try using a personal socket wrench for better leverage. If issues persist, contact customer support. |
| Table or chairs wobble | Bolts not fully tightened; uneven ground. | Ensure all bolts are securely tightened. Adjust the leveling screws on the table legs to compensate for uneven surfaces. |
| Missing parts or hardware | Shipping error; overlooked during unpacking. | Verify both Box A and Box B have been received and thoroughly checked. Contact AECOJOY customer service for replacement parts. |
Specifications
| Feature | Detail |
|---|---|
| Brand | AECOJOY |
| Model Number | 19034 |
| Material | Heavy-Duty E-coating Steel |
| Color | Dark Gray |
| Table Dimensions | φ37.2 inches Round, 28.5 inches Height |
| Chair Dimensions | 21" (W) x 22" (D) x 34" (H) |
| Chair Max Weight Capacity | 350 lbs (158.8 kg) |
| Umbrella Hole Diameter | 1.73 inches (4.4 cm) |
| Item Weight | 62 pounds |
| Product Care | Wipe with Damp Cloth |

Image: Detailed dimensions for the round table and chairs.
Product Overview Video
Watch this official video for a visual overview of the AECOJOY Patio Dining Set, highlighting its features and design.
Video: AECOJOY 5-Piece Outdoor Table and Chairs. This video showcases the patio set's design, features like the umbrella hole, and the e-coated steel frame.
Additional Product Features
- Durable Frame with E-coating: The heavy-duty E-coating steel construction provides excellent rust and weather resistance, ensuring long-lasting outdoor use.
- Modern Net Design: The mesh design of the table and chairs prevents water accumulation, making it easy to clean and quick to dry.
- Ergonomic Design: The chairs feature a curved back design and armrests for improved comfort during leisure time.
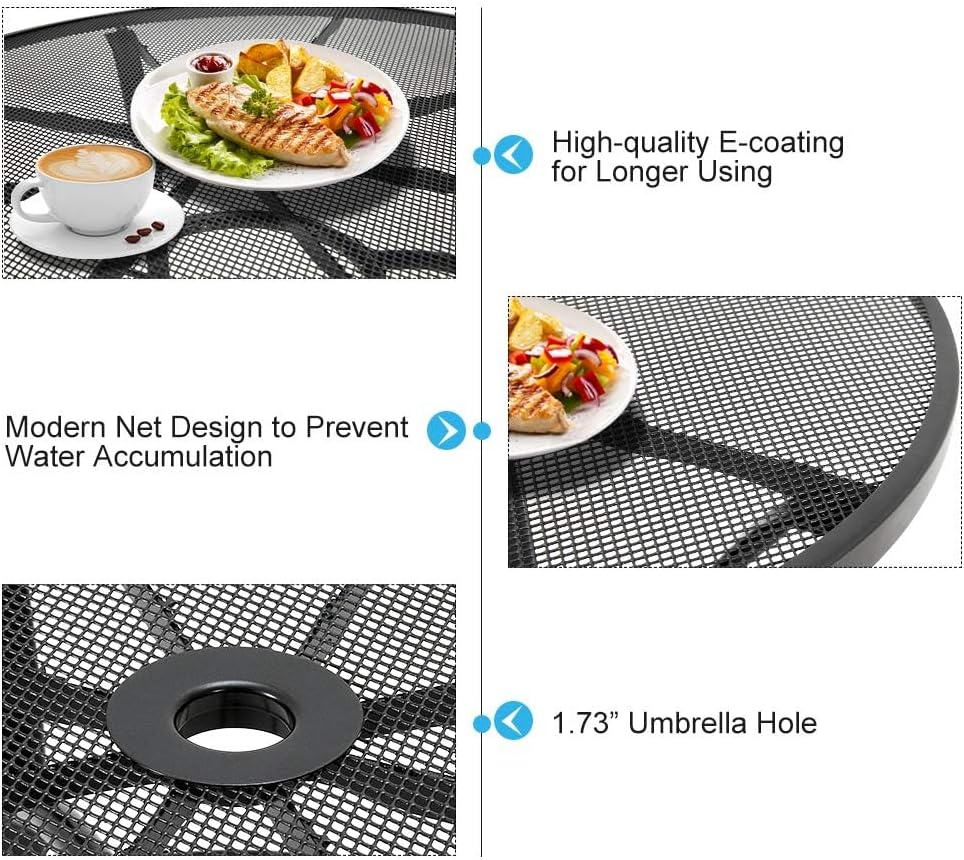
Image: Highlights of the durable E-coating and ergonomic curved back design.

Image: Demonstrates the high-quality E-coating, modern net design for drainage, and the 1.73" umbrella hole.


