
1. Introduction
This manual provides essential information for the safe and effective operation, maintenance, and troubleshooting of your Einhell TE-CN 18 Li-Solo Cordless Nailer/Stapler. This tool is designed for fastening objects using staples or nails in various DIY, workshop, and renovation tasks. As part of the Power X-Change family, it is compatible with all Power X-Change series batteries (sold separately).

Figure 1.1: The Einhell TE-CN 18 Li-Solo Cordless Nailer/Stapler. This image shows the main unit with a battery attached, ready for use, alongside a small quantity of nails and staples.
2. Safety Instructions
WARNING: Read all safety warnings, instructions, illustrations, and specifications provided with this power tool. Failure to follow all instructions listed below may result in electric shock, fire, and/or serious injury.
- Always wear eye protection and hearing protection when operating the tool.
- Do not point the tool at yourself or others.
- Ensure the workpiece is securely fastened before operation.
- Disconnect the battery pack before making any adjustments, changing accessories, or storing the tool.
- Keep hands and body parts away from the firing area.
- Do not operate the tool if the safety nose is damaged or malfunctioning.
- Use only recommended nails and staples for this tool.
- Keep the work area clean and well-lit. Cluttered or dark areas invite accidents.
- Do not operate power tools in explosive atmospheres, such as in the presence of flammable liquids, gases, or dust.
- Maintain power tools. Check for misalignment or binding of moving parts, breakage of parts, and any other condition that may affect the power tool’s operation.

Figure 2.1: Safety Nose Indicator. This icon highlights the importance of the safety nose mechanism, which prevents accidental firing.
3. Product Features
The Einhell TE-CN 18 Li-Solo offers a range of features designed for efficient and safe fastening:
- Power X-Change Compatibility: Utilizes any 18V battery from the Einhell Power X-Change system.
- 2-in-1 Functionality: Capable of both nailing and stapling for versatile applications.
- High Impact Rate: Robust gearbox delivers up to 20 impacts per minute.
- Adjustable Depth: A large adjustment wheel allows for variable impact depth, suitable for different material thicknesses.
- Slim Stapling Nose: Enables precise work close to edges and in confined spaces.
- Easy-Open Magazine: The magazine can be opened and refilled quickly with a push of a button.
- Magazine Level Indicator: Provides a clear overview of the current fill level.
- Safety Release Mechanism: Prevents unintentional firing and reduces the risk of injury.
- Softgrip Surfaces: Ergonomically designed for comfortable and secure handling.
- Practical Belt Clip: For convenient and safe storage during work.
- Included Fasteners: Supplied with 300 nails (32 mm) and 300 staples (19 mm).
- Allen Key: Included for quick and easy clearing of jams.

Figure 3.1: Power X-Change System Compatibility. This image illustrates the nailer's compatibility with the Einhell Power X-Change battery system, showing various tools that share the same battery platform.
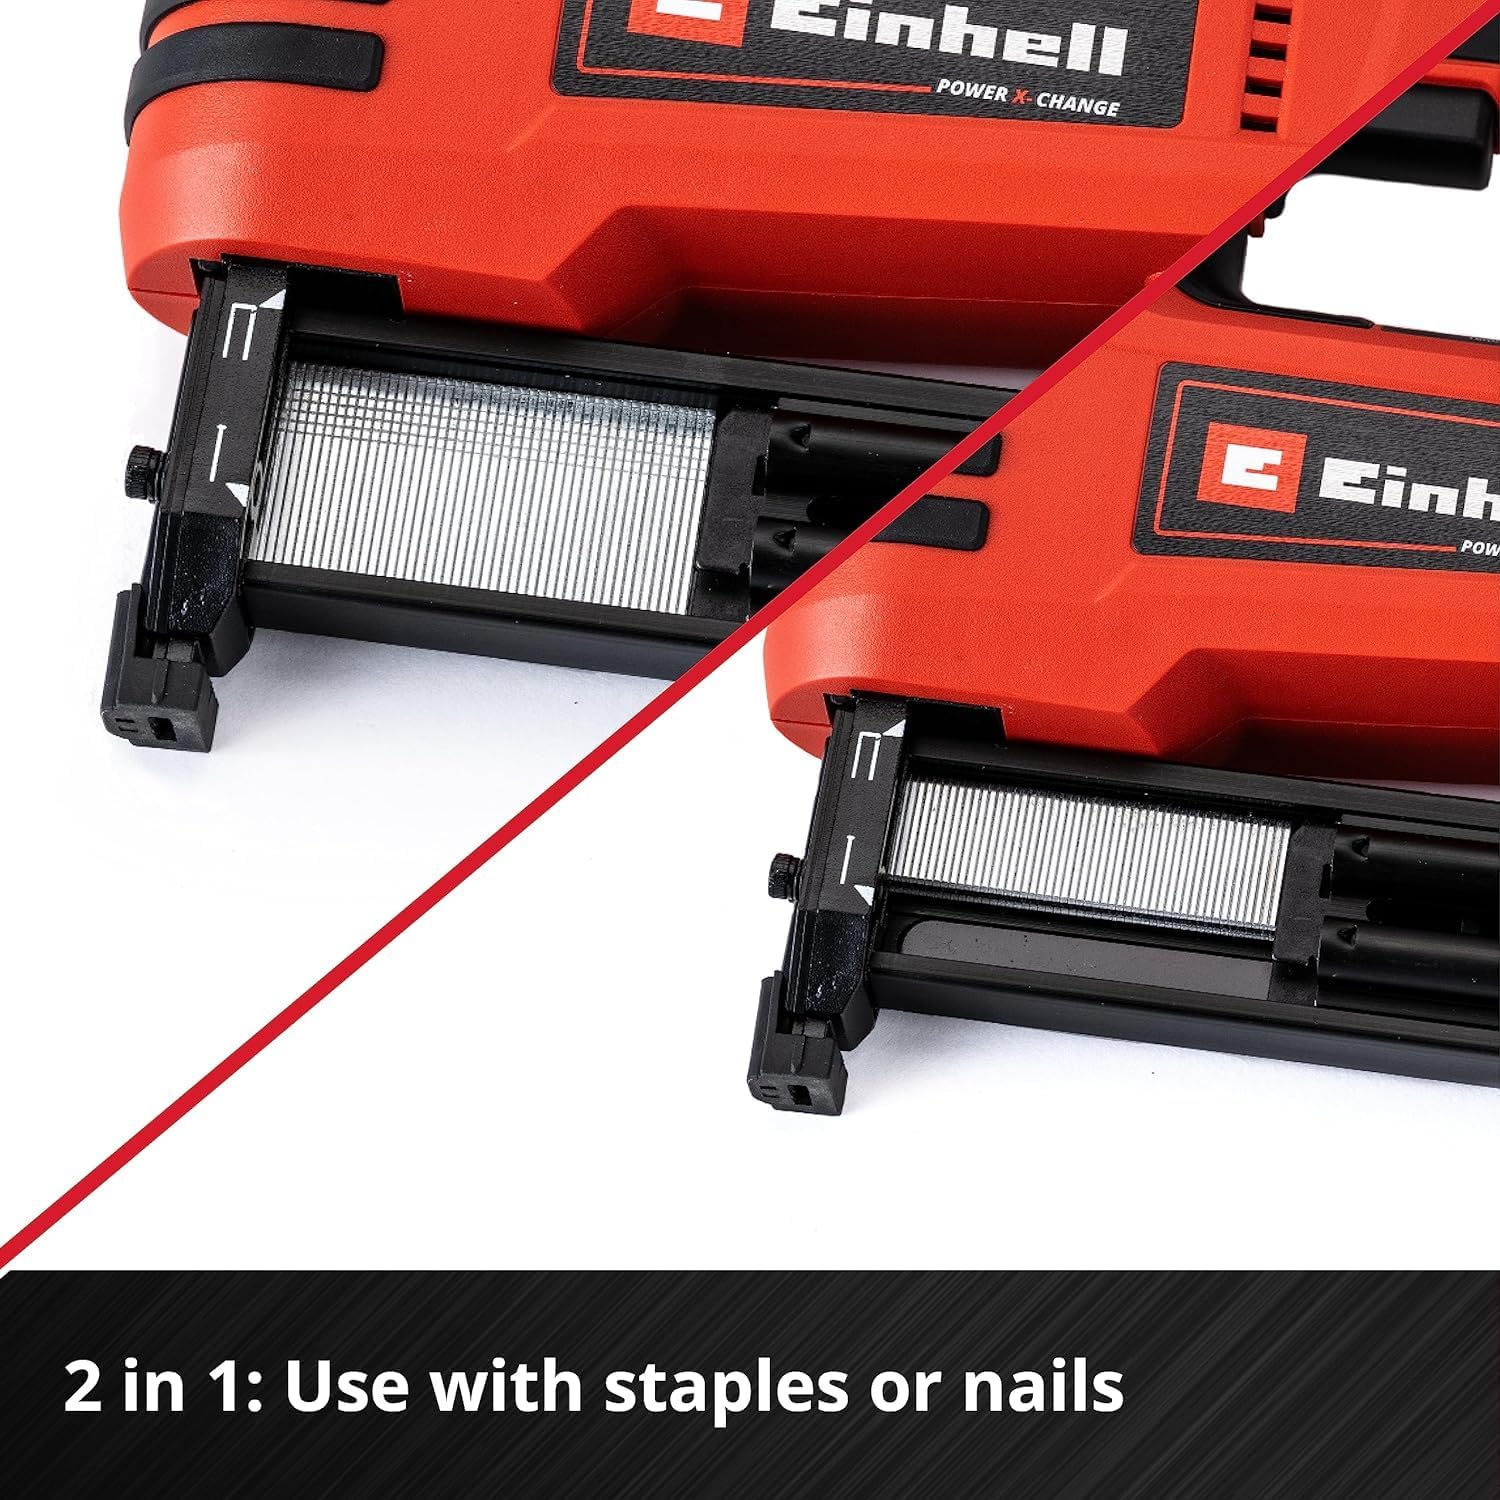
Figure 3.2: Dual Functionality. This image highlights the tool's ability to use both staples and nails, demonstrating the versatility of the magazine.
4. Setup
4.1. Battery Installation
The Einhell TE-CN 18 Li-Solo is supplied without a battery or charger. These must be purchased separately as part of the Power X-Change system.
- Ensure the tool is switched off.
- Align the charged Power X-Change battery pack with the battery slot on the tool.
- Slide the battery pack into the slot until it clicks securely into place.
- To remove, press the release button on the battery pack and slide it out.

Figure 4.1: Battery and Charger Exclusion. This image visually indicates that the battery and charger are not included with the tool and must be acquired separately.
4.2. Loading Nails or Staples
Always disconnect the battery before loading fasteners.
- Press the magazine release button (refer to Figure 4.2) to open the magazine.
- Insert a strip of nails or staples into the magazine with the points facing forward. Ensure the correct size (32mm nails or 19mm staples) is used.
- Close the magazine until it clicks securely.
- Check the magazine level indicator to confirm fasteners are loaded.

Figure 4.2: Magazine Release. This image shows a hand pressing the button to open the fastener magazine for loading.

Figure 4.3: Fastener Sizes. This image displays the two types of fasteners included: 32mm nails and 19mm staples.
4.3. Adjusting Depth
The impact depth can be adjusted to suit the material and desired finish.
- Locate the depth adjustment wheel on the top of the tool.
- Rotate the wheel to increase or decrease the impact depth. Test on a scrap piece of material to find the optimal setting.

Figure 4.4: Depth Adjustment. This image shows hands adjusting the dial on top of the tool to control the fastener's driving depth.

Figure 4.5: Depth Adjustment Icon. This icon visually represents the depth adjustment feature of the tool.
5. Operating Instructions
Before operating, ensure all safety precautions are understood and followed.
- Prepare Workpiece: Ensure the material to be fastened is clean, dry, and free of obstructions.
- Position Tool: Place the nose of the tool firmly against the workpiece at the desired fastening point. The safety nose must be fully depressed for the tool to fire.
- Fire Fastener: Squeeze the trigger to drive a nail or staple. The tool will fire only when the safety nose is engaged.
- Working Near Edges: The slim stapling nose allows for precise fastening close to edges.

Figure 5.1: Operating the Tool. This image shows a user operating the cordless nailer to fasten a baseboard, demonstrating its use in a practical application.

Figure 5.2: Slim Nose Design. This close-up image highlights the slim design of the tool's nose, which facilitates working accurately in tight spaces and close to edges.
6. Maintenance
Regular maintenance ensures the longevity and optimal performance of your tool. Always disconnect the battery before performing any maintenance.
6.1. Cleaning
- Wipe the tool clean with a soft, damp cloth. Do not use harsh chemicals or abrasive cleaners.
- Keep the air vents clear of dust and debris to prevent overheating.
- Periodically inspect the magazine and firing mechanism for any buildup of dust or small debris.
6.2. Clearing Jams
If a nail or staple becomes jammed:
- Disconnect the battery pack immediately.
- Open the magazine and remove any remaining fasteners.
- Use the provided Allen key to carefully remove the jammed fastener from the firing mechanism. Refer to the tool's diagram for specific jam clearing points.
- Ensure all parts are clear before reloading and reattaching the battery.
6.3. Storage
- Store the tool in a dry, secure place, out of reach of children.
- Remove the battery pack before storing for extended periods.
7. Troubleshooting
| Problem | Possible Cause | Solution |
|---|---|---|
| Tool does not fire. |
|
|
| Fasteners not fully driven. |
|
|
| Frequent jams. |
|
|
8. Specifications
| Feature | Detail |
|---|---|
| Model Number | 4257790 |
| Brand | Einhell |
| Power Source | 18V Power X-Change Battery (not included) |
| Impact Rate | Up to 20 impacts per minute |
| Nail Length | Max. 32 mm |
| Staple Length | Max. 19 mm |
| Magazine Capacity | 100 nails or staples |
| Dimensions (L x W x H) | 21.3 x 7.2 x 25.9 cm |
| Weight (without battery) | 2.28 kg |
| Material | Plastic |
| Operating Mode | Automatic |
8.1. Fastener Capacity per Battery Charge
Approximate number of fasteners that can be driven per battery charge (soft timber):
Staples (22 mm)
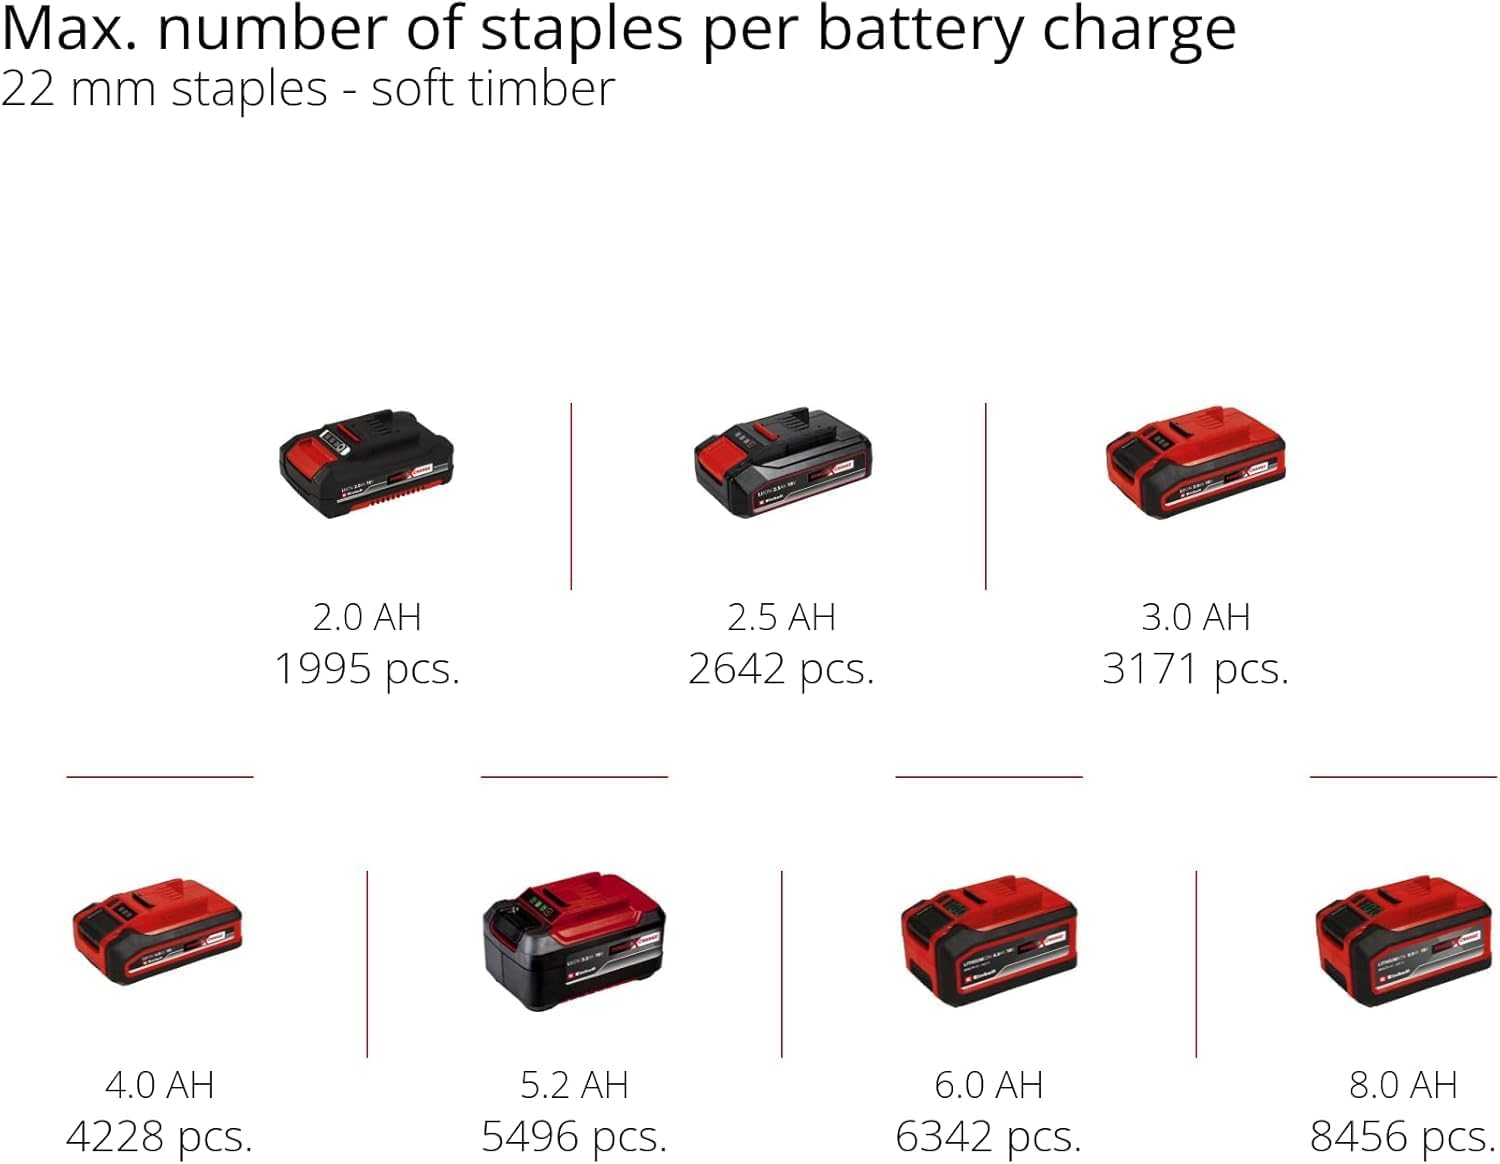
Figure 8.1: Staple Capacity Chart. This chart illustrates the approximate number of 22mm staples that can be driven on a single charge for various Power X-Change battery capacities.
- 2.0 Ah: 1995 pcs.
- 2.5 Ah: 2642 pcs.
- 3.0 Ah: 3171 pcs.
- 4.0 Ah: 4228 pcs.
- 5.2 Ah: 5496 pcs.
- 6.0 Ah: 6342 pcs.
- 8.0 Ah: 8456 pcs.
Nails (32 mm)

Figure 8.2: Nail Capacity Chart. This chart illustrates the approximate number of 32mm nails that can be driven on a single charge for various Power X-Change battery capacities.
- 2.0 Ah: 2030 pcs.
- 2.5 Ah: 2670 pcs.
- 3.0 Ah: 3204 pcs.
- 4.0 Ah: 4272 pcs.
- 5.2 Ah: 5554 pcs.
- 6.0 Ah: 6408 pcs.
- 8.0 Ah: 8544 pcs.
9. Warranty and Support
Einhell provides a 2-year availability for spare parts for this product.
For warranty claims, technical support, or to order spare parts, please contact Einhell customer service or visit their official website. Keep your proof of purchase for warranty validation.
Contact Information: Please refer to the official Einhell website or product packaging for the most up-to-date contact details for your region.


