Introduction
This manual provides detailed instructions for the setup, operation, and maintenance of your Sharp Digital Alarm Clock, Model B08TG1QB2B. Designed for simplicity, this clock features a clear LED display, dual ascending alarms, and a battery backup system to ensure reliability.

Figure 1: Front view of the Sharp Digital Alarm Clock, displaying the time 12:08 in green LED digits.
Product Features
- Easy-to-Use Design: Simple operation suitable for all users.
- Dual Alarm System: Set two independent alarms for different schedules.
- Ascending Alarm Volume: Alarm starts softly and gradually increases in volume for a gentle wake-up.
- Battery Backup: Maintains time and alarm settings during power outages (requires 2x AA batteries, not included).
- Illuminated Green LED Digits: Clear and easy-to-read display.
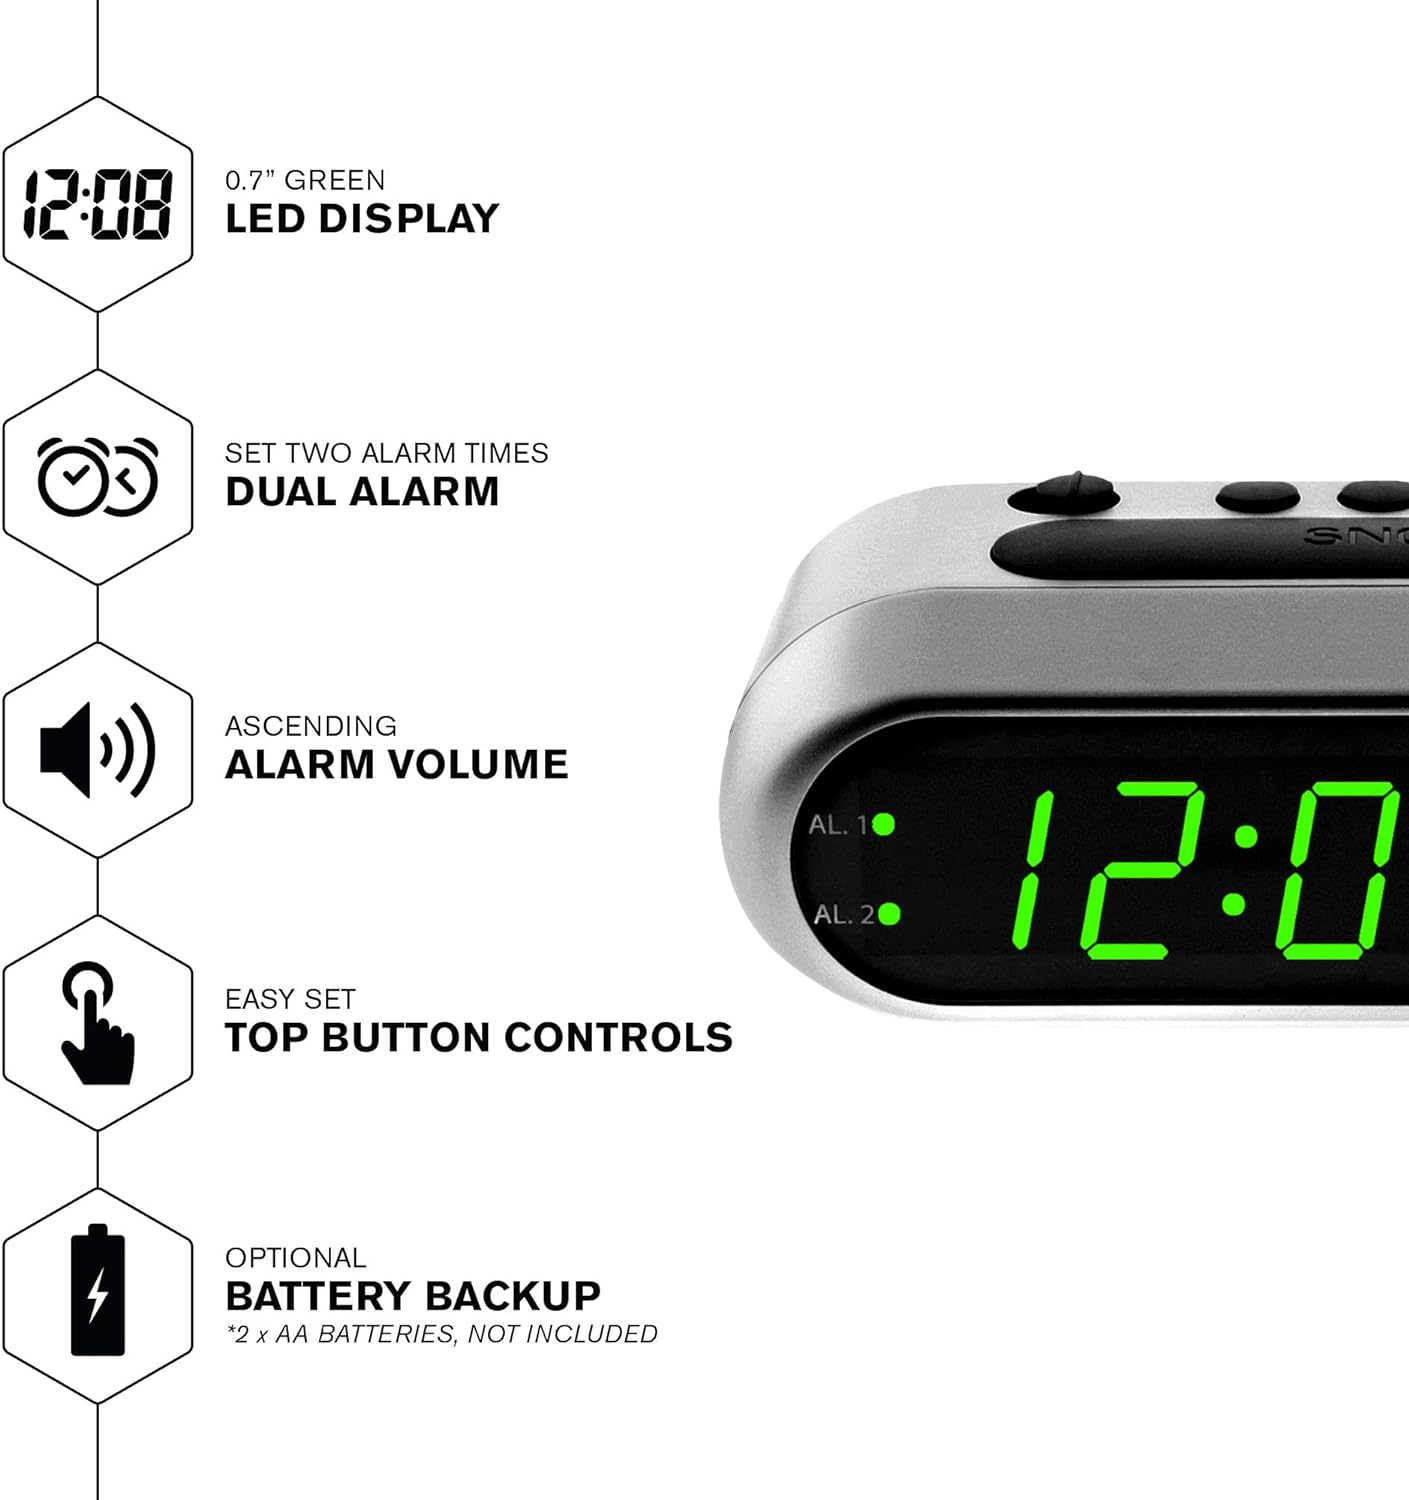
Figure 2: Overview of the clock's main features, including the LED display, dual alarm, ascending volume, and battery backup.
Package Contents
- Sharp Digital Alarm Clock (Model B08TG1QB2B)
- AC Power Adapter
- Instruction Manual
Note: 2x AA batteries for battery backup are not included and must be purchased separately.
Controls and Display
Familiarize yourself with the buttons and indicators on your alarm clock:
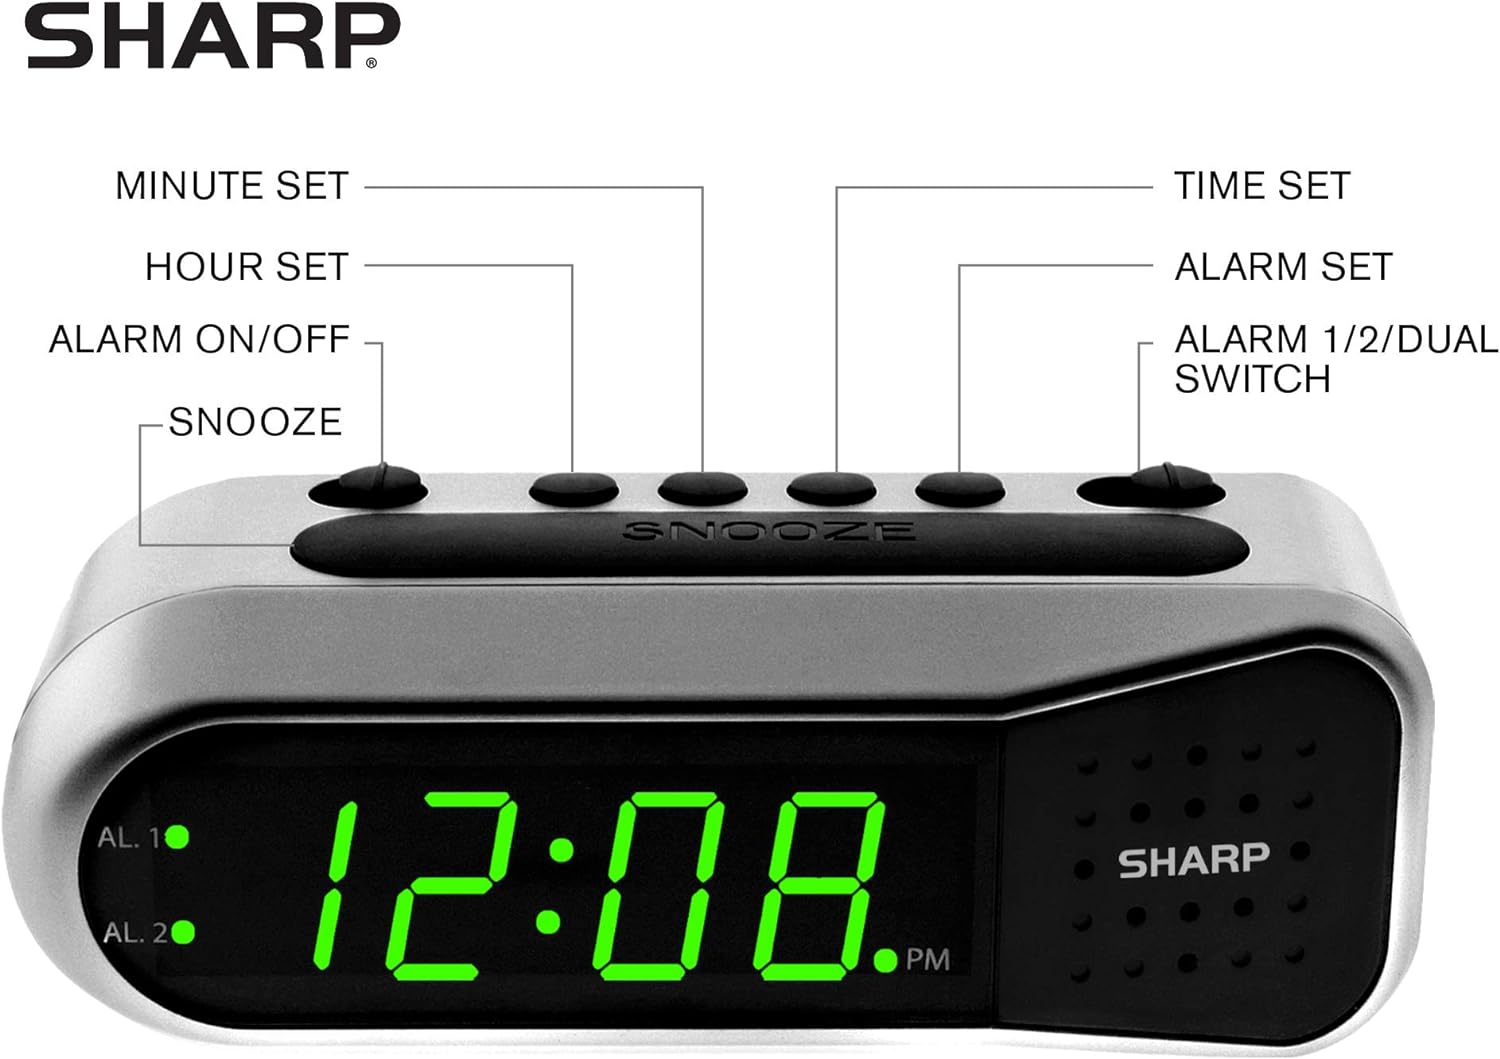
Figure 3: Labeled diagram of the clock's controls and display elements.
- Minute Set Button: Adjusts minutes for time and alarm settings.
- Hour Set Button: Adjusts hours for time and alarm settings.
- Alarm On/Off Switch: Activates or deactivates the selected alarm.
- Snooze Button: Temporarily silences the alarm for a short period.
- Time Set Button: Enters time setting mode.
- Alarm Set Button: Enters alarm setting mode.
- Alarm 1/2/Dual Switch: Selects which alarm (Alarm 1, Alarm 2, or both) is being set or activated.
- AL. 1 Indicator: Lights up when Alarm 1 is active.
- AL. 2 Indicator: Lights up when Alarm 2 is active.
- PM Indicator: Lights up when the displayed time is PM.
Setup
1. Power Connection
Connect the AC power adapter to the DC input jack located on the back of the alarm clock. Plug the adapter into a standard electrical outlet. The display will illuminate.
2. Battery Backup Installation
The battery backup feature requires two (2) AA batteries (not included). These batteries maintain time and alarm settings during a power outage but do not power the display.
- Open the battery compartment cover on the bottom of the clock.
- Insert two (2) AA batteries, observing the correct polarity (+ and -) as indicated inside the compartment.
- Replace the battery compartment cover.
Note: Replace batteries annually or when the clock experiences frequent power interruptions to ensure reliable backup.
3. Initial Time Setting
After connecting power, the display will show a default time (e.g., 12:00 AM). Set the current time:
- Press and hold the TIME SET button. The hour digits will flash.
- While holding TIME SET, press the HOUR SET button repeatedly to adjust the hour. Observe the PM indicator for correct AM/PM setting.
- Release the TIME SET button.
- Press and hold the TIME SET button again. The minute digits will flash.
- While holding TIME SET, press the MINUTE SET button repeatedly to adjust the minutes.
- Release the TIME SET button to save the time.
Operating Instructions
Setting Alarm 1 or Alarm 2
Your clock features two independent alarms. To set an alarm:
- Slide the ALARM 1/2/DUAL switch to either AL. 1 or AL. 2, depending on which alarm you wish to set.
- Press and hold the ALARM SET button. The hour digits for the selected alarm will flash.
- While holding ALARM SET, press the HOUR SET button repeatedly to adjust the alarm hour. Ensure the correct AM/PM is selected.
- Release the ALARM SET button.
- Press and hold the ALARM SET button again. The minute digits for the selected alarm will flash.
- While holding ALARM SET, press the MINUTE SET button repeatedly to adjust the alarm minutes.
- Release the ALARM SET button to save the alarm time.
Activating/Deactivating Alarms
To turn an alarm ON or OFF:
- Slide the ALARM 1/2/DUAL switch to AL. 1 or AL. 2.
- Move the ALARM ON/OFF switch to the ON position to activate the alarm. The corresponding AL. 1 or AL. 2 indicator light will illuminate.
- Move the ALARM ON/OFF switch to the OFF position to deactivate the alarm. The indicator light will turn off.
To activate both alarms, set both alarm times and then slide the ALARM 1/2/DUAL switch to DUAL. Both AL. 1 and AL. 2 indicators will light up.
Snooze Function
When the alarm sounds, press the large SNOOZE button on top of the clock. The alarm will temporarily stop and sound again after approximately 9 minutes.
Stopping the Alarm
To stop the alarm completely after it sounds, slide the ALARM ON/OFF switch to the OFF position. The alarm will reset for the next day.
Maintenance
Cleaning
Wipe the clock with a soft, dry cloth. Do not use abrasive cleaners or solvents, as they may damage the finish.
Battery Replacement
Replace the AA backup batteries annually or if the clock loses time during power interruptions. Refer to the "Battery Backup Installation" section for instructions.
Troubleshooting
| Problem | Possible Cause | Solution |
|---|---|---|
| Clock display is blank. | No AC power. | Ensure the AC adapter is securely plugged into the clock and a working electrical outlet. |
| Alarm does not sound. | Alarm is not activated or set incorrectly. | Verify the ALARM ON/OFF switch is in the ON position and the alarm time is correctly set (check AM/PM). |
| Time is incorrect after power outage. | Backup batteries are dead or not installed. | Install fresh AA batteries or replace existing ones. Reset the time if necessary. |
| Alarm is too quiet/loud. | Alarm volume is ascending, not fixed. | The alarm features an ascending volume. It starts faintly and gradually increases. This is normal operation. |
Specifications
- Model: B08TG1QB2B
- Brand: Sharp
- Display Type: Digital LED (Green)
- Power Source: AC Power Adapter (included), 2x AA Batteries (for backup, not included)
- Product Dimensions: 5.5" W x 2.1" H x 2.3" D (approximate)
- Weight: 8.4 ounces
- Material: Plastic
- Color: Brushed Silver
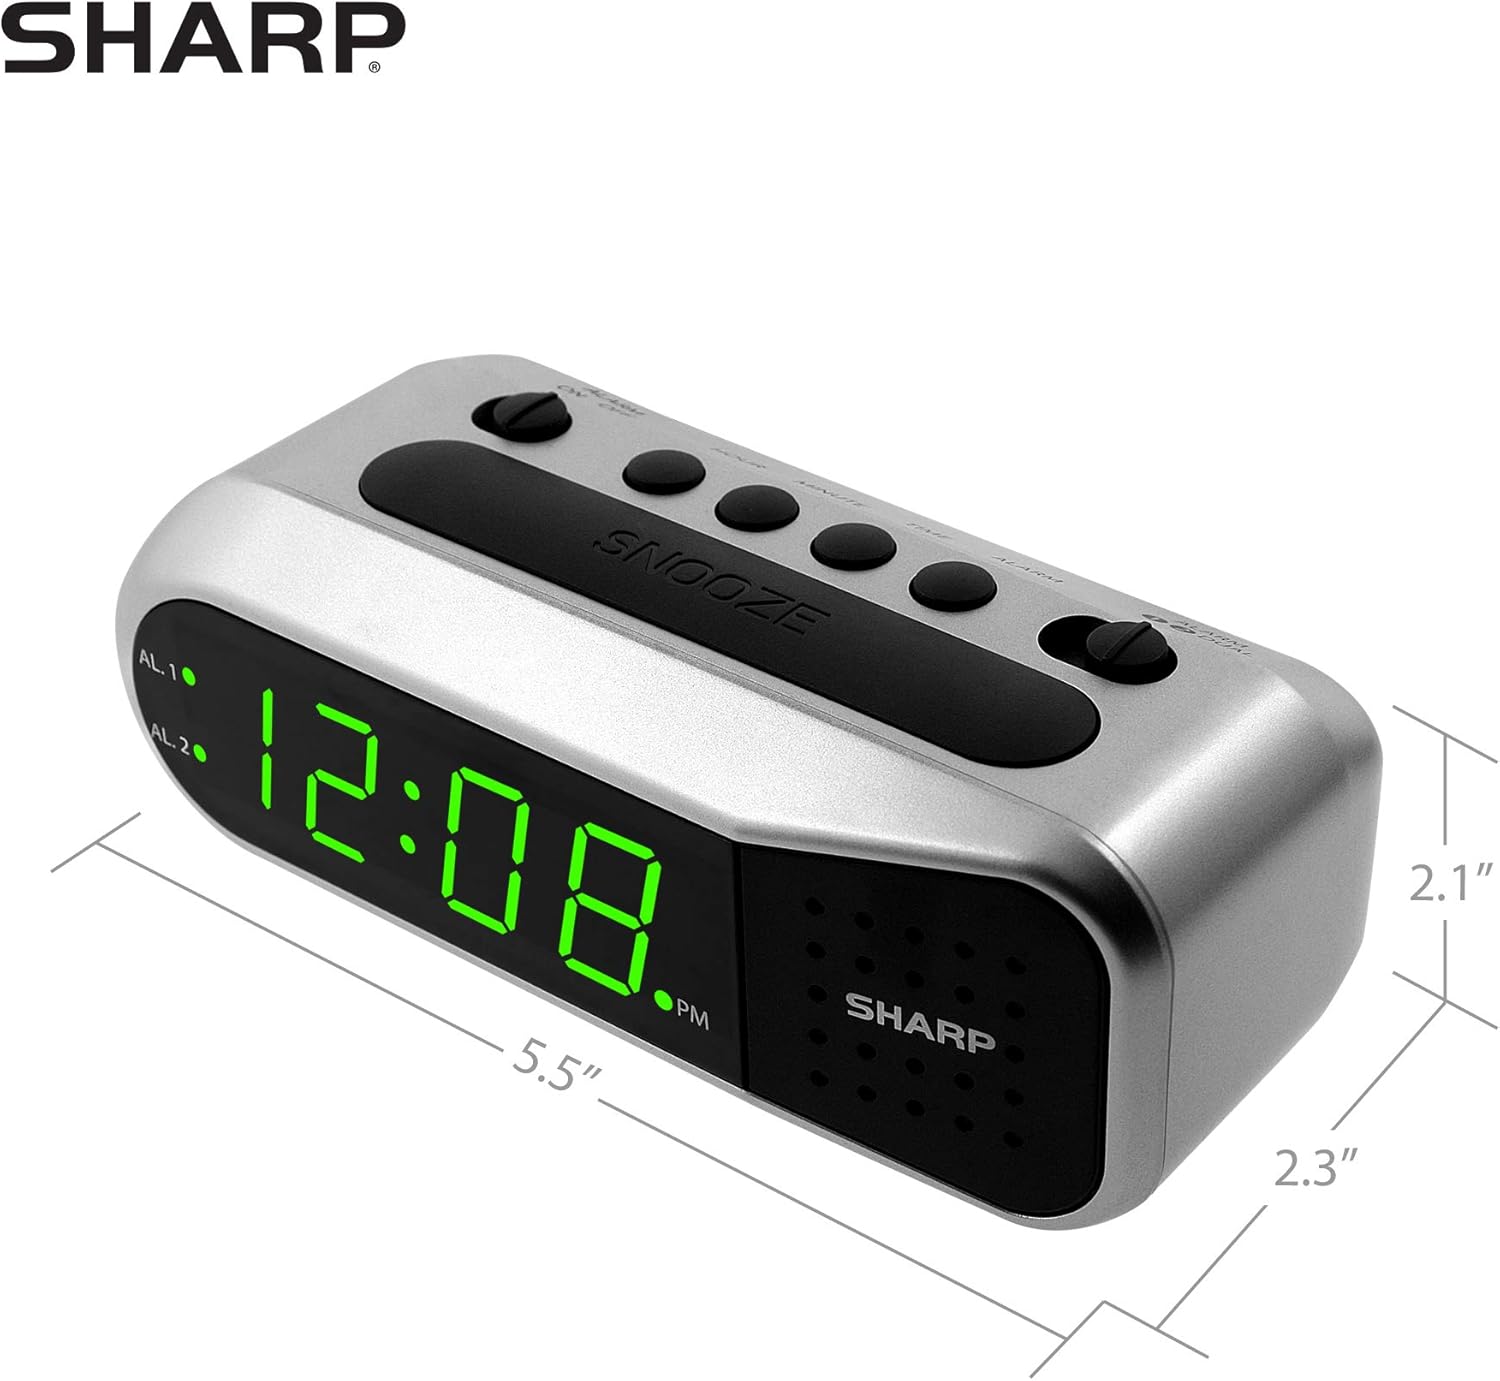
Figure 4: Dimensions of the Sharp Digital Alarm Clock.
Warranty and Support
For warranty information or technical support, please refer to the warranty card included with your product or visit the official Sharp website. Keep your purchase receipt as proof of purchase.
For further assistance, you may contact Sharp customer service through their official channels.


