Introduction
This manual provides essential information for the safe and effective operation, setup, and maintenance of your Oregon 410-230 Semi-Professional 230V Chain Sharpener. Please read this manual thoroughly before using the product to ensure proper handling and to maximize its lifespan.
The Oregon 410-230 is designed to provide convenient and high-quality sharpening for all types of chainsaw chains, making it ideal for users with a moderate volume of chains to sharpen.
Safety Instructions
Always prioritize safety when operating power tools. Failure to follow these instructions may result in serious injury or damage to the equipment.
- Read the Manual: Familiarize yourself with all controls and operations before use.
- Wear Personal Protective Equipment (PPE): Always wear safety glasses, hearing protection, and gloves.
- Stable Work Surface: Ensure the sharpener is mounted securely on a stable, level surface.
- Unplug Before Adjustments: Disconnect the power supply before making any adjustments, changing grinding wheels, or performing maintenance.
- Keep Work Area Clean: Cluttered areas and benches invite accidents.
- Avoid Wet Conditions: Do not operate the sharpener in damp or wet locations.
- Proper Ventilation: Ensure adequate ventilation to prevent dust accumulation.
- Supervision: Do not allow children or untrained personnel to operate the sharpener.
Product Overview
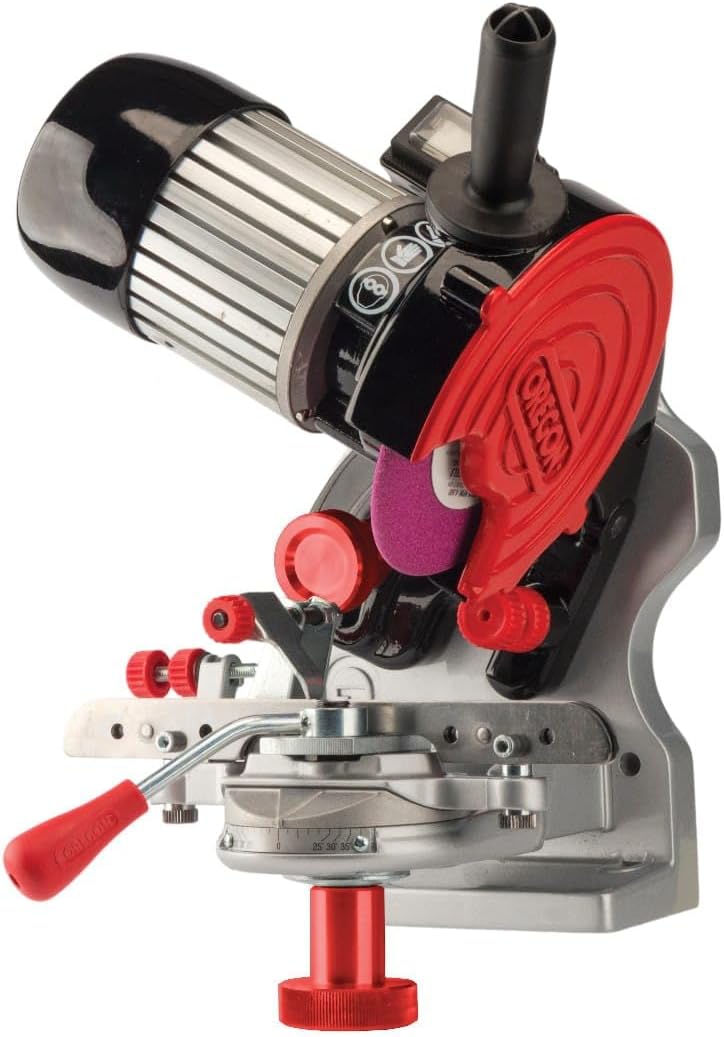
Figure 1: Front view of the Oregon 410-230 Semi-Professional Chain Sharpener, highlighting its motor, grinding wheel, and chain clamping mechanism.
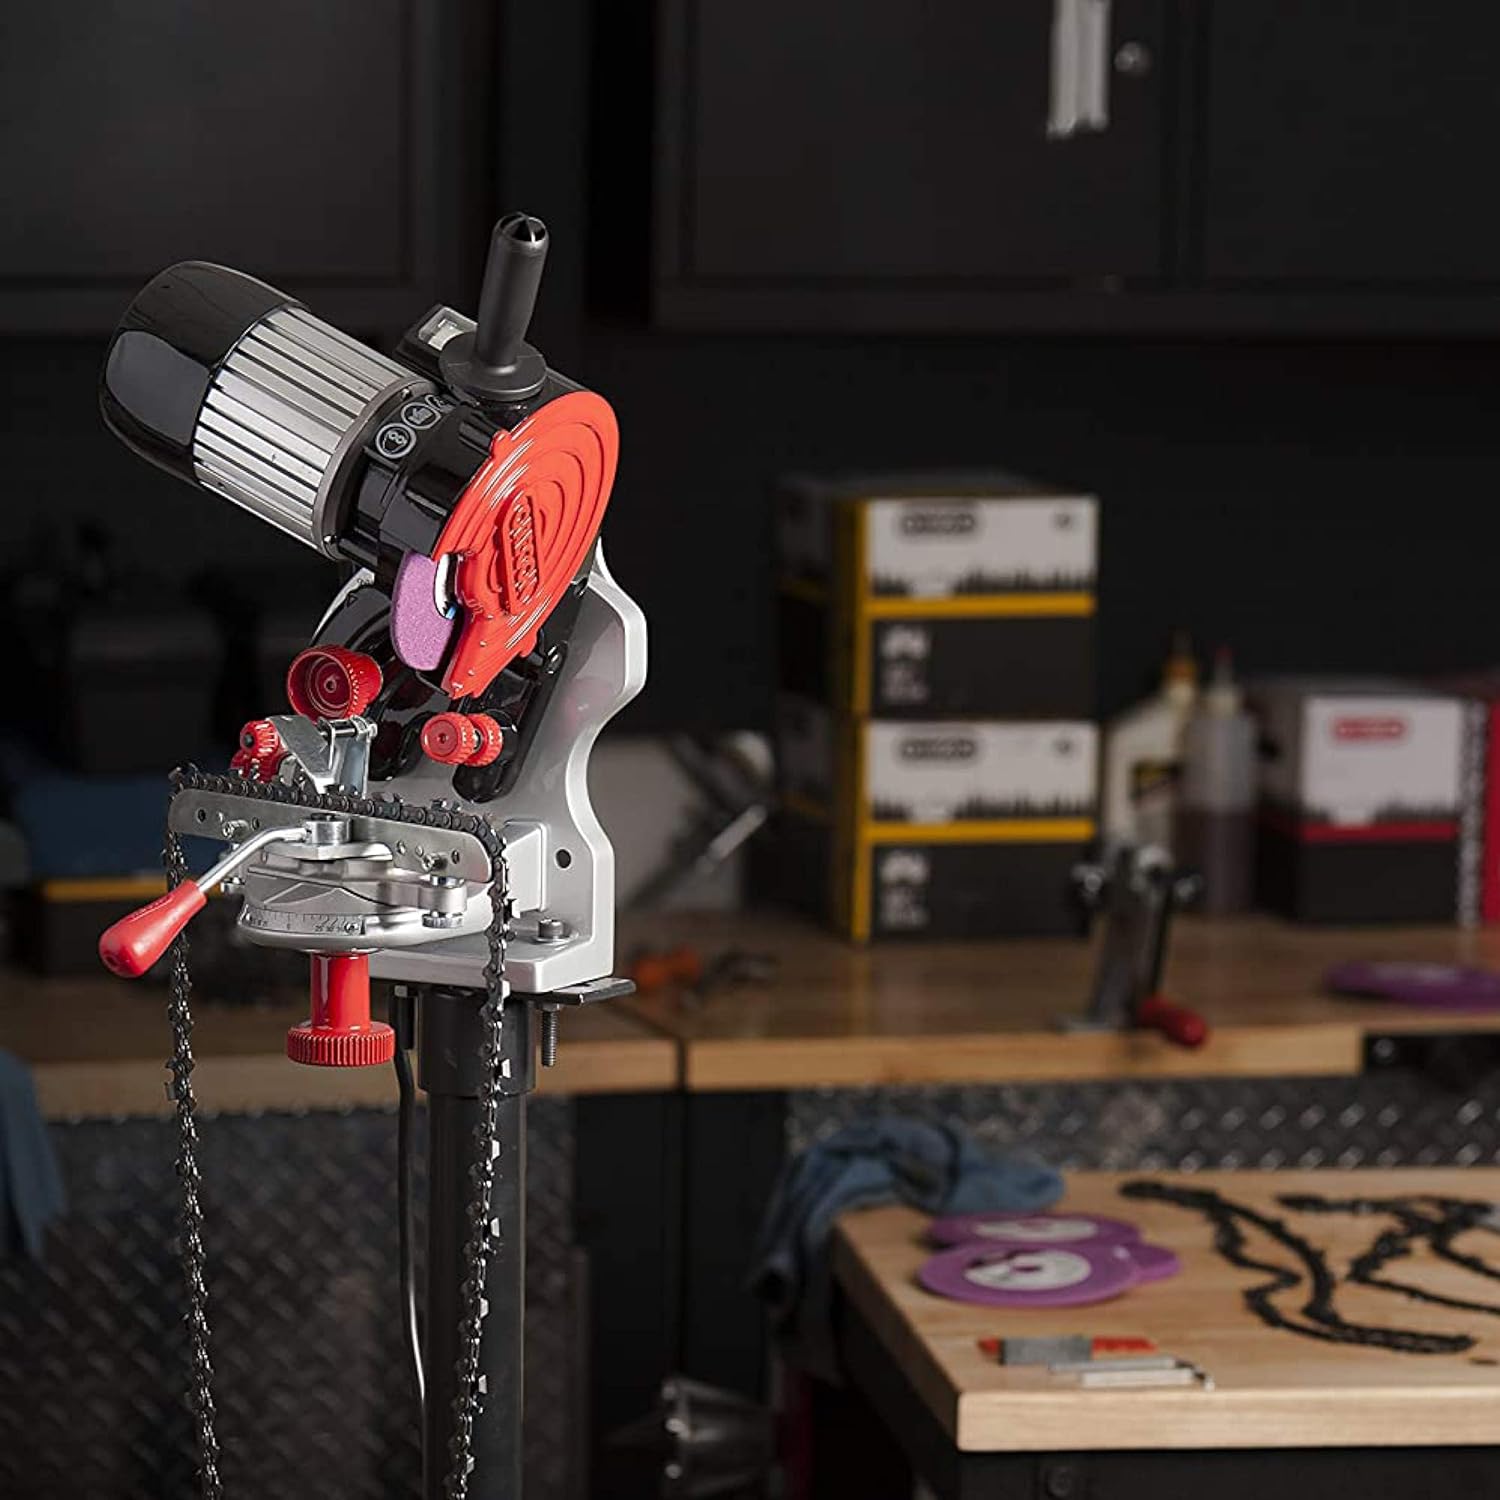
Figure 2: The Oregon 410-230 Chain Sharpener mounted on a workbench, demonstrating its compact size and ease of integration into a workshop environment.
Key Components:
- Motor Unit: Houses the powerful 214W motor and 15W work light.
- Grinding Wheel: The abrasive disc used for sharpening chain cutters. The unit includes 3 sanding discs.
- Chain Clamp: Secures the chainsaw chain in place during sharpening.
- Angle Adjustment: Allows precise setting of the sharpening angle for different chain types.
- Depth Gauge Stop: Ensures consistent grinding depth.
Setup
- Unpacking: Carefully remove all components from the packaging. Verify that all items listed in the "Box Contains" section are present: 1 x Oregon Semi Professional Chainsaw Sharpener (230 volt), 1 x dressing brick and profile guide, 2 x grinding wheels, 1 x 6.0 mm wheel for depth gauge.
- Mounting: Securely mount the sharpener to a sturdy workbench using appropriate bolts or clamps (not included). Ensure it is stable and will not move during operation.
- Grinding Wheel Installation: Select the appropriate grinding wheel for your chain type. Install it onto the motor shaft according to the instructions provided in the separate grinding wheel manual (if applicable) or the sharpener's quick-start guide. Ensure it is tightened securely.
- Power Connection: Connect the sharpener to a standard 230V AC, 50 Hz power outlet. Ensure the power switch is in the "OFF" position before plugging in.
Operating Instructions
Sharpening a Chainsaw Chain:
- Preparation: Clean the chainsaw chain thoroughly to remove any dirt, debris, or oil. This ensures accurate sharpening and prolongs the life of the grinding wheel.
- Set Sharpening Angle: Adjust the angle of the grinding head to match the recommended sharpening angle for your chainsaw chain (typically 25-35 degrees). Refer to your chainsaw chain's specifications for the correct angle.
- Set Depth Gauge Stop: Adjust the depth gauge stop to control the amount of material removed from the cutter. This prevents over-grinding and maintains the correct cutter geometry.
- Position the Chain: Place the chainsaw chain into the chain clamp, ensuring that the cutter to be sharpened is positioned directly under the grinding wheel. Secure the chain firmly in the clamp.
- Sharpening: Turn on the sharpener. Slowly lower the grinding wheel onto the cutter. Apply light, consistent pressure. Grind each cutter until a sharp edge is achieved and the burr (wire edge) is visible on the opposite side.
- Remove Burr: Use the dressing brick to remove the burr from the cutting edge.
- Repeat: Sharpen all cutters on one side of the chain, then flip the chain and adjust the angle (if necessary) to sharpen the cutters on the other side. Ensure all cutters are sharpened to the same length and angle for optimal performance.
- Check Depth Gauges: After sharpening, check the depth gauges (rakers) and file them down if necessary using the included 6.0 mm wheel for depth gauge, ensuring they are at the correct height relative to the cutting edge.
Maintenance
Regular maintenance ensures the longevity and optimal performance of your Oregon chain sharpener.
- Cleaning: After each use, unplug the sharpener and use a brush or compressed air to remove grinding dust and debris from the machine, especially around the motor, grinding wheel, and chain clamp.
- Grinding Wheel Inspection: Regularly inspect the grinding wheel for wear, cracks, or damage. Replace worn or damaged wheels immediately. Use the dressing brick to clean and true the grinding wheel surface as needed.
- Lubrication: Periodically apply a light machine oil to moving parts, such as the pivot points and clamp mechanism, to ensure smooth operation.
- Cord Inspection: Check the power cord for any signs of damage, fraying, or cuts. Replace damaged cords immediately.
- Storage: Store the sharpener in a clean, dry place, away from direct sunlight and extreme temperatures.
Troubleshooting
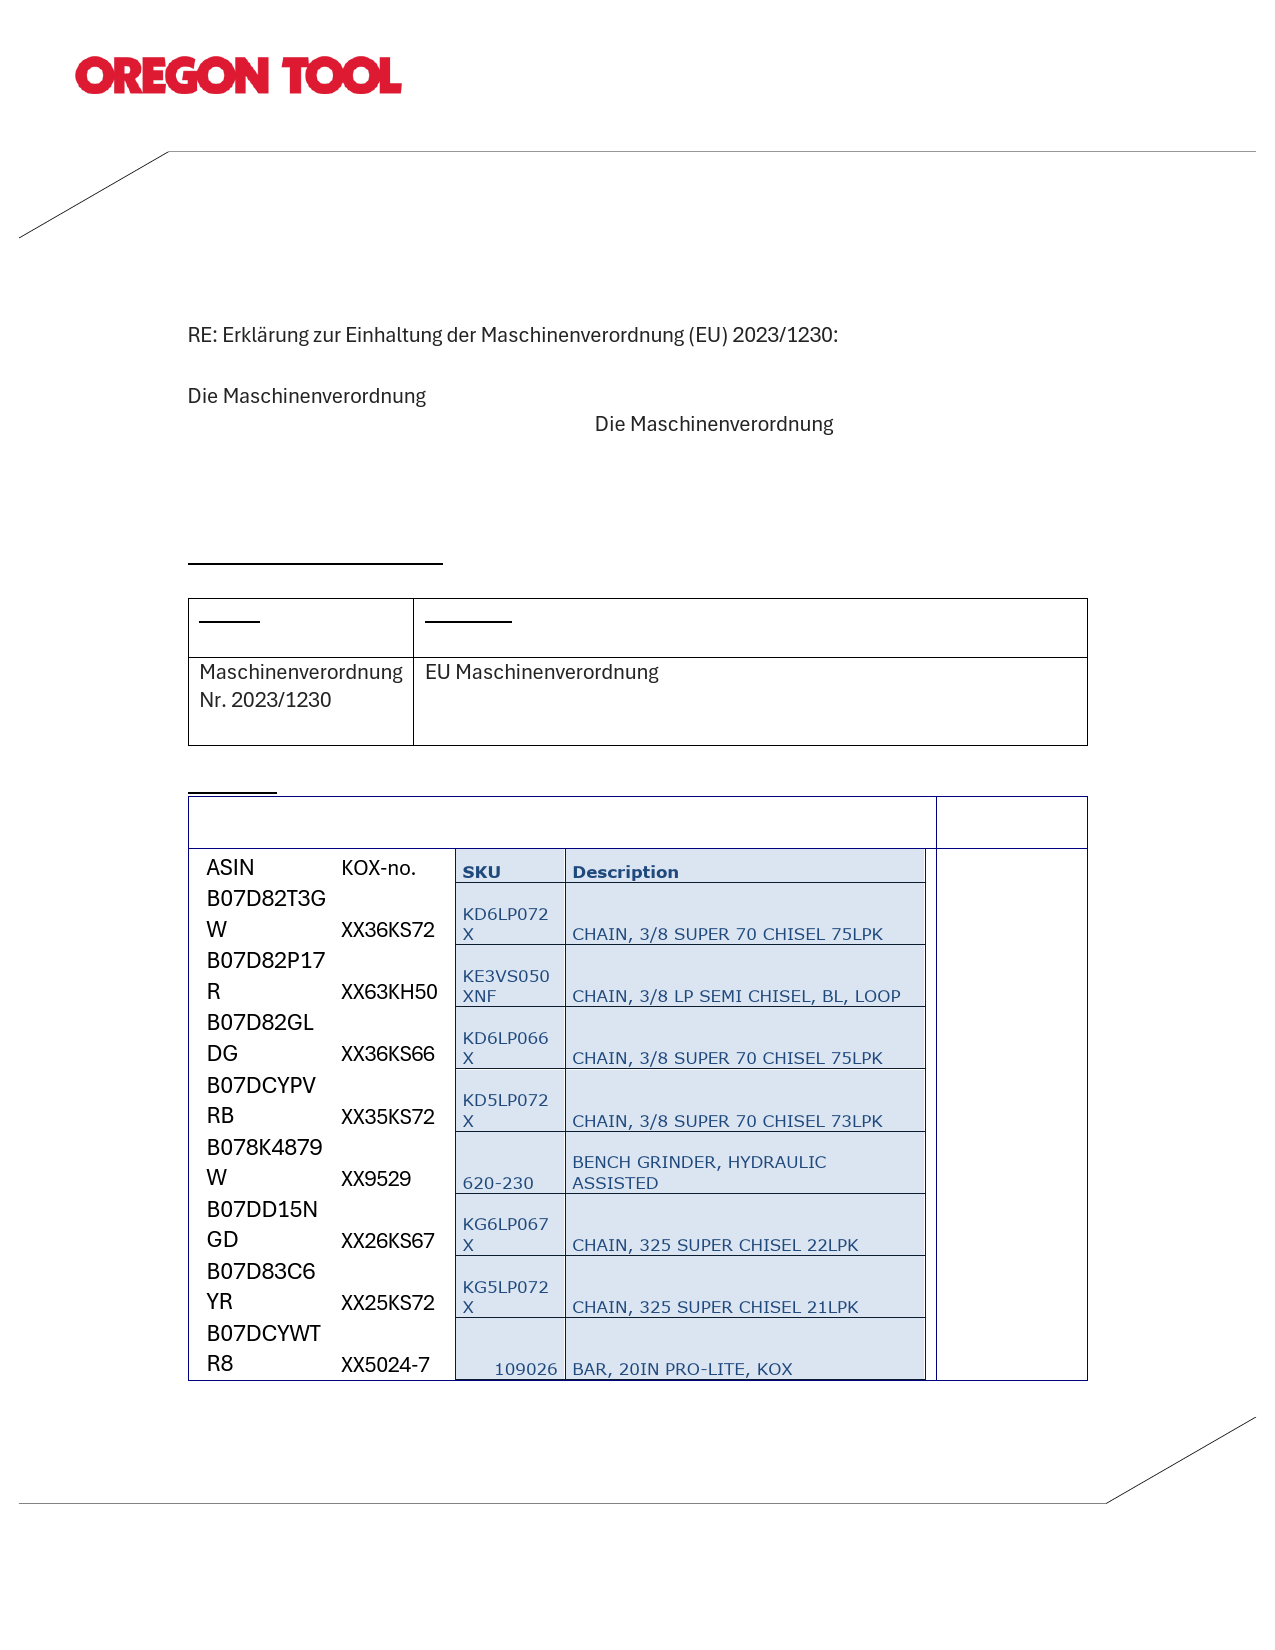
| Problem | Possible Cause | Solution |
|---|---|---|
| Sharpener does not turn on. | No power supply; faulty switch; damaged cord. | Check power outlet and cord. Ensure switch is ON. If problem persists, contact customer support. |
| Chain not sharpening effectively. | Worn or incorrect grinding wheel; incorrect sharpening angle; chain not clean. | Replace grinding wheel. Verify and adjust sharpening angle. Clean chain thoroughly before sharpening. |
| Excessive vibration or noise. | Loose components; damaged grinding wheel; unstable mounting. | Check all fasteners. Inspect and replace grinding wheel if damaged. Ensure sharpener is securely mounted. |
| Grinding wheel wears down quickly. | Excessive pressure during sharpening; incorrect wheel for chain type. | Apply lighter pressure. Ensure correct grinding wheel is used for the chain. |
Specifications
| Feature | Detail |
|---|---|
| Model Number | 410-230 |
| Power Source | Corded Electric |
| Voltage | 230 Volts |
| Wattage | 214 Watts |
| Work Light Wattage | 15 Watts |
| Frequency | 50 Hz |
| Maximum Rotational Speed | 2700 RPM |
| Material | Metal |
| Color | All Grey |
| Item Weight | 0.5 Kilograms |
| Package Dimensions | 38 x 29.5 x 22.9 cm |
| Included Components | 1 x Grinder, 1 x dressing brick and profile guide, 2 x grinding wheels, 1 x 6.0 mm wheel for depth gauge |
Warranty and Support
Oregon products are manufactured to high-quality standards. For warranty information and customer support, please refer to the warranty card included with your product or visit the official Oregon website. Keep your purchase receipt as proof of purchase for any warranty claims.
For technical assistance or spare parts, please contact Oregon customer service through their official channels. You can also visit the Oregon Store on Amazon for more information and related products.