1. Introduction
The JJC Intervalometer Timer Remote Shutter Release (Model TM-MN) is a versatile accessory designed to provide precise control over your camera's shutter. It enables advanced photography techniques such as time-lapse, long exposure, and self-timer shots, minimizing camera shake and expanding creative possibilities. This manual will guide you through the setup, operation, and features of your intervalometer.

Front view of the JJC Intervalometer, showing the LCD screen, control buttons, and wired connection.
2. Key Features
- Compact Size: Measures 12.1 x 4 x 2.1 cm, making it portable and easy to handle.
- Wired Remote Control: Features a 90cm (2.95ft) long wired connection to your camera, ensuring stable communication and preventing camera shake.
- Multi-functional Timer: Includes self-timer, interval timer, long-exposure timer, and exposure-count settings.
- Wide Time Range: Timer settings can be configured from 1 second up to 99 hours, 59 minutes, and 59 seconds.
- Backlit LCD Screen: Humanized backlight design allows for clear viewing and operation in low-light conditions.
- Battery Powered: Operates on 2 AAA alkaline batteries (not included).

This image illustrates the diverse photographic applications possible with the intervalometer, including capturing dynamic action, self-portraits, gradual changes over time, and extended exposure scenes.
3. Package Contents
- JJC Intervalometer Timer Remote Shutter Release (Model TM-MN)
- Connection Cable (90cm)
- User Manual
Note: 2 AAA alkaline batteries are required for operation and are not included in the package.
4. Product Overview
Familiarize yourself with the components and controls of your JJC Intervalometer.

An annotated diagram of the intervalometer's display, detailing the various modes and settings such as self-timer, bulb exposure, interval, number of shots, and beep function.
Controls and Display:
- LCD Screen: Displays current settings, time, and shot count.
- Mode Indicators: Icons for SELF (Self-Timer), BULB (Bulb Exposure), INTVL (Interval Timer), NO. (Number of Shots), and BEEP (Audible Alert).
- HOLD Button: Used to lock settings or hold the shutter open in Bulb mode.
- LOCK Switch: Prevents accidental button presses.
- START/STOP Button: Initiates or halts the timer sequence.
- Directional Pad (Up/Down/Left/Right): Navigates menus and adjusts values.
- SET Button: Confirms selections.
- ON/OFF Switch: Powers the device on or off.
5. Setup
5.1 Battery Installation
- Locate the battery compartment on the back of the intervalometer.
- Open the compartment cover.
- Insert 2 AAA alkaline batteries, ensuring correct polarity (+/-).
- Close the battery compartment cover securely.
5.2 Connecting to Your Camera
The intervalometer connects to your Nikon camera via the included wired cable. The cable length is approximately 90cm (35.43 inches).
- Locate the remote control terminal on your Nikon camera. This is typically a small port on the side of the camera body.
- Connect one end of the supplied cable to the intervalometer's port.
- Connect the other end of the cable to your camera's remote control terminal. Ensure a firm connection.
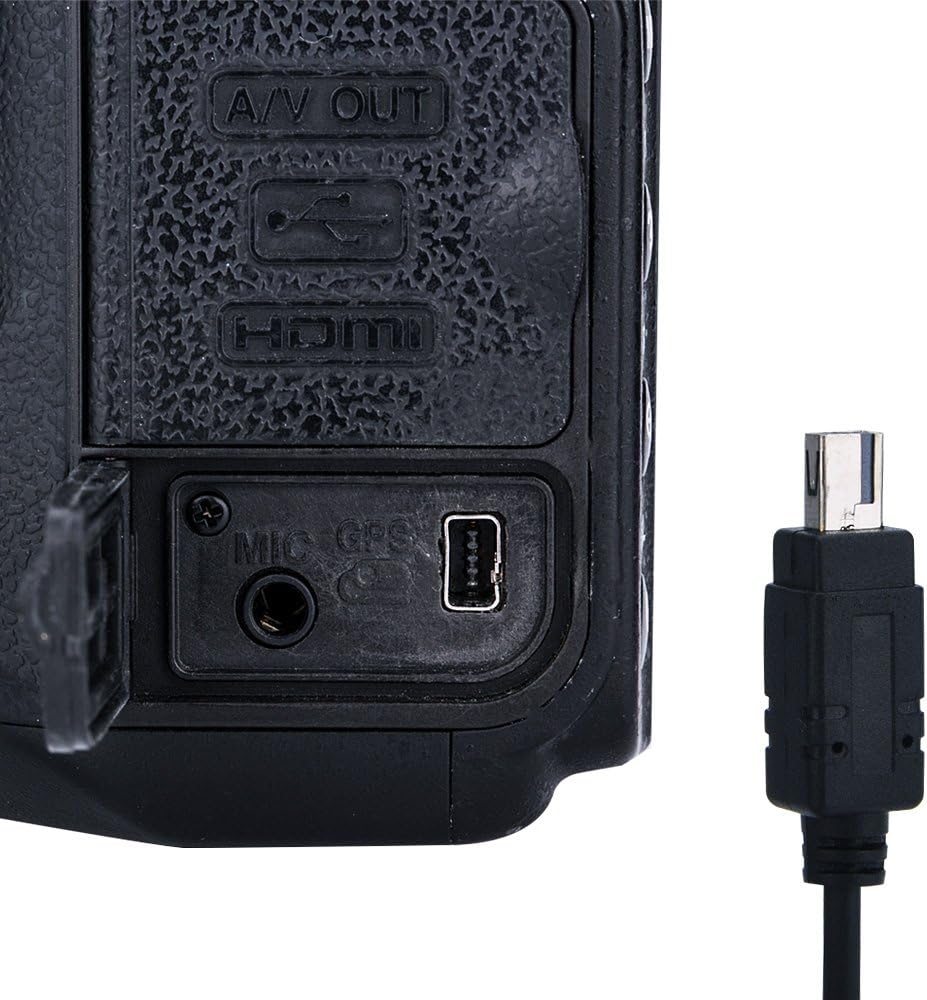
Detail of the camera's remote control port and the corresponding connector from the intervalometer, showing how to establish the wired connection.

A step-by-step visual guide demonstrating the initial setup process: connecting the cable to the camera, powering on the remote, configuring settings, and initiating shooting.
6. Operating Instructions
Turn on the intervalometer using the ON/OFF switch on the side. The LCD screen will illuminate. Use the directional pad to navigate between settings and adjust values, and the SET button to confirm.
6.1 Setting Modes
The intervalometer features five primary modes, indicated by icons on the top of the LCD screen:
- SELF (Self-Timer): Sets a delay before the first photo is taken.
- BULB (Exposure Time): Determines how long the camera's shutter remains open for each shot.
- INTVL (Interval Time): Sets the time between the start of one exposure and the start of the next.
- NO. (Number of Shots): Specifies the total number of photos to be taken.
- BEEP: Toggles the audible beep sound on or off.
6.2 Adjusting Parameters
To adjust a parameter (e.g., Self-Timer delay, Bulb time, Interval, Number of Shots):
- Use the Left/Right arrow buttons to select the desired mode icon (SELF, BULB, INTVL, NO., BEEP).
- Press the SET button to enter the setting adjustment for that mode.
- Use the Up/Down arrow buttons to change the values (hours, minutes, seconds, or number of shots).
- Use the Left/Right arrow buttons to move between hours, minutes, and seconds.
- Press SET again to confirm the value and exit the setting.

A user's hand demonstrates setting the intervalometer. The screen shows time parameters, and an overlay explains how to configure bulb and interval times for specific shot sequences.
Important Note on Interval Time:
The Interval Time (INTVL) must always be longer than the Exposure Time (BULB). This is because the interval time includes the duration of the exposure itself. For example, if your exposure time is 10 seconds, and you want a 5-second gap between shots, your interval time should be set to 15 seconds (10s exposure + 5s gap).
6.3 Starting and Stopping a Sequence
Once all desired parameters are set:
- Ensure your camera is set to the appropriate mode (e.g., Bulb mode for long exposures, or a continuous shooting mode for interval shooting).
- Press the START/STOP button to begin the programmed sequence.
- To stop the sequence at any time, press the START/STOP button again.
6.4 Manual Shutter Release
The intervalometer can also function as a simple wired remote shutter release:
- Press the START/STOP button halfway down to focus.
- Press the START/STOP button fully down to trigger the shutter.
- For continuous shooting or long exposures, press the START/STOP button fully down and slide it into the LOCK position. Release the LOCK to stop.
6.5 Backlight Function
The LCD screen features a backlight for visibility in dark conditions.
- Press any button (except the ON/OFF switch) to activate the backlight.
- The backlight will remain on until manually turned off by pressing a button again, or it may have an auto-off feature after a period of inactivity.

The intervalometer's backlit LCD screen is shown, emphasizing its design for clear visibility and operation in dark environments.
7. Time-Lapse Photography Guide
Time-lapse photography captures a series of images over an extended period to show change or movement when played back quickly.
- Set Camera to Manual (M) Mode: This ensures consistent exposure across all frames.
- Set Exposure Time (BULB): Determine the correct exposure for a single frame. If using a long exposure, set this value.
- Set Interval Time (INTVL): Decide how frequently photos should be taken. Remember, INTVL must be greater than BULB. For example, if BULB is 5 seconds, and you want a 10-second gap, set INTVL to 15 seconds.
- Set Number of Shots (NO.): Specify how many photos you want to capture. You can set this from 1 to 399, or to unlimited.
- Set Self-Timer (SELF) (Optional): If you need a delay before the sequence starts, set this value.
- Start the Sequence: Press the START/STOP button.

This visual sequence demonstrates the intervalometer's ability to capture a set number of photos, ideal for documenting gradual changes like a sunset or sunrise.
8. Long Exposure Photography Guide
For exposures longer than your camera's maximum shutter speed (typically 30 seconds), use the intervalometer's Bulb mode.
- Set Camera to Bulb Mode: This is crucial for exposures longer than 30 seconds.
- Set Exposure Time (BULB) on Intervalometer: Set the desired long exposure duration (e.g., 00:01:00 for 1 minute).
- Set Self-Timer (SELF) (Optional): If you need a delay before the exposure starts.
- Start Exposure: Press the START/STOP button. The intervalometer will hold the shutter open for the set BULB time.
- Stop Exposure: The exposure will automatically end after the set BULB time. You can manually stop it earlier by pressing START/STOP.
9. Troubleshooting
- Device not powering on: Check battery installation and ensure batteries are fresh.
- Camera not triggering: Ensure the cable is securely connected to both the intervalometer and the camera. Verify your camera is in the correct mode (e.g., Bulb for long exposures, or a compatible shooting mode for timed sequences).
- Settings not saving after power off: The intervalometer does not retain settings after being switched off. Re-enter your desired parameters each time you power on the device.
- Interval sequence not working as expected: Double-check that your INTVL (Interval Time) is set to be longer than your BULB (Exposure Time).
10. Specifications
| Model Number | TM-MN |
| Package Dimensions | 6.69 x 2.95 x 1.54 inches |
| Item Weight | 4.2 ounces |
| Batteries Required | 2 AAA batteries |
| Connectivity Technology | Wire |
| Compatible Devices | Nikon Cameras (MC-DC2 compatible models) |
| Max Number of Supported Devices | 1 |
| Special Feature | Ergonomic design, Backlit LCD |
11. Safety Information
- Keep the device away from water and moisture to prevent damage.
- Do not attempt to disassemble or repair the device yourself. Refer to qualified service personnel.
- Use only specified AAA alkaline batteries. Do not mix old and new batteries or different types of batteries.
- Remove batteries if the device will not be used for an extended period to prevent leakage.
- Avoid extreme temperatures and direct sunlight.
12. Product Video Demonstration
This video provides a visual demonstration of the JJC Intervalometer's functions, including connecting it to a camera, setting various timer modes, and capturing different types of photographs like time-lapses and long exposures.
13. Warranty and Support
For warranty information and customer support, please refer to the documentation included with your product packaging or visit the official JJC website. Contact details for support are typically provided on the manufacturer's website.


