1. Introduction
Thank you for choosing the MARS HYDRO TSW2000 LED Grow Light. This manual provides essential information for the safe and efficient operation of your grow light. The TSW2000 is designed to provide full-spectrum lighting for indoor plants, supporting all growth stages from seeding to flowering. Its advanced SMD LED technology and unique reflector design aim to maximize light utilization and plant yield.
2. Safety Information
Please read all safety instructions before operating the device. Failure to follow these instructions may result in electric shock, fire, or other injuries.
- Always disconnect power before installation, maintenance, or moving the light.
- Do not look directly at the LED lights when they are on. This can cause eye damage.
- Ensure the light is installed in a well-ventilated area to prevent overheating.
- Keep the light away from water and other liquids. This product is not water-resistant.
- Do not attempt to modify or disassemble the light. Refer all servicing to qualified personnel.
- Operate the light within the specified voltage range (100-277VAC).
3. Package Contents
Verify that all components are present in your package:
- 1 x TSW2000 LED Grow Light
- 1 x External Driver
- 1 x Power Cord
- 1 x User Manual (this document)
- 1 x Hanging Kit (includes rope hangers and metal clips)
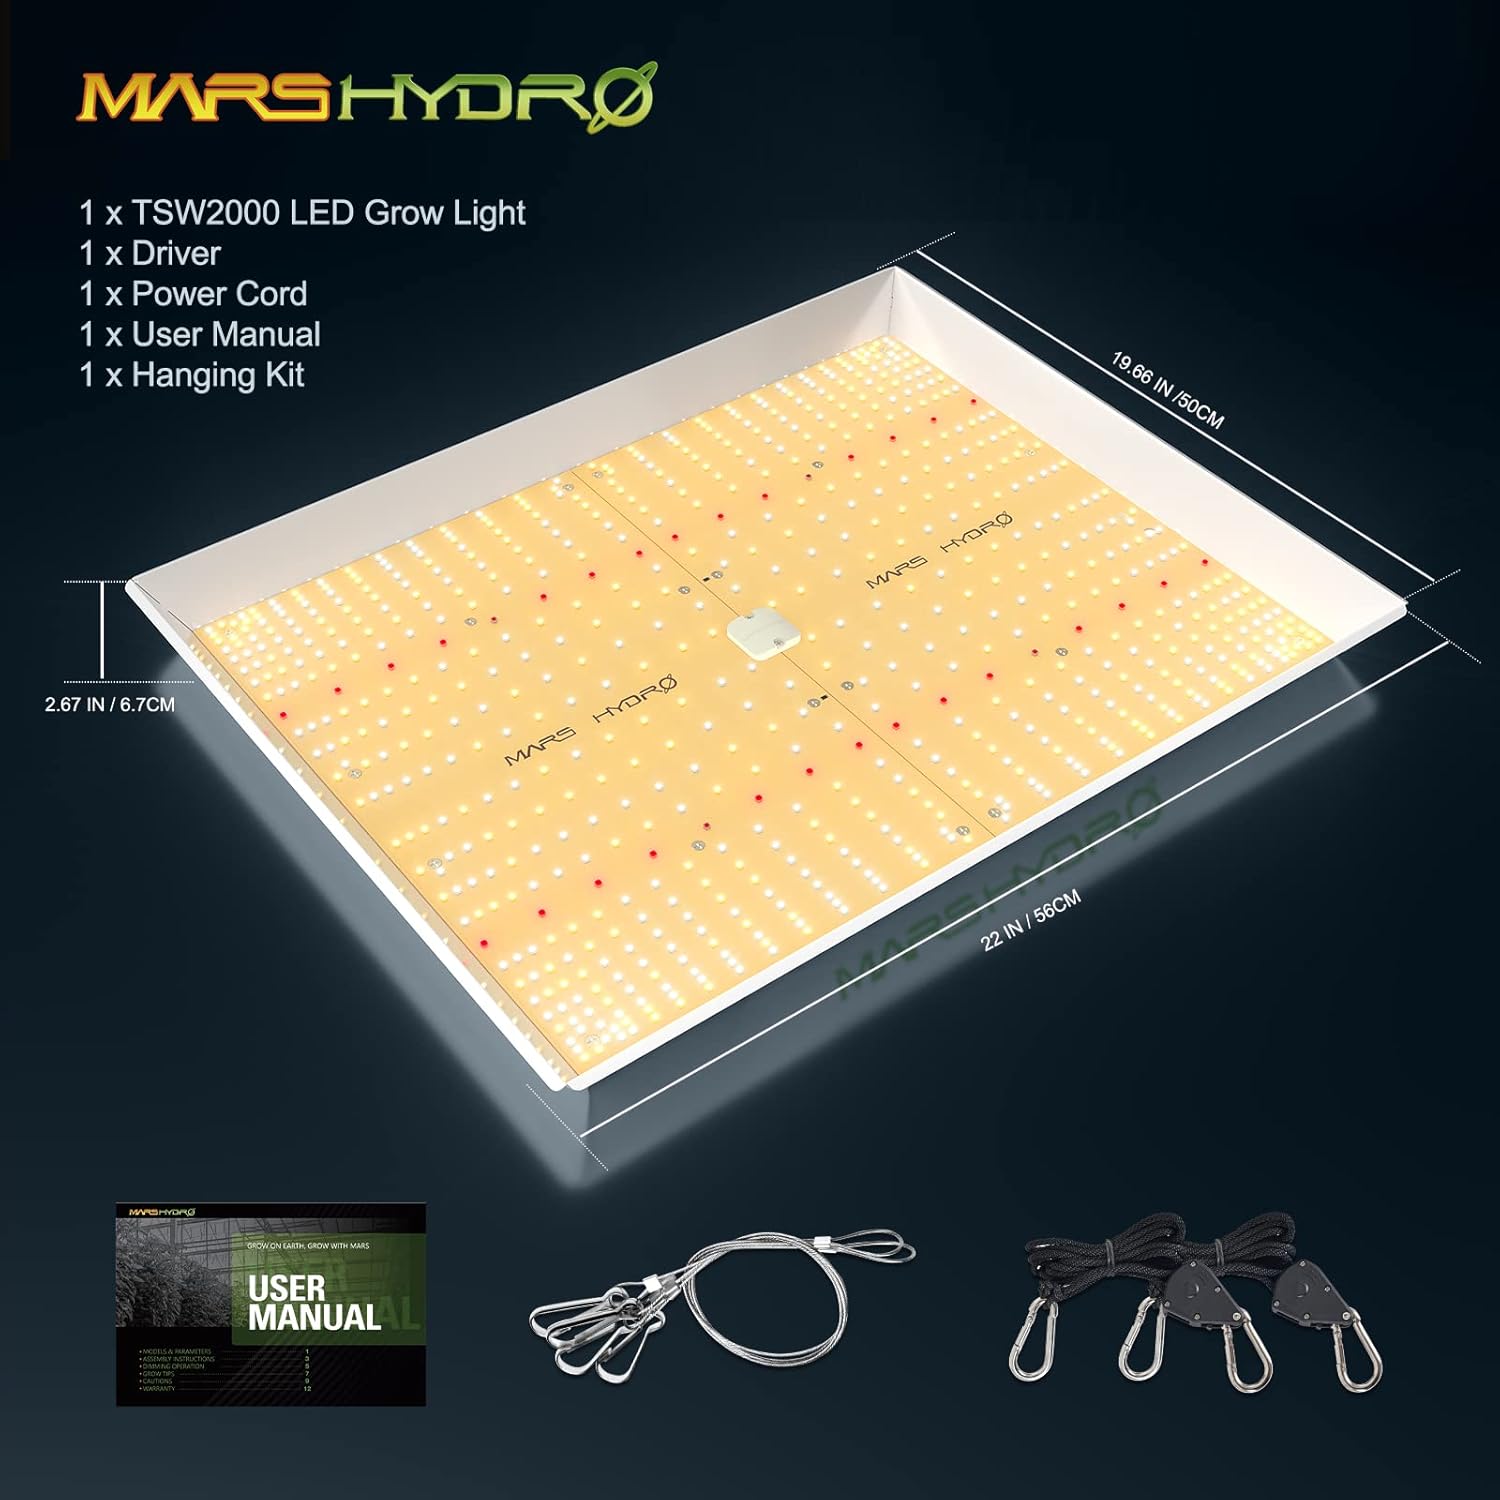
Figure 3.1: Contents of the TSW2000 package, including the LED grow light, external driver, power cord, user manual, and hanging kit.
4. Setup Instructions
4.1. Assembling the Grow Light
- Carefully remove all components from the packaging.
- Attach the metal clips from the hanging kit to the designated points on the top corners of the LED grow light fixture.
- Connect the rope hangers to the metal clips.
- Hang the light securely from a sturdy support structure in your grow area using the rope hangers. Ensure the light is level.
4.2. Connecting the Detachable Driver
The TSW2000 features a detachable driver, allowing you to position it outside the grow space to reduce heat buildup inside the tent.
- Locate the external driver and the corresponding connection port on the LED grow light fixture.
- Connect the driver cable to the light fixture. Ensure a secure connection.
- Position the driver outside your grow tent or in a location where heat dissipation is optimal.

Figure 4.1: Illustration of the detachable driver and its 6.56ft power cords, designed to remove heat from the grow space.
4.3. Power Connection
- Connect the power cord to the external driver.
- Plug the power cord into a compatible electrical outlet (100-277VAC).
- The light is now ready for operation.
5. Operating Instructions
5.1. Dimming Operation
The TSW2000 features an independent dimming button and knob on the external driver, allowing precise control over light intensity.
- Dimmer Button: Toggle between DIM (dimmer on) and EXT (dimmer off, for external controller).
- Dimmer Knob: Adjust brightness from 0% (OFF) to 100% (MAX). Turn the knob clockwise to increase brightness and counter-clockwise to decrease.
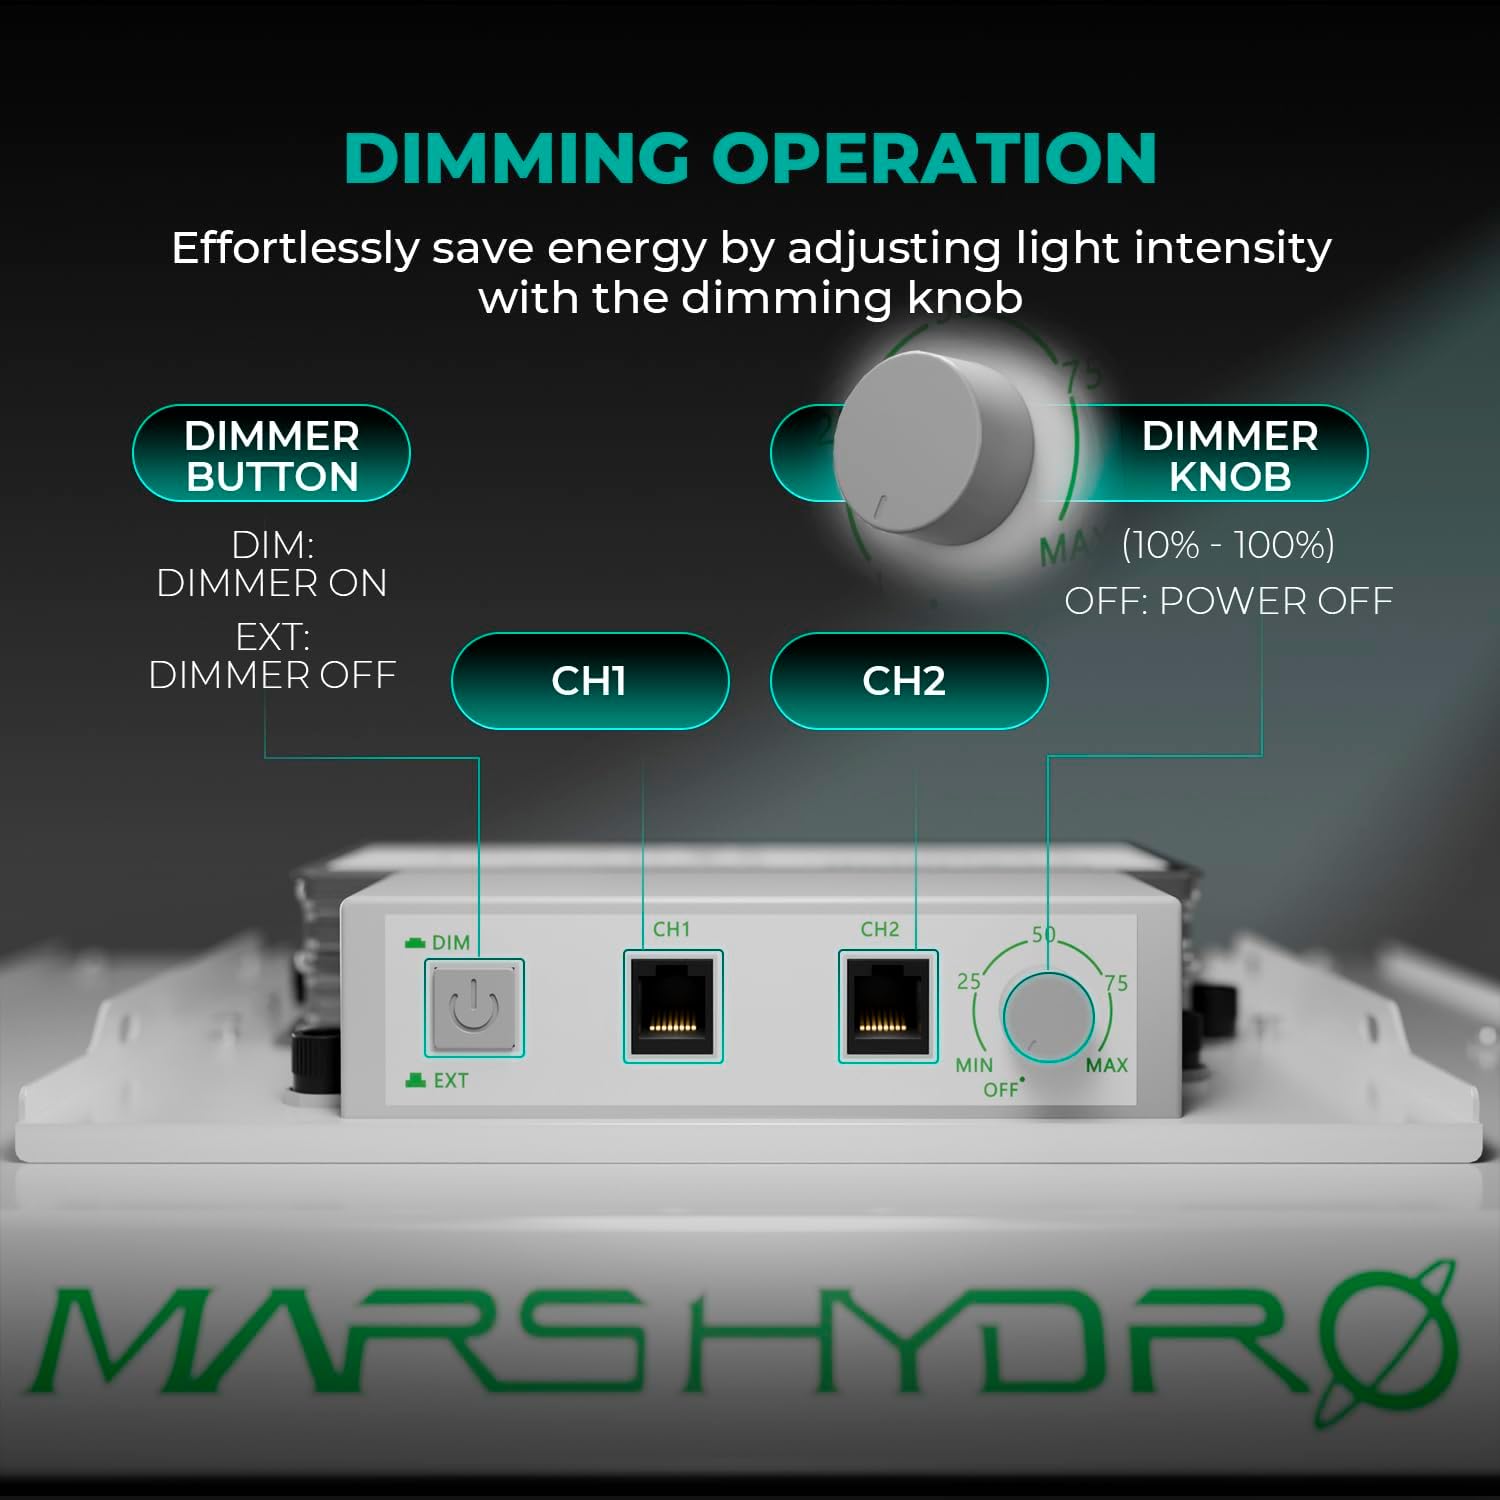
Figure 5.1: The dimming button and knob on the external driver for adjusting light intensity.
5.2. Daisy Chain Functionality
The TSW2000 supports daisy chaining, allowing up to 50 LED lights to be connected and controlled from a single dimmer. This is ideal for larger grow operations.
- Ensure all lights are powered off before connecting.
- Connect the output port (CH2) of the first light's driver to the input port (CH1) of the next light's driver using a suitable daisy chain cable (not included).
- Repeat for additional lights, connecting them in sequence.
- The dimmer on the first light will control the intensity of all connected lights.

Figure 5.2: Multiple TSW2000 lights connected via daisy chain, allowing simultaneous dimming control.
5.3. Full Spectrum Lighting
The TSW2000 provides a sun-like full spectrum, including 730-740nm Red IR, 3200-4200Knm, and 5200-6800Knm spectra. This optimized spectrum supports rapid plant response from seed to flower, contributing to increased yield and crop quality.

Figure 5.3: The optimized full spectrum of the TSW2000, highlighting the importance of red light (660nm) for boosting flowering and harvests.
5.4. Recommended Hanging Height and Dimmer Settings
Adjust the hanging height and dimmer setting according to your plant's growth stage for optimal results. The recommended footprint for flowering is 3x3ft and for vegetative growth is 4x4ft.

Figure 5.4: Recommended hanging height, dimmer settings, and PPFD intensity for different plant growth stages.
| Stage | Hang Height | Dimmer Setting | Intensity (PPFD) |
|---|---|---|---|
| Seedling/Clone | 12" (30cm) | 25% | 150-350 µmol.m².s¹ |
| Vegetative | 12" (30cm) | 75% | 550-1000 µmol.m².s¹ |
| Flowering | 12" (30cm) | 100% | 700-1300 µmol.m².s¹ |
5.5. Coverage Area
The TSW2000 provides uniform light distribution across its coverage area, ensuring all plants receive adequate light for growth.
- Core Coverage: 3ft x 3ft
- Max Coverage: 4ft x 4ft

Figure 5.5: PPFD (Photosynthetic Photon Flux Density) map illustrating light intensity distribution at various heights (12", 14", 18") within a 3x3ft grow tent.
6. Maintenance
Regular maintenance ensures the longevity and optimal performance of your MARS HYDRO TSW2000 LED Grow Light.
- Cleaning: Periodically wipe the light fixture and reflector with a soft, dry cloth to remove dust and debris. Ensure the light is unplugged before cleaning. Do not use liquid cleaners directly on the LEDs or electrical components.
- Inspection: Regularly check the power cord and connections for any signs of damage or wear. If any damage is found, discontinue use and contact customer support.
- Ventilation: Ensure adequate airflow around the light and its driver to prevent heat buildup.
7. Troubleshooting
If you encounter issues with your TSW2000 LED Grow Light, refer to the following common problems and solutions:
- Light does not turn on:
- Check if the power cord is securely plugged into both the driver and the wall outlet.
- Ensure the wall outlet is functional by testing it with another device.
- Verify that the dimmer knob is not set to OFF (0%).
- If using daisy chain, ensure the main light is powered on and its dimmer is not off.
- Light output is too low/high:
- Adjust the dimmer knob to the desired intensity.
- Ensure the dimmer button is set to DIM if you are using the onboard dimmer.
- Uneven light distribution:
- Ensure the light fixture is hung level and centered over your grow area.
- Adjust the hanging height according to the recommended settings for your plant stage.
If the problem persists after attempting these solutions, please contact MARS HYDRO customer support.
8. Specifications
Detailed technical specifications for the MARS HYDRO TSW2000 LED Grow Light:

Figure 8.1: Key performance and electrical specifications for the TSW2000 LED Grow Light.
| Feature | Detail |
|---|---|
| Model | TSW2000 |
| Brand | MARS HYDRO |
| Wattage | 300 watts |
| Input Voltage | 100-277 Volts AC |
| Light Source Type | LED (SMD) |
| Light Color | Sunlike Full Spectrum (730-740nm Red IR, 3200-4200Knm, 5200-6800Knm) |
| PPF | 776 µmol/s |
| PPE | 2.6 µmol/J |
| Core Coverage | 3ft x 3ft |
| Max Coverage | 4ft x 4ft |
| Product Dimensions | 21.2"L x 19.7"W x 3.7"H |
| Item Weight | 7.69 Pounds |
| Material | Aluminum (with powder coating for heat dissipation) |
| Control Method | Push Button (Dimmer) |
| Connectivity Protocol | Wired (Daisy Chain capable) |
| Efficiency | High Efficiency |
| Water Resistance Level | Not Water Resistant |
9. Warranty and Support
MARS HYDRO products are designed for durability and performance. This product typically comes with a manufacturer's warranty. Please refer to the warranty card included with your purchase or visit the official MARS HYDRO website for detailed warranty terms and conditions.
For technical support, troubleshooting assistance, or warranty claims, please contact MARS HYDRO customer service through their official channels. Provide your product model (TSW2000) and purchase information when seeking support.


