1. Product Overview
The EPEVER TRIRON 4210N is a 40A Maximum Power Point Tracking (MPPT) solar charge controller designed for 12V/24V DC systems. It efficiently manages power from solar panels to charge various battery types, including lead-acid (Sealed, Gel, Flooded, User) and lithium (LiFePO4, Li-NiCoMn, Lithium User). This set includes the TRIRON 4210N controller and the MT50 Remote Meter for enhanced monitoring and control.
Key Features:
- Advanced MPPT technology for high tracking efficiency.
- Modular design for flexible configuration with different display and interface modules.
- Supports multiple battery types: Sealed (AGM), Gel, Flooded, Lead-acid User, LiFePO4 Lithium, Li(NiCoMn)O2 Lithium, Lithium User (9~34V).
- Negative ground design for broad application compatibility.
- Dual 5V DC USB output interface (Max 2.2A) for charging electronic devices.
- Four-stage charging (bulk, absorption, float, equalization) to prolong battery life.
- Comprehensive electronic protection features.
- Real-time energy statistics function.
Package Contents:
The package typically includes:
- EPEVER TRIRON 4210N MPPT Solar Charge Controller
- EPEVER MT50 Remote Meter
- Remote Temperature Sensor (RT-S)
- USB to RS485 Communication Cable
- User Manual

Image: Contents of the EPEVER TRIRON 4210N and MT50 Remote Meter package, including the controller, remote meter, temperature sensor, and cables.
2. Safety Information
Please read all instructions and warnings carefully before installation and operation. Failure to follow these instructions may result in electric shock, fire, or severe injury.
- Ensure all wiring is correctly polarized and securely connected. Loose connections can cause overheating and fire.
- Always connect the battery to the charge controller first, then the solar panel, and finally the load. Disconnect in the reverse order.
- Do not attempt to repair or modify the controller. Refer servicing to qualified personnel.
- Install the controller in a well-ventilated area, away from flammable materials and corrosive gases.
- Wear appropriate personal protective equipment (PPE), including eye protection and insulated gloves, when working with batteries and solar panels.
- Ensure the system voltage is compatible with the controller's specifications (12V/24V auto work).
- Use appropriate circuit breakers or fuses for all connections to prevent overcurrent.
3. Installation
3.1 Mounting the Controller
Mount the controller vertically on a flat, non-flammable surface in a dry, well-ventilated indoor area. Ensure there is sufficient clearance around the controller for heat dissipation. The recommended clearances are 150mm (5.9 inches) above and below the unit.

Image: Controller dimensions and recommended mounting clearances for proper ventilation.
3.2 Wiring Connections
Follow the wiring sequence carefully to prevent damage to the controller or other components. Always ensure all power sources are disconnected before making or breaking connections.
- Connect the Battery: Connect the battery cables to the controller's battery terminals (marked with '+' and '-'). Ensure correct polarity. Always connect the battery first.
- Connect the Solar Panel: Connect the solar panel cables to the controller's PV terminals (marked with solar panel icon and '+' and '-'). Ensure correct polarity.
- Connect the DC Load: Connect the DC load cables to the controller's load terminals (marked with light bulb icon and '+' and '-'). Ensure correct polarity.
- Connect Remote Temperature Sensor: Plug the remote temperature sensor into the designated port on the controller. Secure the sensor to the battery case for accurate temperature compensation.
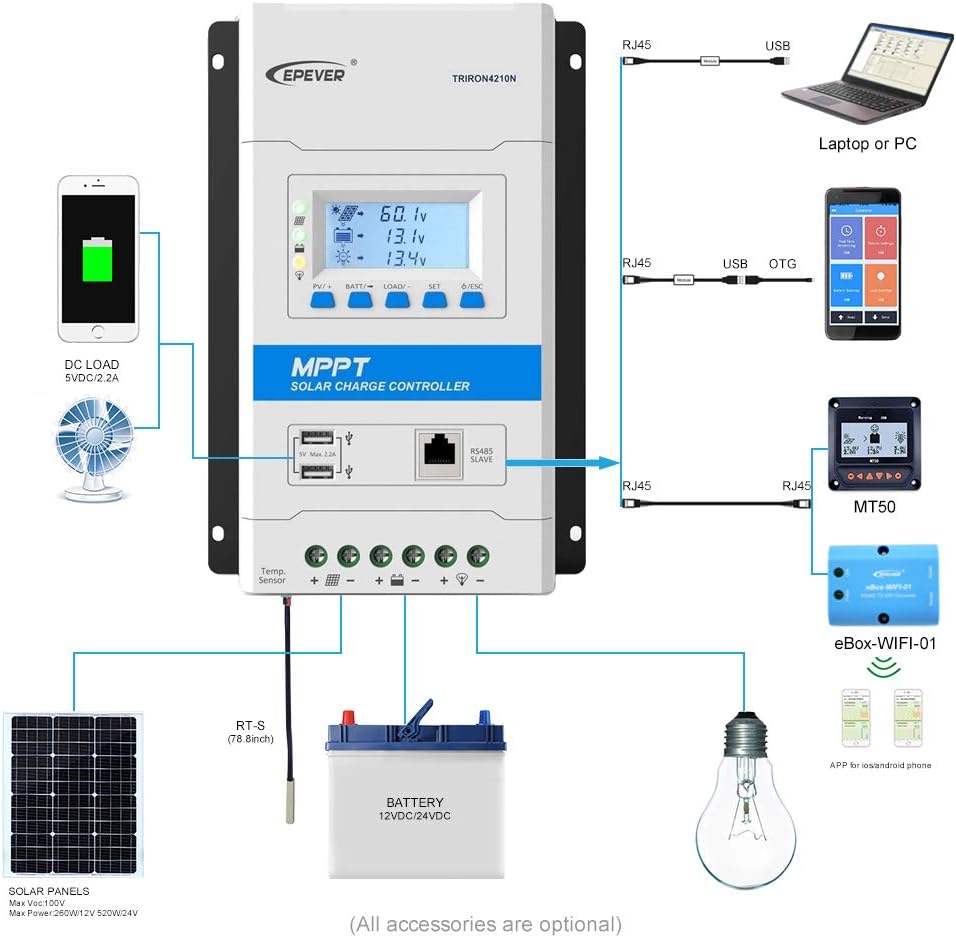
Image: Detailed wiring diagram showing connections for solar panels, battery, and DC load to the TRIRON 4210N controller.
Video: This video demonstrates the unboxing, component identification, and step-by-step installation process for the EPEVER TRIRON 4210N solar charge controller, including wiring the battery, solar panel, and remote temperature sensor.
3.3 Connecting the MT50 Remote Meter
The MT50 Remote Meter connects to the controller via an RJ45 communication cable. This allows for remote monitoring of system status and parameter settings.
- Connect one end of the RJ45 cable to the RS485 port on the TRIRON 4210N controller.
- Connect the other end of the RJ45 cable to the corresponding port on the MT50 Remote Meter.
3.4 Communication Interfaces
The TRIRON 4210N features an RS485 communication port, allowing connection to various accessories for extended functionality:
- PC Software: Connect via an RS485 to USB adapter cable for monitoring and parameter configuration using PC software.
- Mobile App: Connect via an eBox-WIFI-01 or eBox-BLE-01 module for wireless monitoring and control through a mobile application.
4. Operation
4.1 LCD Display and Buttons
The controller features an LCD display and five buttons for viewing system parameters and making adjustments.

Image: Various screens displayed on the TRIRON 4210N LCD, showing PV voltage, current, battery status, and load information.
- PV/+ Button: Used to navigate forward through display screens or increase parameter values.
- BATT/→ Button: Used to navigate right through display screens or move cursor during parameter setting.
- LOAD/- Button: Used to navigate backward through display screens or decrease parameter values.
- SET Button: Used to enter parameter setting mode or confirm a setting.
- ESC Button: Used to exit parameter setting mode or return to the previous screen.
4.2 Parameter Settings
To adjust parameters such as battery type, capacity, and temperature unit, use the navigation buttons to access the setting menus. Press the SET button to enter edit mode, use PV/+ and LOAD/- to change values, and SET again to confirm. Refer to the detailed instructions in the included user manual for specific parameter adjustments.
4.3 USB Output
The controller is equipped with dual 5V DC USB ports (Max 2.2A) for charging compatible electronic devices. These ports are active when the controller is powered by the battery.
5. Maintenance
Regular maintenance ensures optimal performance and longevity of your solar charge controller.
- Check Connections: Periodically inspect all wiring connections for tightness and corrosion. Tighten any loose connections.
- Clean the Controller: Keep the controller clean and free from dust and debris. Ensure the heat sink fins are not obstructed to allow for proper cooling.
- Inspect Cables: Check all cables for signs of wear, damage, or insulation degradation. Replace damaged cables immediately.
- Battery Inspection: For lead-acid batteries, check electrolyte levels and terminal condition as per battery manufacturer guidelines.
- Software Updates: Check the manufacturer's website for any available firmware updates for your controller.
6. Troubleshooting
This section provides basic troubleshooting steps for common issues. For more complex problems, consult the full user manual or contact EPEVER technical support.
Common Issues and Solutions:
- No Display/No Power:
- Check battery connections and ensure they are secure and correctly polarized.
- Verify battery voltage is within the controller's operating range.
- No Charging from Solar Panel:
- Check solar panel connections and polarity.
- Ensure sufficient sunlight is reaching the solar panels.
- Verify solar panel open circuit voltage (Voc) is within the controller's input range.
- Load Not Working:
- Check load connections and polarity.
- Ensure the load is not exceeding the controller's rated load current.
- Check battery voltage; the load may be disconnected if the battery voltage is too low.
- Incorrect Battery Readings:
- Verify the remote temperature sensor is correctly connected and placed near the battery.
- Ensure the correct battery type and capacity are set in the controller's parameters.
7. Specifications
| Parameter | Value |
|---|---|
| Model | TRIRON4210N-mppt |
| System Voltage | 12/24VDC Auto Work |
| Rated Charge Current | 40A |
| Battery Input Voltage Range | 8-32V |
| Max. PV Open Circuit Voltage | 100V (Min operating environment temp); 92V (25℃ environment temp) |
| MPP Voltage Range | (Vbat+2V) ~ 72V |
| Max. PV Array Power Support | 520W (12V battery); 1040W (24V battery) |
| Working Environment Temperature | -25℃ ~ +55℃ (with LCD) / -30℃ ~ +55℃ (without LCD) |
| Lithium Battery Types Supported | LiFePO4 (4 series; 8 series) / Li-NiCoMn (3 series; 6 series) / User (Lithium battery setting requires RS485 or WIFI BOX) |
| Lead-acid Battery Types Supported | Sealed (AGM), Gel, Flooded, Lead-acid User |
| Self-consumption | ≤14mA (12V); ≤15mA (24V) |
| Temperature Compensation | -3mV/℃/2V |
| Grounding | Common Negative |
| Terminals/Wire Size | 6AWG (16mm²) |
| USB Output | Dual 5V DC, Max 2.2A |
| Item Weight | 6.69 pounds |
| Package Dimensions | 17.56 x 8.43 x 4.88 inches |
| UPC | 655160074776 |
8. Warranty and Support
For warranty information and technical support, please refer to the documentation included with your product or visit the official EPEVER website. Keep your purchase receipt as proof of purchase for warranty claims.


