1. Introduction
Thank you for purchasing the Pyle PLCMTR83QIR Wireless Backup Rearview Dash Camera System. This comprehensive system is designed to enhance vehicle safety and parking convenience with its wireless connectivity, 7-inch quad-view LCD monitor, and durable waterproof cameras. This manual provides detailed instructions for installation, operation, and maintenance to ensure optimal performance and longevity of your device.
Package Contents
Please check the package contents carefully. If any items are missing or damaged, contact your dealer immediately.
- Display Monitor
- (4) Cameras
- (4) 2.4G Antennas
- Remote Control
- Camera DC Power Cables
- Power & Wiring Harness

Image: The complete Pyle PLCMTR83QIR system, including the 7-inch monitor, four wireless cameras, remote control, and all necessary cables and antennas.

Image: A visual representation of all components included in the Pyle PLCMTR83QIR package, confirming the contents listed.
2. Important Safety Information
- Read all instructions carefully before installation and operation.
- Installation should be performed by a qualified professional if you are unsure about vehicle electrical systems.
- Ensure all wiring is properly insulated and secured to prevent short circuits or damage.
- Do not operate the system in a manner that distracts you from driving. Always prioritize safe driving practices.
- Keep the monitor and cameras clean and free from obstructions for clear visibility.
- This system is an aid for safe driving and parking; it does not replace the need for careful observation and judgment.
- Disconnect power before performing any maintenance or installation.
3. Setup and Installation
The Pyle PLCMTR83QIR system is designed for easy wireless setup, minimizing the need for long cable runs. Follow these steps for proper installation.
3.1 Camera Installation
- Choose Mounting Location: Select a suitable location for each camera on your vehicle (car, truck, bus, van, trailer). Common locations include the rear of the vehicle for backup, or sides for blind spot monitoring. Ensure the camera has a clear line of sight.
- Secure Cameras: Mount each camera securely using the provided hardware. The cameras are IP-68 marine grade waterproof and designed for outdoor use.
- Connect Power: Connect the camera's DC power cable to a 12V DC power source on your vehicle. For a backup camera, this is typically connected to the reverse light circuit so it powers on when reversing. For continuous monitoring, connect to a constant 12V source.
- Attach Antennas: Screw the 2.4G antennas onto each camera. Ensure they are tightened securely for optimal wireless signal transmission.

Image: A detailed view of one of the wireless cameras, highlighting its wide 120-degree viewing angle, essential for comprehensive coverage.

Image: This diagram visually explains the wireless communication between the camera and the monitor, showing the signal transmission path and the external antenna for extended range.
3.2 Monitor Installation
- Mount the Monitor: Use the universal car/automobile mounting ability to securely place the 7-inch LCD monitor on your dashboard or windshield. Ensure it does not obstruct your view of the road.
- Connect Power: Connect the monitor's power and wiring harness to a 12V DC power source in your vehicle. This can be a cigarette lighter adapter or hardwired to the vehicle's electrical system.
- Attach Antennas: Screw the antennas onto the monitor for receiving wireless signals from the cameras.
- Power On and Pair: Once powered, the monitor should automatically detect and pair with the wireless cameras. If not, refer to the "Operating" section for manual pairing instructions.
4. Operating Instructions
The Pyle PLCMTR83QIR system offers various features for enhanced vehicle monitoring. Familiarize yourself with the monitor controls and remote functions.
4.1 Monitor Controls
The 7-inch LCD monitor features intuitive buttons for navigation and control:
- MONITOR: Cycles through single camera views (CAM1, CAM2, CAM3, CAM4) and quad-view display.
- MENU/OK: Accesses the system menu for settings adjustments. Press again to confirm selections.
- < / >: Navigation buttons for moving through menu options or adjusting values.
- POWER: Turns the monitor on/off.
- MODE: Switches between different display modes (e.g., single view, quad view).

Image: The monitor showcasing its quad-view display ability, allowing simultaneous monitoring of up to four camera feeds for comprehensive situational awareness.
4.2 Remote Control Functions
The included remote control provides convenient access to all monitor functions from a distance.
- Power Button: Turns the monitor on/off.
- Channel Selection: Buttons to directly select specific camera channels (CAM1, CAM2, CAM3, CAM4).
- Quad View Button: Activates the quad-view display.
- Menu/Navigation: Access and navigate system settings.
- Recording Controls: Start/stop DVR recording (if applicable).
4.3 DVR Recording
The system supports DVR recording via an SD card slot (SD card not included). This feature allows you to record video footage for evidence in case of an accident or for reviewing parking maneuvers.
- Insert SD Card: Insert a compatible SD card into the designated slot on the monitor.
- Access Recording Settings: Use the MENU button to navigate to recording settings. Here you can configure recording modes (e.g., continuous, motion detection), loop recording, and video quality.
- Start/Stop Recording: Recording can typically be started and stopped manually via the monitor buttons or remote control, or automatically based on your settings.
- Playback: Access recorded files through the monitor's menu for playback.
4.4 Night Vision and Waterproof Features
The cameras are equipped with night vision capabilities for clear visibility in low-light conditions and are IP-68 marine grade waterproof for reliable performance in various weather conditions.
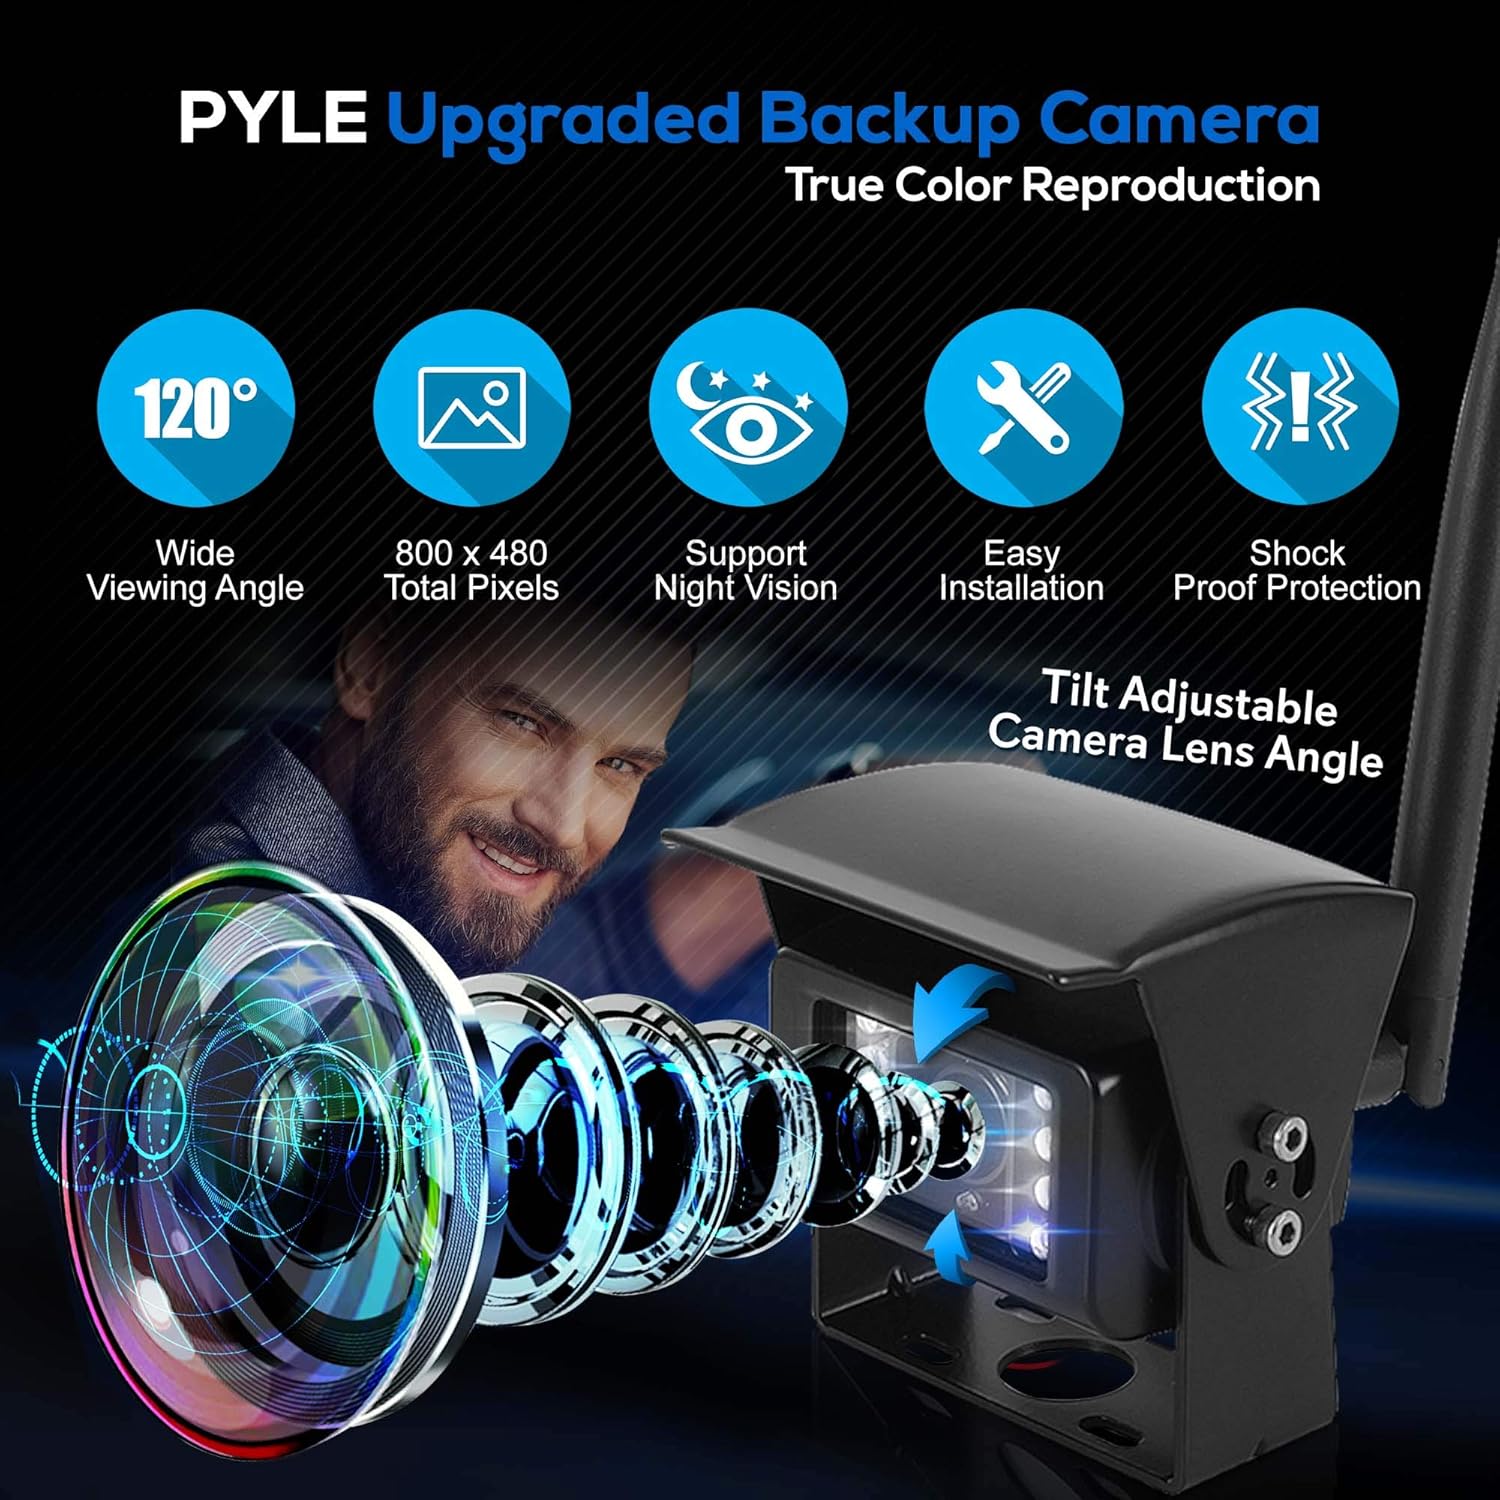
Image: An infographic detailing the advanced features of the Pyle camera, including its wide viewing angle, resolution, night vision, ease of installation, and robust shock-proof design.

Image: This image demonstrates the camera's waterproof and weather-resistant capabilities, showing it enduring water splashes while mounted on a truck, ensuring reliable operation in harsh conditions.
5. Maintenance
- Cleaning the Monitor: Use a soft, dry cloth to clean the monitor screen. For stubborn smudges, slightly dampen the cloth with water or a screen-safe cleaner. Avoid abrasive materials or harsh chemicals.
- Cleaning the Cameras: Periodically check and clean the camera lenses to ensure clear vision. Use a soft cloth and mild cleaning solution if necessary. Remove any dirt, mud, or snow accumulation.
- Check Connections: Regularly inspect all power and antenna connections for tightness and corrosion. Ensure cables are not pinched or damaged.
- Software Updates: Check the Pyle website periodically for any available firmware updates for your system.
6. Troubleshooting
| Problem | Possible Cause | Solution |
|---|---|---|
| No image on monitor |
|
|
| Image is blurry or distorted |
|
|
| Remote control not working |
|
|
| DVR recording issues |
|
|
7. Specifications
| Feature | Detail |
|---|---|
| Model Number | PLCMTR83QIR |
| Screen Size | 7 inches |
| Display Resolution | 800 x 480 pixels |
| Video System | NTSC/PAL auto switching |
| Connectivity | Wireless (2.4Ghz) |
| Wireless Range | Up to 330+ ft. (line of sight) |
| Camera Sensor | 1/4'' Color CMD OV7725 |
| Camera Viewing Angle | 120 degrees |
| Minimum Illumination | 0.1 Lux (Night Vision) |
| Waterproof Rating | IP-68 Marine Grade |
| DVR Recording | Yes, via SD Card Slot (SD card not included) |
| Power Supply | 12 Volts DC |
| Product Dimensions (Monitor) | 0.48"L x 4.73"W x 7.09"H |
| Item Weight | 4 pounds (total system) |
8. Warranty and Support
Pyle products are designed and manufactured to the highest quality standards. For specific warranty information, please refer to the warranty card included with your product or visit the official Pyle website.
For technical support, troubleshooting assistance, or replacement parts, please contact Pyle Customer Service:
- Website: www.pyleusa.com
- Email: Refer to website for support contact form or email address.
- Phone: Refer to website for current customer service phone numbers.
Please have your model number (PLCMTR83QIR) and purchase date ready when contacting support.


